UR5 Robot + Python: Generate Dataset and perform Hand-Eye Calibration
참고
이 튜토리얼은 Universal Robots UR5e를 사용하여 구축 및 테스트되었습니다.
Introduction
정확한 핸드-아이 칼리브레이션에는 좋은 데이터 세트가 필요하지만 이 데이터 세트를 생성하는 것은 쉬운 일이 아닙니다. 이 튜토리얼에서는 먼저 Zivid 카메라와 Universal Robots(UR) UR5e 간의 통신을 설정합니다. 그런 다음 3D 이미지와 로봇 포즈로 구성된 데이터 세트를 추출합니다. 마지막으로 이 데이터 세트를 사용하여 핸드-아이 칼리브레이션을 수행합니다. 샘플은 Eye-in-hand와 Eye-to-hand 모두에서 작동합니다.
핸드-아이 칼리브레이션에 익숙하지 않은 경우 다음을 먼저 확인하는 것이 좋습니다. Hand-Eye Calibration.
Requirements
표준 TCP/IP 연결이 가능한 UR 로봇.
Zivid-Python 설치.
Prepare UR5e robot
Github에서 zivid-python-samples 을 복제하고 ur_hand_eye_calibration 폴더로 이동한 후 runtime requirements 를 설치합니다.
cd source\applications\advanced\hand_eye_calibration\ur_hand_eye_calibration
pip install -r requirements.txt
cd source/applications/advanced/hand_eye_calibration/ur_hand_eye_calibration
pip install -r requirements.txt
UR RTDE (Real-Time Data Exchange) 통신 프로토콜을 포함한 모든 타사 라이브러리를 설치합니다.
이 샘플에 필요한 세 개의 파일은 다음과 같습니다.
universal_robots_communication_file.xml - I/O 레지스터가 있는 구성 파일입니다.
universal_robots_robot_motion_script.urp - UR 컨트롤러에서 생성되고 실행되는 로봇 모션 스크립트입니다.
universal_robots_perform_hand_eye_calibration.py - 이미지와 포즈를 캡처하고 저장하고 핸드-아이 칼리브레이션을 수행하는 Python 스크립트입니다.
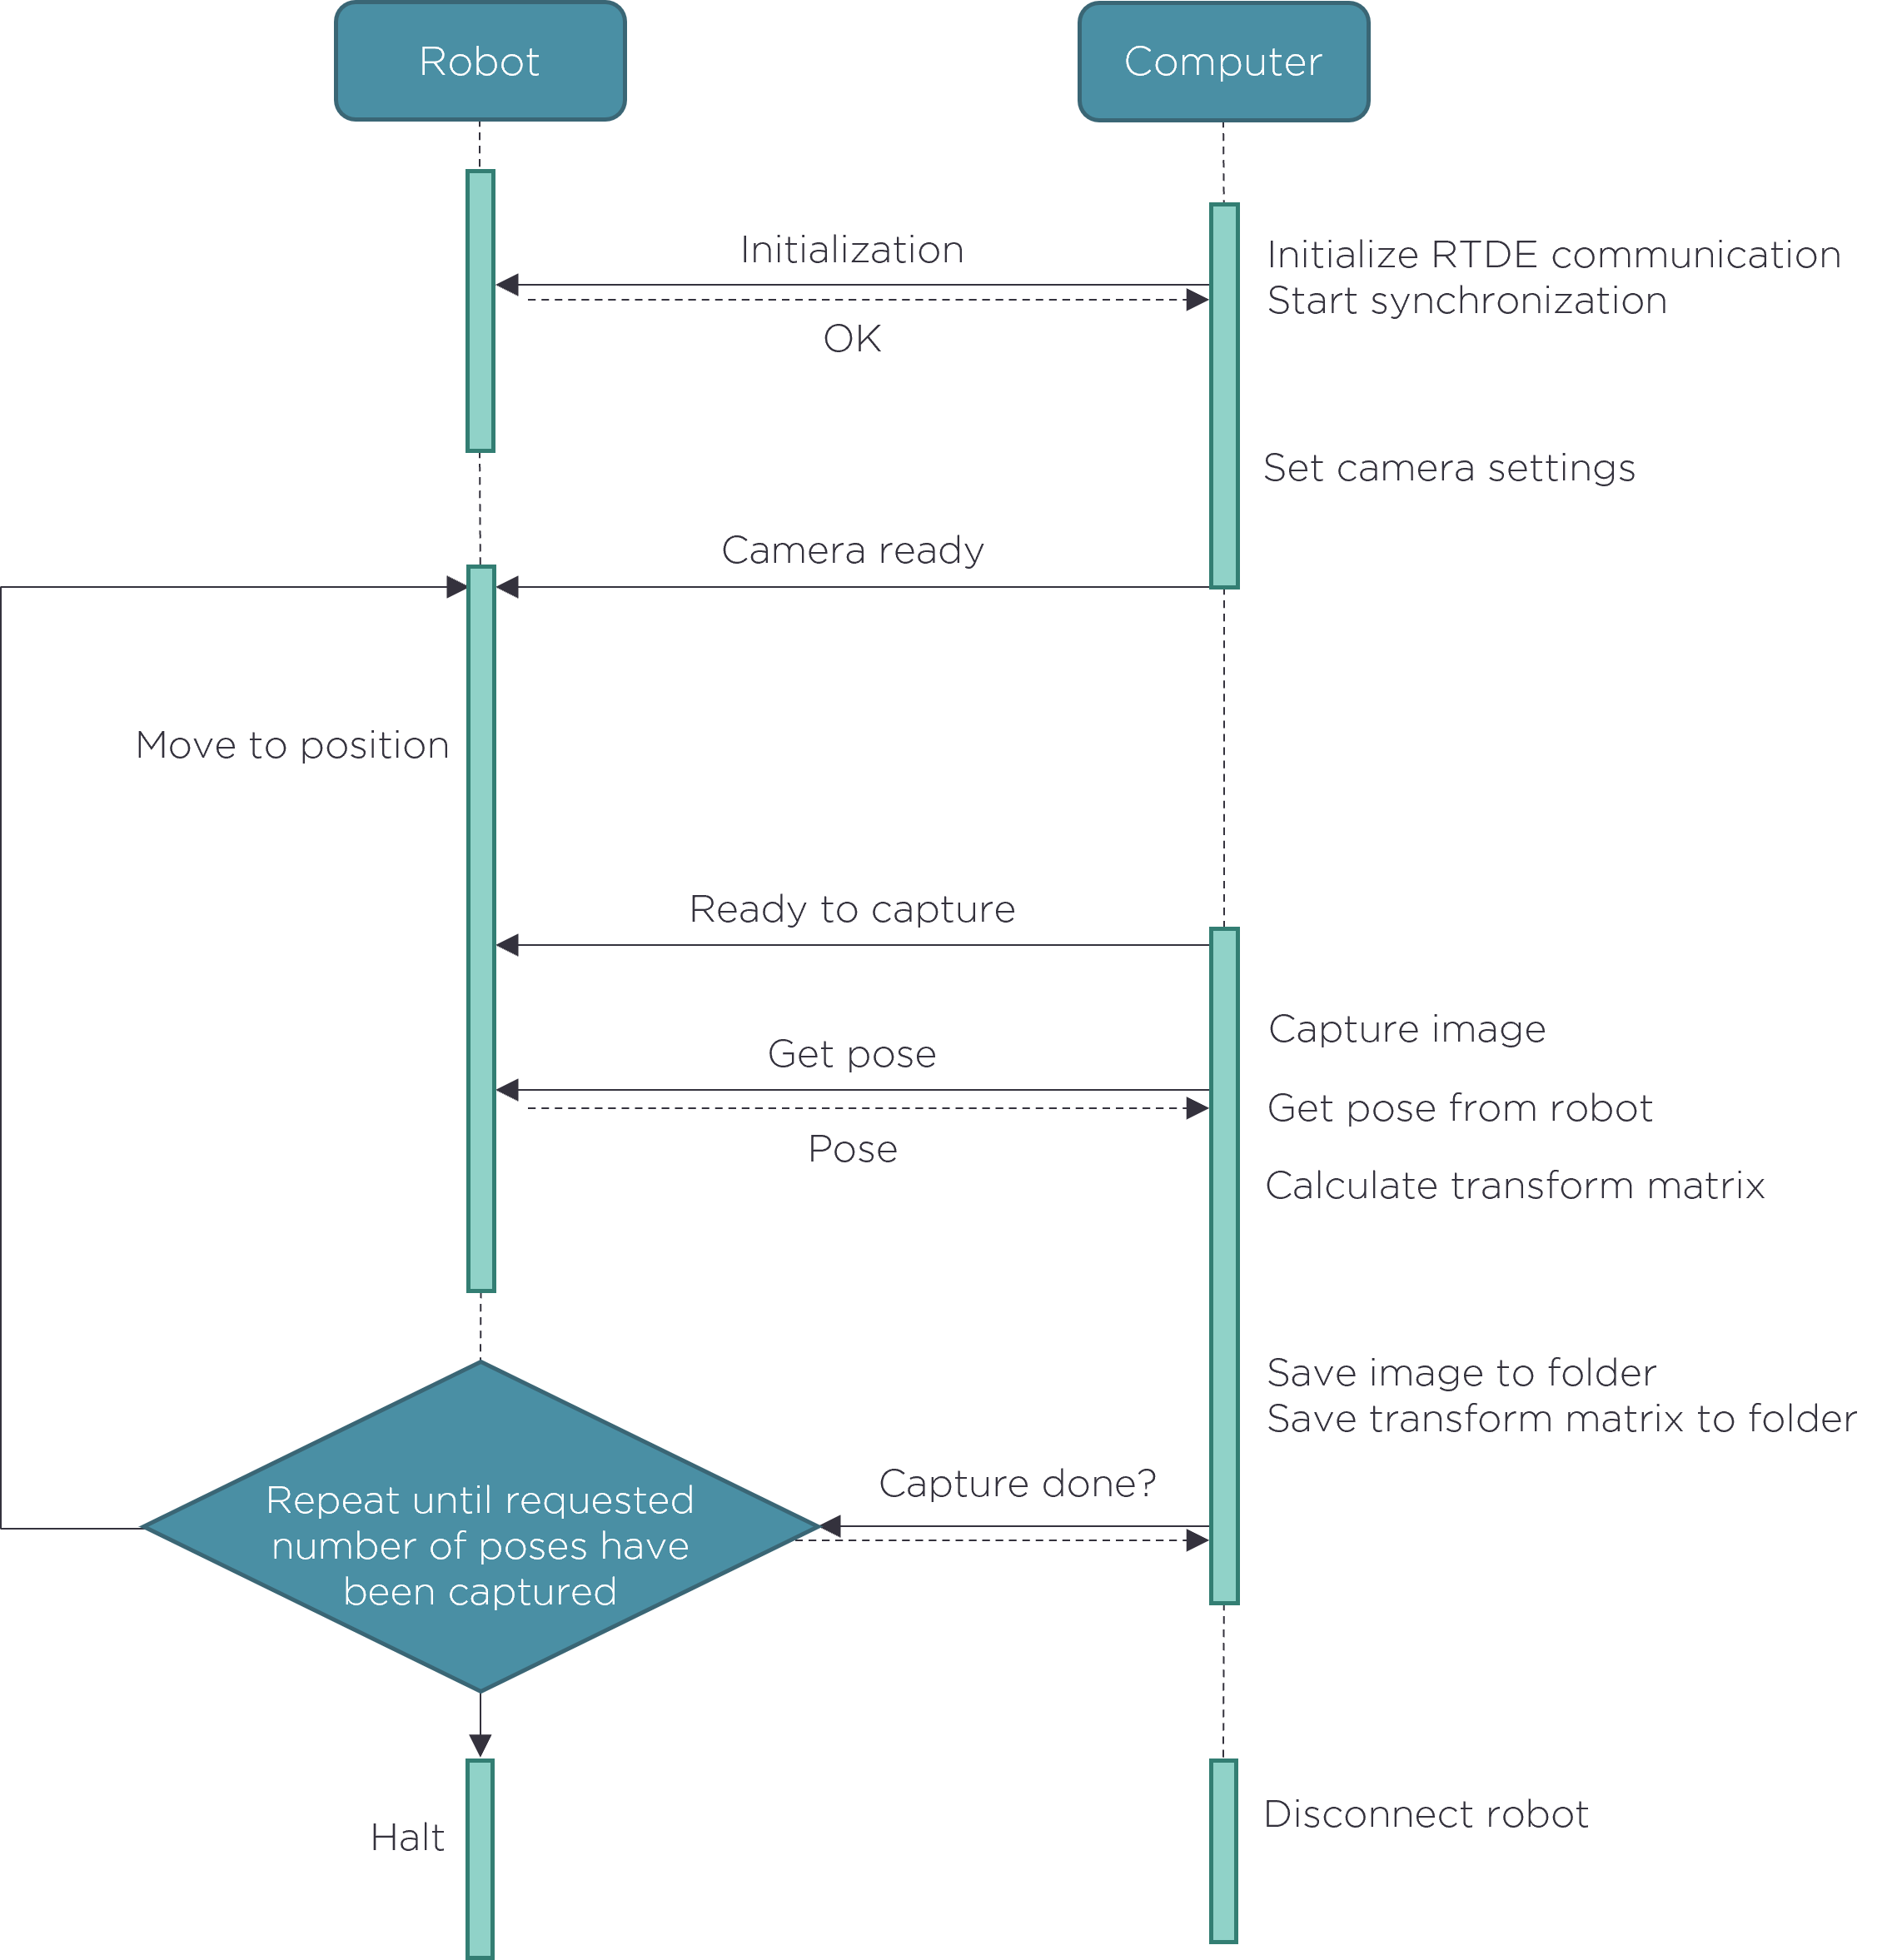
로봇 모션 스크립트는 칼리브레이션에 사용되는 모든 로봇 포즈를 설정하는 곳입니다. python 스크립트는 이미지를 캡처하고, 로봇 포즈를 읽고, 핸드-아이 칼리브레이션을 수행합니다. 로봇과 컴퓨터 간의 통신은 UR RTDE (Real-Time Data Exchange) 를 통해 이루어집니다. 통신 흐름의 개요는 아래에 설명되어 있습니다.

데이터세트를 생성하기 전에 UR 로봇 모션 스크립트를 일부 조정해야 합니다.
Modify universal_robots_robot_motion_script.urp robot motion script
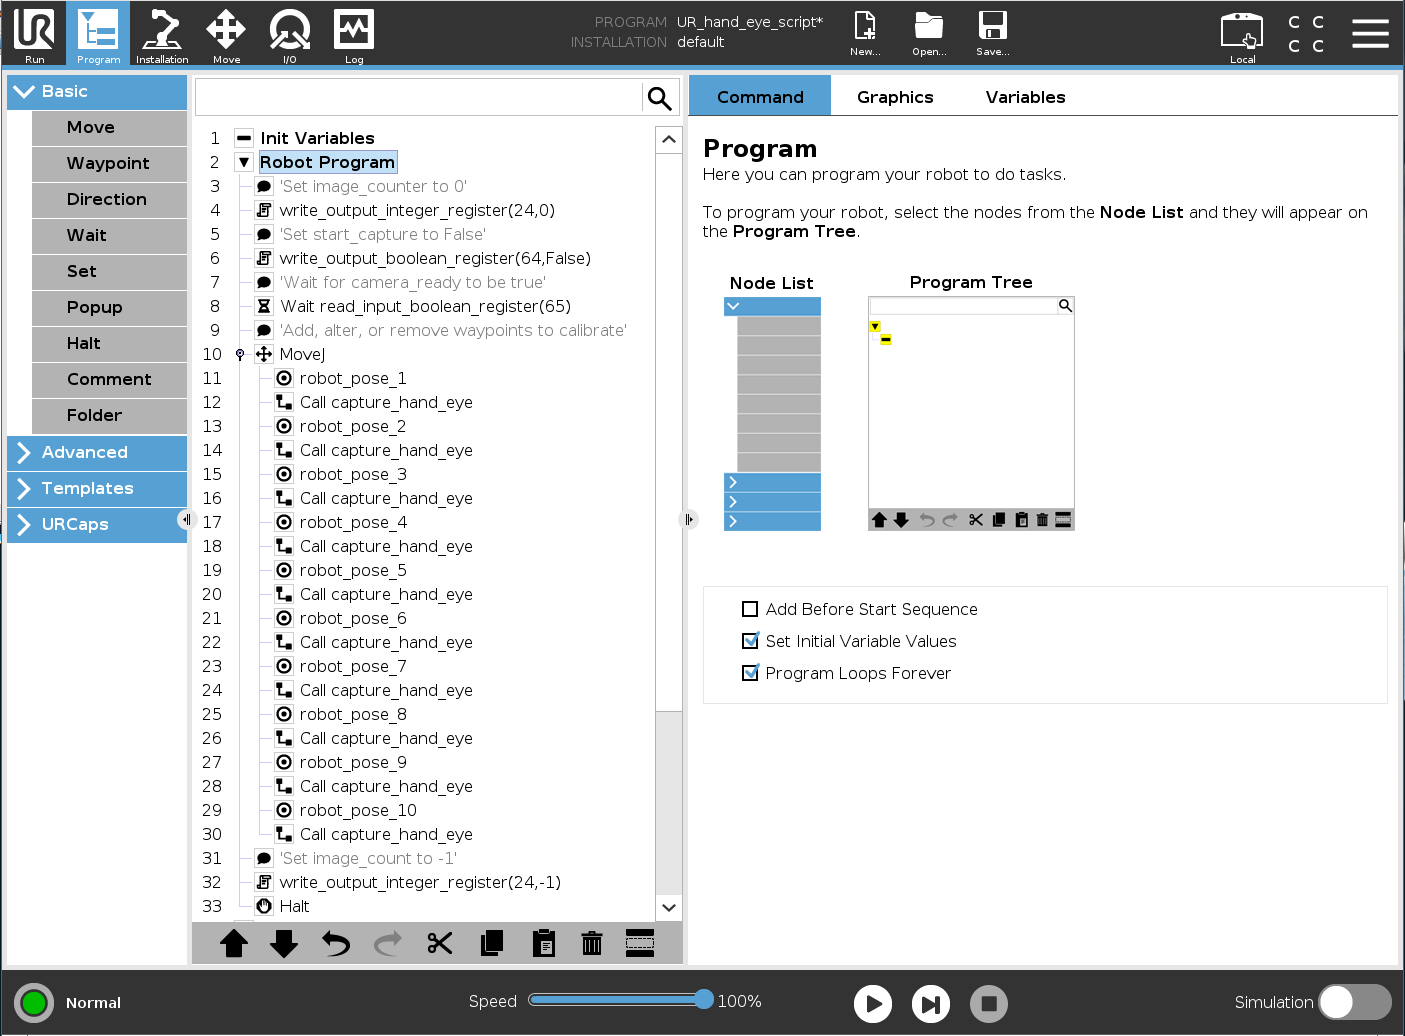
먼저, universal_robots_robot_motion_script.urp 파일을 USB 드라이브에 저장하고 UR 컨트롤러에 스크립트를 로드합니다. 컨트롤러 인터페이스는 다음과 유사해야 합니다.

여기서 capture_hand_eye 는 로봇의 모든 포즈에 대해 카메라가 하나의 이미지를 캡처하도록 트리거하는 하위 프로그램입니다. 이 하위 프로그램은 통신 인터페이스의 논리 채널인 레지스터를 통해 PC와 통신합니다. 다음은 Python 스크립트와 통신하는 데 사용되는 I/O 변수입니다.
image_count
start_capture
camera_ready
finish_capture
- output_int_register_24 = image_count:
획득한 이미지와 포즈의 수를 계산합니다.
- output_bit_register_64 = start_capture:
카메라가 이미지를 캡처하도록 트리거하는 Bool입니다.
- input_bit_register_64 = finish_capture:
UR 로봇이 다음 위치로 이동하도록 하는 Bool입니다.
- input_bit_register_65 = ready_to_capture::
카메라를 사용할 준비가 되었음을 UR 로봇에 알리는 Bool입니다.
universal_robots_communication_file.xml 파일은 어떤 레지스터에 데이터를 쓰고 있는지 명시합니다. Python 스크립트에서 레지스터를 변경하면 구성 파일에서도 동일한 레지스터를 변경해야 합니다.
<?xml version="1.0"?>
<rtde_config>
    <recipe key="out">
        <field name="actual_TCP_pose" type="VECTOR6D"/>
        <field name="output_int_register_24" type="INT32"/>
        <field name="output_bit_register_64" type="BOOL"/>
    </recipe>
    <recipe key="in">
        <field name="input_bit_register_64" type="BOOL"/>
        <field name="input_bit_register_65" type="BOOL"/>
    </recipe>
</rtde_config>
좋은 데이터 세트를 생성하려면 Hand-Eye Calibration Process 에 설명된 단계를 따라야 합니다. 모든 웨이포인트인 robot_pose_X 는 설정에 맞게 수정해야 합니다. 가장 쉬운 방법은 로봇을 free-drive 모드로 설정하고 손으로 원하는 자세로 움직이는 것입니다. 각 자세에서 Zivid Calibration Object 가 카메라에 표시되는지 확인하세요. ArUco 마커를 사용하는 경우, 각 캡처마다 모든 마커를 표시할 필요는 없습니다.
How To Get Good Quality Data On Zivid Calibration Object 은 최적의 3D 이미지 품질을 위해 파라미터를 조정하는 방법을 설명합니다.
조심
칼리브레이션 대상의 촬영된 이미지가 잘 노출되지 않으면 핸드아이 보정이 작동하지 않습니다.
웨이포인트를 추가하거나 제거하는 경우, 모든 웨이포인트 다음에 capture_hand_eye 를 호출하는 것을 잊지 마십시오. 정확한 핸드-아이 변환을 얻으려면 10-20개의 웨이포인트를 사용하는 것이 좋습니다.
Python 스크립트를 실행하기 전에 모든 로봇의 위치를 수동으로 검토하는 것이 좋습니다. 이렇게 하면 로봇이 한 자세에서 다음 자세로 이동할 때 특이점을 피하는지 확인할 수 있습니다.
조심
eye-in-hand 칼리브레이션을 수행하는 경우 Zivid 카메라가 로봇과 충돌하지 않는지 확인하십시오.
Run python script
이제 장면에 맞게 로봇 스크립트를 수정했으므로 데이터 세트를 생성하고 보정을 수행할 준비가 되었습니다!
팁
핸드-아이 칼리브레이션을 실행하기 전에 카메라를 Warm-up 하고 Infield Correction 실행하는 것이 좋습니다. 워밍업, Infield Correction, 핸드-아이 칼리브레이션 시 애플리케이션과 동일한 촬영 주기를 사용하세요. 온도에 따른 성능 요소의 영향을 더욱 줄이려면 Thermal Stabilization 을 활성화하세요.
먼저, UR 컨트롤러에서 universal_robots_robot_motion_script.urp 를 실행합니다. 프로그램이 시작되면 Python 스크립트가 camera_ready 변수를 True로 설정할 때까지 기다립니다. 그런 다음 명령줄에서 universal_robots_perform_hand_eye_calibration.py 스크립트를 실행합니다.
For Eye-in-hand:
python universal_robots_perform_hand_eye_calibration.py --eih --ip 192.168.0.123For Eye-to-hand:
python universal_robots_perform_hand_eye_calibration.py --eth --ip 192.168.0.123
For Eye-in-hand:
python universal_robots_perform_hand_eye_calibration.py --eih --ip 192.168.0.123 marker --dictionary aruco4x4_50 --ids 1 2 3For Eye-to-hand:
python universal_robots_perform_hand_eye_calibration.py --eth --ip 192.168.0.123 marker --dictionary aruco4x4_50 --ids 1 2 3
192.168.0.123 을 로봇의 실제 IP 주소로 대체합니다. UR Teach Pendant 오른쪽 상단의 Hamburger menu → System 으로 이동하여 로봇의 IP 주소를 확인하거나 설정합니다.
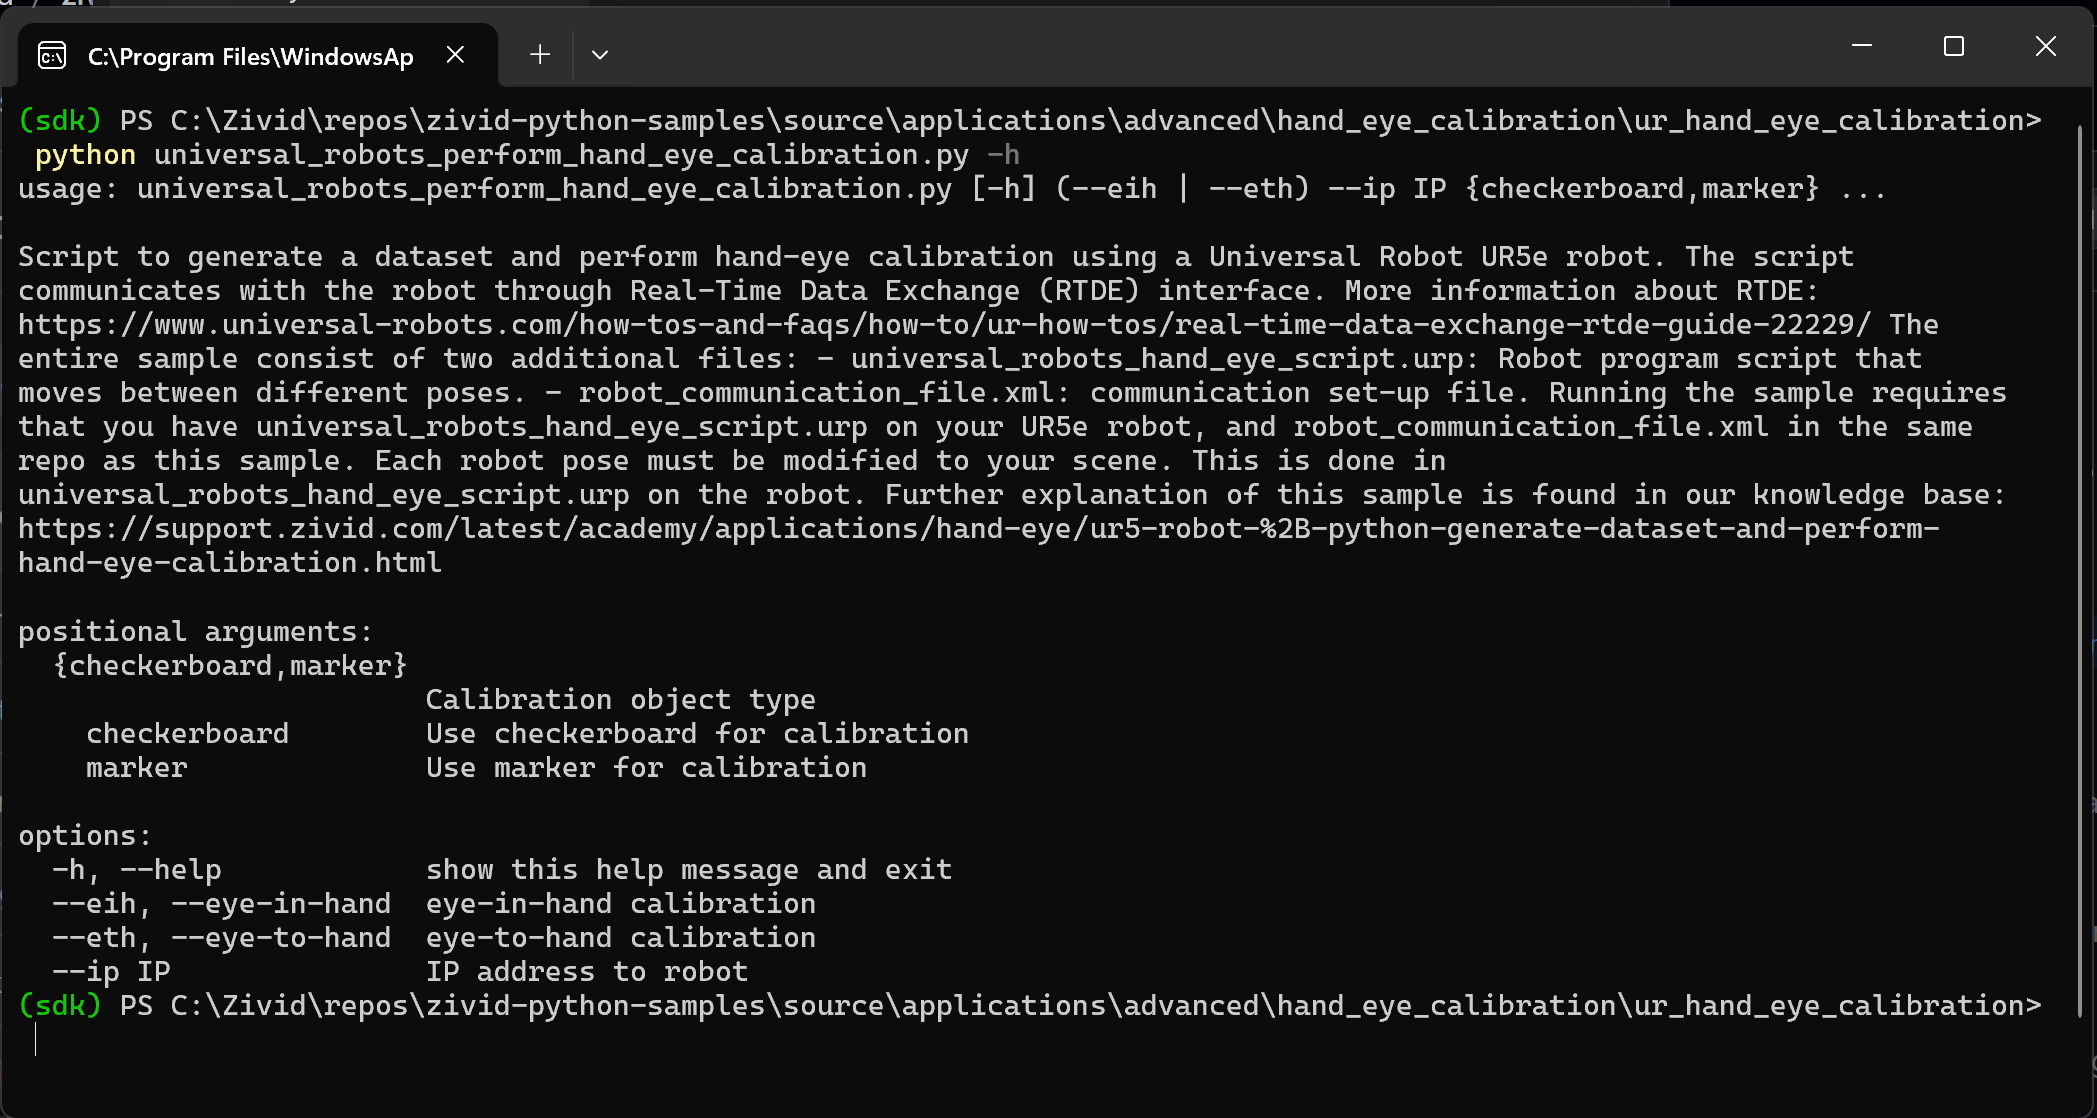
Python 스크립트에 필요한 다양한 입력은 명령 프롬프트에 다음 명령을 입력하면 표시됩니다.
python universal_robots_perform_hand_eye_calibration.py -h

스크립트가 완료되면 다음을 출력합니다.
데이터를 저장한 디렉토리
핸드-아이 변환 - 4x4 칼리브레이션 매트릭스
각 로봇 포즈에 대한 회전 및 변환의 residual
Zivid가 잔차(residual)를 계산하는 방법에 대한 자세한 설명은 Hand-Eye Calibration Residuals 을 참조합니다.
Transformation matrix이 있으면 이를 사용하여 카메라 프레임에서 로봇 베이스 프레임으로 3D 포인트를 변환할 수 있습니다. 이 작업을 수행하는 방법에 대한 자세한 내용은 How To Use The Result Of Hand-Eye Calibration 을 참조합니다.