Any Robot + RoboDK + Python: Generate Dataset and Perform Hand-Eye Calibration
참고
이 튜토리얼은 UR5e 및 Yaskawa H10에서만 테스트되었으며 RoboDK에서 지원하는 로봇에서만 작동합니다.
Introduction
정확한 hand-eye calibration에는 좋은 데이터 세트가 필요하지만 이 데이터 세트를 생성하는 것은 어려운 작업일 수 있습니다. 이 작업을 단순화하는 한 가지 방법은 미리 로봇 포즈를 저장하고 나중에 획득 프로세스를 자동화하는 것입니다. 이 자습서에서는 RoboDK를 사용하여 hand-eye dataset의 수집을 자동화합니다. 이것은 Zivid hand-eye calibration에서 hand-eye transform matrix를 얻는 데 필요한 필요한 3D 이미지와 로봇 포즈를 제공합니다. 이 샘플은 eye-in-hand와 eye-to-hand 모두 작동합니다.
hand-eye calibration에 익숙하지 않다면 Hand-Eye Calibration 문서를 참조하여 시작하는 것이 좋습니다.
Requirements
Linux의 경우 Zivid 도구를 포함하여 Zivid software 를 설치합니다.
Zivid-Python 을 설치합니다.
RoboDK software 를 설치합니다.
Robodk robot library 가 지원하는 로봇이어야 합니다.
Set Up RoboDK Environment
RoboDK .rdk 파일은 로봇, 대상 포즈 및 환경에 대한 정보를 저장합니다. hand-eye calibration dataset을 생성하는데 필요하고 유용한 .rdk 파일의 구성 요소는 다음과 같습니다.
로봇 모델 파일 (.robot)
대상 포즈 목록 (예: Target 0, Target 1, Target 2 등)
로봇 환경의 가상 모델 (선택 사항)
사용 중인 카메라의 CAD 모델, 예: Zivid 2 CAD file (선택 사항)
RoboDK에서 example file .rdk 를 열어 확인하십시오.
Add Robot to RoboDK Environment
RoboDK 프로그램을 열고 사용할 로봇을 추가하여 시작합니다. 로봇을 추가하려면 File -> Open online library 로 이동하여 GUI를 사용하여 라이브러리를 엽니다. 이 인터페이스를 통해 모델과 일치하는 로봇을 찾아 마우스로 Open 을 선택합니다. 로봇이 스테이션에 나타나지 않으면 Download 를 선택하고 .rdk 환경으로 다운로드하여 사용합니다. 이는 Select a robot RoboDK tutorial 에도 설명되어 있습니다.
Connect to Robot through RoboDK
경고
사용하는 로봇 브랜드에 따라 RoboDK에 연결하려면 드라이버 설정이 필요할 수 있습니다. 이 설정에 대한 도움말은 RoboDK 설명서의 로봇 팁 섹션을 참조하세요. 예를 들어, ABB robots 에 대한 도움말은 다음과 같습니다.
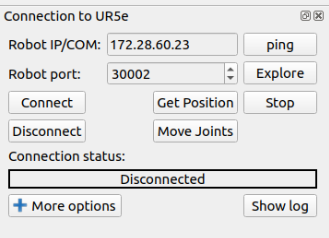
Hand-Eye 스크립트를 실행하기 전에 먼저 RoboDK 인터페이스를 사용하여 로봇에 연결해야 합니다. RoboDK GUI에서 Connect -> Connect Robot 합니다. 그러면 로봇 IP와 포트 번호를 삽입할 수 있는 측면 패널이 열립니다.
참고
대부분의 로봇에는 제어 펜던트 또는 태블릿에 원격 모드가 있습니다. 연결을 설정할 수 있도록 로봇이 원격 모드에 있는지 확인하십시오.
로봇에 연결하려면 로봇의 IP 주소를 알아야 하며 로봇 제어 펜던트에서 해당 IP 주소를 찾거나 나열해야 합니다. connecting to the robot for RoboDK 단계를 따르세요. 확인해야 하는 또 다른 연결 정보는 포트 번호입니다. 이전에 변경하지 않은 경우 드라이버와 함께 제공되는 기본 포트 번호를 사용합니다.
Connect 를 클릭하고 Connection status 상자가 녹색이면 RoboDK 인터페이스를 사용하여 로봇을 제어할 수 있습니다. 빨간색이면 포트 번호와 IP 주소가 올바른지 확인하십시오. 문제가 해결되지 않고 계속 빨간색이면 이 튜토리얼의 끝에 있는 Troubleshoot RoboDK chapter을 확인하십시오.
Create Poses for Hand-Eye Calibration
포즈를 저장하기 위해 how to create a target in RoboDK 알아보세요.
RoboDK를 사용하여 포즈를 만드는 것은 두 가지 방법으로 접근할 수 있습니다.
펜던트를 사용하여 로봇을 원하는 포즈로 물리적으로 이동한 다음 RoboDK를 통해 연결하여 포즈를 기록합니다.
RoboDK를 통해 로봇을 원격으로 이동하여 포즈 생성 및 저장
팁
로봇을 RoboDK를 통해 이동 중인데 로봇이 충분히 빠르게 또는 충분히 느리게 이동하지 않는 경우 set the robot speed in RoboDK 링크를 선택하여 RoboDK에서 로봇 속도를 설정하십시오. 속도를 설정한 후 자신이 만든 프로그램을 마우스 오른쪽 단추로 클릭하고 Run on the robot 으로 표시한 다음 다시 마우스 오른쪽 단추를 클릭하고 Run 을 선택합니다.
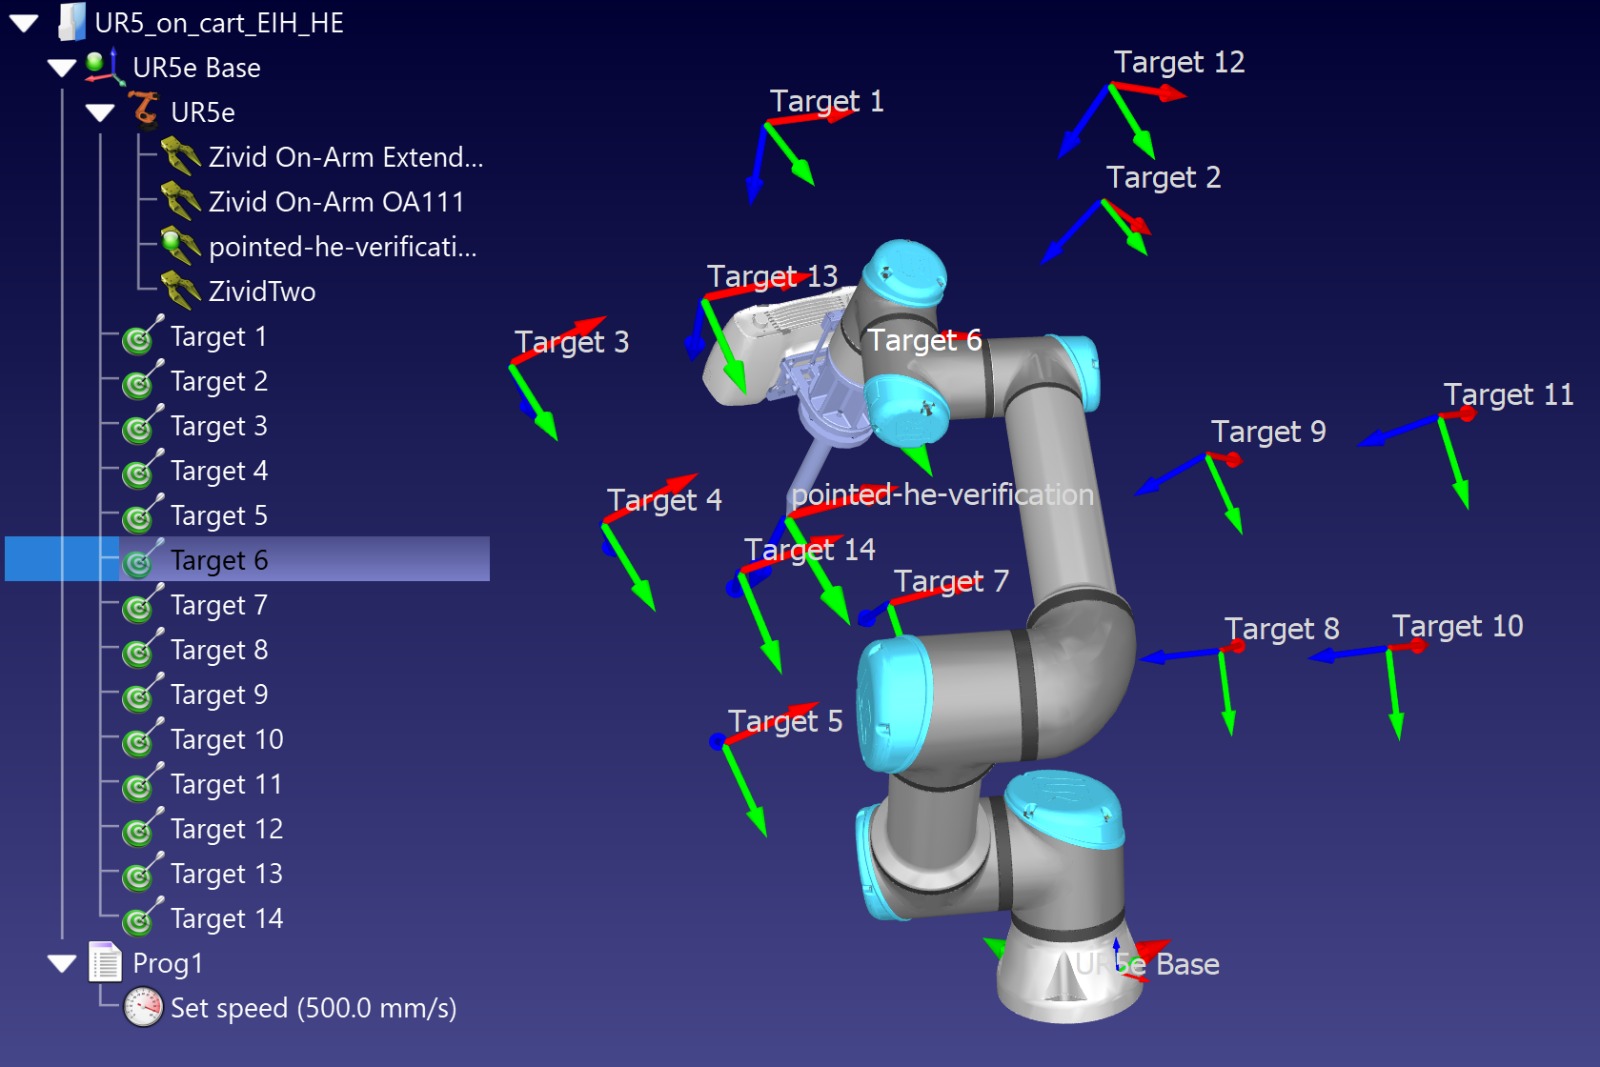
시퀀스에 추가되는 각 포즈는 카메라가 캘리브레이션 객체를 향하도록 하고, 전체 객체가 시야 내에 있어야 합니다. 캘리브레이션 객체는 이미지 중앙에 위치해야 합니다. 포즈를 생성할 때는 Zivid Studio를 사용하여 로봇을 위치로 이동시키는 동안 라이브 모드로 촬영하세요. 이렇게 하면 최적의 촬영 범위를 제공하는 방향을 선택하는 데 도움이 됩니다. 정확한 핸드-아이 변환을 위해서는 10~20개의 포즈를 사용하는 것이 좋습니다. 아래 그림은 RoboDK에서 어떻게 보이는지 보여줍니다.
Run the Python Script
스크립트를 실행하기 전에 .rdk 파일을 열고 로봇에 연결해야 합니다. The script can be found in the Zivid python samples ; 아래에 표시된 필수 명령줄 인수를 사용합니다.
type_group.add_argument("--eih", "--eye-in-hand", action="store_true", help="eye-in-hand calibration")
type_group.add_argument("--eth", "--eye-to-hand", action="store_true", help="eye-to-hand calibration")
parser.add_argument(
    "--settings-path",
    required=False,
    type=Path,
    help="Path to the camera settings YML file",
)
parser.add_argument("--ip", required=True, help="IP address of the robot controller")
parser.add_argument(
    "--target-keyword",
    required=True,
    help='This is the keyword shared for naming all poses used for hand-eye dataset, i.e. if we have: "Target 1", "Target 2", ... , "Target N". Then we should use "Target"',
)
subparsers = parser.add_subparsers(dest="calibration_object", required=True, help="Calibration object type")
subparsers.add_parser("checkerboard", help="Use checkerboard for calibration")
marker_parser = subparsers.add_parser("marker", help="Use marker for calibration")
marker_parser.add_argument(
    "--dictionary",
    required=True,
    choices=list(zivid.calibration.MarkerDictionary.valid_values()),
    help="Dictionary used for marker calibration",
)
marker_parser.add_argument("--ids", nargs="+", required=True, type=int, help="IDs used for marker calibration")
스크립트가 초기화되면 데이터 세트 및 결과를 저장하기 위한 대체 경로를 선택할 수 있는 옵션이 제공됩니다. 경로가 지정되지 않은 경우 데이터 세트 및 결과는 hand-eye/datasets/<date acquired> 에 저장됩니다. 스크립트는 다음과 같이 주어진 포즈를 실행하고 hand-eye calibration을 수행합니다.
Script walk-through
RoboDK 핸드-아이 칼리브레이션 스크립트를 작동시키려면 두 개의 추가 Python 파일이 필요합니다.
robodk_tools.py 는 로봇을 설정하는데 사용됩니다.
save_load_matrix.py 는 YAML 파일에서 행렬을 저장하고 로드하는 데 사용됩니다.
스크립트는 각각 다음 단계를 통해 실행됩니다.
Connect to robot
먼저 IP 주소를 인수로 제공하여 robodk_tools.py 의 connect_to_robot() 함수를 사용하여 로봇에 연결해야 합니다. 이 함수는 시뮬레이터와의 링크를 설정하는데 사용되는 rdk 개체와 다양한 로봇 구성 파라미터를 포함하는 robot 개체를 반환합니다.
Set robot targets
그런 다음 robodk_tools.py 에서 get_robot_targets() 함수를 사용하여 대상 목록을 가져옵니다. 이 목록은 RoboDK .rdk 파일에서 가져오며 각 대상에 대한 로봇 포즈를 포함합니다. 대상 목록을 얻으려면 이전 단계에서 얻은 rdk 개체와 사용자가 제공한 대상 키워드를 인수로 제공해야 합니다.
Set robot speed and acceleratio
로봇 구성의 마지막 단계는 로봇의 속도와 가속도를 정의하는 것입니다. 이러한 매개 변수를 정의하기 위해 robot_speed_accel_limits 라는 이름의 4개의 정수 목록을 만듭니다. 각각 선형 속도, 관절 속도, 선형 가속 및 관절 가속입니다. 그런 다음 robodk_tools.py 의 set_robot_speed_and_acceleration() 함수를 로봇 개체와 robot_speed_accel_limits 를 인수로 사용하여 로봇 구성이 수행됩니다.
Generate Hand-Eye dataset
이제 로봇을 대상 목록의 각 포즈로 이동하여 핸드-아이 데이터 세트를 생성합니다. 각 포즈에 대해 ZDF 파일과 캡처 중 로봇의 포즈를 캡처하여 저장합니다. 이 단계에서 사용자는 datasets/hand-eye 라는 폴더가 생성되고 데이터 세트가 저장될 디렉터리 경로를 제공해야 합니다. 경로를 제공하지 않으면 기본 경로(이 스크립트의 위치)가 사용됩니다. 이 데이터 세트를 생성하기 위해 generate_hand_eye_dataset() 함수를 사용합니다. 이 함수는 카메라에 액세스하기 위해 zivid 애플리케이션 app 객체를, 로봇을 이동할 대상 목록을 가져오기 위해 robot 객체를 인수로 사용합니다.
Perform Hand-Eye calibration
hand-eye calibration을 수행하기 위해 이전 단계에서 저장된 모든 로봇 포즈와 ZDF 파일을 반복합니다. perform_hand_eye_calibration() 함수를 calibration 유형(eye-in-hand 또는 eye-to-hand)과 데이터 세트 디렉토리 경로를 인수로 사용하여 hand-eye transformation matrix과 residuals을 얻습니다.
Save Hand-Eye results
마지막으로 transformation matrix과 residuals이 저장됩니다. 이는 저장할 경로(이 경우 데이터 세트 디렉토리)와 함께 save_hand_eye_results() 함수를 인수로 사용하여 수행됩니다.
Verify and use Transform from Hand-Eye
Hand-eye Calibration을 완료한 후 결과 변환 매트릭스가 정확하고 정확도 요구 사항 내에 있는지 확인할 수 있습니다.
verify the hand-eye calibration with visualization 샘플을 준비했습니다. 이 샘플에서는 핸드-아이 캘리브레이션 변환을 사용하여 모든 포인트 클라우드를 로봇 베이스로 변환하고 중첩하여 표시합니다. 캘리브레이션 객체 포인트 클라우드가 얼마나 잘 중첩되는지 시각적으로 확인함으로써 로봇 포즈와 핸드-아이 변환의 정확도를 파악할 수 있습니다. 즉, 핸드-아이 캘리브레이션 정확도와 로봇 위치 정확도를 시각화합니다.
저희가 추천하는 또 다른 검증 방법은 Zivid Calibration Object 장면에 배치하고 터치 테스트 샘플을 실행하는 것입니다. 이 샘플은 보정 객체를 캡처 및 감지하고, 자세를 계산한 후, 뾰족한 핸드-아이 검증 도구가 장착된 로봇을 움직여 객체의 특정 지점에 터치하도록 합니다. 그런 다음 도구의 뾰족한 끝이 해당 지점에 얼마나 가까이 있는지 확인하여 로봇이 원하는 자세로 얼마나 잘 이동했는지 시각적으로 확인할 수 있습니다. 터치 테스트 실행 방법은 Any Robot + RoboDK + Python: Verify Hand-Eye Calibration Result Via Touch Test 문서를 참조하세요.
또한 utilize the hand-eye transform 방법을 배울 수 있는 샘플도 있습니다. 이 샘플에서는 카메라에서 단일 지점이나 전체 지점 클라우드를 로봇 기본 프레임으로 변환하는 방법을 설명합니다.
Troubleshoot RoboDK
Robot Moving to Different Configuration than Intended
Connect Through Firewall on windows
참고
이 방법은 Windows 11에서 테스트되었습니다.
Check driver blockage
Windows를 실행하는 컴퓨터에 연결할 때 방화벽이 로봇에 대한 연결을 차단할 수 있다는 점에 유의하십시오. 한 가지 옵션은 방화벽을 완전히 비활성화하는 것이지만 시스템이 취약해질 수 있으므로 권장하지 않습니다.
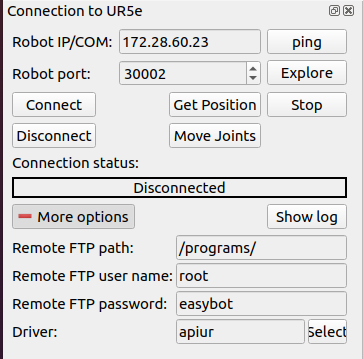
대신 Windows 방화벽에 새 규칙을 추가하여 사용하는 로봇의 드라이버 및 IP 주소에 대해서만 통신을 허용할 수 있습니다. 이 두 속성을 찾으려면 connect to robot 을 선택하여 more options 패널을 확장합니다. 이 경우 드라이버는 guilabel:apiur 입니다.
시스템의 Windows Defender 방화벽으로 이동하여 Advanced settings 으로 이동하세요. 그러면 방화벽 규칙 정의 페이지로 이동합니다. 여기에서 로봇 제어에 필요한 드라이버와의 통신을 허용하도록 인바운드 규칙을 변경할 수 있습니다.
Robot driver에 표지판이 차단되어 있으면 인바운드 규칙을 확인하십시오. driver가 차단된 경우 이 규칙을 비활성화합니다. 그렇지 않으면 방화벽이 통신을 차단합니다.
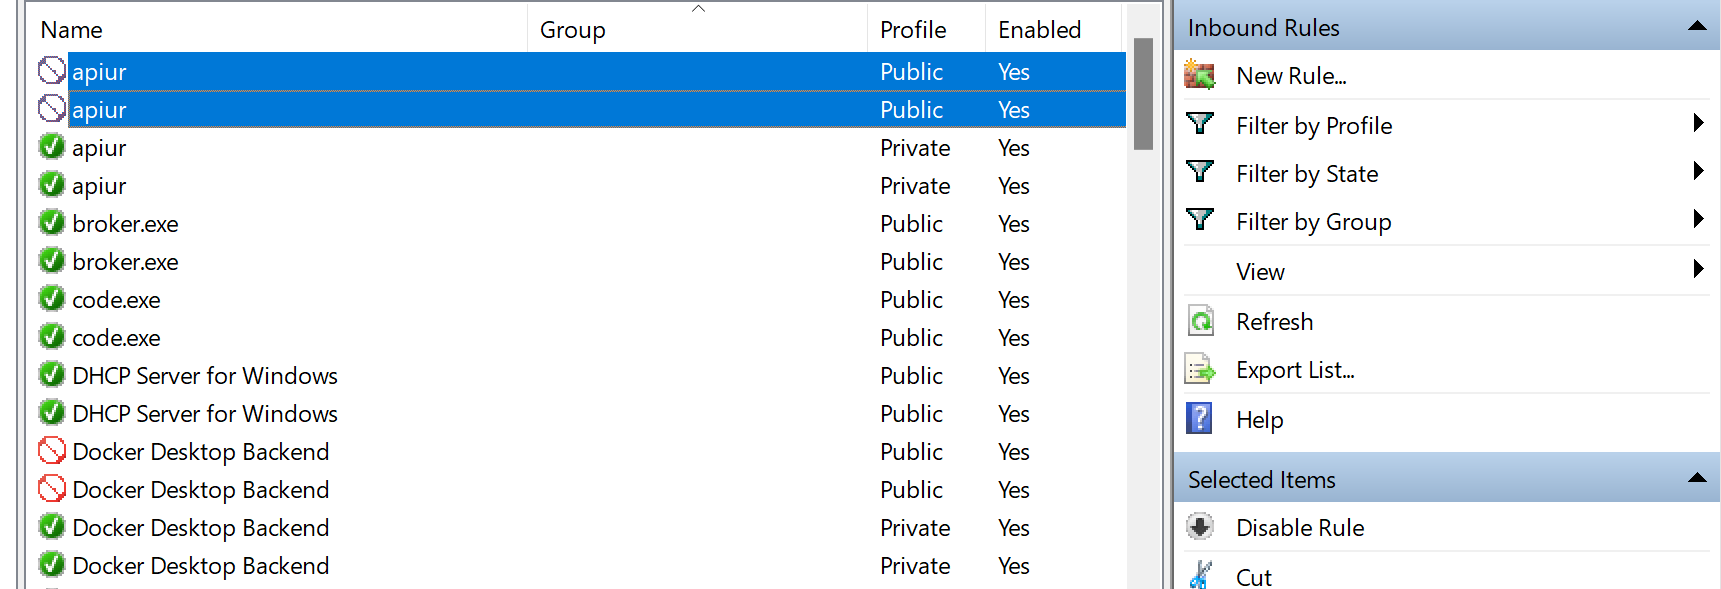
이 규칙이 비활성화되면 RoboDK 소프트웨어가 로봇에 연결할 수 있는지 확인하십시오. 그래도 로봇에 연결할 수 없으면 driver가 로봇과 통신할 수 있도록 특별히 허용하는 규칙을 만들어야 합니다.
Create a new inbound rule
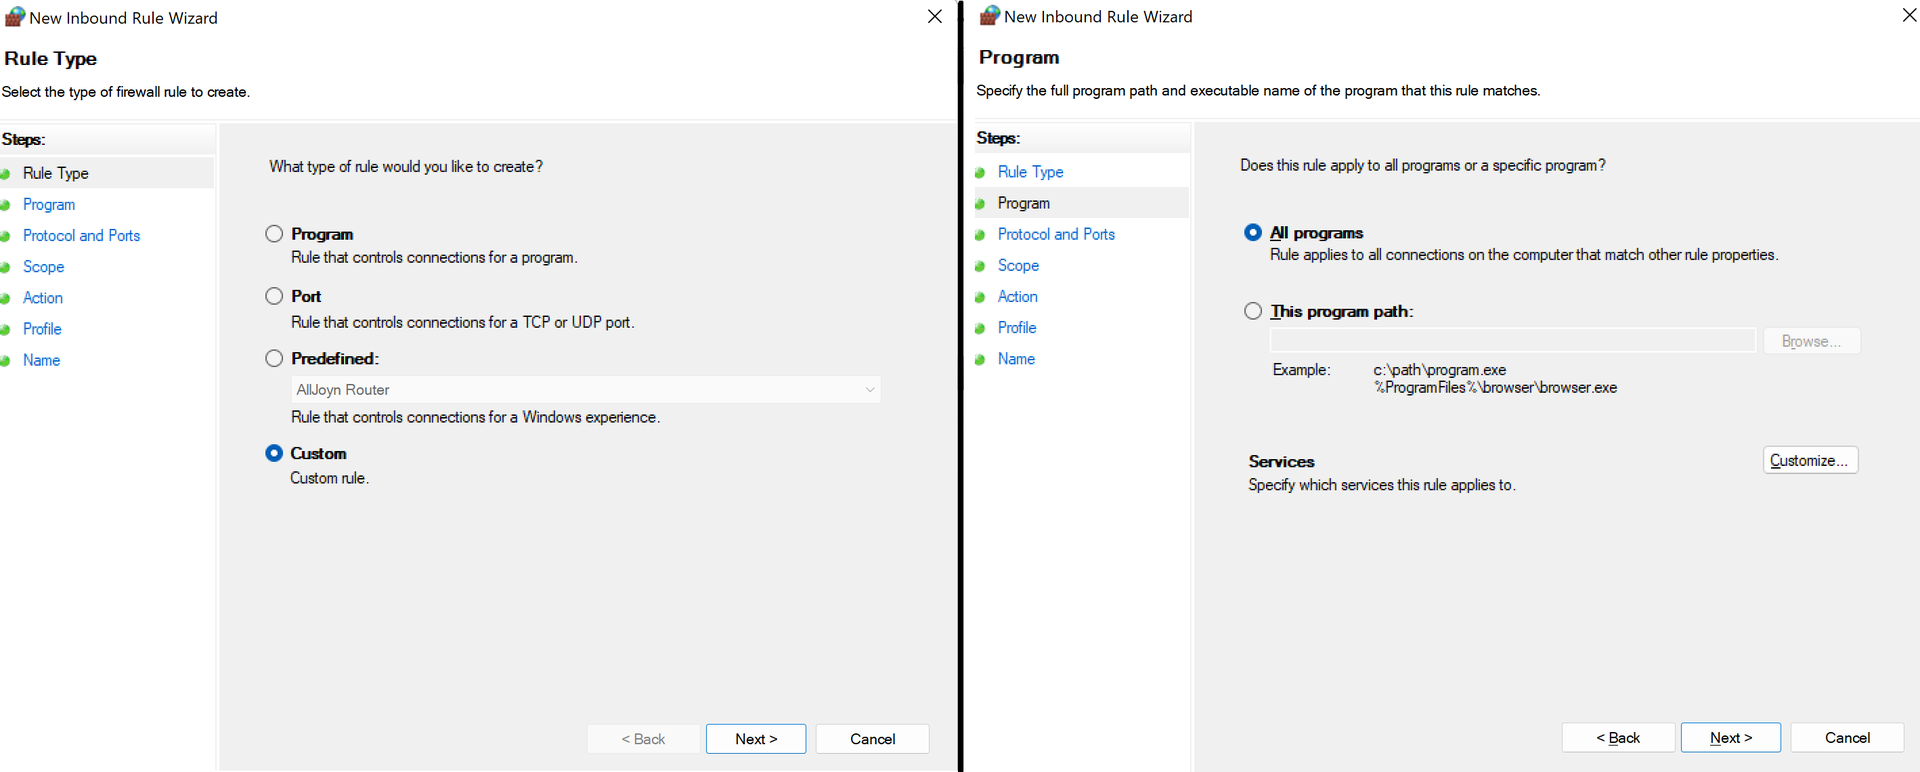
New Rule… 을 클릭하면 컴퓨터와 로봇 간의 통신을 허용하는 규칙을 만들고 정의할 수 있습니다.

시작하려면 첫 번째 페이지에서 Custom 옵션을 선택하고 두 번째 페이지에서 All programs 옵션을 선택해야 합니다. 아래 그림에서 찾을 수 있습니다.
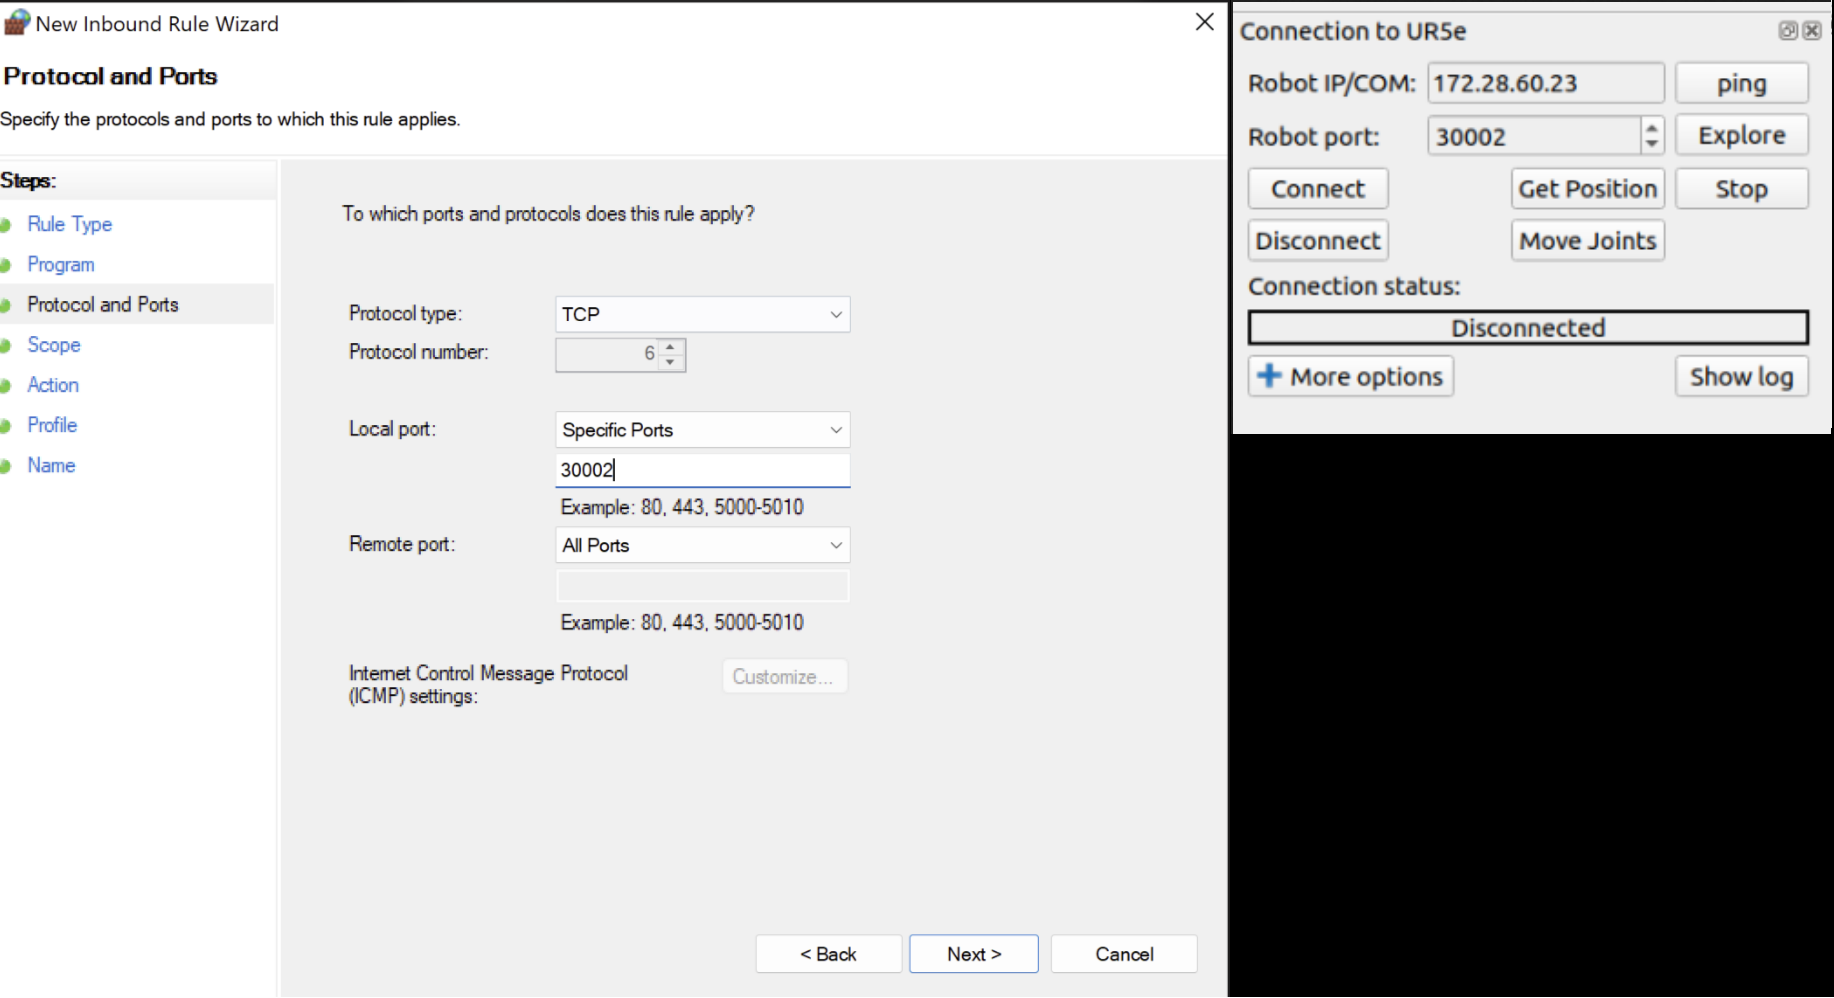
다음 페이지에서 TCP를 프로토콜로 선택한 다음 특정 로컬 포트를 선택하고 RoboDK의 포트 번호와 일치하는 포트 번호를 삽입해야 합니다.
다음 단계는 IP 주소를 설정하는 것입니다. Which remote IP address does this rule apply to? 아래에서 These IP addresses 를 선택합니다. 그런 다음 Add 를 클릭하고 RoboDK의 IP와 일치하는 IP를 설정합니다.
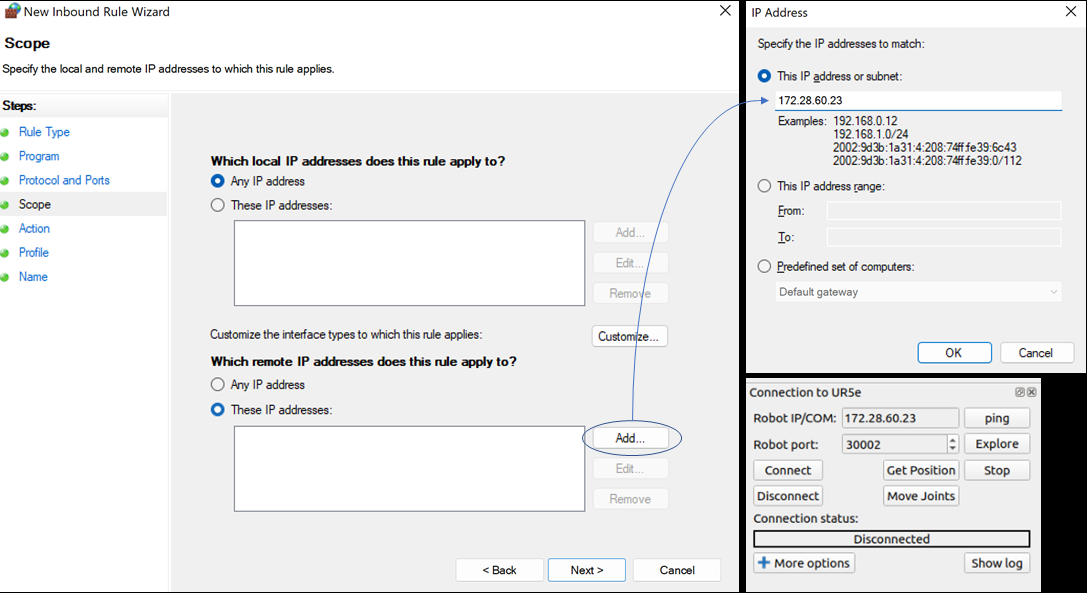
OK 및 Next 를 누른 후 Allow all connections 을 선택하고 다음 페이지에서 모든 확인란을 선택합니다.
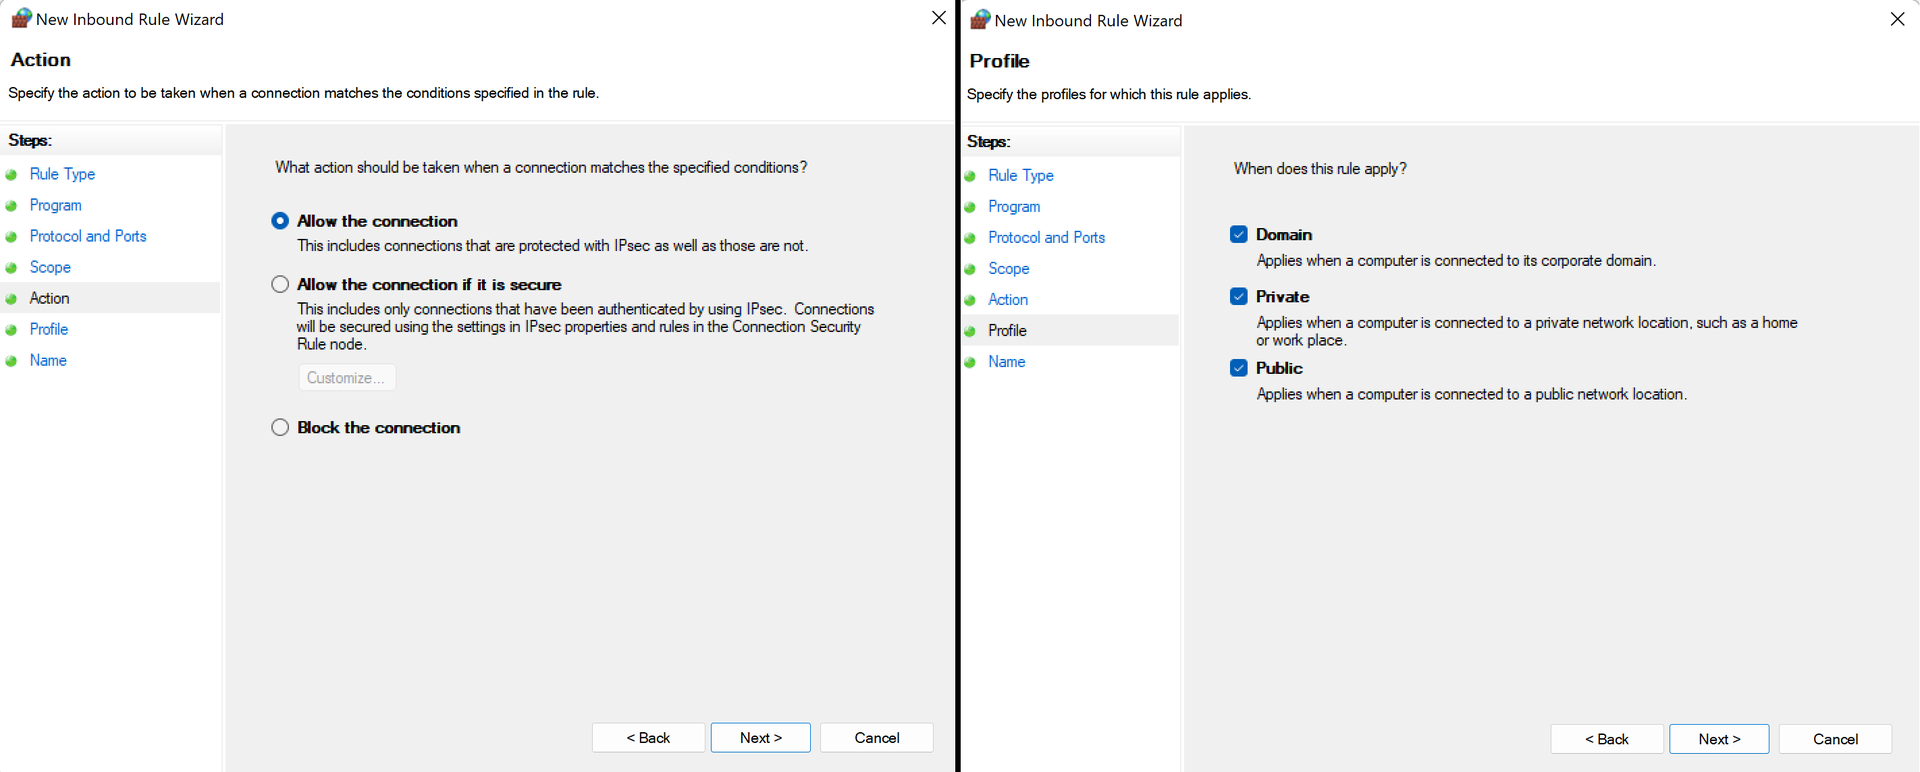
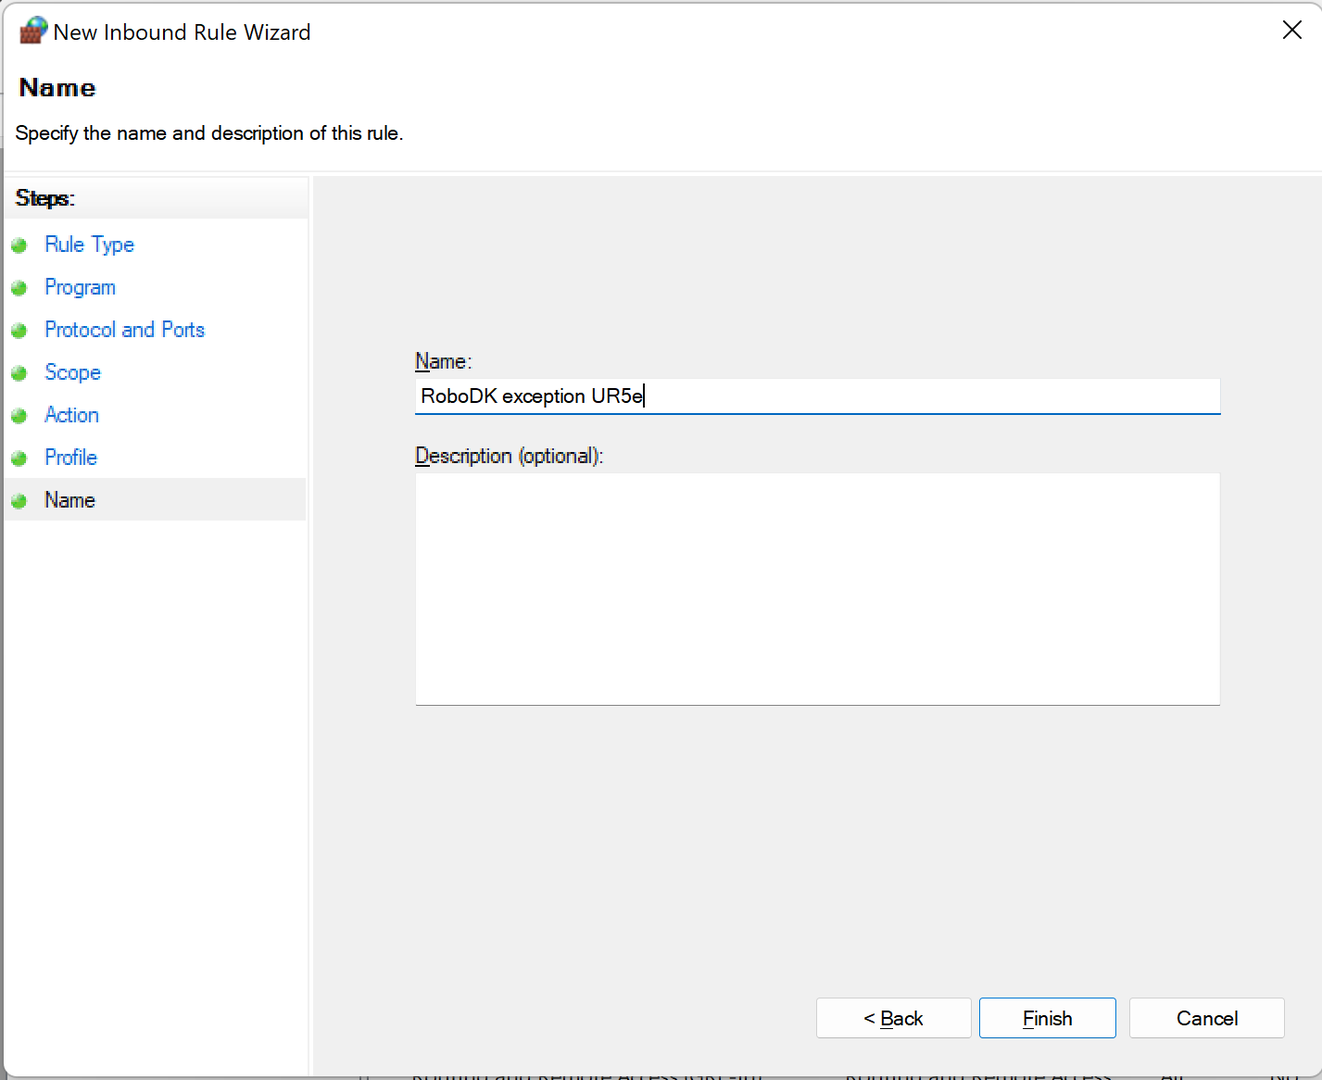
마지막으로 규칙의 적절한 이름을 선택하고 Finish 을 클릭하면 됩니다!
