Any Robot + RoboDK + Python: Verify Hand-Eye Calibration Result Via Touch Test
참고
이 튜토리얼은 UR5e 및 Yaskawa H10에서만 테스트되었으며 RoboDK에서 지원하는 로봇에서만 작동합니다.
Introduction
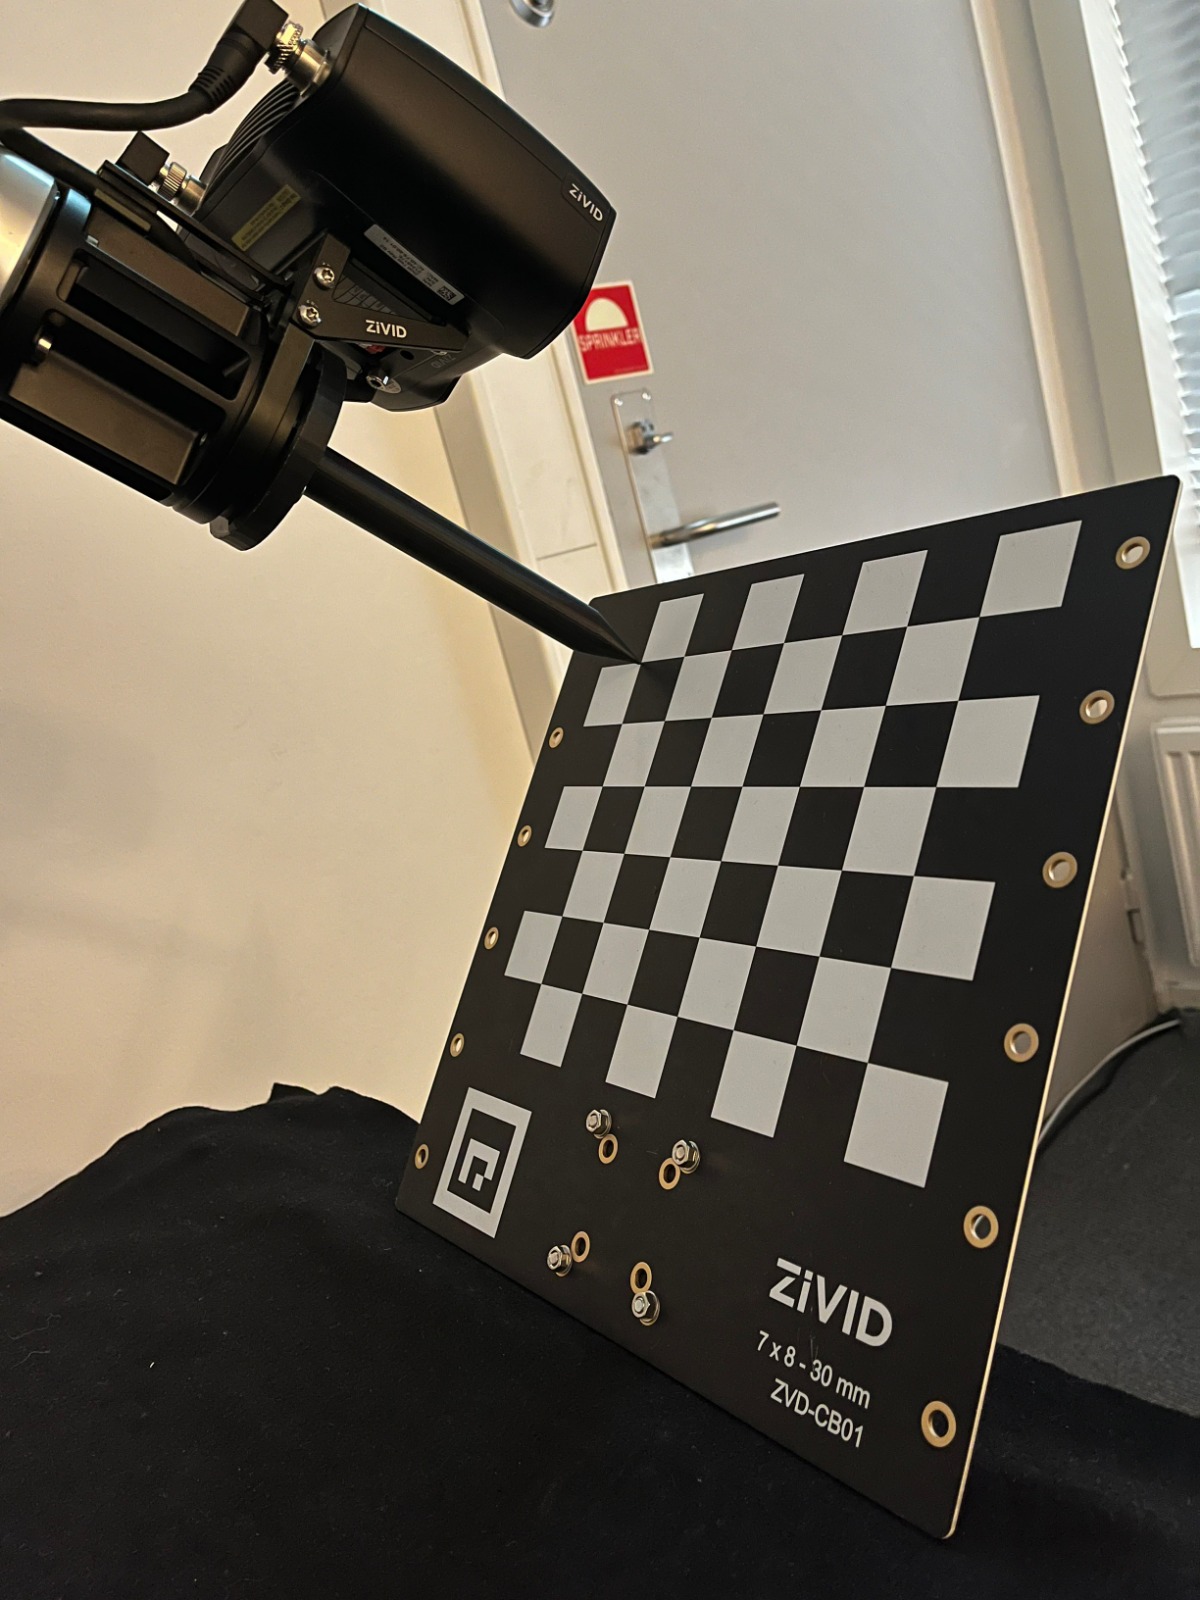
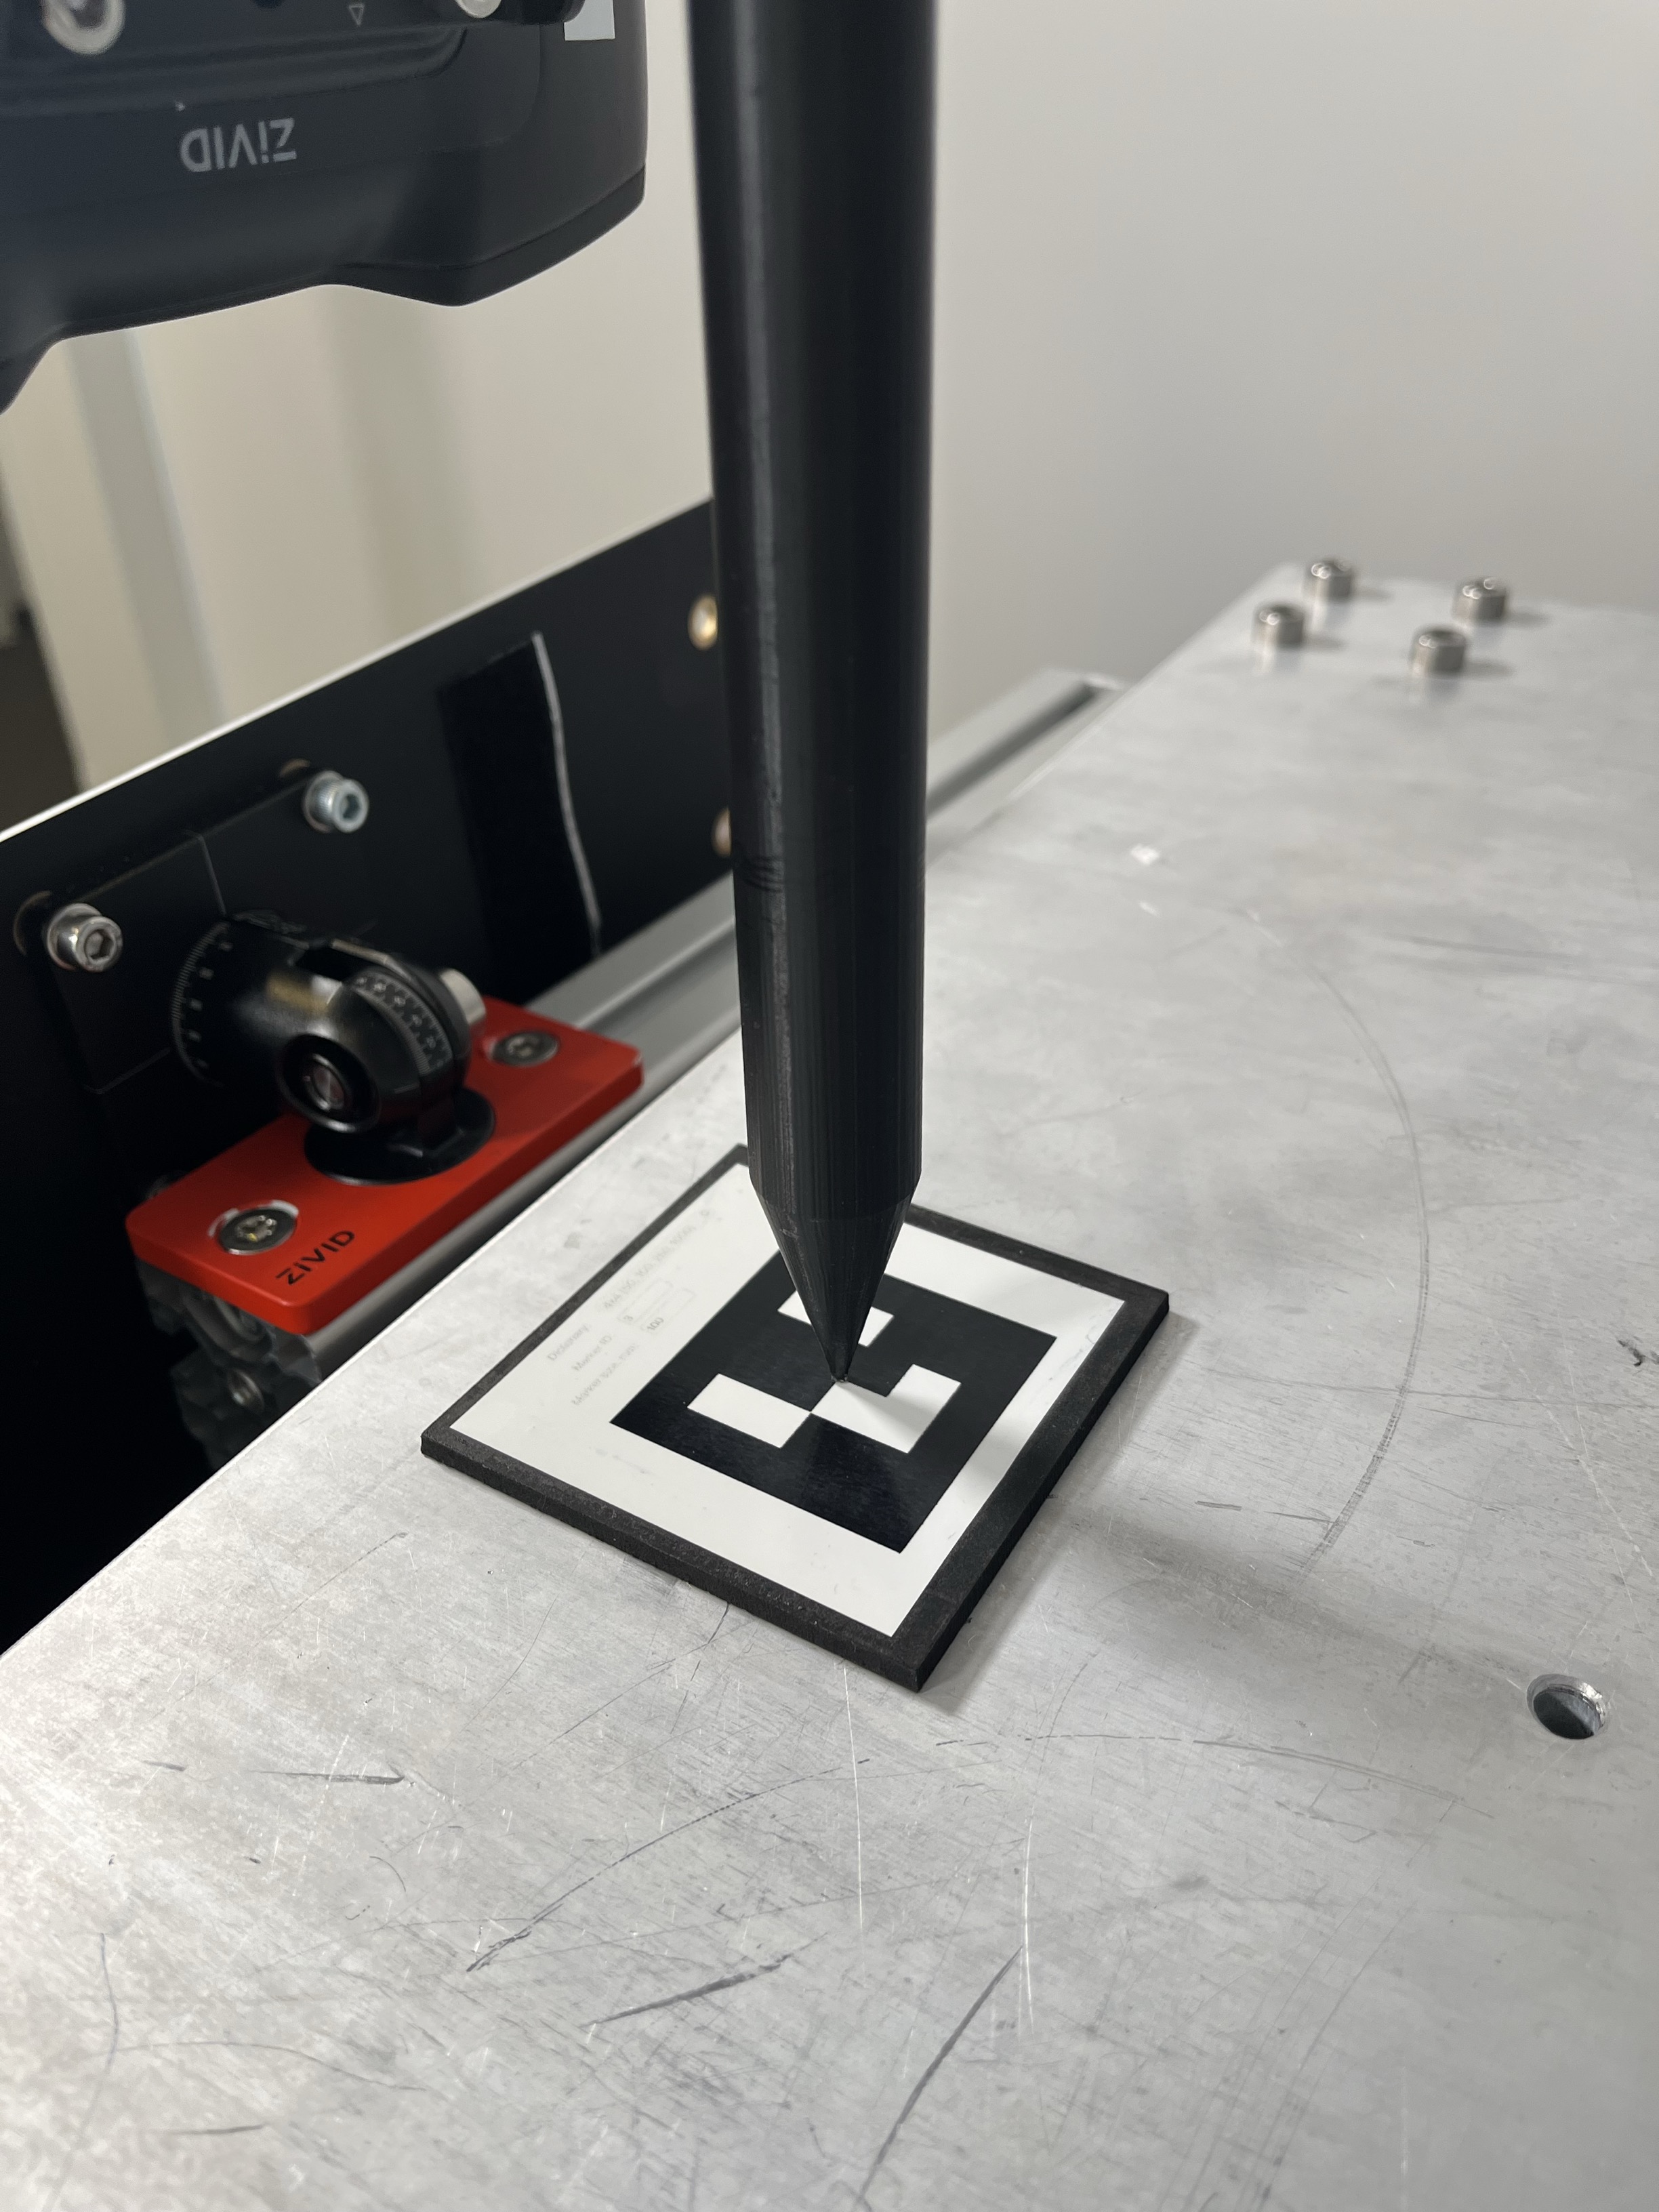
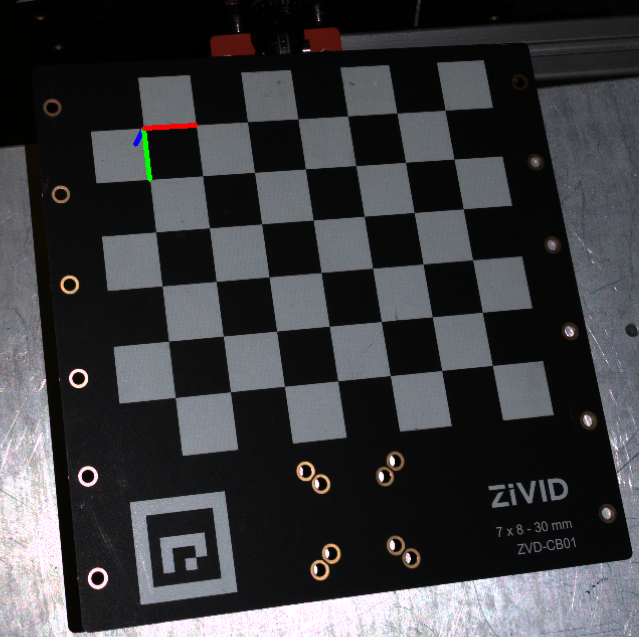
때로는 Hand-Eye Calibration의 정확도를 측정하기 어렵습니다.따라서 정확도를 쉽게 검증하기 위해 터치 테스트를 만들었습니다.이 테스트에서는 RoboDK를 사용하여 로봇을 이동합니다.이 샘플은 Eye-in-Hand 및 Eye-to-Hand의 두 가지 유형의 Hand-Eye Calibration 결과에 적용됩니다.터치 테스트는 Zivid Calibration Object 는는 카메라의 FOV 에 놓고 캡처한 다음 로봇이 특정 지점을 터치하도록 제어하는 것으로 구성됩니다.터치한 후 Zivid Calibration Object를 이동하고 로봇이 다시 터치하도록 지시할 수 있습니다.원하는 만큼 이 프로세스를 반복할 수 있습니다.두 가지 제한 사항은 로봇의 도달 범위와 카메라의 FOV 뿐입니다.
아래 이미지에서 터치 테스트의 예상 결과를 볼 수 있습니다.
참고
터치의 정확도는 로봇 보정 오류, 핸드-아이 칼리브레이션 오류, TCP 보정 오류, 보정 객체 포즈 추정 오류에 따라 달라집니다.
Requirements
Linux의 경우 Zivid Tools를 포함하여 Zivid software 를 설치합니다.
Zivid-Python 을 설치합니다.
RoboDK software 를 설치합니다.
Robodk robot library 에서 지원하는 로봇이어야 합니다.
Hand-Eye 보정의 결과로 생성된 Hand-Eye 변환 행렬이 포함된 .yaml 파일입니다.
Pointed Hand-Eye Verification Tool을 정의하는 transformation 매트릭스가 포함된 A.yaml 파일을 준비합니다.
Pointed Hand-Eye Verification Tool
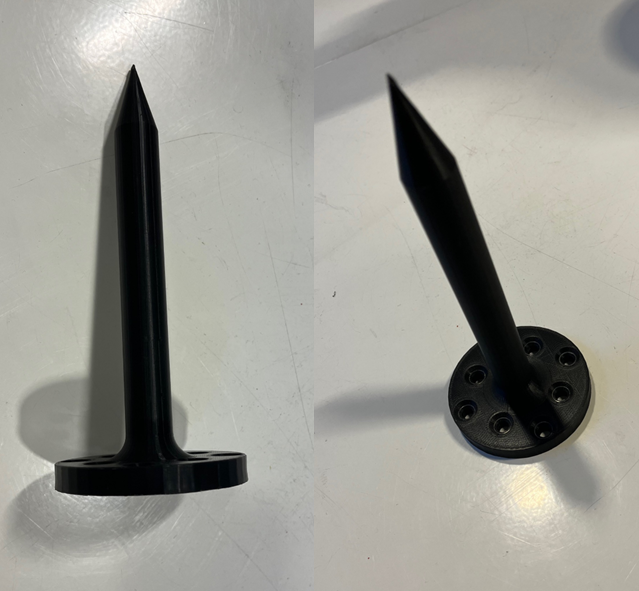
Pointed Hand-Eye Verification Tool은 이 튜토리얼에서 터치 도구로 사용됩니다. 이 도구는 UR5e(ISO 9409-1-50-4-M6) 및 Yaskawa HC10(ISO 9409-1-63-4-M6)과 호환됩니다.
pointed-hand-eye-verification-tool.STL- 3D 프린팅에 사용할 수 있는 STL의 CAD 모델입니다.pointed-hand-eye-verification-tool.STEP- RoboDK에 로드할 수 있는 STEP의 CAD 모델입니다.pointed-hand-eye-verification-tool.yaml- 이 튜토리얼과 관련된 코드 샘플에서 필요한 YAML의 변환 매트릭스입니다.
Pointed Hand-Eye 검증 도구는 다음 이미지에 설명되어 있습니다.
On-arm Mounts
이 튜토리얼에서는 로봇 end-effector와 Pointed Hand-Eye Verification Tool 사이에 부착된 Zivid On-Arm Mount Extender 및 Zivid On-Arm Mount 를 사용한다고 가정합니다. 이러한 마운트는 로봇 end-effector와 Pointed Hand-Eye Verification Tool 사이의 거리를 증가시킵니다. 아래 이미지에서 각 마운트에 대해 추가된 측정값을 찾을 수 있습니다.
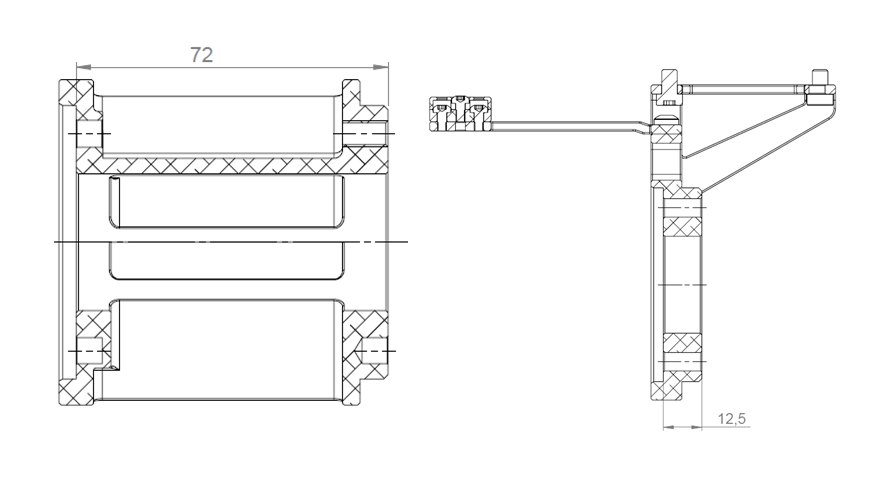
on-arm-mounts.yaml 파일에는 로봇 end effector와 Pointed Hand-Eye Verification Tool 사이에 설치된 두 마운트의 변환 매트릭스가 포함되어 있습니다. 마운트에 대한 자세한 내용은 on-arm camera mount datasheet 및 on-arm mount extender datasheet 를 참조하십시오.
이미 RoboDK 환경이 설정되어 있고 로봇에 연결되어 있는 경우 Create the Capture Pose for the Touch Test 로 이동할 수 있습니다.
Set Up RoboDK Environment
RoboDK .rdk 파일은 로봇, 대상 자세 및 환경에 대한 정보를 저장합니다. 터치 테스트를 수행하는 데 필요한 .rdk 파일의 구성 요소는 다음과 같습니다.
로봇 모델 파일 (.robot)
하나의 대상 포즈(이 튜토리얼에서 사용되는 이름은 “touch_test_pose” 입니다.)
로봇 환경의 가상 모델 (선택 사항)
사용 중인 카메라의 CAD 모델, 예: Zivid 2 CAD file (선택 사항)
Pointed Hand-Eye 검증 도구의 CAD 모델 (선택 사항)
Add Robot to RoboDK Environment
RoboDK 프로그램을 열고 사용할 로봇을 추가하여 시작합니다. 로봇을 추가하려면 File -> Open online library 로 이동하여 GUI를 사용하여 라이브러리를 엽니다. 이 인터페이스를 통해 모델과 일치하는 로봇을 찾아 마우스로 Open 을 선택합니다. 로봇이 스테이션에 나타나지 않으면 Download 를 선택하고 .rdk 환경으로 끌어다 놓습니다. 이는 Select a robot RoboDK tutorial 에서 설명합니다.
Connect to Robot through RoboDK
경고
사용하는 로봇 브랜드에 따라 RoboDK에 연결하려면 드라이버 설정이 필요할 수 있습니다. 이 설정에 대한 도움말은 RoboDK 설명서의 로봇 팁 섹션을 참조하세요. 예를 들어, ABB robots 에 대한 도움말은 다음과 같습니다.
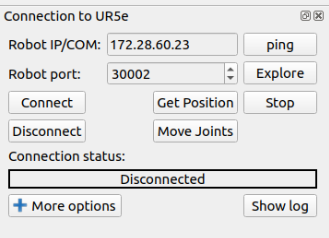
터치 테스트 스크립트를 실행하기 전에 먼저 RoboDK 인터페이스를 사용하여 로봇을 연결해야 합니다. RoboDK GUI에서 Connect -> Connect Robot 을 선택합니다. 이렇게 하면 로봇 IP와 포트 번호를 입력할 수 있는 측면 패널이 열립니다.
참고
대부분의 로봇은 제어 펜던트 또는 태블릿에 원격 모드가 있습니다. 로봇이 연결을 설정할 수 있도록 원격 모드에 있는지 확인하십시오.
로봇에 연결하려면 IP 주소를 알아야 하며 로봇 제어 펜던트에서 찾거나 나열해야 합니다. connecting to the robot for RoboDK 단계를 따르십시오. 확인해야 하는 또 다른 연결은 포트 번호입니다. 이전에 변경하지 않은 경우 드라이버와 함께 제공되는 기본 번호가 작동해야 합니다.
Connect 을 클릭하고 Connection status 창이 녹색이면 RoboDK 인터페이스를 사용하여 로봇을 제어할 수 있습니다. 대신 빨간색이면 포트 번호와 IP 주소가 올바른지 확인하십시오. 여전히 빨간색이면 이 튜토리얼 끝에 있는 Troubleshoot RoboDK chapter를 확인하십시오.
Create the Capture Pose for the Touch Test
터치 테스트를 위한 캡처 포즈를 저장하기 위해 how to create a target in RoboDK 에 대해 알아보십시오.
RoboDK를 사용하여 포즈를 생성하는 방법은 두 가지가 있습니다.
펜던트를 사용하여 물리적으로 로봇을 원하는 포즈로 이동한 다음 RoboDK를 통해 연결하고 포즈를 저장합니다.
RoboDK를 통해 원격으로 로봇을 이동하여 포즈를 생성하고 저장합니다.
팁
RoboDK를 통해 로봇을 움직이고 있는데 로봇이 충분히 빠르거나 느리게 움직이지 않는 경우 set the robot speed in RoboDK 를 확인하십시오. 속도를 설정한 후 생성한 프로그램을 마우스 오른쪽 버튼으로 클릭하고 Run on the robot 을 표시한 다음 다시 마우스 오른쪽 버튼을 클릭하고 Run 을 선택합니다.
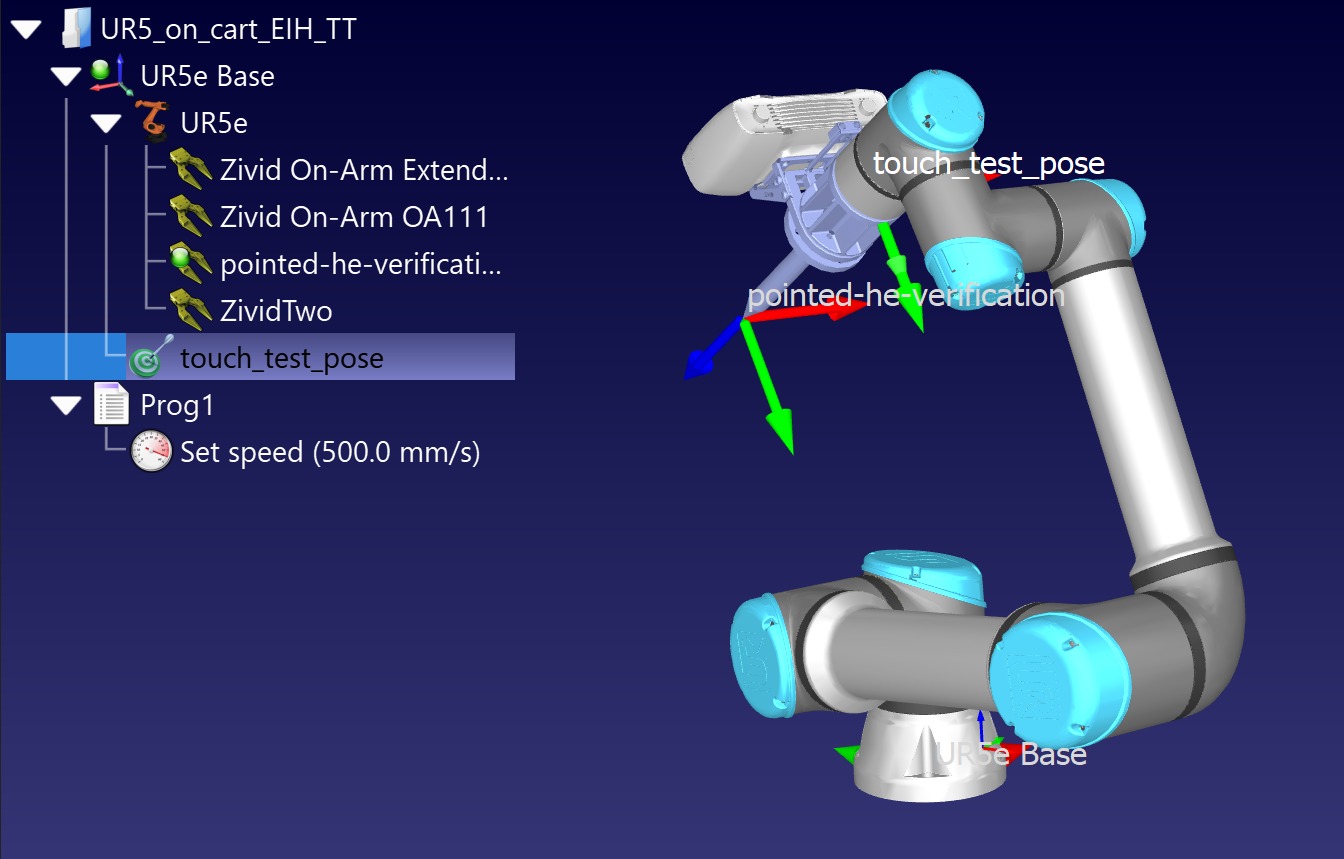
터치 테스트 캡처 포즈를 생성하기 전에 Zivid Calibration Object 를 어디에 배치할지 고려해야 합니다. Eye-in-Hand인 경우, 카메라의 FOV 내에 있어야 합니다. Eye-to-Hand인 경우, 로봇이 Zivid 보정 객체의 시야를 가리지 않도록 해야 합니다. 터치 테스트에는 하나의 포즈만 필요합니다. 아래 그림은 RoboDK에서 어떻게 보이는지 보여줍니다.
Run the Touch Test
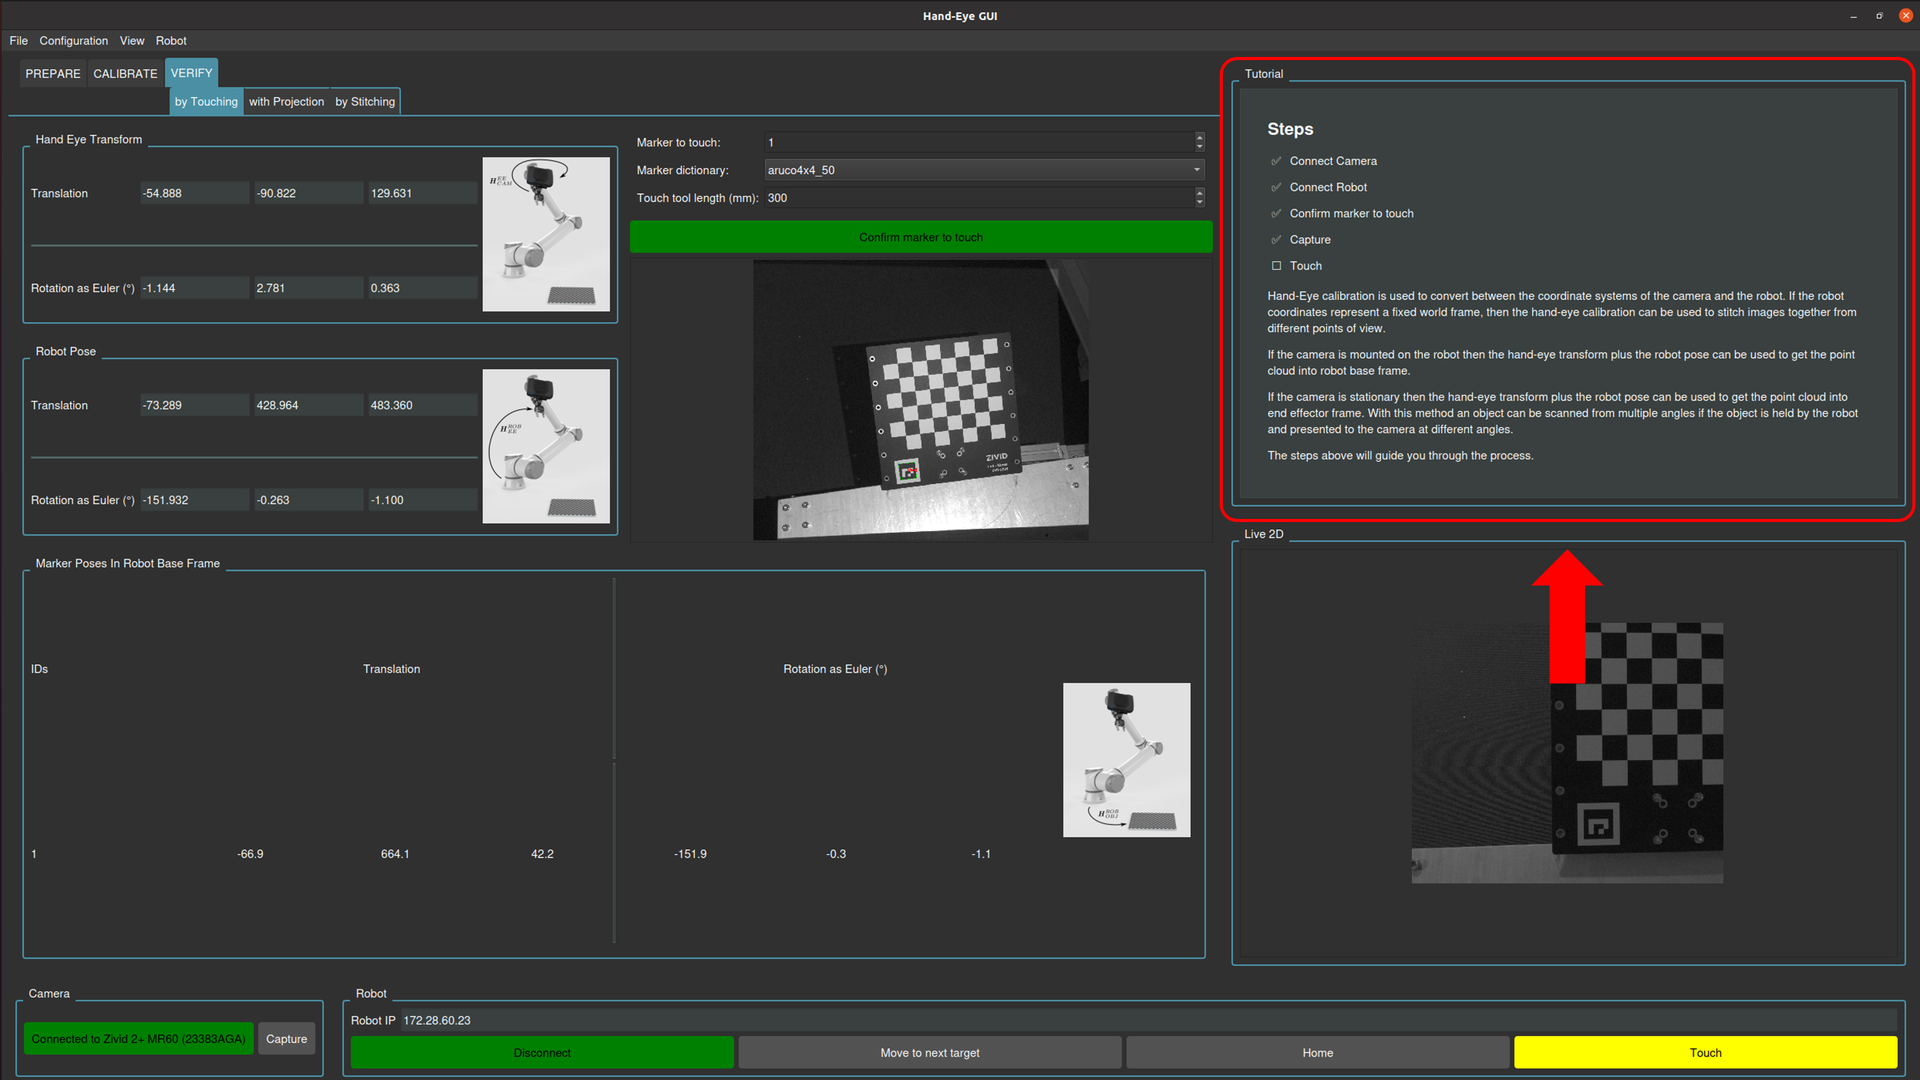
Hand-Eye GUI를 사용한 터치 테스트 절차
이 가이드에서는 Hand-Eye GUI 사용하여 터치 테스트를 실행하는 데 필요한 단계를 안내합니다.

Connect the Camera
카메라가 제대로 연결되고 시스템에서 인식되는지 확인하세요.

Connect to the Robot
GUI를 통해 로봇과 통신을 설정합니다.

Fill the Hand-Eye Transform Matrix
핸드-아이 변환 행렬을 채우는 데는 여러 가지 옵션이 있습니다.
Load from disk: File > 디렉토리에서 데이터 로드 로 이동하여 저장된 핸드-아이 칼리브레이션 파일이 있는 폴더를 선택합니다.
Use result from GUI calibration: GUI를 통해 핸드아이 보정을 수행한 경우 아무것도 다시 로드하지 않고도 결과 매트릭스를 유지할 수 있습니다.
Enter manually: 또는 해당 입력 필드에 변환 행렬을 직접 수동으로 입력할 수 있습니다.

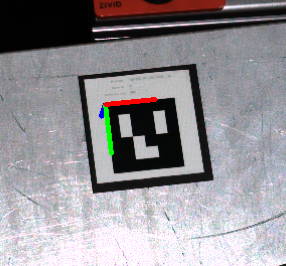
ArUco Marker를 터치하고 도구 길이를 구성합니다.
터치 테스트 중에 사용될 마커 ID를 선택하거나 확인하세요.
로봇의 엔드 이펙터 참조점과 물리적 도구 끝 사이의 거리를 지정합니다.

Capture to Detect the Marker
장면에서 타겟 마커를 찾기 위해 마커 감지를 시작합니다.

Touch the Marker
감지된 마커의 중앙을 로봇이 물리적으로 터치하도록 이동합니다.

핸드-아이 스크립트를 사용한 터치 테스트 절차
스크립트를 실행하기 전에 .rdk 파일을 열고 로봇에 연결해야 합니다. The script can be found in the Zivid Python Samples . 아래와 같이 다음 명령줄 인수를 사용합니다.
type_group.add_argument("--eih", "--eye-in-hand", action="store_true", help="eye-in-hand configuration")
type_group.add_argument("--eth", "--eye-to-hand", action="store_true", help="eye-to-hand configuration")
parser.add_argument(
    "--settings-path",
    required=False,
    type=Path,
    help="Path to the camera settings YML file",
)
parser.add_argument("--ip", required=True, help="IP address of the robot controller")
parser.add_argument(
    "--target-keyword",
    required=True,
    help="RoboDK target name representing a robot pose at which the calibration object is in the field of view of the camera",
)
parser.add_argument(
    "--tool-yaml",
    required=True,
    help="Path to YAML file that represents the Pointed Hand-Eye Verification Tool transformation matrix",
)
parser.add_argument(
    "--mounts-yaml",
    required=False,
    help="Path to YAML file that represents the on-arm mounts transformation matrix",
)
parser.add_argument(
    "--hand-eye-yaml",
    required=True,
    help="Path to the YAML file that contains the Hand-Eye transformation matrix",
)
subparsers = parser.add_subparsers(dest="calibration_object", required=True, help="Calibration object type")
subparsers.add_parser("checkerboard", help="Verify using Zivid calibration board")
marker_parser = subparsers.add_parser("marker", help="Verify using ArUco marker")
marker_parser.add_argument(
    "--dictionary",
    required=True,
    choices=list(zivid.calibration.MarkerDictionary.valid_values()),
    help="Dictionary of the targeted ArUco marker",
)
marker_parser.add_argument(
    "--id", nargs=1, required=True, type=int, help="ID of ArUco marker to be used for verification"
)
스크립트는 다음 단계로 실행됩니다.
로봇은 이전에 정의된 캡처 포즈로 이동합니다.
사용자는 Zivid 보정 객체를 FOV 에 놓고 Enter 누르라는 요청을 받습니다.
카메라는 Zivid 보정 객체를 캡처하고 터치 지점의 포즈가 계산되어 사용자에게 표시됩니다.
사용자가 Enter 키를 누르면 로봇이 Zivid 보정 개체의 특정 지점에 닿습니다.
Enter 키를 누르면 로봇이 뒤로 물러나 캡처 포즈로 돌아갑니다.
이 시점에서 Zivid 보정 객체를 이동하여 다른 위치에서 터치 테스트를 수행할 수 있습니다.
사용자는 터치 테스트를 반복하거나 중단하려면 “y” 를 “n” 에 입력하라는 요청을 받습니다.
Script walk-through
RoboDK Hand-Eye Calibration 검증 스크립트가 작동하려면 3개의 추가 Python 파일이 필요합니다.
robodk_tools.py 는 로봇을 구성하는 데 사용됩니다.
save_load_matrix.py 는 YAML 파일에서 행렬을 저장하고 로드하는 데 사용됩니다.
스크립트는 각각 다음 단계를 통해 실행됩니다.
Connect to robot
먼저 IP 주소를 사용하여 로봇에 연결합니다. 그런 다음 시뮬레이터와 링크를 설정하는데 사용되는 rdk 객체와 다양한 로봇 구성 매개변수를 포함하는 로봇 객체 robot 을 돌려 받습니다.
Set robot speed and acceleration
로봇 구성의 마지막 단계는 로봇의 속도와 가속도를 정의하는 것입니다.
Load Pointed Hand-Eye Verification Tool transformation matrix
그런 다음 Pointed Hand-Eye Verification Tool을 정의하는 변환 매트릭스가 로드됩니다.
Define TCP transformation matrix
그런 다음 도구 중심점(TCP)을 정의해야 합니다. 먼저 프로그램은 사용자가 On-Arm 마운트 매트릭스가 포함된 a.yaml 파일을 제공했는지 확인합니다. 사용자가 온암 마운트 매트릭스를 제공하지 않는 경우 Pointed Hand-Eye Verification Tool이 로봇의 엔드 이펙터에 직접 부착되어 있다고 가정합니다. 따라서 TCP 행렬은 Pointed Hand-Eye Verification Tool 행렬과 동일합니다.
if user_options.mounts_yaml:
    print("Loading the on-arm mounts transformation matrix from a YAML file")
    flange_to_tool_base_transform = load_and_assert_affine_matrix(Path(user_options.mounts_yaml))

    flange_to_tcp_transform = flange_to_tool_base_transform @ tool_base_to_tool_tip_transform
else:
    flange_to_tcp_transform = tool_base_to_tool_tip_transform
Move to Capture Pose
이 샘플을 실행하는 동안 열려 있는 .rdk 파일에서 가져온 capture_pose 로 로봇이 이동합니다.
capture_pose = get_robot_targets(rdk, target_keyword=user_options.target_keyword)
if not capture_pose:
    raise IndexError(
        "The list of poses retrieved from RoboDK is empty...\nMake sure that you have created a Capture Pose and that you introduced the right keyword for it."
    )
robot.MoveJ(capture_pose[0])
Place the Zivid Calibration Object
다음 단계는 사용자가 Zivid 보정 객체를 카메라의 FOV 에 배치했는지 확인하는 것입니다.
Zivid Calibration Object Detection and Pose Estimatio
Enter 누르면 Zivid 보정 객체가 캡처되고 카메라 프레임에서 해당 객체의 포즈가 추정됩니다.
Zivid 보정 객체 포즈를 카메라에서 로봇 베이스 프레임으로 변환
이 변환 대한 자세한 내용을 이해하려면 Hand-Eye Calibration Solution 확인하십시오.
Get the Touch Pose
로봇이 움직이도록 제어하는 터치 포즈가 엔드 이펙터(플랜지) 포즈이기 때문에 TCP 를 고려해야 합니다.
Get the Approach Pose
우리는 접근 포즈를 Z축의 터치 포즈로부터의 오프셋으로 정의하고 -140mm로 임의로 선택합니다.
Touch the Zivid Calibration Object
Zivid 보정 객체에 접근하여 터치하기 전에 계산된 터치 포즈가 사용자에게 표시됩니다.
그런 다음 사용자는 Enter 눌러 로봇이 터치를 수행하도록 할 수 있습니다.
Zivid 교정 객체를 터치하기 위해 로봇은 먼저 관절 운동을 통해 접근 자세로 이동합니다. 그런 다음 터치 자세로 직선 이동합니다. 이 시점에서 사용자는 Zivid 교정 객체에 접근하여 수행된 터치의 정확도를 시각적으로 확인할 수 있습니다.
Move Away from the Zivid Calibration Object
이 프로그램에서는 로봇이 Zivid 보정 개체에서 벗어나 캡처 포즈로 돌아가도록 하려면 사용자가 Enter 를 눌러야 합니다.
Touch the Zivid Calibration Object Again
이 시점에서 Zivid 보정 객체를 이동하여 카메라의 FOV 내 다른 위치로 터치 테스트를 수행할 수 있습니다. 사용자는 터치 테스트를 반복하거나 중단하려면 “y” 또는 “n” 을 입력해야 합니다.
Troubleshoot RoboDK
Robot Moving to Different Configuration than Intended
Connect Through Firewall on windows
참고
이 방법은 Windows 10에서 테스트되었습니다.
Check driver blockage
Windows를 실행하는 컴퓨터에 연결할 때 방화벽이 로봇에 대한 연결을 차단할 수 있다는 점에 유의하십시오. 한 가지 옵션은 방화벽을 완전히 비활성화하는 것이지만 시스템을 취약하게 만들 수 있으므로 권장하지 않습니다.
대신 사용하는 로봇의 드라이버 및 IP 주소에 대해서만 통신을 허용하도록 Windows 방화벽에 새 규칙을 추가할 수 있습니다. 이 두 속성을 찾으려면 connect to robot 를 선택하여 more options 에서 확인하십시오. 이 경우 드라이버는 apiur 를 선택합니다.
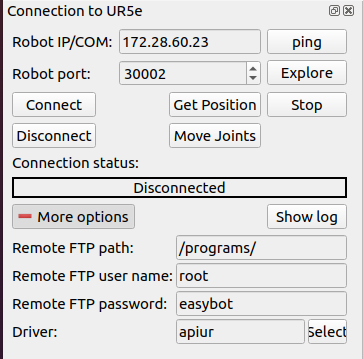
시스템의 Windows Defender 방화벽으로 이동하여 Advanced settings 으로 이동하세요. 그러면 방화벽 규칙 정의 페이지로 이동합니다. 여기에서 로봇 제어에 필요한 드라이버와의 통신을 허용하도록 인바운드 규칙을 변경할 수 있습니다.
로봇 드라이버에 막힌 표지판이 있으면 인바운드 규칙을 확인하십시오. 드라이버가 차단된 경우 이 규칙을 비활성화합니다. 그렇지 않으면 방화벽이 통신을 차단합니다.
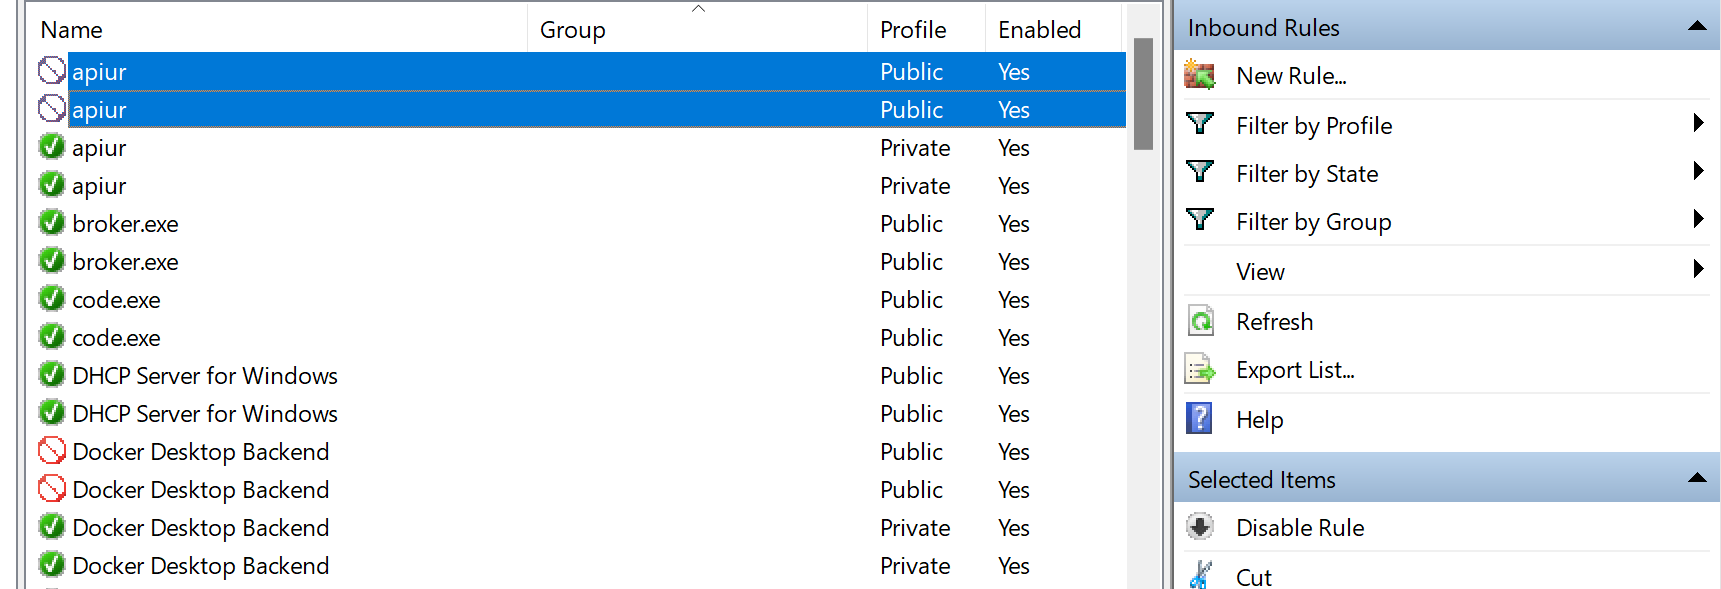
이 규칙이 비활성화되면 RoboDK 소프트웨어가 로봇에 연결할 수 있는지 확인하십시오. 여전히 로봇에 연결할 수 없는 경우 드라이버가 로봇과 통신할 수 있도록 특별히 허용하는 규칙을 만들어야 합니다.
Create a new inbound rule
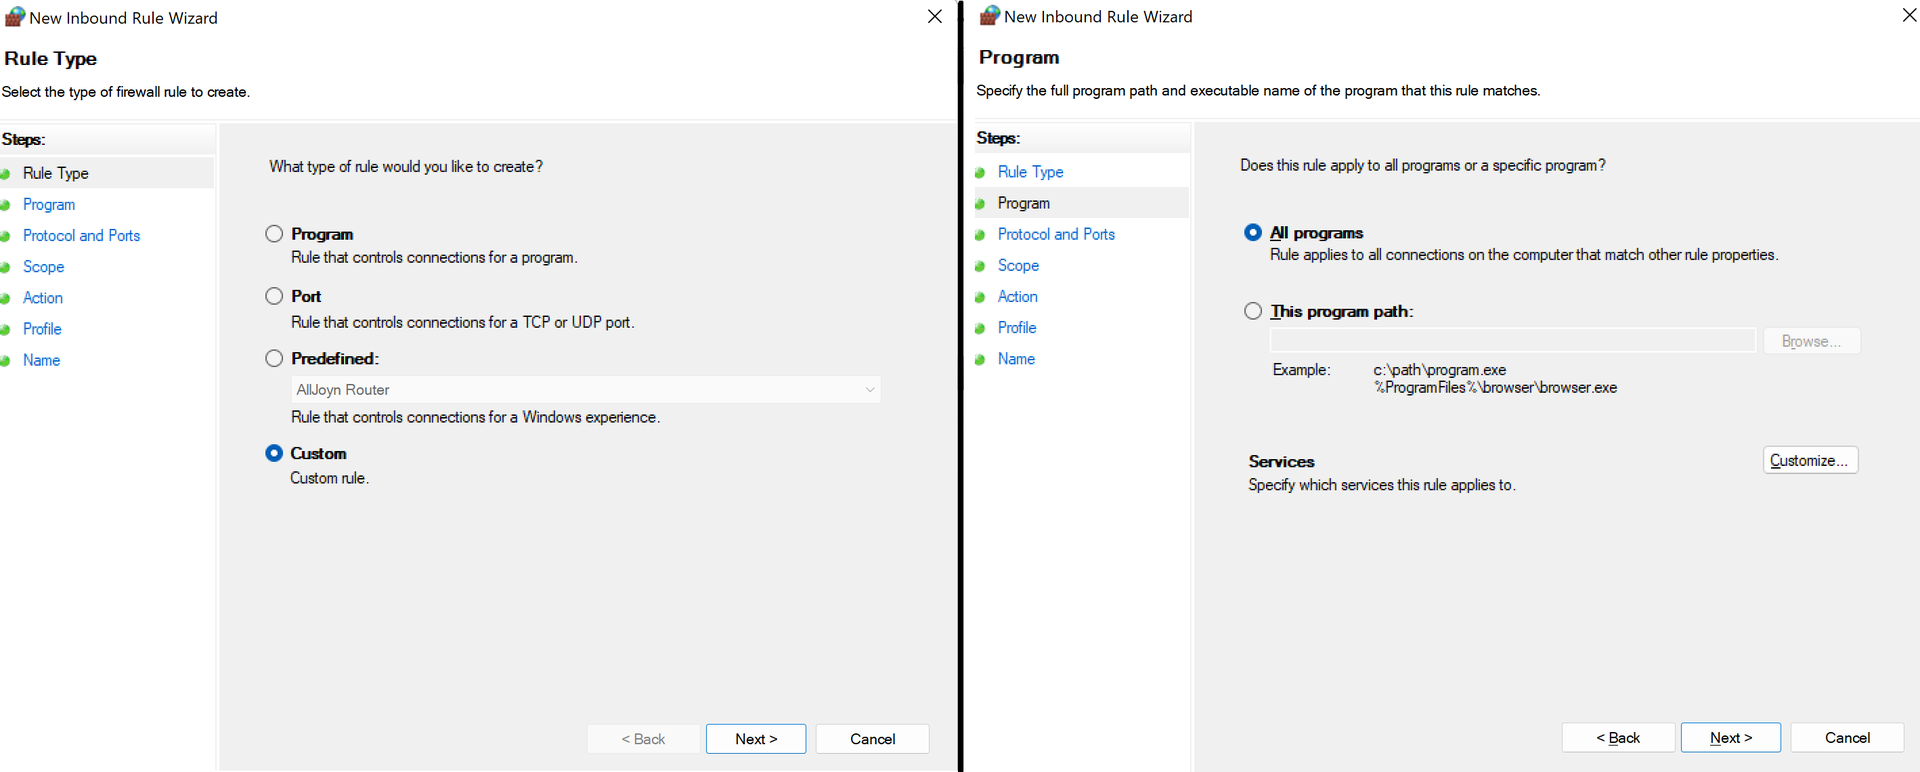
New Rule… 을 클릭하여 컴퓨터와 로봇 간의 통신을 허용하는 규칙을 만들고 정의합니다.

우선 첫 번째 페이지에서 Custom 옵션을 선택하고 두 번째 페이지에서 All programs 옵션을 선택합니다. 아래 그림에서 확인할 수 있습니다.
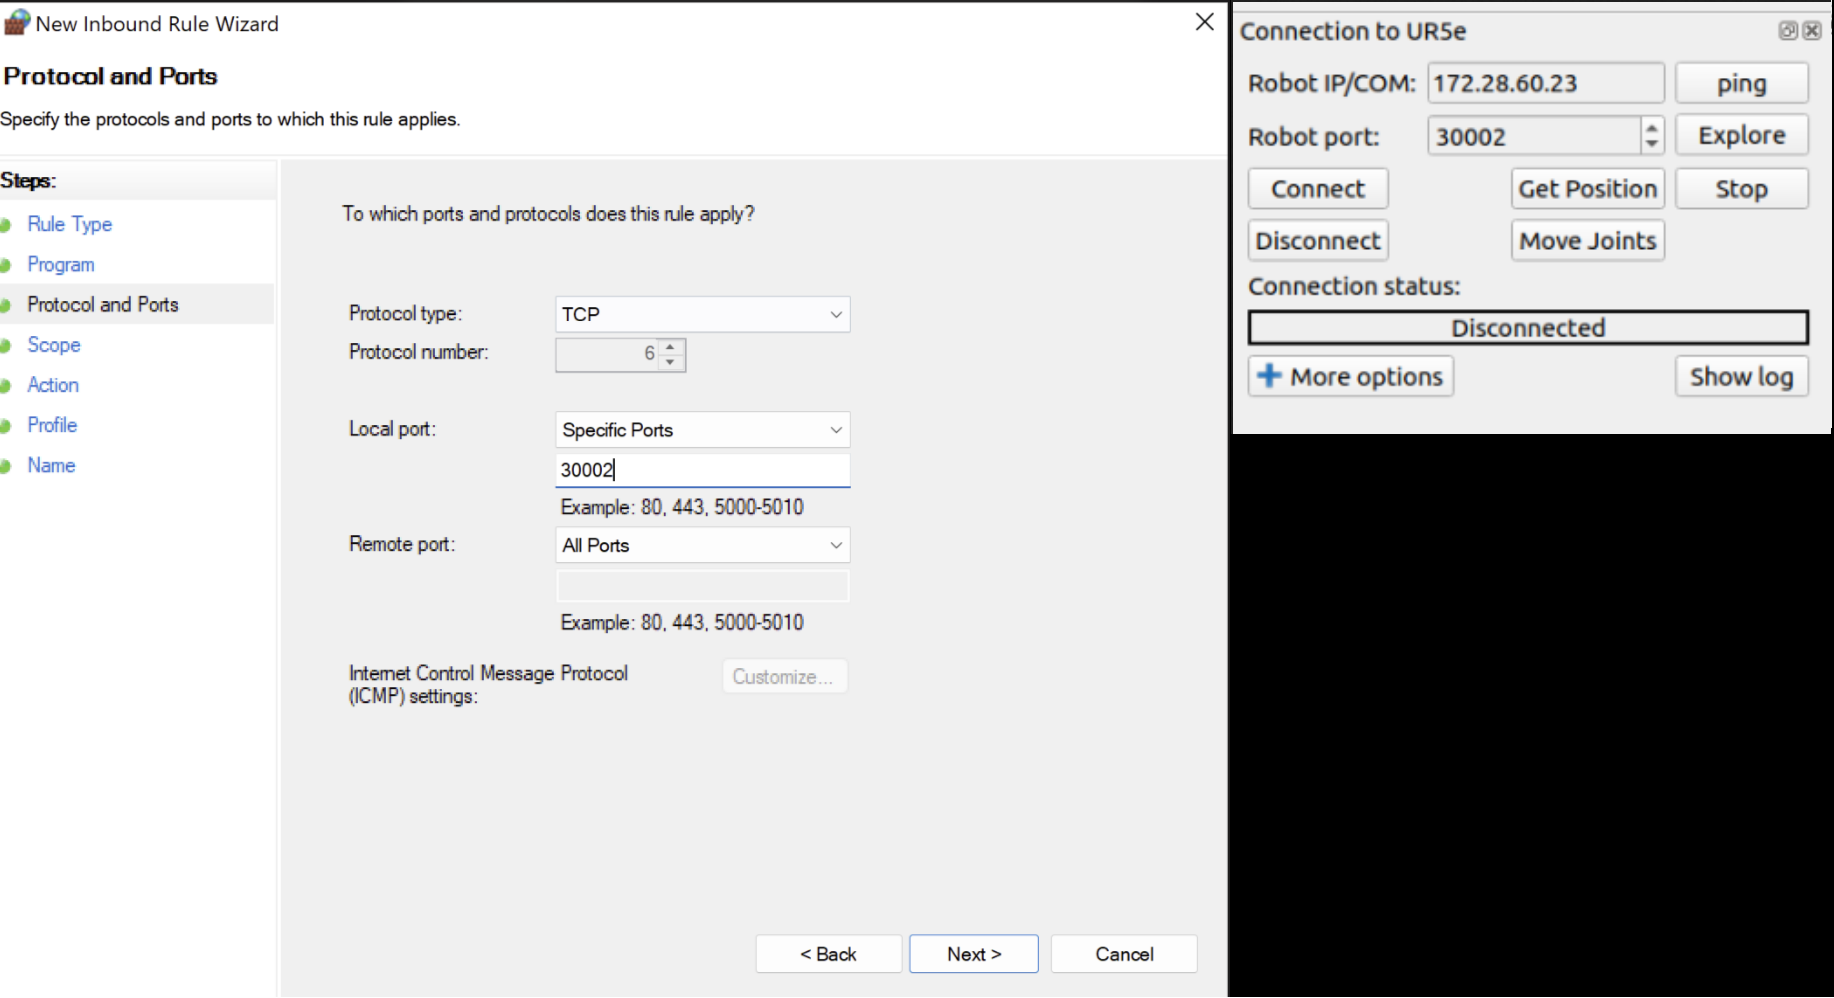
다음 페이지에서 TCP를 프로토콜로 선택한 다음 특정 로컬 포트를 선택하고 RoboDK의 포트 번호와 일치하는 포트 번호를 삽입해야 합니다.
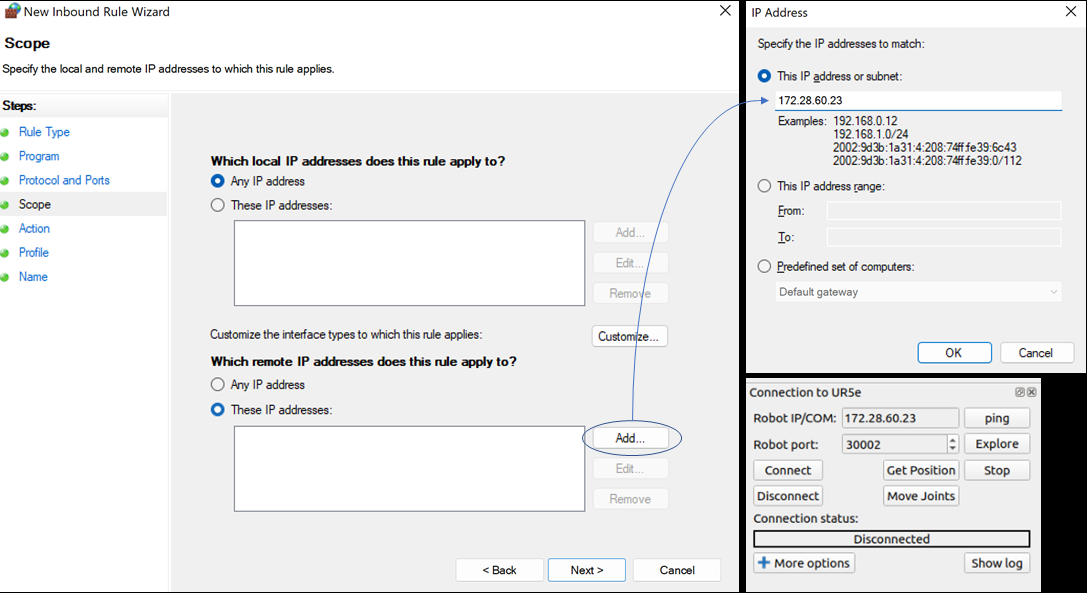
다음 단계는 IP 주소를 설정하는 것입니다. Which remote IP address does this rule apply to? 에서 These IP addresses 를 선택하십시오. 그런 다음 Add 의 IP와 일치하는 IP를 설정합니다.
OK 및 Next 를 누른 후 Allow all connections 을 선택하고 다음 페이지에서 모든 상자를 선택합니다.
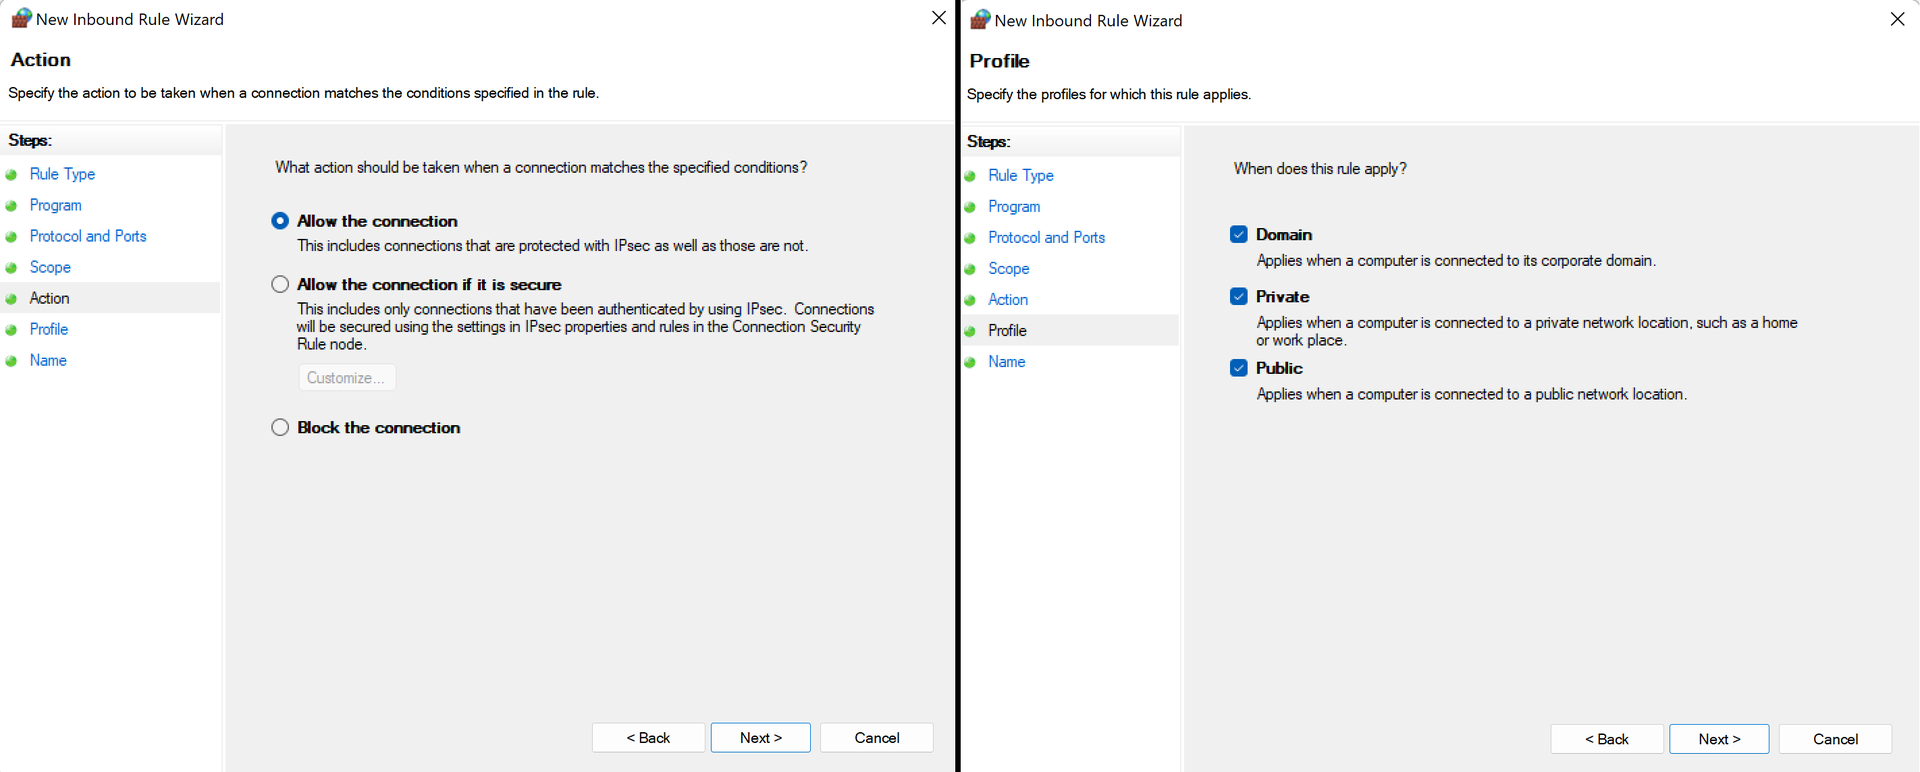
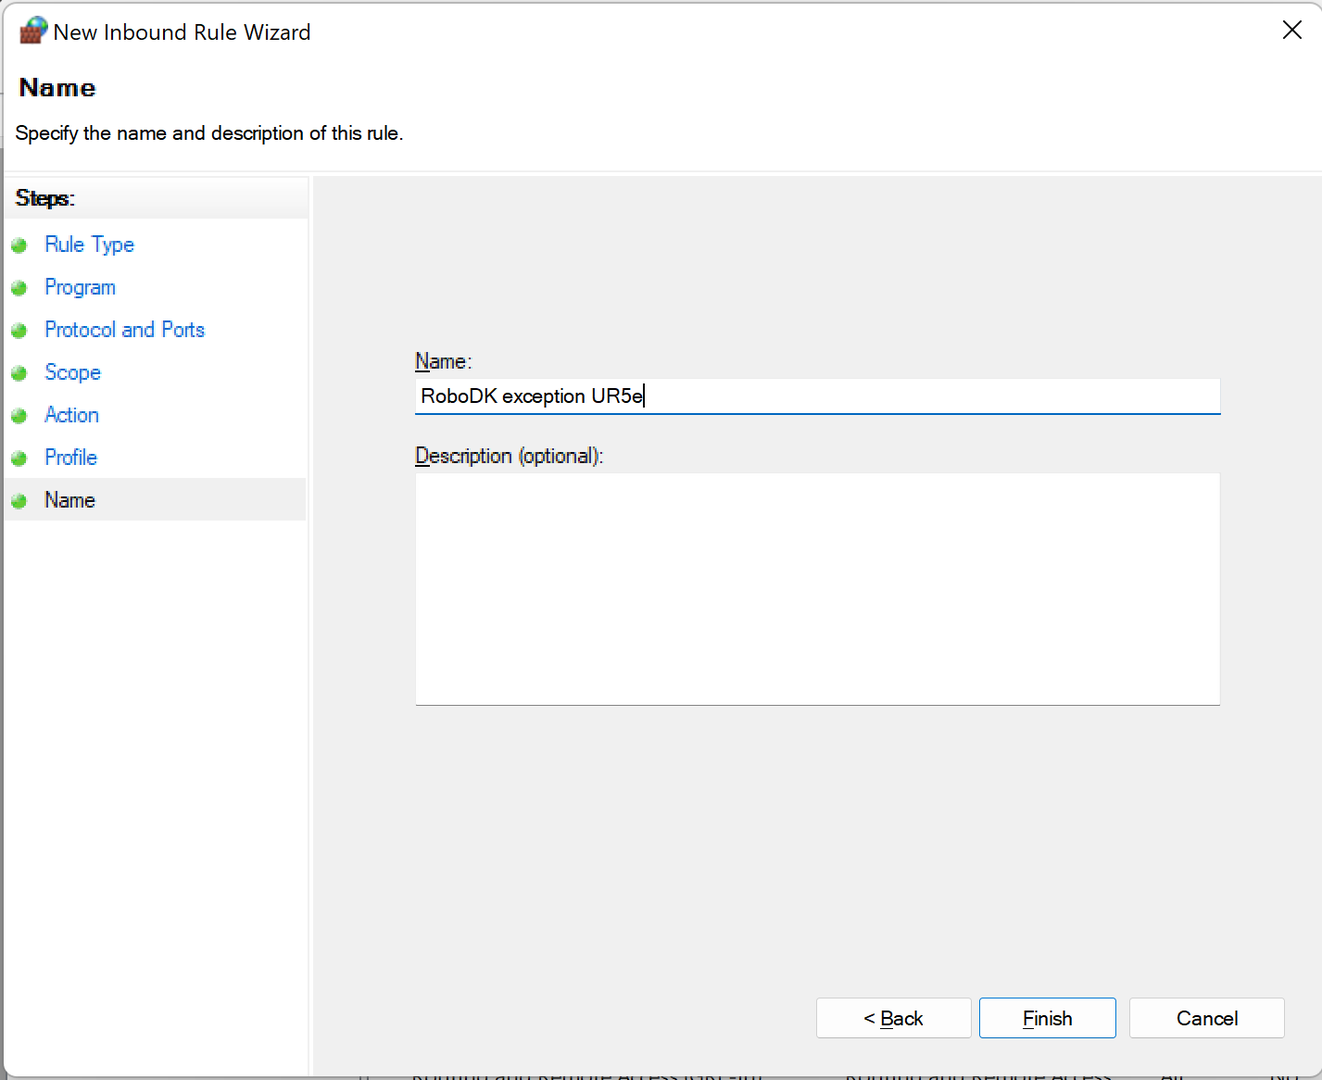
마지막으로 규칙에 적합한 이름을 선택하고 Finish 을 클릭하면 됩니다!
