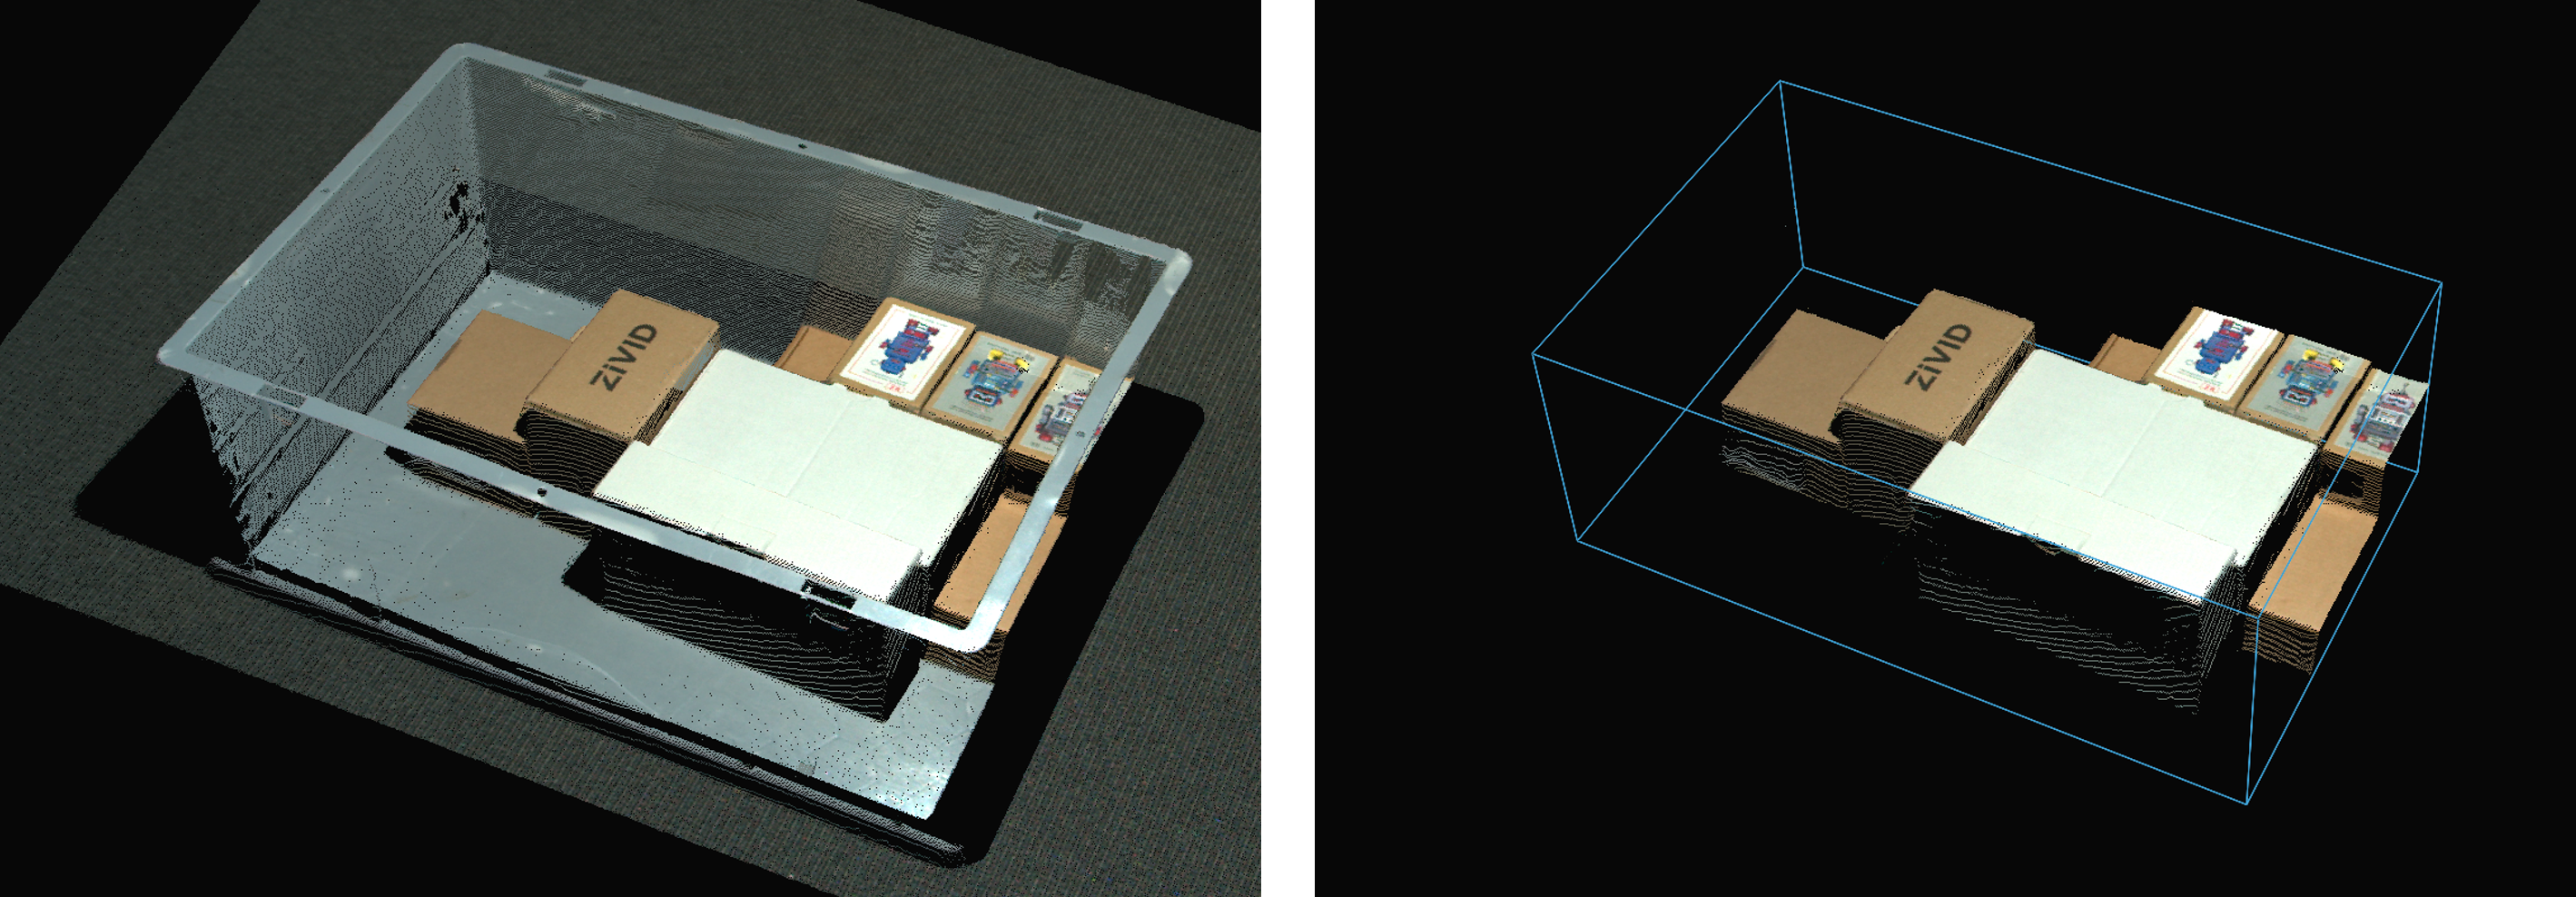
Region of Interest Tutorial
관심 영역(ROI)은 사용자가 정의한 관심 영역 밖의 지점을 제거하여 촬영 시간을 단축할 수 있습니다. ROI는 3D의 상자, 카메라의 z값 범위, 또는 둘 다일 수 있습니다.
ROI는 애플리케이션이 전체 장면이 아닌 시야의 일부만 요구하는 경우에 유용합니다. 예를 들어 빈에서 부품을 감지하려는 경우 감지 알고리즘은 전체 장면이 아닌 빈 내부 로만 검색 공간이 줄어들면 이점을 얻을 수 있습니다.

ROI as a Box
ROI box filtering benefits
ROI 상자 필터링은 다음과 같은 이점 중 하나를 제공합니다.
- 캡처 시간 단축(동일한 포인트 클라우드 품질)
전송, 복사 및 처리할 데이터가 줄어들어 다음 중 하나 또는 둘 다 사용하면 속도가 크게 향상됩니다.
Weak GPU (Intel/Jetson)
Heavy point cloud processing (Omni/Stripe, 5MP 해상도, 다중 획득 HDR)
- 더 나은 포인트 클라우드 품질(동일한 캡처 시간)
다양한 설정을 사용할 수 있습니다. 예:
Phase 대신 Stripe/Omni Engine 사용
Sampling::Pixel을 사용한 더 높은 해상도
HDR에서 더 많은 획득 추가
- Cheaper GPU (동일한 캡처 시간)
처리할 데이터가 적을수록 처리 속도가 느려질 수 있으며, 예를 들어 다음을 사용할 수 있습니다.
전용 Nvidia 대신 Intel/Jetson
- Cheaper Network Card (동일한 캡처 시간)
전송할 데이터가 적으면 네트워크가 포화되지 않아 다음과 같은 기능을 사용할 수 있습니다.
2.5G/10G 대신 1G
10G 대신 2.5G
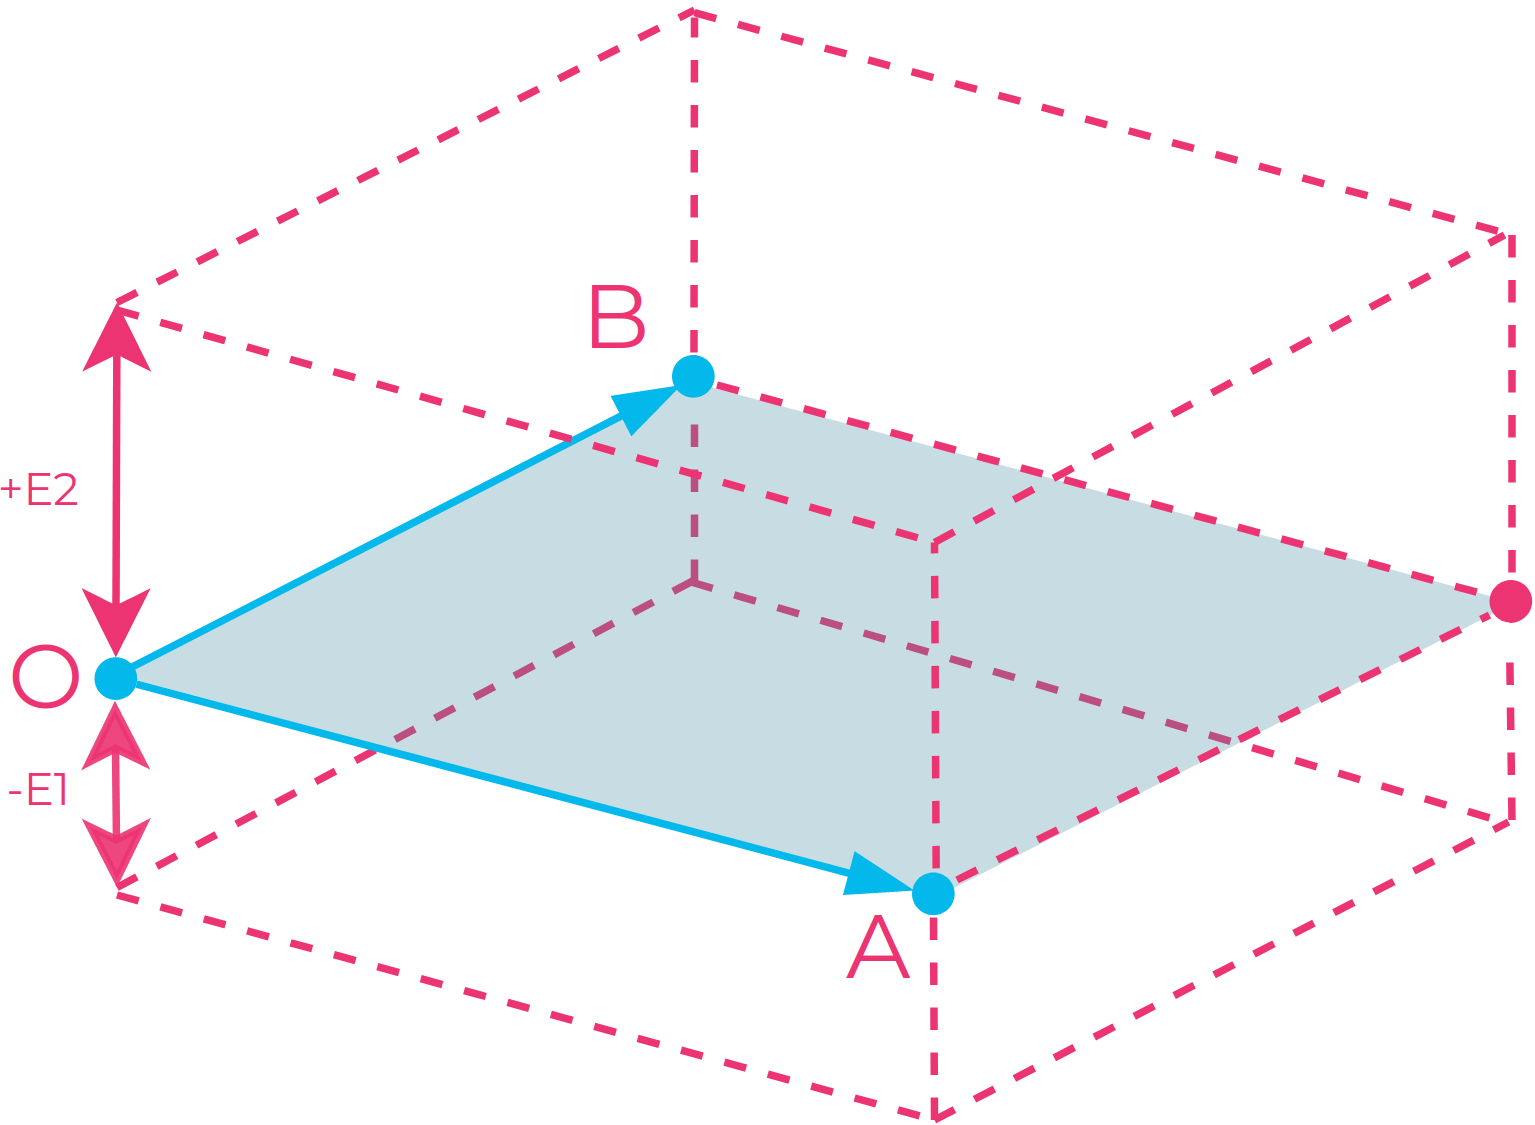
RegionOfInterest::Box 매개변수를 사용하면 ROI를 상자로 사용할 수 있습니다. 세 개의 점 은 상자의 기본 평면을 정의하고 두 개의 범위 는 높이를 정의합니다.
세 점(
Box::PointO,Box::PointA,Box::PointB) 은 3D 카메라 좌표계에 주어지며, 상자의 기준 평면을 정의합니다. 네 번째 점은 기준 평면을 좌표계에 연결하고 사각형을 완성하기 위해 자동으로 찾아집니다. 세 점은 순서대로 두 벡터를 구성합니다.포인트 O는 벡터의 원점입니다.
포인트 A는 원점에서 첫 번째 벡터를 구성합니다.
포인트 B는 원점에서 두 번째 벡터를 구성합니다.
두 개의 범위(
Box::Extents)는 기본 프레임을 상자 모양으로 돌출시킵니다. 점 O, 점 A, 점 B로 정의된 벡터 OA 와 OB 의 교차곱은 범위의 방향을 나타냅니다. 따라서 음수 범위는 교차곱의 반대 방향으로 돌출됩니다.

ROI 상자 그림: 상자의 바닥 평면을 정의하기 위해 세 개의 포인트(O, A 및 B)이 지정되고 네 번째 점이 자동으로 선택되어 사각형을 완성합니다. 그런 다음 네 개의 포인트으로 정의된 경계 평면을 위쪽(+E2)과 아래쪽(-E1)으로 돌출시켜 상자를 완성할 수 있습니다.
참고
상자의 기본 프레임은 수직 모서리가 있는 직사각형으로 제한되지 않습니다. 따라서 평행사변형을 밑변으로 만들고 평행육면체를 상자로 만드는 것이 가능합니다.
팁
몇가지 팁을 소개합니다. 세 점을 선택할 때 다음 단계를 따라해 보십시오.
임의의 모서리에서 포인트 O를 선택합니다.
포인트 B가 포인트 A에 대해 반시계 방향 위치에 있도록 포인트 A를 선택합니다.
포인트 A에 대해 반시계 방향 위치에서 포인트 B를 선택합니다.
이렇게 하면 익스텐트가 카메라를 향한 양의 방향을 갖게 됩니다.
Configure ROI box in Zivid Studio
Zivid Studio에서 ROI 상자를 만든 후에는 설정 YAML을 내보내어 애플리케이션으로 다시 로드할 수 있습니다.
const auto settingsFile = "Settings.yml";
std::cout << "Loading settings from file: " << settingsFile << std::endl;
const auto settingsFromFile = Zivid::Settings(settingsFile);
ROI box examples and Performance
Robot Picking example
다음은 ROI 박스 필터링이 유용한 저사양 PC(Intel Iris Xe 통합 노트북 GPU 및 1G 네트워크 카드)를 사용하여 대규모 포인트 클라우드를 처리하는 예입니다.
고정형 Zivid 2+ MR130 카메라를 장착한 로봇이 600 x 400 x 300mm 크기의 통에서 물건을 집어 올리는 모습을 상상해 보세요. 로봇과의 충분한 간격을 확보하기 위해 카메라는 통 상단에서 1700mm 거리에 설치되어 약 1000 x 800mm의 시야각(FOV)을 제공합니다. 이 거리에 카메라를 설치하면 시야각(FOV)의 상당 부분이 ROI(관심 영역) 밖에 위치하게 되어 각 면에서 픽셀 열/행의 약 20/25%를 잘라낼 수 있습니다. 아래 표에서 볼 수 있듯이 ROI 박스 필터링을 사용하면 캡처 시간을 크게 단축할 수 있습니다.

Zivid 2 - Presets |
Acquisition Time |
Capture Time |
||
|---|---|---|---|---|
No ROI |
ROI |
No ROI |
ROI |
|
Manufacturing Specular |
0.64 초 |
0.64 초 |
2.1 초 |
1.0 초 |
Consumer Goods Quality |
0.90 초 |
0.88 초 |
5.0 초 |
3.0 초 |
Robot Guidance / Assembly example
다음은 저사양 PC(Nvidia MX 250 노트북 GPU와 1G 네트워크 카드)를 사용하여 대규모 포인트 클라우드를 처리하는 예입니다. 여기서 ROI 상자 필터링이 매우 유용합니다.
로봇 유도(예: 드릴링, 용접, 접착) 또는 조립(예: 페그인홀)과 같은 일부 응용 분야에서는 ROI가 촬영 거리에서 카메라의 FOV에 비해 매우 작을 수 있습니다. 이러한 경우, ROI가 포인트 클라우드 포인트의 5~10%에 불과한 경우가 많으므로, ROI 박스 필터링(아래 표 참조)을 활용하면 캡처 시간을 크게 단축할 수 있습니다.

Zivid 2 - Presets |
Acquisition Time |
Capture Time |
||
|---|---|---|---|---|
No ROI |
ROI |
No ROI |
ROI |
|
Manufacturing Specular |
0.65 초 |
0.63 초 |
1.3 초 |
0.7 초 |
Manufacturing Small Features |
0.70 초 |
0.65 초 |
5.0 초 |
0.8 초 |
ROI as a Depth Range
매개변수 RegionOfInterest::Depth 사용하면 ROI를 카메라의 z 값 범위로 사용할 수 있으며, 이때 포인트는 다음 임계값 내에 유지됩니다.
최소 깊이 임계값(
RegionOfInterest::Depth::minValue)최대 깊이 임계값(
RegionOfInterest::Depth::maxValue)
이 기능은 장면의 전경이나 배경에 필터링하고 싶은 점이 있을 때 유용합니다. z 값은 카메라 기준 프레임에 주어지므로 카메라에 수직으로 필터링됩니다. 따라서 이 기능은 카메라가 촬영하려는 물체에 수직으로 장착되어 있을 때 가장 효과적입니다.

ROI API
ROI는 Camera Settings 의 일부이며 Zivid SDK 기본 설정 개체 아래에 설정됩니다. 따라서 캡처할 때 적용되며 나중에 포인트 클라우드 개체에는 적용되지 않습니다.
팁
ROI를 상자 형태로 사용하면 캡처 시간이 단축되지만, ROI를 깊이 범위 형태로 사용하면 그렇지 않습니다.
Zivid::Settings settings{
    Zivid::Settings::Color{ settings2D },

    Zivid::Settings::Engine::stripe,

    Zivid::Settings::RegionOfInterest::Box::Enabled::yes,
    Zivid::Settings::RegionOfInterest::Box::PointO{ 1000, 1000, 1000 },
    Zivid::Settings::RegionOfInterest::Box::PointA{ 1000, -1000, 1000 },
    Zivid::Settings::RegionOfInterest::Box::PointB{ -1000, 1000, 1000 },
    Zivid::Settings::RegionOfInterest::Box::Extents{ -1000, 1000 },

    Zivid::Settings::RegionOfInterest::Depth::Enabled::yes,
    Zivid::Settings::RegionOfInterest::Depth::Range{ 200, 2000 },

    Zivid::Settings::Processing::Filters::Cluster::Removal::Enabled::yes,
    Zivid::Settings::Processing::Filters::Cluster::Removal::MaxNeighborDistance{ 10 },
    Zivid::Settings::Processing::Filters::Cluster::Removal::MinArea{ 100 },

    Zivid::Settings::Processing::Filters::Hole::Repair::Enabled::yes,
    Zivid::Settings::Processing::Filters::Hole::Repair::HoleSize{ 0.2 },
    Zivid::Settings::Processing::Filters::Hole::Repair::Strictness{ 1 },

    Zivid::Settings::Processing::Filters::Noise::Removal::Enabled::yes,
    Zivid::Settings::Processing::Filters::Noise::Removal::Threshold{ 7.0 },

    Zivid::Settings::Processing::Filters::Noise::Suppression::Enabled::yes,
    Zivid::Settings::Processing::Filters::Noise::Repair::Enabled::yes,

    Zivid::Settings::Processing::Filters::Outlier::Removal::Enabled::yes,
    Zivid::Settings::Processing::Filters::Outlier::Removal::Threshold{ 5.0 },

    Zivid::Settings::Processing::Filters::Reflection::Removal::Enabled::yes,
    Zivid::Settings::Processing::Filters::Reflection::Removal::Mode::global,

    Zivid::Settings::Processing::Filters::Smoothing::Gaussian::Enabled::yes,
    Zivid::Settings::Processing::Filters::Smoothing::Gaussian::Sigma{ 1.5 },

    Zivid::Settings::Processing::Filters::Experimental::ContrastDistortion::Correction::Enabled::yes,
    Zivid::Settings::Processing::Filters::Experimental::ContrastDistortion::Correction::Strength{ 0.4 },

    Zivid::Settings::Processing::Filters::Experimental::ContrastDistortion::Removal::Enabled::no,
    Zivid::Settings::Processing::Filters::Experimental::ContrastDistortion::Removal::Threshold{ 0.5 },

    Zivid::Settings::Processing::Resampling::Mode::upsample2x2,

    Zivid::Settings::Diagnostics::Enabled::no,
};

setSamplingPixel(settings, camera);
std::cout << settings << std::endl;
var settings = new Zivid.NET.Settings()
{
    Engine = Zivid.NET.Settings.EngineOption.Stripe,

    RegionOfInterest =
    {
        Box = {
            Enabled = true,
            PointO = new Zivid.NET.PointXYZ{ x = 1000, y = 1000, z = 1000 },
            PointA = new Zivid.NET.PointXYZ{ x = 1000, y = -1000, z = 1000 },
            PointB = new Zivid.NET.PointXYZ{ x = -1000, y = 1000, z = 1000 },
            Extents = new Zivid.NET.Range<double>(-1000, 1000),
        },
        Depth =
        {
            Enabled = true,
            Range = new Zivid.NET.Range<double>(200, 2000),
        },
    },
    Processing =
    {
        Filters =
        {
            Cluster =
            {
                Removal = { Enabled = true, MaxNeighborDistance = 10, MinArea = 100}
            },
            Hole =
            {
                Repair = { Enabled = true, HoleSize = 0.2, Strictness = 1 },
            },
            Noise =
            {
                Removal = { Enabled = true, Threshold = 7.0 },
                Suppression = { Enabled = true },
                Repair = { Enabled = true },
            },
            Outlier =
            {
                Removal = { Enabled = true, Threshold = 5.0 },
            },
            Reflection =
            {
                Removal = { Enabled = true, Mode = ReflectionFilterModeOption.Global },
            },
            Smoothing =
            {
                Gaussian = { Enabled = true, Sigma = 1.5 },
            },
            Experimental =
            {
                ContrastDistortion =
                {
                    Correction = { Enabled = true, Strength = 0.4 },
                    Removal = { Enabled = true, Threshold = 0.5 },
                },
            },
        },
        Resampling = { Mode = Zivid.NET.Settings.ProcessingGroup.ResamplingGroup.ModeOption.Upsample2x2 },
    },
    Diagnostics = { Enabled = false },
};

settings.Color = settings2D;

SetSamplingPixel(ref settings, camera);
Console.WriteLine(settings);
settings = zivid.Settings()
settings.engine = zivid.Settings.Engine.stripe

settings.region_of_interest.box.enabled = True
settings.region_of_interest.box.point_o = [1000, 1000, 1000]
settings.region_of_interest.box.point_a = [1000, -1000, 1000]
settings.region_of_interest.box.point_b = [-1000, 1000, 1000]
settings.region_of_interest.box.extents = [-1000, 1000]

settings.region_of_interest.depth.enabled = True
settings.region_of_interest.depth.range = [200, 2000]

settings.processing.filters.cluster.removal.enabled = True
settings.processing.filters.cluster.removal.max_neighbor_distance = 10
settings.processing.filters.cluster.removal.min_area = 100

settings.processing.filters.hole.repair.enabled = True
settings.processing.filters.hole.repair.hole_size = 0.2
settings.processing.filters.hole.repair.strictness = 1

settings.processing.filters.noise.removal.enabled = True
settings.processing.filters.noise.removal.threshold = 7.0

settings.processing.filters.noise.suppression.enabled = True
settings.processing.filters.noise.repair.enabled = True

settings.processing.filters.outlier.removal.enabled = True
settings.processing.filters.outlier.removal.threshold = 5.0

settings.processing.filters.reflection.removal.enabled = True
settings.processing.filters.reflection.removal.mode = (
    zivid.Settings.Processing.Filters.Reflection.Removal.Mode.global_
)

settings.processing.filters.smoothing.gaussian.enabled = True
settings.processing.filters.smoothing.gaussian.sigma = 1.5

settings.processing.filters.experimental.contrast_distortion.correction.enabled = True
settings.processing.filters.experimental.contrast_distortion.correction.strength = 0.4

settings.processing.filters.experimental.contrast_distortion.removal.enabled = False
settings.processing.filters.experimental.contrast_distortion.removal.threshold = 0.5

settings.processing.resampling.mode = zivid.Settings.Processing.Resampling.Mode.upsample2x2

settings.diagnostics.enabled = False

settings.color = settings_2d

_set_sampling_pixel(settings, camera)
print(settings)
Tutorials
ROI API를 사용하는 방법에 대한 예제는 아래 튜토리얼을 확인하십시오.
성능 정보는 Region of Interest 에서 확인하세요.
Version History
SDK |
Changes |
|---|---|
2.14.0 |
Zivid Studio의 ROI 상자 조작 기능이 추가되었습니다. |
2.12.0 |
ROI 상자 필터링은 캡처 시간을 줄여줍니다. |
2.9.0 |
ROI API가 추가 되었습니다. |