2D + 3D Capture Strategy
애플리케이션에 2D 및 3D 데이터가 모두 필요한 경우 이 튜토리얼이 도움이 됩니다.
다양한 2D-3D 캡처 접근 방식의 장단점을 설명 및 강조하고, 몇 가지 제한 사항을 명확히 하고, 사이클 시간에 미치는 영향을 설명합니다. 2D용 외부 조명과 내부 프로젝터 사용의 차이점에 대해 다룹니다.
- 2D data
RGB image
- 3D data
2D 데이터를 얻는 방법에는 크게 두 가지가 있습니다.
camera.capture2D(Zivid::Settings2D or Zivid::Settings ).imageRGBA_SRGB()와 2D Image Capture Process 를 참조하세요.2D3D 캡처의 일부로
frame = camera.capture2D3D(Zivid::Settings):frame.pointCloud().copyImageRGBA_SRGB(). 이렇게 하면 2D 데이터와 3D 데이터 간의 일대일 매핑이 보장됩니다.frame.frame2D().imageRGBA_SRGB(). 이는 2D를 독립적으로 캡처하는 것과 같습니다.
그러나 어느 것을 사용할지는 요구 사항에 따라 다릅니다.
다른 시나리오는 다른 장단점으로 이어질 것입니다. 먼저 필요한 데이터를 기준으로 분류합니다. 그런 다음 다양한 시나리오에 대한 속도와 품질의 장단점에 대해 논의합니다.
About external light
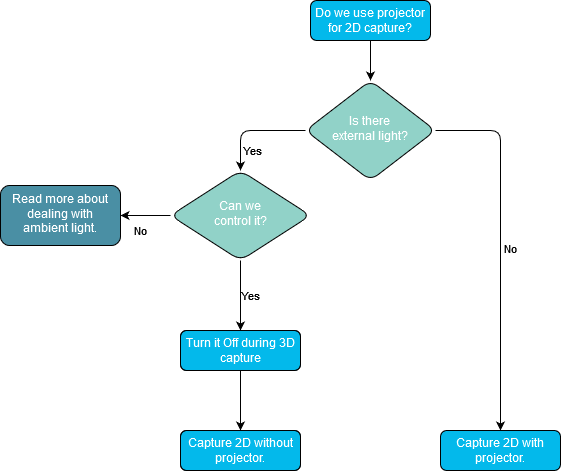
다양한 전략을 살펴보기 전에 외부 광원에 대해 먼저 설명해야 합니다. 2D 캡처에 이상적인 광원은 blooming effects 를 제한하기 때문에 강하고 확산되는 광원입니다. 내부 프로젝터를 광원으로 사용하면 블루밍 효과는 거의 피할 수 없습니다. Mounting the camera at an angle 하면 이 효과가 크게 줄어들지만 여전히 외부 확산 광원이 더 좋습니다. 외부 조명은 3D 데이터에 노이즈를 유발하므로 3D 캡처 중에는 외부 조명을 끄는 것이 이상적입니다.
블루밍 효과의 감소 외에도 강한 외부 조명은 주변 조명의 변화로 인한 노출 변화를 완화할 수 있습니다. 주변광 변화의 일반적인 예시:
일광의 변화(낮/밤, 구름 등)
도어 개폐
천장 조명의 켜짐 및 꺼짐
참고
Zivid 3와 Zivid 2+R 은 주변광 변화에 매우 강합니다.
Zivid 2+ M60/M130/L110 및 Zivid 2에 대한 고려 사항
노출의 이러한 변화는 3D 및 2D 데이터에 다르게 영향을 미칩니다. 2D 데이터에서 노출 변화의 영향은 사용된 감지 알고리즘에 따라 다릅니다. 분할이 2D에서 수행되는 경우 이러한 변형은 분할 성능에 영향을 미칠 수도 있고 그렇지 않을 수도 있습니다. 포인트 클라우드의 경우 노이즈 변동으로 인해 포인트 클라우드 완성도에 변동이 있을 수 있습니다.
이것은 다음과 같은 질문으로 이어집니다. 2D에 프로젝터를 사용해야 합니까?

이 주제에 대한 자세한 내용은 Optimizing Color Image 를 확인하세요.
2D data before 3D data
예를 들어 2D에서 분할을 수행한 다음 나중에 피킹 포즈를 결정하는 경우 3D보다 빠른 2D가 필요합니다. 2D 데이터를 얻는 가장 빠른 방법은 별도의 2D 캡처를 이용하는 것입니다. 따라서 3D 데이터보다 먼저 2D 데이터가 필요한 경우에는 별도의 2D 캡처를 수행해야 합니다.
경고
2D와 3D 촬영을 전환할 때 카메라 재구성이 필요할 수 있습니다. 이로 인해 2D+3D 촬영 시 촬영 시간이 늘어날 수 있으며, 촬영이 연달아 진행됩니다. 특히 다음과 같은 경우:
가능하다면 2D 촬영 시 조리개를 3D 촬영 시 조리개와 동일하게 유지하십시오. 조리개가 고정된 Zivid 3에는 이 방법이 적용되지 않습니다.
2D와 3D에서 동일한 샘플링 설정을 사용하는 것을 고려해보세요. Sampling (2D) 및 Sampling (3D) 을 참조하세요.
샘플링 설정을 전환하면 35ms의 페널티가 발생합니다.
3D에서 낮은 해상도를 사용함으로써 얻는 이점은 종종 단점보다 크며, 특히 까다로운 장면의 경우 더욱 그렇습니다.
다음 코드 샘플은 아래의 내용을 수행하는 방법을 보여줍니다.
Capture 2D
2D 데이터를 사용하고 3D를 동시에 캡처
const auto frame2dAndCaptureTime = captureAndMeasure2D(camera, settings2D);
std::future<Duration> userThread =
    std::async(std::launch::async, useFrame<Zivid::Frame2D>, std::ref(frame2dAndCaptureTime.frame));
const auto frameAndCaptureTime = captureAndMeasure3D(camera, settings2D3D);
const auto processTime = useFrame(frameAndCaptureTime.frame);
const auto processTime2D = userThread.get();
다음은 실제 벤치마크 수치를 보여줍니다. 페이지 하단에서 더 자세한 표를 확인하실 수 있습니다.
2D data as part of how I use 3D data
이 경우 3D 데이터보다 2D 데이터에 먼저 접근할 필요가 없습니다. 따라서 전반적인 속도와 품질에만 신경 쓰면 됩니다.
Speed
최적의 속도를 위해서는 페널티 전환을 피해야 합니다.
Zivid 3에는 조절 가능한 조리개가 없지만 다른 카메라의 경우 2D 촬영 시 조리개를 3D 촬영 시 조리개와 동일하게 유지합니다.
2D와 3D에서 동일한 샘플링 설정을 사용하려면 Sampling (2D) 및 Sampling (3D) 를 참조하세요.
샘플링 설정을 전환하면 35ms의 페널티가 발생합니다.
3D에서 낮은 해상도를 사용함으로써 얻는 이점은 종종 단점보다 크며, 특히 까다로운 장면의 경우 더욱 그렇습니다.
2D Quality
최적의 2D 품질을 얻으려면 요구 사항에 맞게 2D 설정을 조정하세요. 이 주제에 대한 자세한 내용은 Optimizing Color Image 를 참조하세요.
다음은 실제 벤치마크 수치를 보여줍니다. 페이지 하단에서 더 자세한 표를 확인하실 수 있습니다.
2D data after I have used the 3D data
아래 표는 3D+2D 캡처 시간 예를 보여줍니다.
카메라 해상도 및 1:1 매핑
정확한 2D 분할 및 감지를 위해서는 고해상도 컬러 이미지가 유용합니다. Zivid 3는 8MPx, Zivid 2+는 5MPx, Zivid 2는 2.3MPx 센서를 탑재하고 있습니다. 다음 표는 2D 및 3D 캡처에 대한 각 카메라의 해상도 출력을 보여줍니다.
2D capture |
Zivid 3 |
Zivid 2+ |
Zivid 2 |
|---|---|---|---|
Full resolution |
2816 x 2816 |
2448 x 2048 |
1944 x 1200 |
2x2 subsampled |
1408 x 1408 |
1224 x 1024 |
972 x 600 |
4x4 subsampled |
704 x 704 |
612 x 512 |
Not available |
3D capture |
Zivid 3 |
Zivid 2+ |
Zivid 2 |
|---|---|---|---|
Full resolution |
2816 x 2816 |
2448 x 2048 |
1944 x 1200 |
2x2 subsampled |
1408 x 1420 |
1224 x 1024 |
972 x 600 |
4x4 subsampled |
704 x 704 |
612 x 512 |
Not available |
capture2D3D() 캡처를 수행하면 2D와 3D 데이터가 모두 포함된 프레임이 생성됩니다.
2D 데이터는 두 가지 방법으로 추출할 수 있습니다.
frame.frame2D().imageRGBA_SRGB()이는 2D를 독립적으로 캡처한 것과 같습니다.
frame.pointCloud().copyImageRGBA_SRGB()이렇게 하면 2D와 3D의 해상도가 달라야 하는 설정에서도 1:1 매핑이 보장됩니다.
2D 캡처의 출력 해상도는 Settings2D::Sampling::Pixel 설정을 통해 제어되고, 3D 캡처의 출력 해상도는 Settings::Sampling::Pixel 과 Settings::Processing::Resampling 설정을 조합하여 제어합니다. Pixel Sampling (2D), Pixel Sampling (3D) 및 Resampling 을 참조하세요.
앞서 언급했듯이, 분할 및 감지에는 고해상도 2D 데이터가 필요한 것이 일반적입니다. 예를 들어, Consumer Goods Z2+ MR130 Quality 프리셋을 권장하고, 이 프리셋은 Sampling::Pixel by2x2 로 설정합니다. 이 경우 다음 중 하나를 수행해야 합니다.
3D 데이터를 업샘플링하여 1대1 대응을 복원하거나
2D 인덱스를 하위 샘플링된 3D 데이터의 인덱스에 매핑하거나
frame.pointCloud().copyImageRGBA_SRGB()통해 포인트 클라우드에서 2D 데이터를 가져옵니다.
Resampling
2D 캡처의 해상도를 맞추려면 서브샘플링을 취소하는 업샘플링을 적용하기만 하면 됩니다. 이렇게 하면 서브샘플링된 캡처의 속도 이점이 유지됩니다. 예를 들어 다음과 같습니다.
auto settings2D = Zivid::Settings2D{
    Zivid::Settings2D::Acquisitions{ Zivid::Settings2D::Acquisition{} },
    Zivid::Settings2D::Sampling::Pixel::all,
};
auto settings = Zivid::Settings{
    Zivid::Settings::Engine::stripe,
    Zivid::Settings::Acquisitions{ Zivid::Settings::Acquisition{} },
    Zivid::Settings::Sampling::Pixel::blueSubsample2x2,
    Zivid::Settings::Sampling::Color::disabled,
    Zivid::Settings::Processing::Resampling::Mode::upsample2x2,
};
settings_2d = zivid.Settings2D()
settings_2d.acquisitions.append(zivid.Settings2D.Acquisition())
settings_2d.sampling.pixel = zivid.Settings2D.Sampling.Pixel.all
settings = zivid.Settings()
settings.engine = "stripe"
settings.acquisitions.append(zivid.Settings.Acquisition())
settings.sampling.pixel = zivid.Settings.Sampling.Pixel.blueSubsample2x2
settings.sampling.color = zivid.Settings.Sampling.Color.disabled
settings.processing.resampling.mode = zivid.Settings.Processing.Resampling.Mode.upsample2x2
자세한 내용은 Resampling 을 참조하세요.
Mapping pixel indices between different resolutions
다른 옵션은 2D 인덱스를 서브샘플링된 3D 데이터의 인덱스에 매핑하는 것입니다. 이 옵션은 조금 더 복잡하지만, 잠재적으로 더 효율적입니다. 포인트 클라우드는 서브샘플링된 상태로 유지될 수 있으므로 메모리와 처리 능력을 덜 소모합니다.
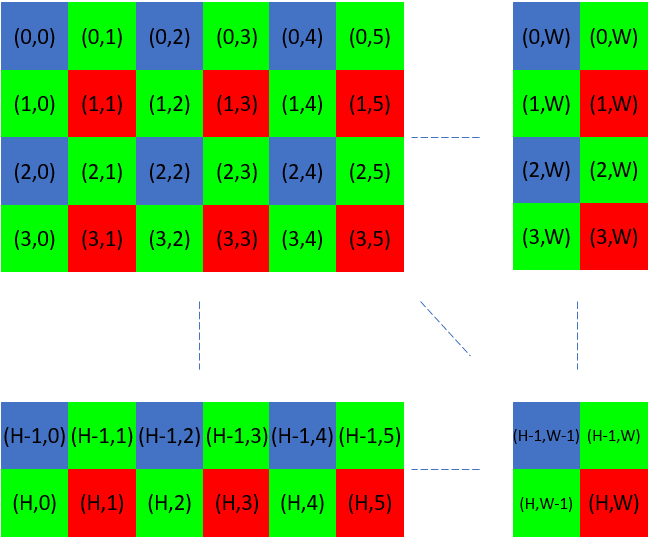
전체 해상도 2D 데이터와 하위 샘플링된 포인트 클라우드 간의 상관관계를 확립하려면 특정 매핑 기법이 필요합니다. 이 과정은 베이어 그리드의 파란색 또는 빨간색 픽셀에 해당하는 픽셀에서 RGB 값을 추출하는 과정을 포함합니다.
Zivid::Experimental::Calibration::pixelMapping(camera, settings); 를 사용하면 이 매핑을 수행하는 데 필요한 매개변수를 얻을 수 있습니다. 다음은 이 함수를 사용하는 예입니다.
const auto pixelMapping = Zivid::Experimental::Calibration::pixelMapping(camera, settings);
std::cout << "Pixel mapping: " << pixelMapping << std::endl;
cv::Mat mappedBGR(
    fullResolutionBGR.rows / pixelMapping.rowStride(),
    fullResolutionBGR.cols / pixelMapping.colStride(),
    CV_8UC3);
std::cout << "Mapped width: " << mappedBGR.cols << ", height: " << mappedBGR.rows << std::endl;
for(size_t row = 0; row < static_cast<size_t>(fullResolutionBGR.rows - pixelMapping.rowOffset());
    row += pixelMapping.rowStride())
{
    for(size_t col = 0; col < static_cast<size_t>(fullResolutionBGR.cols - pixelMapping.colOffset());
        col += pixelMapping.colStride())
    {
        mappedBGR.at<cv::Vec3b>(row / pixelMapping.rowStride(), col / pixelMapping.colStride()) =
            fullResolutionBGR.at<cv::Vec3b>(row + pixelMapping.rowOffset(), col + pixelMapping.colOffset());
    }
}
return mappedBGR;
pixel_mapping = calibration.pixel_mapping(camera, settings)
return rgba[
    int(pixel_mapping.row_offset) :: pixel_mapping.row_stride,
    int(pixel_mapping.col_offset) :: pixel_mapping.col_stride,
    0:3,
]
For more details about mapping (example for blueSubsample2x2)

파란색 픽셀에 해당하는 모든 RGB 값을 추출하기 위해 인덱스를 사용합니다.
빨간색 픽셀에 해당하는 모든 RGB 값을 추출하기 위해 다음과 같은 인덱스를 사용합니다.
참고
Intrinsics 함수를 사용하고 2D 및 3D 캡처의 해상도가 서로 다른 경우, 해당 함수를 올바르게 사용해야 합니다. 자세한 내용은 Camera Intrinsics 참조하세요.
Summary
- Our recommendation:
전체 해상도로 2D 캡처
Subsampled된 해상도를 사용한 3D 캡처
참고
사용자 코드에서 서브샘플링이나 다운샘플링은 서로 다른 해상도로 2D와 3D를 캡처하고 복사할 때 1:1 픽셀 대응을 원하는 경우에만 필요합니다.
다음은 다양한 하드웨어에 대한 실제 측정값을 보여주는 표입니다.
- Zivid 3
- Zivid 2+
- Zivid 2
팁
PC에서 다양한 2D-3D 전략을 테스트하려면 YML 파일에서 로드된 설정으로 ZividBenchmark.cpp 샘플을 실행할 수 있습니다. Samples 로 이동하고 튜토리얼을 보려면 C++를 선택합니다.
Version History
SDK |
Changes |
|---|---|
2.17.0 |
Zivid 3 XL250에 대한 지원이 추가되었습니다. |
2.14.0 |
이전 Zivid 2+ 모델보다 빠르고 피스 피킹에 더 적합한 Zivid 2+ MR130, LR110 및 MR60에 대한 지원이 추가되었습니다. |
2.12.0 |
Zivid 2+의 경우 2D 캡처의 경우 최대 50%, 3D 캡처의 경우 최대 5%까지 획득 시간이 단축됩니다. Zivid One+는 지원 종료되어 더 이상 지원되지 않습니다. 따라서 2D+3D 캡처와 관련된 대부분의 복잡성은 더 이상 적용되지 않습니다. |
2.11.0 |
Zivid 2와 Zivid 2+는 이제 3D ➞ 2D 및 3D ➞ 2D에 대한 동시 처리 및 수집을 지원하며, 캡처 모드 간 전환이 최적화되었습니다. |