2D Image Projection
Introduction
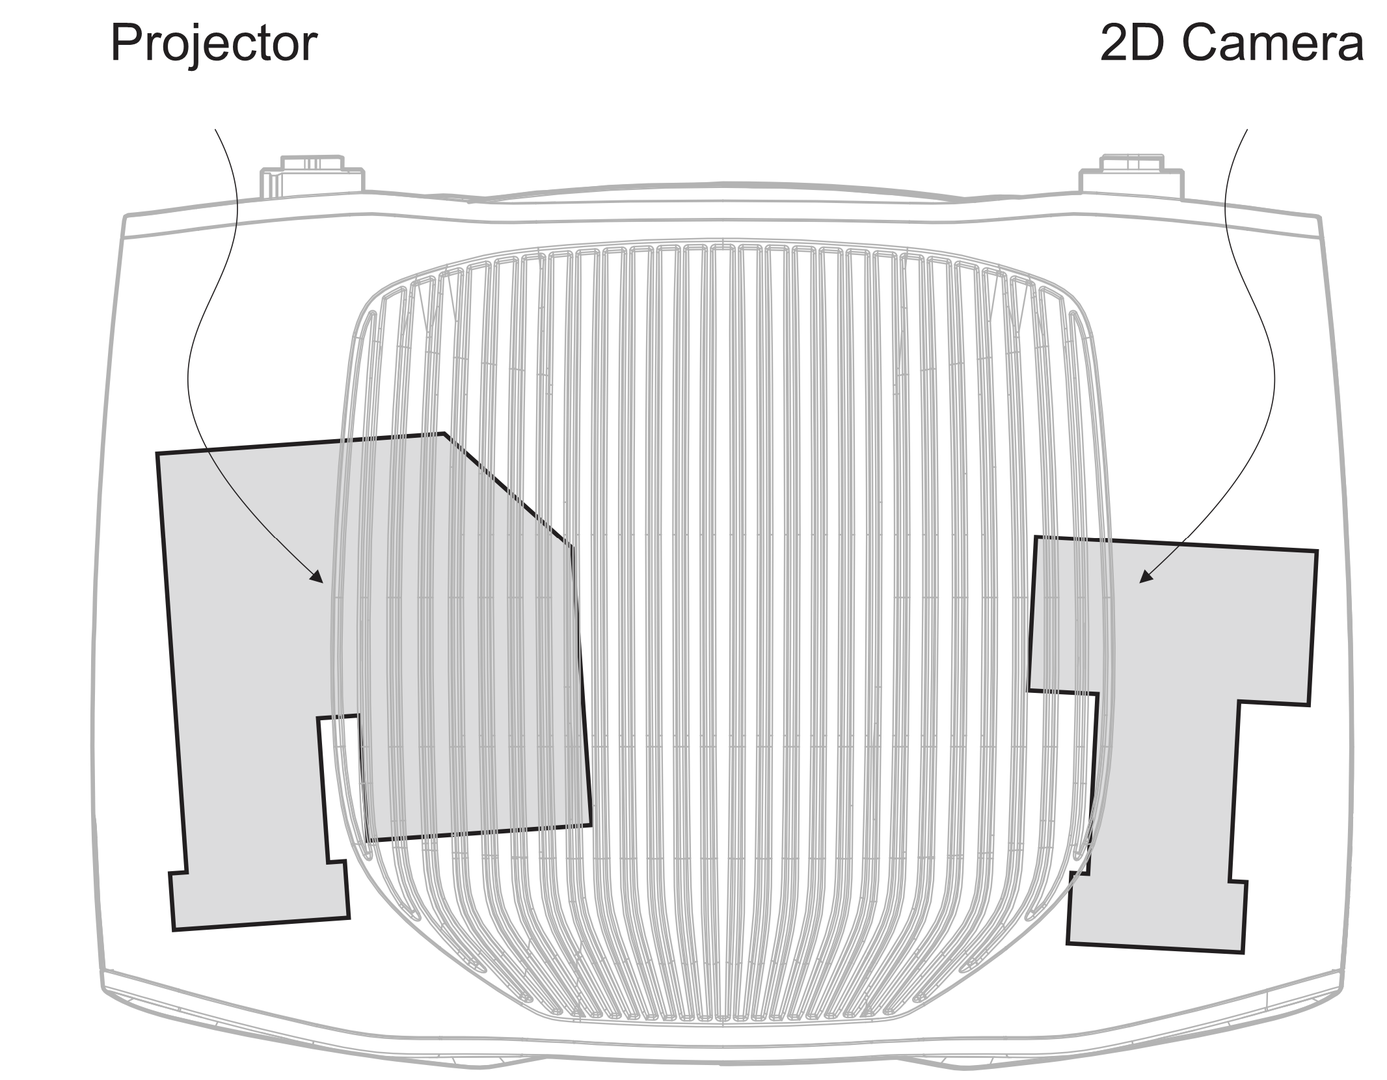
Zivid 3D 카메라의 주요 구성 요소는 2D 컬러 카메라와 프로젝터입니다. 2D 이미지 픽셀은 카메라 센서 픽셀(광자를 수집하는 센서 부분)에 해당합니다. 마찬가지로, 2D 프로젝터 이미지 픽셀은 프로젝터 픽셀(광자를 방출하는 프로젝터 부분)에 해당합니다. 이 튜토리얼에서는 프로젝터를 사용하여 장면에 컬러 이미지를 투사하는 방법을 보여줍니다.

Create a Projector image
프로젝터 이미지를 생성하려면 프로젝터 이미지 해상도가 필요합니다. 카메라에 연결하고 프로젝터 해상도를 가져오면 쉽게 수행할 수 있습니다.
std::cout << "Connecting to camera" << std::endl;
auto camera = zivid.connectCamera();

std::cout << "Retrieving the projector resolution that the camera supports" << std::endl;
const auto projectorResolution = Zivid::Projection::projectorResolution(camera);
2D Projector imag
다음 단계는 Zivid::Image<Zivid::ColorBGRA> 를 만드는 것입니다. 아래에서는 Zivid 이미지를 처음부터 만드는 방법과 OpenCV 이미지를 Zivid 이미지로 변환하는 방법을 보여줍니다.
파일(예:PNG)에서 이미지를 로드하거나 처음부터 만들어서 Zivid 이미지를 만들 수 있습니다.
이는 Zivid 이미지를 불러오는 방법의 예입니다. 단, 이미지 해상도가 Zivid 카메라 프로젝터 해상도와 일치해야 한다는 제약이 있습니다.
Camera |
Resolution |
|---|---|
Zivid 3 |
1000 x 720 |
Zivid 2+ |
1280 x 720 |
Zivid 2 |
1000 x 720 |
std::string projectorImageFileForGivenCamera = getProjectorImageFileForGivenCamera(camera);

std::cout << "Reading 2D image (of resolution matching the Zivid camera projector resolution) from file: "
          << projectorImageFileForGivenCamera << std::endl;
const auto projectorImageForGivenCamera = Zivid::Image<Zivid::ColorBGRA>(projectorImageFileForGivenCamera);
string projectorImageFileForGivenCamera = GetProjectorImageFileForCamera(camera);

Console.WriteLine("Reading 2D image (of resolution matching the Zivid camera projector resolution) from file: " + projectorImageFileForGivenCamera);
var projectorImageForGivenCamera = new Zivid.NET.ImageBGRA(projectorImageFileForGivenCamera);
projector_image_file_for_given_camera = get_projector_image_file_for_camera(camera)

print(
    f"Reading 2D image (of resolution matching the Zivid camera projector resolution) from file: {projector_image_file_for_given_camera}"
)
projector_image_for_given_camera = zivid.Image.load(projector_image_file_for_given_camera, "bgra_srgb")
이는 모든 픽셀이 빨간색인 Zivid 이미지를 만드는 방법의 예입니다.
    const auto redColor = Zivid::ColorBGRA(0, 0, 255, 255);
    auto projectorImage = createProjectorImage(projectorResolution, redColor);

Zivid::Image<Zivid::ColorBGRA> createProjectorImage(
    const Zivid::Resolution &projectorResolution,
    const Zivid::ColorBGRA &ZividColor)
{
    const std::vector<Zivid::ColorBGRA> imageData(projectorResolution.size(), ZividColor);
    Zivid::Image<Zivid::ColorBGRA> projectorImage{ projectorResolution, imageData.begin(), imageData.end() };

    return projectorImage;
}
            var redColor = new Zivid.NET.ColorBGRA { b = 0, g = 0, r = 255, a = 255 };
            var projectorImage = CreateProjectorImage(projectorResolution, redColor);

static Zivid.NET.ImageBGRA CreateProjectorImage(Zivid.NET.Resolution resolution, Zivid.NET.ColorBGRA color)
{
    var pixelArray = new Zivid.NET.ColorBGRA[resolution.Height, resolution.Width];
    for (ulong y = 0; y < resolution.Height; y++)
    {
        for (ulong x = 0; x < resolution.Width; x++)
        {
            pixelArray[y, x] = color;
        }
    }
    var projectorImage = new Zivid.NET.ImageBGRA(pixelArray);
    return projectorImage;
}
    red_color = (0, 0, 255, 255)
    projector_image = create_projector_image(projector_resolution, red_color)

def create_projector_image(resolution: Tuple, color: Tuple) -> np.ndarray:
    """Create projector image (numpy array) of given color.

    Args:
        resolution: projector resolution
        color: bgra

    Returns:
        An image (numpy array) of color given by the bgra value

    """
    projector_image = np.full((resolution[0], resolution[1], len(color)), color, dtype=np.uint8)
    return projector_image
파일(예: PNG)에서 이미지를 로드하거나 처음부터 만들어서 OpenCV 이미지를 만들 수 있습니다.
이 예제에서는 OpenCV를 사용하여 이미지를 불러온 후 Zivid 이미지로 변환합니다. OpenCV를 사용하면 임의 해상도의 이미지 크기를 Zivid 카메라 프로젝터 해상도에 맞게 쉽게 조정할 수 있다는 장점이 있습니다.
    std::string imageFile = std::string(ZIVID_SAMPLE_DATA_DIR) + "/ZividLogo.png";
    std::cout << "Reading 2D image (of arbitrary resolution) from file: " << imageFile << std::endl;
    const auto inputImage = cv::imread(imageFile, cv::IMREAD_UNCHANGED);

Zivid::Image<Zivid::ColorBGRA> resizeAndCreateProjectorImage(
    const cv::Mat &inputImage,
    const Zivid::Resolution &projectorResolution)
{
    cv::Mat projectorImageResized;
    cv::Mat projectorImageBGRA;
    cv::resize(
        inputImage,
        projectorImageResized,
        cv::Size(projectorResolution.width(), projectorResolution.height()),
        cv::INTER_LINEAR);
    cv::cvtColor(projectorImageResized, projectorImageBGRA, cv::COLOR_BGR2BGRA);

    std::cout << "Creating a Zivid::Image from the OpenCV image" << std::endl;
    Zivid::Image<Zivid::ColorBGRA> projectorImage{ projectorResolution,
                                                   projectorImageBGRA.datastart,
                                                   projectorImageBGRA.dataend };

    return projectorImage;
}
    image_file = get_sample_data_path() / "ZividLogo.png"
    print("Reading 2D image (of arbitrary resolution) from file: ")
    input_image = cv2.imread(str(image_file))
    if input_image is None:
        raise RuntimeError(f"File {image_file} not found or couldn't be read.")

def _resize_and_create_projector_image(image_to_resize: np.ndarray, final_resolution: Tuple) -> np.ndarray:
    """Resizes an image to a given resolution.

    Args:
        image_to_resize: openCV image that needs to be resized
        final_resolution: resolution after resizing

    Returns:
        An image with a resolution that matches the projector resolution

    """
    resized_image = cv2.resize(
        image_to_resize, (final_resolution[1], final_resolution[0]), interpolation=cv2.INTER_LINEAR
    )
    projector_image = cv2.cvtColor(resized_image, cv2.COLOR_BGR2BGRA)

    return projector_image
이 예에서는 빈 OpenCV 이미지를 만든 다음 Zivid 이미지로 변환합니다.
std::cout << "Creating a blank projector image with resolution: " << projectorResolution.toString()
          << std::endl;
const cv::Scalar backgroundColor{ 0, 0, 0, 255 };
auto projectorImageOpenCV = cv::Mat{ static_cast<int>(projectorResolution.height()),
                                     static_cast<int>(projectorResolution.width()),
                                     CV_8UC4,
                                     backgroundColor };

std::cout << "Creating a Zivid::Image from the OpenCV image" << std::endl;
const Zivid::Image<Zivid::ColorBGRA> projectorImage{ projectorResolution,
                                                     projectorImageOpenCV.datastart,
                                                     projectorImageOpenCV.dataend };
이제 프로젝터 이미지를 투사할 수 있습니다. 이 이미지는 3D 데이터를 고려하지 않고 생성되었습니다.
2D Projector image from 3D
3D 데이터에서 프로젝터 이미지를 생성하는 것은 3D 객체를 장면에 투영하려는 경우 유용합니다. 또는 포인트 클라우드에서 감지할 수 있는 장면의 특정 지점, 표면 또는 기타 3D 피처에 무언가를 투영할 수도 있습니다. 이를 위해서는 3D 지점과 프로젝터 픽셀 간의 상관 관계가 필요합니다. 3D 데이터에서 2D 프로젝터 이미지를 생성하는 것이 적절하지 않다면 Start Projection 으로 바로 이동하세요.
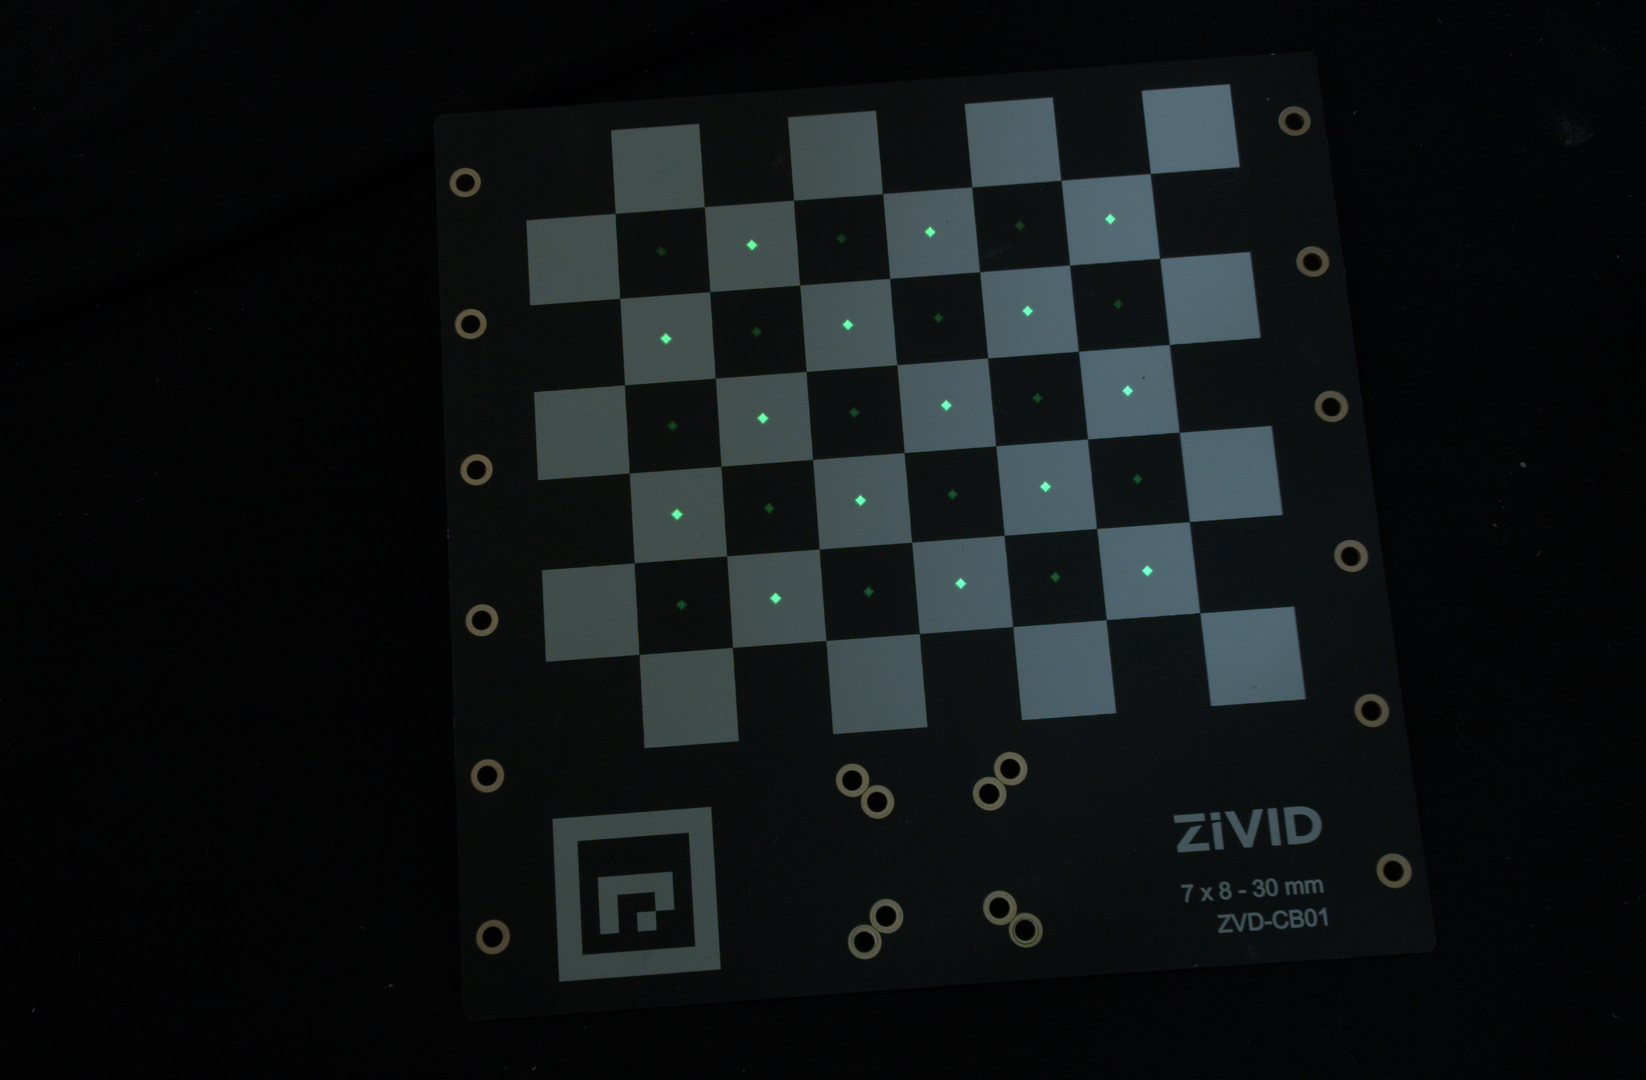
이 예시에서는 Zivid 교정 보드의 체커보드 중앙에 작은 녹색 원을 투사합니다. 아래 이미지는 예상되는 최종 결과를 보여줍니다.

Zivid SDK를 통해 체커보드의 특징점(체커 중심)을 감지할 수 있습니다.
Zivid::Projection::pixelsFrom3DPoints() 함수는 Zivid 카메라의 내부 보정을 사용하여 카메라 참조의 3D 점을 프로젝터 픽셀로 변환합니다. 이러한 3D 점은 다음과 같이 프로젝터 픽셀로 변환됩니다.
다음 단계는 프로젝터 이미지를 만들고, 얻은 프로젝터 픽셀의 좌표에 녹색 원을 그리는 것입니다.
std::cout << "Creating a blank projector image with resolution: " << projectorResolution.toString()
<< std::endl;
const cv::Scalar backgroundColor{ 0, 0, 0, 255 };
auto projectorImageOpenCV = cv::Mat{ static_cast<int>(projectorResolution.height()),
static_cast<int>(projectorResolution.width()),
CV_8UC4,
backgroundColor };
std::cout << "Drawing circles on the projector image for each grid point" << std::endl;
const cv::Scalar circleColor{ 0, 255, 0, 255 };
drawFilledCircles(projectorImageOpenCV, projectorPixels, 2, circleColor);
std::cout << "Creating a Zivid::Image from the OpenCV image" << std::endl;
const Zivid::Image<Zivid::ColorBGRA> projectorImage{ projectorResolution,
projectorImageOpenCV.datastart,
projectorImageOpenCV.dataend };
print(f"Creating a blank projector image with resolution: {projector_resolution}")
background_color = (0, 0, 0, 255)
projector_image = np.full(
    (projector_resolution[0], projector_resolution[1], len(background_color)), background_color, dtype=np.uint8
)
print("Drawing circles on the projector image for each grid point")
circle_color = (0, 255, 0, 255)
_draw_filled_circles(projector_image, projector_pixels, 2, circle_color)
프로젝터 이미지를 나중에 사용하기 위해 디스크에 저장할 수 있습니다. 이미지는 PNG, JPEG, BMP 등의 형식으로 저장할 수 있습니다.
Start Projection
다음은 이미지 투사를 시작하는 방법을 보여줍니다.
참고
이미지 핸들이 활성 상태인 한 이미지는 계속해서 투사됩니다.
Capture and save a 2D image while Projecting
프로젝터와 2D 카메라는 개별적으로 제어할 수 있습니다. 따라서 프로젝터가 투사하는 동안 장면의 2D 이미지(투사된 이미지가 장면에 있는 상태)를 캡처할 수 있습니다.
{ // A Local Scope to handle the projected image lifetime

    auto projectedImageHandle = Zivid::Projection::showImage(camera, projectorImage);

    const auto settings2D = get2DCaptureSettings(camera);

    std::cout << "Capturing a 2D image with the projected image" << std::endl;
    const auto frame2D = projectedImageHandle.capture2D(settings2D);

    const std::string capturedImageFile = "CapturedImage.png";
    std::cout << "Saving the captured image: " << capturedImageFile << std::endl;
    frame2D.imageBGRA_SRGB().save(capturedImageFile);

    std::cout << "Press enter to stop projecting..." << std::endl;
    std::cin.get();

} // projectedImageHandle now goes out of scope, thereby stopping the projection
with zivid.projection.show_image_bgra(camera, projector_image) as projected_image:
    print("Capturing a 2D image with the projected image")
    frame_2d = projected_image.capture_2d(settings_2d)

    captured_image_file = "CapturedImage.png"
    print(f"Saving the captured image: {captured_image_file}")
    frame_2d.image_bgra_srgb().save(captured_image_file)

    input("Press enter to stop projecting ...")
Stop Projection
stop() 함수가 핸들에서 호출되거나, 핸들이 범위를 벗어나거나, 카메라에서 3D 캡처가 시작되면 투영이 중지됩니다.
Stop by using Projection Handle
auto projectedImageHandle = Zivid::Projection::showImage(camera, projectorImage);
std::cout << "Press enter to stop projecting using the \".stop()\" function." << std::endl;
std::cin.get();
projectedImageHandle.stop();
Stop by leaving a scope / with context manager
void projecting(Zivid::Camera &camera, const Zivid::Image<Zivid::ColorBGRA> &projectorImageFunctionScope)
{
    auto projectedImageHandle = Zivid::Projection::showImage(camera, projectorImageFunctionScope);

    std::cout << "Press enter to stop projecting by leaving a function scope" << std::endl;
    std::cin.get();
}
Stop by triggering a 3D capture
projectedImageHandle = Zivid::Projection::showImage(camera, projectorImage);

std::cout << "Press enter to stop projecting by performing a 3D capture" << std::endl;
std::cin.get();
const auto settings = Zivid::Settings{ Zivid::Settings::Acquisitions{ Zivid::Settings::Acquisition() } };
camera.capture3D(settings);
projectedImageHandle = Zivid.NET.Projection.Projection.ShowImage(camera, projectorImage);

Console.WriteLine("Press enter to stop projecting by performing a 3D capture");
Console.ReadLine();
var settings = new Zivid.NET.Settings
{
    Acquisitions = { new Zivid.NET.Settings.Acquisition { } },
};
using (var frame3D = camera.Capture3D(settings)) { }
Projection Brightness
Zivid 펌웨어는 프로젝터 출력(프로젝터 밝기)에 제한을 두어 카메라의 수명을 보호하도록 설계되었습니다.
투사 시 밝기를 최대화하는 것이 목표라면 프로젝터가 색상 채널 중 하나만 사용하도록 설정하세요. 프로젝터 이미지의 각 색상 픽셀을 순수 색상 값인 빨간색(255,0,0), 녹색(0,255,0), 파란색(0,0,255) 중 단 하나의 색상 값으로 설정하면 됩니다. 빛을 투사하지 않으려면 픽셀을 검은색(0,0,0)으로 설정하세요.
팁
인간의 지각에 있어서 녹색은 훨씬 더 좋은 선택입니다. 왜냐하면 우리 눈은 빨간색과 파란색보다 녹색에 훨씬 더 민감하기 때문입니다.
백색광이나 빨간색, 초록색, 파란색의 다른 조합을 투사할 때 카메라 펌웨어는 자동으로 광 출력(프로젝터 밝기)을 줄입니다. 이는 거의 모든 픽셀이 순수한 녹색(0,255,0)으로 설정되어 있더라도 동일하게 적용됩니다. 단, 픽셀이 순수한 녹색이나 검은색에서 약간 벗어나는 경우(예: 0,255,1)는 예외입니다.
Code Samples
투영을 직접 경험해 보려면 다음 코드 샘플을 확인하세요.
Version History
SDK |
Changes |
|---|---|
2.16 |
체커의 모서리 대신 체커보드 특징점을 통해 점을 다시 투영합니다. |
2.12 |
2D 이미지 투영 API가 실험 단계에서 제외되었습니다. |
2.11.0 |
C# 및 Python에 대한 지원이 추가되었습니다. |
2.10 |
Experimental 2D Image Projection API 기능이 추가되었습니다. |