Settings Selector based on Capture Speed
이 섹션에서는 각 획득을 트리거한 시점부터 포인트 클라우드를 얻을 때까지의 시간 예산을 기반으로 최상의 카메라 설정에 대한 자세한 지침을 제공합니다. 여기서는 데이터 전송 및 포인트 클라우드 처리도 PC 사양에 따라 달라지기 때문에 PC 사양도 고려합니다. 좋은 포인트 클라우드를 얻기 위한 3D 캡처 설정과 좋은 컬러 이미지를 얻기 위한 2D 캡처 설정을 다룹니다.
Piece Picking 애플리케이션에 사용할 Zivid 카메라를 결정하고 올바르게 장착하고 배치했습니다. 다음 단계는 주어진 PC 사양에 따라 주기 시간 요구 사항을 충족하는 카메라 설정을 선택하는 것입니다. 아직 PC가 없는 경우 이 섹션에서는 사용된 설정과 함께 캡처 시간 요구 사항을 충족하는 PC 사양을 찾는 방법도 설명합니다.
3D settings
장면 복잡도에 따라 Piece Picking 애플리케이션을 두 가지 범주로 나누었습니다. 각 범주에 대해 주어진 이미징 요구 사항 및 캡처 속도 요구 사항을 충족하는 설정을 지정하고 권장합니다.
Consumer Goods
장면이 매우 밝고 반짝이는 어두운 개체로 구성되지 않은 경우 Piece Picking에 대해 Fast settings을 선택하여 주기 시간을 상당히 절약할 수 있습니다. Fast settings은 더 좁은 다이내믹 레인지를 커버하지만 더 빠른 캡처를 제공합니다. 다음은 Fast settings이 잘 작동하는 장면의 예입니다. 보시다시피 강한 직접 반사, 하이라이트 및 채도를 유발하는 항목이 없으며 매우 어두운 항목이 없습니다.

참고
장면에 밝고 반짝이는 어두운 항목이 없으면 Fast settings을 선택합니다.
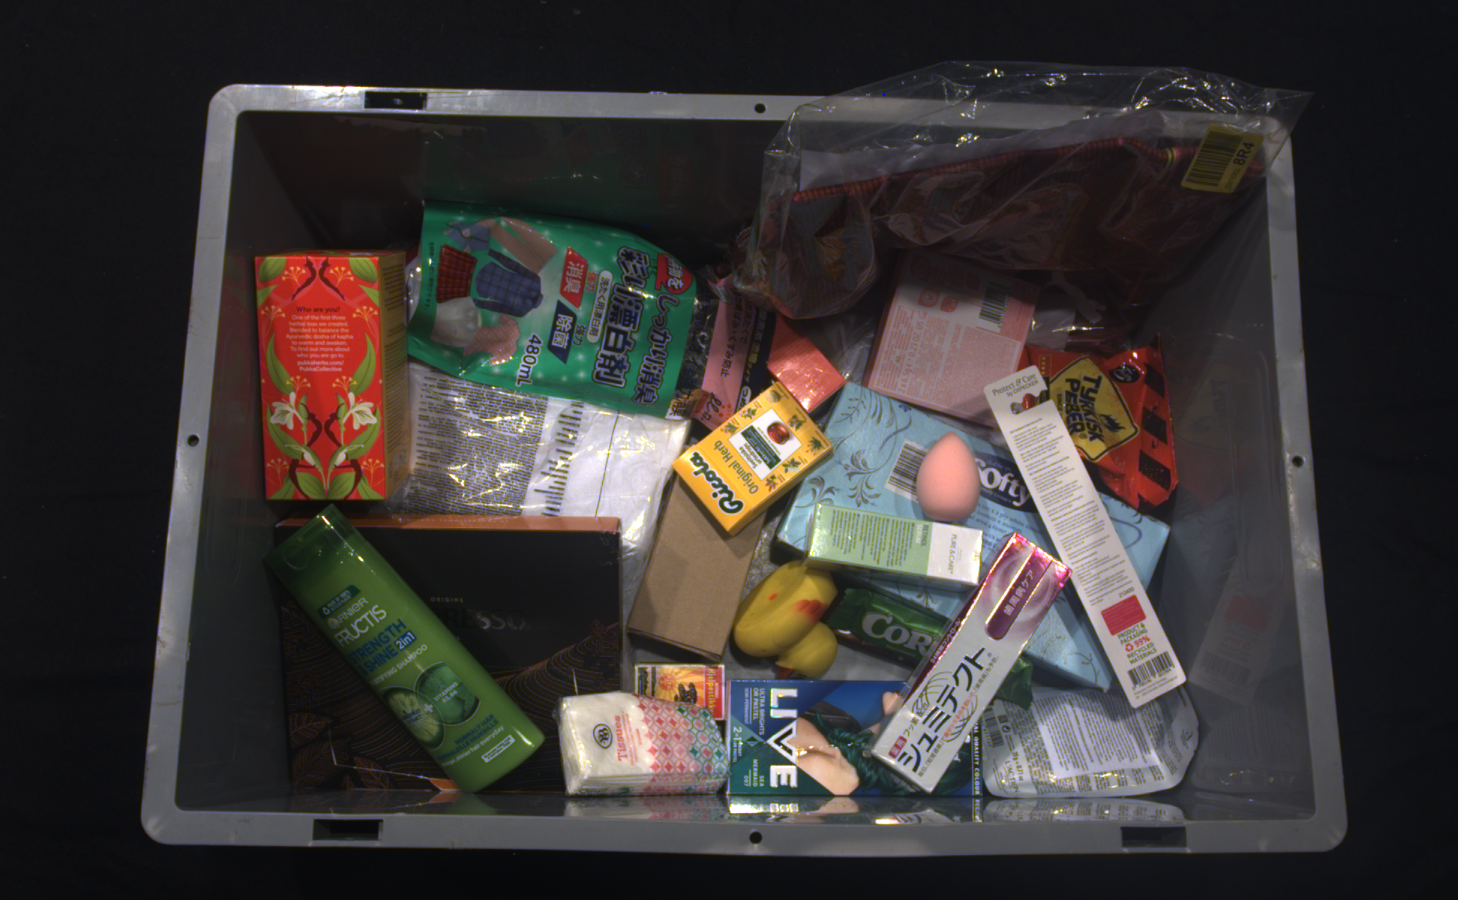
소비재에 대한 Quality settings을 통해 카메라는 상당히 넓은 다이나믹 레인지를 커버하여 다양한 물체에 적합한 포인트 클라우드를 제공합니다. 이 경우 장면에는 밝고 반사되는 플라스틱으로 포장된 물체와 폴리백에 들어 있는 품목부터 어두운 흡수성 재료에 이르기까지 모든 것이 포함될 수 있습니다. 아래 이미지는 Quality settings이 필요한 전형적인 복잡한 소비재 장면을 보여줍니다.
참고
카메라가 아무것도 놓치지 않도록 하려면 Quality settings을 선택하십시오.
Settings Selector Table
다음 표는 필요한 캡처 시간 예산에 따른 설정 선택기 도구를 나타냅니다. 동일한 표는 캡처 속도 요구 사항을 충족할 수 있는 PC의 성능과 비용을 나타냅니다. High-End, Mid-End 및 Low-End 구성의 예를 보려면 Recommended Industrial PCs 를 확인하십시오.
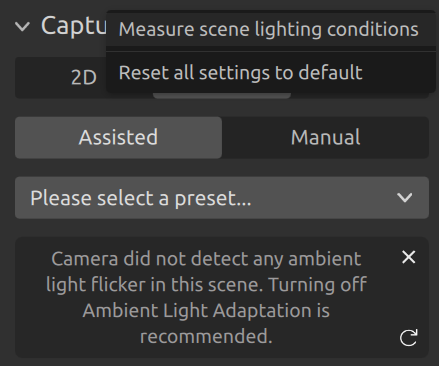
color Inconsistency in form of random color tint in your color images 경우, 해당 지역의 그리드 주파수(50Hz 또는 60Hz)에 맞는 Presets을 선택하세요. 주변광에 문제가 없다면 최적의 성능을 위해 끄기를 선택하세요. 확실하게 확인하려면 Zivid 카메라를 사용하여 check if there is flickering light in the scene 를 확인하세요.
Application |
Capture Time (2D + 3D) |
Camera Settings |
||
|---|---|---|---|---|
High-End PC |
Mid-End PC |
Low-End PC |
||
Consumer Goods (Quality) |
~250 ms |
~850 ms |
~1600 ms |
|
Consumer Goods (Fast) |
~150 ms |
~250 ms |
~430 ms |
|
원하는 설정 파일을 다운로드하려면 Zivid Studio에서 카메라(해당 모델)에 연결하고 Presets 설정을 선택하고 주변광 적응을 켜고 설정을 내보낼 수도 있습니다.
조심
주변광 주파수에 맞춰 설정을 조정하면 캡처 시간이 더 길어질 수 있습니다.
Application
Camera Settings
Consumer Goods (Quality)
Consumer Goods (Fast)
원하는 설정 파일을 다운로드하려면 Zivid Studio에서 카메라(해당 모델)에 연결하고 Presets 설정을 선택하고 주변광 적응을 켜고 설정을 내보낼 수도 있습니다.
조심
주변광 주파수에 맞춰 설정을 조정하면 캡처 시간이 더 길어질 수 있습니다.
Application
Camera Settings
Consumer Goods (Quality)
Consumer Goods (Fast)
Piece Picking에 대한 위의 요구 사항에 도달하는 것을 입증하기 위해 우리는 다양한 PC에서 카메라로 벤치마크 캡처 프로그램을 지속적으로 실행합니다. 다음 표는 결과를 보여줍니다.
Parcel Picking
Parcel은 장면의 복잡성과 캡처 시간에 따라 두 가지 설정으로 나뉩니다.
Parcels Fast 설정은 가장 짧은 사이클 시간을 달성하도록 설계되었습니다. 이러한 설정은 동적 범위가 제한적이지만, 다음과 같이 비교적 간단하게 이미징할 수 있는 객체에 적합합니다.
cardboard boxes
white envelopes
밝은 폴리백
참고
상자, 소포, 서류가방 등만 이미지화하는 경우 Parcels Fast 설정을 선택하세요.
팁
어두운 반사 객체에 대한 데이터 범위를 넓히려면 노출 시간을 늘려보거나 Parcels Quality Presets으로 전환해보세요.
더 까다로운 장면에서는 Parcels Quality 설정을 사용해 보세요. 이 설정은 다이내믹 레인지가 더 넓고 다음과 같은 객체의 표면을 효과적으로 커버할 수 있습니다.
검은색 폴리백
어두운 비닐봉지
어두운 플라스틱 랩
팁
캡처 시간을 줄이려면 엔진을 Omni에서 Stripe로 전환하세요. 검은색 소포의 경우 적용 범위가 줄어들 수 있습니다.
Settings Selector Table
color Inconsistency in form of random color tint in your color images 또는 artifacts in the form of ripples/waves across the whole point cloud , 50/60Hz를 선택하여 주변광(격자) 주파수에 맞는 Presets을 선택하세요. 주변광에 문제가 없다면 최적의 성능을 위해 끄기를 선택하세요. 확실하게 확인하려면 check if there is flickering light in the scene 를 확인하세요.
Application |
Capture Time (2D + 3D) |
Camera Settings |
||
|---|---|---|---|---|
High-End PC |
Mid-End PC |
Low-End PC |
||
Parcels (Quality) |
~135 ms |
~900 ms |
~1600 ms |
|
Parcels (Fast) |
~50 ms |
~100 ms |
~200 ms |
|
원하는 설정 파일을 다운로드하려면 Zivid Studio에서 카메라(해당 모델)에 연결하고 Presets 설정을 선택하고 주변광 적응을 켜고 설정을 내보낼 수도 있습니다.
조심
주변광 주파수에 맞춰 설정을 조정하면 캡처 시간이 더 길어질 수 있습니다.
Application
Camera Settings
Parcels (Quality/Reflective)
Parcels (Fast/Matte)
원하는 설정 파일을 다운로드하려면 Zivid Studio에서 카메라(해당 모델)에 연결하고 Presets 설정을 선택하고 주변광 적응을 켜고 설정을 내보낼 수도 있습니다.
조심
주변광 주파수에 맞춰 설정을 조정하면 캡처 시간이 더 길어질 수 있습니다.
Application
Camera Settings
Parcels (Quality/Reflective)
Parcels (Fast/Matte)
소포(Parcels)에 대한 위 요건을 충족하는지 확인하기 위해 다양한 PC에서 카메라를 사용하여 벤치마크 캡처 프로그램을 지속적으로 실행했습니다. 다음 표는 그 결과를 보여줍니다.
Testing 3D Settings
Zivid Studio를 사용하여 3D 설정을 테스트할 수 있습니다.
Zivid Studio에서 설정을 가져오려면:
File → Import Capture Settings 를 클릭합니다.
설정 파일의 위치로 이동합니다.
Open를 클릭합니다.
YML 파일을 Zivid Studio로 끌어서 놓아 설정을 가져올 수도 있습니다.
SDK를 사용하여 설정을 로드할 수도 있습니다.
2D settings
Piece Picking 애플리케이션에 대한 2D 설정을 얻기 위한 세 가지 옵션을 제공합니다.
Use settings presets
코드 샘플과 함께 Zivid calibration board를 사용하여 자동으로 2D 설정 가져옵니다.
Manually tune 2D settings
3D 설정 Presets에는 2D 설정도 포함되어 있습니다. 따라서 3D 및 2D 캡처에 동일한 설정 Presets을 사용하는 것이 좋습니다. 그래도 만족스러운 결과가 나오지 않으면 다음 옵션을 확인해 보세요.
Automatic 2D settings
Zivid 칼리브레이션 보드를 사용하여 2D 캡처에 대한 수집 설정을 자동으로 찾으려면 auto_2d_settings.py 샘플을 실행하세요. 칼리브레이션 보드를 빈의 상단 또는 하단에 놓고 칼리브레이션 보드 위치와 원하는 초점 범위(빈 높이)를 명령줄 인수로 지정하여 샘플을 실행하세요. 예를 들어 칼리브레이션 보드를 빈 상단에 놓고 빈 높이가 400mm인 경우, 다음과 같이 샘플을 실행하세요.
python auto_2d_settings.py --desired-focus-range 400 --checkerboard-at-start-of-range --use-projector --no-color-balance
Calibration board를 빈 바닥에 놓으면 다음을 실행합니다.
python auto_2d_settings.py --desired-focus-range 400 --checkerboard-at-end-of-range --use-projector --no-color-balance
Manually tune 2D settings
2D 설정 Presets이나 자동 조정으로 충분한 2D 화질을 얻을 수 없는 경우, 색상 균형 및 감마 매개변수를 조정하여 색상 설정을 수동으로 조정할 수 있습니다. 감마 보정을 사용하면 이미지를 어둡게 하거나 밝게 할 수 있습니다. 색상 채널 매개변수는 색상 이미지를 더욱 자연스럽게 만들어 줍니다.
색상을 최적화하는 방법에 대한 심층적인 튜토리얼은 Optimizing Color Image 을 참조하세요.
Testing 2D Settings
2D 설정을 테스트하려면 Zivid Studio의 2D 캡처 모드를 사용하거나 코드 샘플 중 하나를 실행하면 됩니다.
Zivid Studio에서 설정을 가져오려면:
File → Import Capture Settings 를 클릭합니다.
설정 파일의 위치로 이동합니다.
Open를 클릭합니다.
YML 파일을 Zivid Studio로 끌어서 놓아 설정을 가져올 수도 있습니다.
다음 코드는 API에서 내보낸 설정을 사용하는 방법을 보여줍니다.
auto camera = zivid.connectCamera();
const auto settings = Zivid::Settings(settingsPath);
    const auto frame2D = camera.capture2D(settings);
이미지를 캡처한 후 linear RGB 또는 sRGB로 저장할 수 있습니다.
const auto imageRGBA = frame2D.imageRGBA();
const auto imageFile = "ImageRGBA_linear.png";
std::cout << "Saving 2D color image (Linear RGB) to file: " << imageFile << std::endl;
imageRGBA.save(imageFile);
const auto imageSRGB = frame2D.imageRGBA_SRGB();
const auto imageFile = "ImageRGBA_sRGB.png";
std::cout << "Saving 2D color image (sRGB color space) to file: " << imageFile << std::endl;
imageSRGB.save(imageFile);
참고
낮은(~300lx) 및 높은(~1000lx) 주변 조명 조건에서 위의 일반적인 장면에 대해 권장하는 3D 및 2D 설정을 테스트했습니다. 카메라 선택기 섹션에서 지정한 거리 범위와 장면의 다양한 항목에 대해 이 작업을 수행했습니다. 따라서 우리는 이러한 설정이 이러한 범주에 맞는 대부분의 장면에서 작동할 것이라고 확신합니다. 그러나 장면에서 기대하는 항목을 정확히 알고 있고 전문적인 카메라 사용자인 경우 상황에 맞게 설정을 수동으로 구성하여 최적화할 수 있습니다. 보다 자세한 내용은 Capturing High Quality Point Clouds 를 확인하십시오.
Avoiding interference from flickering light
바코드 판독기나 형광등과 같은 깜빡이는 광원(10~1000Hz)은 Zivid 카메라에 간섭을 일으킬 수 있습니다. 이러한 간섭은 color inconsistency in the color image 로 나타날 수 있습니다. 이를 방지하려면 깜빡이는 광원이 다음 중 하나여야 합니다.
Zivid 카메라 노출 시간과 관련된 연속적이고 주파수
Zivid 카메라 샘플링 간격과 상관된 연속 및 주파수
Zivid 카메라 인수 중 비활성화됨
활성 광원이 있는 경우의 구성
첫 번째 단계는 활성 광원의 주파수를 파악하는 것입니다. 주파수가 확실하지 않으면 Zivid 카메라로 측정할 수 있습니다.
Detecting and measuring ambient light frequency
Zivid Studio를 열고 카메라에 연결합니다. Capture 섹션의 세 개의 점을 클릭합니다. 그런 다음 Measure scene lighting conditions 를 클릭합니다. 소프트웨어가 감지된 주변광 플리커 주파수를 표시합니다.

또는 SDK를 사용하여 주변광 상태를 측정할 수 있습니다. 이 방법은 심각한 주변광 깜빡임이 감지되는지, 그리고 50Hz 또는 60Hz 전력망에 해당하는지 보고합니다.
std::cout << "Measuring scene conditions" << std::endl;
auto sceneConditions = camera.measureSceneConditions();
auto flickerClassification = sceneConditions.ambientLight().flickerClassification().toString();
std::cout << "Flicker classification: " << flickerClassification << std::endl;
    auto flickerFrequency = sceneConditions.ambientLight().flickerFrequency();
    std::cout << "Measured flickering frequency in the scene: " << flickerFrequency << " Hz." << std::endl;
Console.WriteLine("Measuring scene conditions");
var sceneConditions = camera.MeasureSceneConditions();
var flickerClassification = sceneConditions.AmbientLight.FlickerClassification.ToString();
Console.WriteLine("Flicker classification: " + flickerClassification);
    var flickerFrequency = sceneConditions.AmbientLight.FlickerFrequency;
    Console.WriteLine($"Measured flickering frequency in the scene: {flickerFrequency} Hz.");
print("Measuring scene conditions")
scene_conditions = camera.measure_scene_conditions()
flicker_classification = scene_conditions.ambient_light.flicker_classification
print(f"Flicker classification: {flicker_classification}")
    flicker_frequency = scene_conditions.ambient_light.flicker_frequency
    print(f"The measured flickering frequency in the scene: {flicker_frequency} Hz.")
예를 들어 바코드 스캐너와 같이 하나의 광원을 측정하는 경우, 주변광과 같이 장면의 다른 모든 광원을 끕니다.
그런 다음 간섭을 피하기 위해 활성 광원이나 Zivid 카메라 설정을 구성할 수 있습니다.
다음을 사용하여 활성 광원(예: 바코드 스캐너)의 주파수 (\(f_c\)) 를 Zivid 카메라 노출 시간 (\(t_z\)) 과 일치시킵니다.
예를 들어:
다음을 사용하여 Zivid 카메라의 노출 시간 (\(t_z\)) 을 활성 광원(예: 바코드 스캐너)과 주파수 (\(f_c\)) 에 맞춥니다.
예를 들어:
계산된 노출 시간이 실행 가능하지 않은 경우 동일한 공식을 사용하여 2D sampling interval (\(t_z\)) 을 활성 광원 주파수 (\(f_c\)) 와 일치하도록 설정합니다.
예를 들어:
이러한 경우의 예로는 긴 노출 시간을 보정하기 위해 프로젝터 밝기를 너무 많이 낮춰야 하는 경우입니다. 이로 인해 컬러 이미지에 눈에 띄는 노이즈가 발생합니다. 이는 Settings2D::Sampling::Color 에서 rgb 모드를 사용하는 경우이며, rgbStrongAmbientLight 모드를 사용하는 경우는 아닙니다. 또 다른 예로는 과다 노출이 있는데, 이는 게인이나 프로젝터 밝기와 같은 다른 획득 설정을 사용하여 긴 노출 시간을 적절히 보정할 수 없을 때 발생합니다.
Configuration in presence of both active and flickering AC-powered light sources
전력선 주파수 변조(예: 미국 60Hz, EU 50Hz)로 작동하는 강력하고 제어 불가능한 광원이 있는 경우 추가적인 문제가 발생할 수 있습니다. 형광등과 같은 AC 전원 광원의 주파수를 변경하는 것은 불가능하므로 Zivid 카메라 설정과 활성 광원의 주파수를 조정해야 합니다.
Configuring Zivid camera
interference from ambient light 을 완화하려면 Zivid 카메라의 노출 시간을 전력선 주기의 배수와 일치하도록 설정합니다.
10 000 µs or 20 000 µs in the presence of 50 Hz grid frequency.
8 333 µs or 16 667 µs in the presence of 60 Hz grid frequency.
예를 들어 2D 이미지의 과다 노출로 인해 그리드 주파수에 맞게 노출 시간을 조정할 수 없는 경우 대신 2D sampling interval 을 활성화하고 해당 지역의 그리드 주파수와 동기화하세요.
10 000 µs in the presence of 50 Hz grid frequency.
8 333 µs in the presence of 60 Hz grid frequency.
Color Inconsistency (random Color Tint) 를 방지하기 위해 2D 이미지 획득 시 노출 시간 또는 2D 샘플링 간격을 설정해야 합니다. 3D 이미지 획득의 경우, Ripples from Ambient Light Interference 문제가 발생하지 않는 한 이 설정은 필요하지 않습니다.
노출 시간 매칭을 통한 솔루션은 2D 샘플링 간격 매칭보다 더 나은 성능과 일관된 캡처 시간을 제공하므로 더 선호됩니다.
Configuring active light source
마지막으로, Zivid 카메라 노출 시간에 맞춰 활성 깜박임 광원의 주파수를 다음과 같이 계산할 수 있습니다.
다음 섹션에서는 멀티스레딩을 사용하여 속도 최적화 Optimizing Robot Cycle Times 에 대해 다룹니다.
Version History
SDK |
Changes |
|---|---|
2.17.0 |
Zivid 3 카메라와 샘플링 간격 설정에 대한 지원이 추가되었습니다. |
2.16.0 |
주변광 주파수 측정 및 주변광 간섭을 피하기 위한 가이드라인에 대한 지원이 추가되었습니다. |
2.12.0 |
Zivid One+는 서비스 종료로 더 이상 지원되지 않습니다. |