调整色彩平衡
在SDK中有调整红色、绿色和蓝色通道的颜色平衡值的功能。非完全白色和/或非常强的环境光会影响彩色图像的RGB值。如果您的应用需要使用准确的RGB值,请在相机上运行色彩平衡。如果您没有使用Zivid相机的投影仪来捕获彩色图像,通常更需要进行色彩平衡的调整。
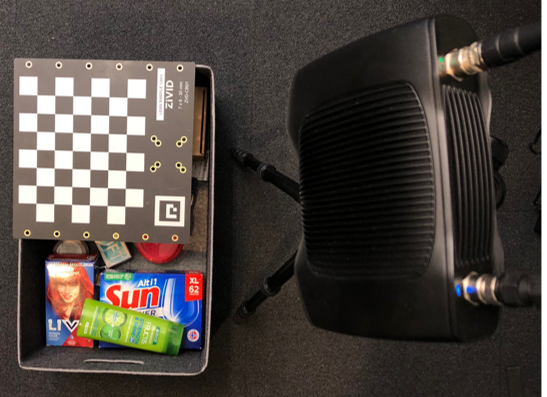
本教程展示了如何通过循环拍摄 Zivid calibration board 来平衡2D图像的颜色。作为先决条件,您必须找到合适的2D采集设置并将其保存为一个YML文件,本教程将展示如何使用这些设置来平衡颜色。查看 工具栏 了解如何从 Zivid Studio 导出设置。

首先,我们需要提供要进行颜色平衡处理的2D采集设置的路径。
def _options() -> argparse.Namespace:
    """Configure and take command line arguments from user.

    Returns:
        Arguments from user

    """
    parser = argparse.ArgumentParser(
        description=(
            "Balance the color of a 2D image\n"
            "Example:\n"
            "\t $ python color_balance.py path/to/settings.yml\n\n"
            "where path/to/settings.yml is the path to the 2D acquisition settings you want to find color balance for."
        ),
        formatter_class=argparse.RawTextHelpFormatter,
    )

    parser.add_argument(
        dest="path",
        type=Path,
        help="Path to YML containing 2D capture settings",
    )

    return parser.parse_args()
然后,我们连接到相机。
在这之后,我们需要加载2D采集设置。
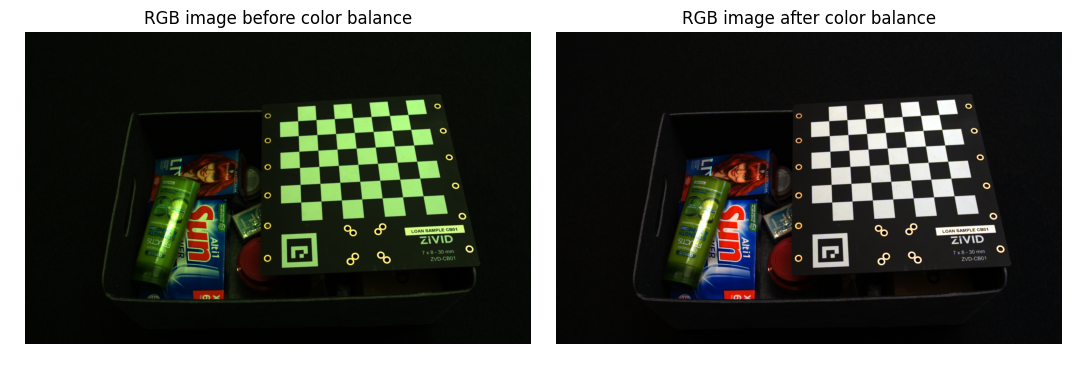
然后我们捕获图像并显示它。
现在我们将检测并找到标定板的白色方块作为平衡算反的白色参考。
如果您想使用自定义蒙版,例如一张纸或一面白墙,您可以提供自己的蒙版。您可以使用以下示例内容来对图像的中心像素进行蒙版操作。
def get_central_pixels_mask(image_shape: Tuple, num_pixels: int = 100) -> np.ndarray:
    """Get mask for central NxN pixels in an image.

    Args:
        image_shape: (H, W) of image to mask
        num_pixels: Number of central pixels to mask

    Returns:
        mask: Mask of (num_pixels)x(num_pixels) central pixels

    """
    height = image_shape[0]
    width = image_shape[1]

    height_start = int((height - num_pixels) / 2)
    height_end = int((height + num_pixels) / 2)
    width_start = int((width - num_pixels) / 2)
    width_end = int((width + num_pixels) / 2)

    mask = np.zeros((height, width))
    mask[height_start:height_end, width_start:width_end] = 1

    return mask
然后我们运行校准算法,该算法通过拍摄图像并屏蔽除我们用于校准的白色像素以外的所有内容来平衡RGB图像的颜色。
以下是实现该功能的算法示例。
def white_balance_calibration(
    camera: zivid.Camera, settings_2d: zivid.Settings2D, mask: np.ndarray
) -> Tuple[float, float, float]:
    """Balance color for RGB image by taking images of white surface (checkers, piece of paper, wall, etc.) in a loop.

    Args:
        camera: Zivid camera
        settings_2d: 2D capture settings
        mask: (H, W) of bools masking the white surface

    Raises:
        RuntimeError: If camera does not need color balancing

    Returns:
        corrected_red_balance: Corrected red balance
        corrected_green_balance: Corrected green balance
        corrected_blue_balance: Corrected blue balance

    """
    if not camera_may_need_color_balancing(camera):
        raise RuntimeError(f"{camera.info.model} does not need color balancing.")

    corrected_red_balance = 1.0
    corrected_green_balance = 1.0
    corrected_blue_balance = 1.0

    saturated = False

    while True:
        settings_2d.processing.color.balance.red = corrected_red_balance
        settings_2d.processing.color.balance.green = corrected_green_balance
        settings_2d.processing.color.balance.blue = corrected_blue_balance

        rgba = camera.capture_2d(settings_2d).image_rgba_srgb().copy_data()
        mean_color = compute_mean_rgb_from_mask(rgba[:, :, 0:3], mask)

        mean_red, mean_green, mean_blue = mean_color[0], mean_color[1], mean_color[2]

        if int(mean_green) == int(mean_red) and int(mean_green) == int(mean_blue):
            break
        if saturated is True:
            break
        max_color = max(float(mean_red), float(mean_green), float(mean_blue))
        corrected_red_balance = float(np.clip(settings_2d.processing.color.balance.red * max_color / mean_red, 1, 8))
        corrected_green_balance = float(
            np.clip(settings_2d.processing.color.balance.green * max_color / mean_green, 1, 8)
        )
        corrected_blue_balance = float(np.clip(settings_2d.processing.color.balance.blue * max_color / mean_blue, 1, 8))

        corrected_values = [corrected_red_balance, corrected_green_balance, corrected_blue_balance]

        if 1.0 in corrected_values or 8.0 in corrected_values:
            saturated = True

    return (corrected_red_balance, corrected_green_balance, corrected_blue_balance)
然后应用色彩平衡设置,捕捉新图像并显示它。
settings_2d.processing.color.balance.red = red_balance
settings_2d.processing.color.balance.green = green_balance
settings_2d.processing.color.balance.blue = blue_balance
rgba_balanced = camera.capture_2d(settings_2d).image_rgba_srgb().copy_data()
display_rgb(rgba_balanced[:, :, 0:3], title="RGB image after color balance", block=True)
最后,我们将带有新色彩平衡增益的2D采集设置保存到文件中。
下图显示了应用色彩平衡前后的彩色图像。

如需平衡2D图像的颜色,您可以运行我们的代码示例,运行该代码需要提供2D采集设置的路径。
示例: color_balance.py
python color_balance.py /path/to/settings.yml
具有新色彩平衡增益的2D采集设置将被保存到文件中,作为输出数据。