2D 图像投影
介绍
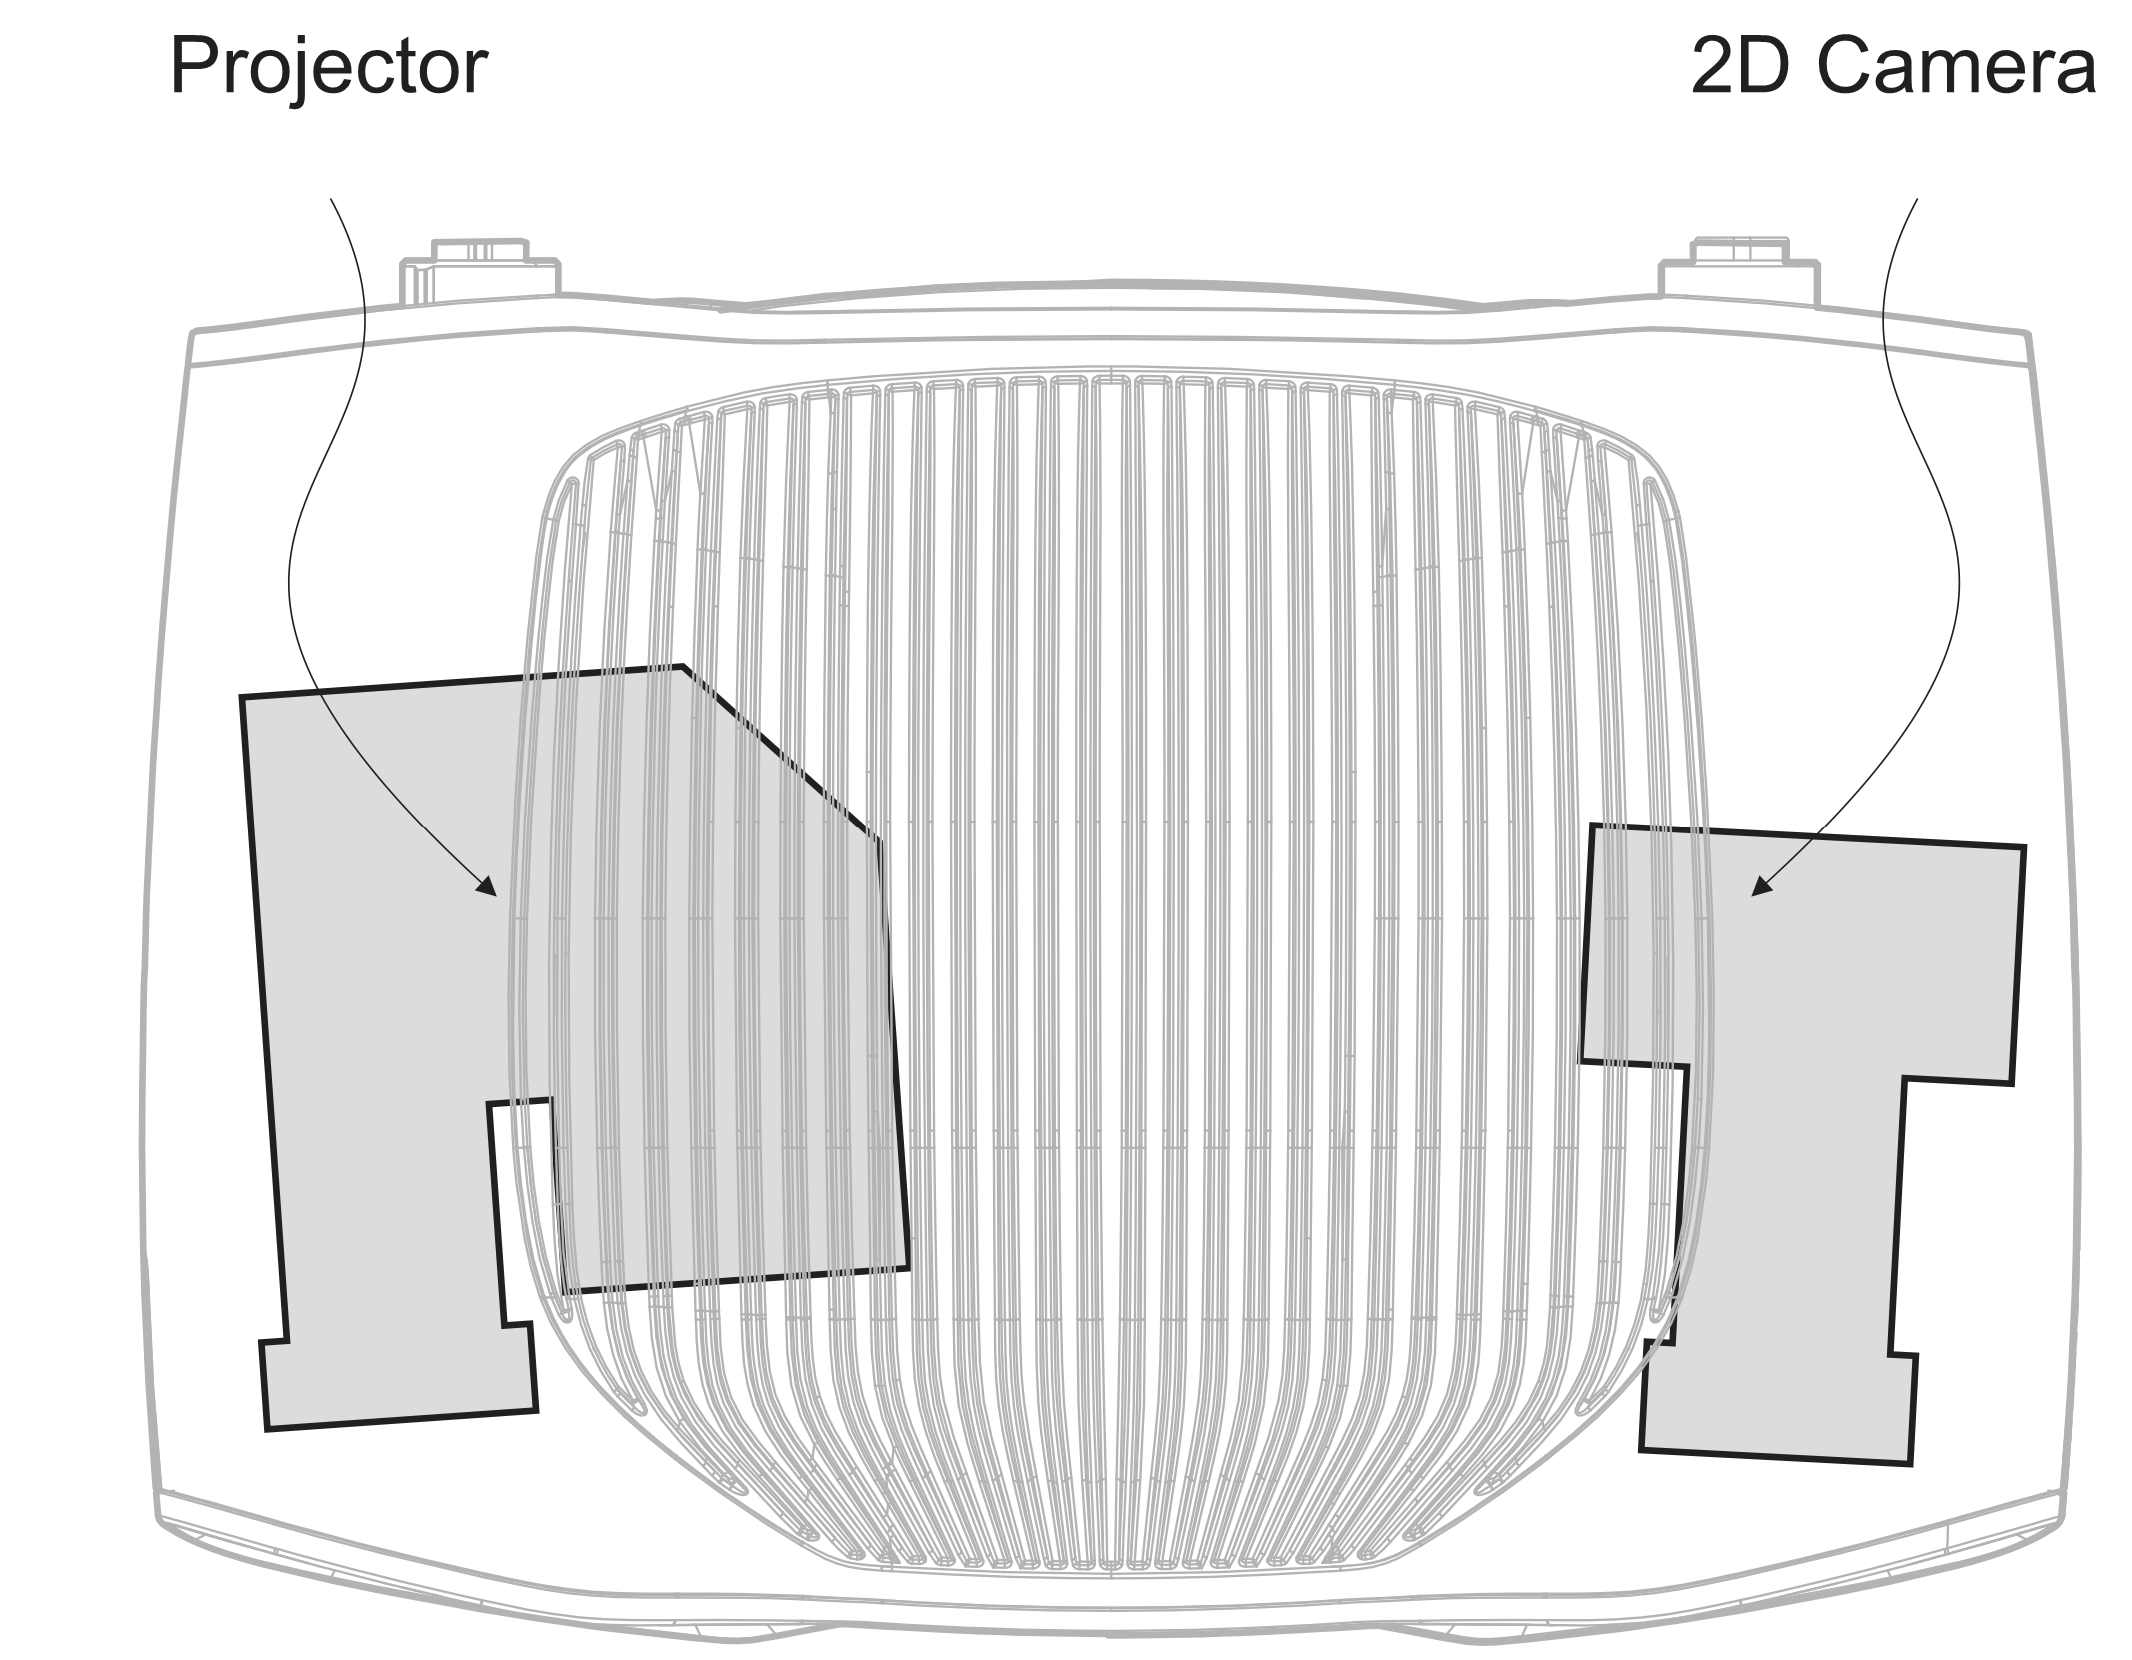
Zivid 3D 相机的主要组成部分包括一个 2D 彩色相机和一个投影仪。2D 图像的像素对应于相机传感器的像素(即传感器中收集光子的部分)。同样地,2D 投影图像的像素则对应于投影仪的像素(即投影仪中发射光子的部分)。本教程将介绍如何使用投影仪将彩色图像投射到场景中。
创建投影仪图像
要创建投影仪图像,您需要知道投影仪图像分辨率。通过连接到相机并检索投影仪分辨率可以轻松完成此操作:

std::cout << "Connecting to camera" << std::endl;
auto camera = zivid.connectCamera();

std::cout << "Retrieving the projector resolution that the camera supports" << std::endl;
const auto projectorResolution = Zivid::Projection::projectorResolution(camera);
Console.WriteLine("Connecting to camera");
using (var camera = zivid.ConnectCamera())
{
    Console.WriteLine("Retrieving the projector resolution that the camera supports");
    var projectorResolution = Zivid.NET.Projection.Projection.ProjectorResolution(camera);
2D 投影仪图像
下一步是创建一个 Zivid::Image<Zivid::ColorBGRA> 。下面演示了如何从头开始创建 Zivid 图像以及如何将 OpenCV 图像转换为 Zivid 图像。
您可以通过从文件(例如 PNG)加载或从头开始创建来创建 Zivid 图像。
这是如何加载 Zivid 图像的示例。限制是图像分辨率必须与 Zivid 相机投影仪分辨率相匹配。
相机 |
分辨率 |
|---|---|
Zivid 3 |
1000 x 720 |
Zivid 2+ |
1280 x 720 |
Zivid 2 |
1000 x 720 |
std::string projectorImageFileForGivenCamera = getProjectorImageFileForGivenCamera(camera);

std::cout << "Reading 2D image (of resolution matching the Zivid camera projector resolution) from file: "
          << projectorImageFileForGivenCamera << std::endl;
const auto projectorImageForGivenCamera = Zivid::Image<Zivid::ColorBGRA>(projectorImageFileForGivenCamera);
string projectorImageFileForGivenCamera = GetProjectorImageFileForCamera(camera);

Console.WriteLine("Reading 2D image (of resolution matching the Zivid camera projector resolution) from file: " + projectorImageFileForGivenCamera);
var projectorImageForGivenCamera = new Zivid.NET.ImageBGRA(projectorImageFileForGivenCamera);
projector_image_file_for_given_camera = get_projector_image_file_for_camera(camera)

print(
    f"Reading 2D image (of resolution matching the Zivid camera projector resolution) from file: {projector_image_file_for_given_camera}"
)
projector_image_for_given_camera = zivid.Image.load(projector_image_file_for_given_camera, "bgra_srgb")
这是如何创建所有像素均为红色的 Zivid Image 的示例。
    const auto redColor = Zivid::ColorBGRA(0, 0, 255, 255);
    auto projectorImage = createProjectorImage(projectorResolution, redColor);

Zivid::Image<Zivid::ColorBGRA> createProjectorImage(
    const Zivid::Resolution &projectorResolution,
    const Zivid::ColorBGRA &ZividColor)
{
    const std::vector<Zivid::ColorBGRA> imageData(projectorResolution.size(), ZividColor);
    Zivid::Image<Zivid::ColorBGRA> projectorImage{ projectorResolution, imageData.begin(), imageData.end() };

    return projectorImage;
}
            var redColor = new Zivid.NET.ColorBGRA { b = 0, g = 0, r = 255, a = 255 };
            var projectorImage = CreateProjectorImage(projectorResolution, redColor);

static Zivid.NET.ImageBGRA CreateProjectorImage(Zivid.NET.Resolution resolution, Zivid.NET.ColorBGRA color)
{
    var pixelArray = new Zivid.NET.ColorBGRA[resolution.Height, resolution.Width];
    for (ulong y = 0; y < resolution.Height; y++)
    {
        for (ulong x = 0; x < resolution.Width; x++)
        {
            pixelArray[y, x] = color;
        }
    }
    var projectorImage = new Zivid.NET.ImageBGRA(pixelArray);
    return projectorImage;
}
    red_color = (0, 0, 255, 255)
    projector_image = create_projector_image(projector_resolution, red_color)

def create_projector_image(resolution: Tuple, color: Tuple) -> np.ndarray:
    """Create projector image (numpy array) of given color.

    Args:
        resolution: projector resolution
        color: bgra

    Returns:
        An image (numpy array) of color given by the bgra value

    """
    projector_image = np.full((resolution[0], resolution[1], len(color)), color, dtype=np.uint8)
    return projector_image
您可以通过从文件(例如 PNG)加载或从头开始创建来获得一副 OpenCV 图像。
此示例使用 OpenCV 加载图像,然后将其转换为 Zivid 图像。使用 OpenCV 的好处是可以非常轻松地调整任意分辨率的图像大小以适应 Zivid 相机投影仪分辨率。
    std::string imageFile = std::string(ZIVID_SAMPLE_DATA_DIR) + "/ZividLogo.png";
    std::cout << "Reading 2D image (of arbitrary resolution) from file: " << imageFile << std::endl;
    const auto inputImage = cv::imread(imageFile, cv::IMREAD_UNCHANGED);

Zivid::Image<Zivid::ColorBGRA> resizeAndCreateProjectorImage(
    const cv::Mat &inputImage,
    const Zivid::Resolution &projectorResolution)
{
    cv::Mat projectorImageResized;
    cv::Mat projectorImageBGRA;
    cv::resize(
        inputImage,
        projectorImageResized,
        cv::Size(projectorResolution.width(), projectorResolution.height()),
        cv::INTER_LINEAR);
    cv::cvtColor(projectorImageResized, projectorImageBGRA, cv::COLOR_BGR2BGRA);

    std::cout << "Creating a Zivid::Image from the OpenCV image" << std::endl;
    Zivid::Image<Zivid::ColorBGRA> projectorImage{ projectorResolution,
                                                   projectorImageBGRA.datastart,
                                                   projectorImageBGRA.dataend };

    return projectorImage;
}
    image_file = get_sample_data_path() / "ZividLogo.png"
    print("Reading 2D image (of arbitrary resolution) from file: ")
    input_image = cv2.imread(str(image_file))
    if input_image is None:
        raise RuntimeError(f"File {image_file} not found or couldn't be read.")

def _resize_and_create_projector_image(image_to_resize: np.ndarray, final_resolution: Tuple) -> np.ndarray:
    """Resizes an image to a given resolution.

    Args:
        image_to_resize: openCV image that needs to be resized
        final_resolution: resolution after resizing

    Returns:
        An image with a resolution that matches the projector resolution

    """
    resized_image = cv2.resize(
        image_to_resize, (final_resolution[1], final_resolution[0]), interpolation=cv2.INTER_LINEAR
    )
    projector_image = cv2.cvtColor(resized_image, cv2.COLOR_BGR2BGRA)

    return projector_image
在此示例中,创建了一个空白的 OpenCV 图像,然后将其转换为 Zivid Image。
std::cout << "Creating a blank projector image with resolution: " << projectorResolution.toString()
          << std::endl;
const cv::Scalar backgroundColor{ 0, 0, 0, 255 };
auto projectorImageOpenCV = cv::Mat{ static_cast<int>(projectorResolution.height()),
                                     static_cast<int>(projectorResolution.width()),
                                     CV_8UC4,
                                     backgroundColor };

std::cout << "Creating a Zivid::Image from the OpenCV image" << std::endl;
const Zivid::Image<Zivid::ColorBGRA> projectorImage{ projectorResolution,
                                                     projectorImageOpenCV.datastart,
                                                     projectorImageOpenCV.dataend };
现在可以投影图像了。请注意,该图像是在不考虑任何 3D 数据的情况下创建的。
从 3D 捕获中获取的 2D 投影仪图像
如果您想要将某个 3D 对象投影到场景上,那么从 3D 数据创建投影仪图像会非常有用。或者,您可能希望将某些内容投影到场景中的特定点、曲面或可以从点云检测到的任何其他 3D 特征上。要实现这一点则需要知道 3D 点和投影仪像素之间的关联性。如果您不需要从 3D 数据创建 2D 投影仪图像,您可以直接转到 开始投影
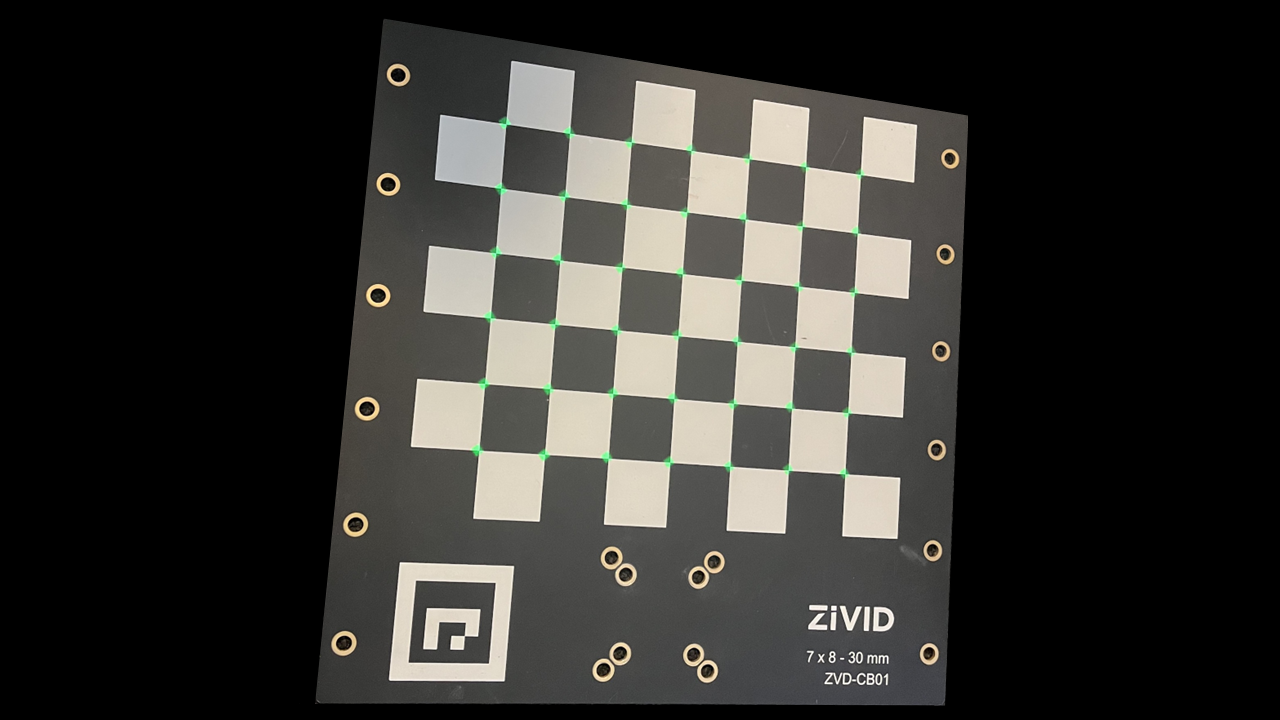
在此示例中,我们在 Zivid 标定板的棋盘格中心投射绿色小圆圈。下图展示了预期的最终结果。
我们可以通过 Zivid SDK 检测棋盘的特征点(棋盘中心)。
const auto detectionResult = Zivid::Calibration::detectCalibrationBoard(camera);
const auto featurePoints = detectionResult.featurePoints();
Zivid::Projection::pixelsFrom3DPoints() 使用 Zivid 相机的内部校准将相机参考系中的 3D 点转换为投影仪像素。这些 3D 点按如下方式转换为投影仪像素:
std::cout << "Getting projector pixels (2D) corresponding to points (3D)" << std::endl;
const auto projectorPixels = Zivid::Projection::pixelsFrom3DPoints(camera, featurePoints);
下一步是创建投影仪图像并在获得的投影仪像素坐标上绘制绿色圆圈。
std::cout << "Creating a blank projector image with resolution: " << projectorResolution.toString()
<< std::endl;
const cv::Scalar backgroundColor{ 0, 0, 0, 255 };
auto projectorImageOpenCV = cv::Mat{ static_cast<int>(projectorResolution.height()),
static_cast<int>(projectorResolution.width()),
CV_8UC4,
backgroundColor };
std::cout << "Drawing circles on the projector image for each grid point" << std::endl;
const cv::Scalar circleColor{ 0, 255, 0, 255 };
drawFilledCircles(projectorImageOpenCV, projectorPixels, 2, circleColor);
std::cout << "Creating a Zivid::Image from the OpenCV image" << std::endl;
const Zivid::Image<Zivid::ColorBGRA> projectorImage{ projectorResolution,
projectorImageOpenCV.datastart,
projectorImageOpenCV.dataend };
print(f"Creating a blank projector image with resolution: {projector_resolution}")
background_color = (0, 0, 0, 255)
projector_image = np.full(
    (projector_resolution[0], projector_resolution[1], len(background_color)), background_color, dtype=np.uint8
)
print("Drawing circles on the projector image for each grid point")
circle_color = (0, 255, 0, 255)
_draw_filled_circles(projector_image, projector_pixels, 2, circle_color)
可以将投影仪图像保存到磁盘以供以后使用。图像可以保存为 PNG、JPEG、BMP 等格式。
const std::string projectorImageFile = "ProjectorImage.png";
std::cout << "Saving the projector image to file: " << projectorImageFile << std::endl;
projectorImage.save(projectorImageFile);
开始投影
下面展示了如何投影图像。
备注
只要图像句柄保持活动状态,图像就会连续投影。
投影时捕获并保存 2D 图像
投影仪和2D相机可以单独控制。因此,当投影仪进行投影时,可以捕获场景的2D图像(场景上有投影图像的情况下)。
{ // A Local Scope to handle the projected image lifetime

    auto projectedImageHandle = Zivid::Projection::showImage(camera, projectorImage);

    const auto settings2D = get2DCaptureSettings(camera);

    std::cout << "Capturing a 2D image with the projected image" << std::endl;
    const auto frame2D = projectedImageHandle.capture2D(settings2D);

    const std::string capturedImageFile = "CapturedImage.png";
    std::cout << "Saving the captured image: " << capturedImageFile << std::endl;
    frame2D.imageBGRA_SRGB().save(capturedImageFile);

    std::cout << "Press enter to stop projecting..." << std::endl;
    std::cin.get();

} // projectedImageHandle now goes out of scope, thereby stopping the projection
with zivid.projection.show_image_bgra(camera, projector_image) as projected_image:
    print("Capturing a 2D image with the projected image")
    frame_2d = projected_image.capture_2d(settings_2d)

    captured_image_file = "CapturedImage.png"
    print(f"Saving the captured image: {captured_image_file}")
    frame_2d.image_bgra_srgb().save(captured_image_file)

    input("Press enter to stop projecting ...")
停止投影
如果在句柄上调用 stop() 函数、句柄超出范围或者在相机上启动 3D 捕获,投影都将停止。
通过Projection Handle停止投影
auto projectedImageHandle = Zivid::Projection::showImage(camera, projectorImage);
std::cout << "Press enter to stop projecting using the \".stop()\" function." << std::endl;
std::cin.get();
projectedImageHandle.stop();
var projectedImageHandle = Zivid.NET.Projection.Projection.ShowImage(camera, projectorImage);
Console.WriteLine("Press enter to stop projecting using the \".Stop()\" function");
Console.ReadLine();
projectedImageHandle.Stop();
通过上下文管理器(context manager)离开作用域来停止投影
{
    projectorImage = createProjectorImage(projectorResolution, greenColor);
    projectedImageHandle = Zivid::Projection::showImage(camera, projectorImage);

    std::cout << "Press enter to stop projecting by leaving a local scope" << std::endl;
    std::cin.get();
}
void projecting(Zivid::Camera &camera, const Zivid::Image<Zivid::ColorBGRA> &projectorImageFunctionScope)
{
    auto projectedImageHandle = Zivid::Projection::showImage(camera, projectorImageFunctionScope);

    std::cout << "Press enter to stop projecting by leaving a function scope" << std::endl;
    std::cin.get();
}
通过触发 3D 捕获来停止投影
projectedImageHandle = Zivid::Projection::showImage(camera, projectorImage);

std::cout << "Press enter to stop projecting by performing a 3D capture" << std::endl;
std::cin.get();
const auto settings = Zivid::Settings{ Zivid::Settings::Acquisitions{ Zivid::Settings::Acquisition() } };
camera.capture3D(settings);
projectedImageHandle = Zivid.NET.Projection.Projection.ShowImage(camera, projectorImage);

Console.WriteLine("Press enter to stop projecting by performing a 3D capture");
Console.ReadLine();
var settings = new Zivid.NET.Settings
{
    Acquisitions = { new Zivid.NET.Settings.Acquisition { } },
};
using (var frame3D = camera.Capture3D(settings)) { }
Projection Brightness(投影仪亮度)
Zivid 固件旨在通过对光输出(投影仪亮度)施加限制来保障相机的使用寿命。
如果您的目标是在投影过程中最大化亮度,请仅使用投影仪的一个颜色通道进行投影。您可以通过将投影图像中的每个彩色像素设置为 单一 的纯色值来实现这一点:红色 (255,0,0)、绿色 (0,255,0) 或蓝色 (0,0,255)。在不需要投射光线的位置,请将像素设为黑色 (0,0,0)。
小技巧
当谈到人类的感知时,绿色是迄今为止最好的选择,因为我们的眼睛对绿色比对红色和蓝色更敏感。
当投射白光或红、绿、蓝光的任何其他组合时,相机固件将自动降低光输出(投影仪亮度)。即使几乎所有像素都被设置为例如纯绿色(0,255,0),这种情况也会发生,只有一个例外,即像素稍微偏离纯绿色或黑色,例如(0,255,1)。
代码示例
要获得投影功能的实践经验,请查看以下代码示例:
版本历史
SDK |
变更 |
|---|---|
2.16 |
通过棋盘格特征点而不是角点重新投影点。 |
2.12 |
2D 图像投影 API 已从实验性功能的范畴中移除。 |
2.11.0 |
添加了对 C# 和 Python 的支持。 |
2.10 |
新增了实验性功能 2D 图像投影 API。 |