基于捕获速度的设置选择器
本章节将根据您从触发采集到获得点云的时间预算来提供有关最佳相机设置的详细说明。同时,我们还会考虑您的PC规格,因为数据传输和点云处理也取决于此。我们通过优化3D捕获的设置来获得良好的点云,以及通过优化2D捕获的设置来获得良好的彩色图像。
在这之前,您已确定选择哪款Zivid相机用于您的单品拣选应用,并且已正确安装和定位它。下一步是根据您的PC规格选择满足您的周期时间要求的相机设置。如果您还没有准备好PC,本文也介绍了如何结合使用的设置找到满足您的捕获时间要求的PC规格。
3D设置
我们根据场景的复杂性将单品拣选应用分为两类。对于每个类别,我们指定并推荐满足给定成像要求和捕获速度要求的设置。
消费品(Consumer Goods)
如果您的场景不包含非常明亮、反光和深色的物体,您可以选择适用于单品拣选的快速设置(Fast settings)来节省大量的循环时间。快速设置(Fast settings)覆盖了较窄的动态范围,但能够提供更快的捕获。这里有一个适合使用快速设置的场景示例。如您所见,里面没有导致强烈直接反射、高光和饱和度的物体,也没有颜色非常暗的物体。
备注
如果场景中没有明亮、反光和深色的物体,请选择快速设置。
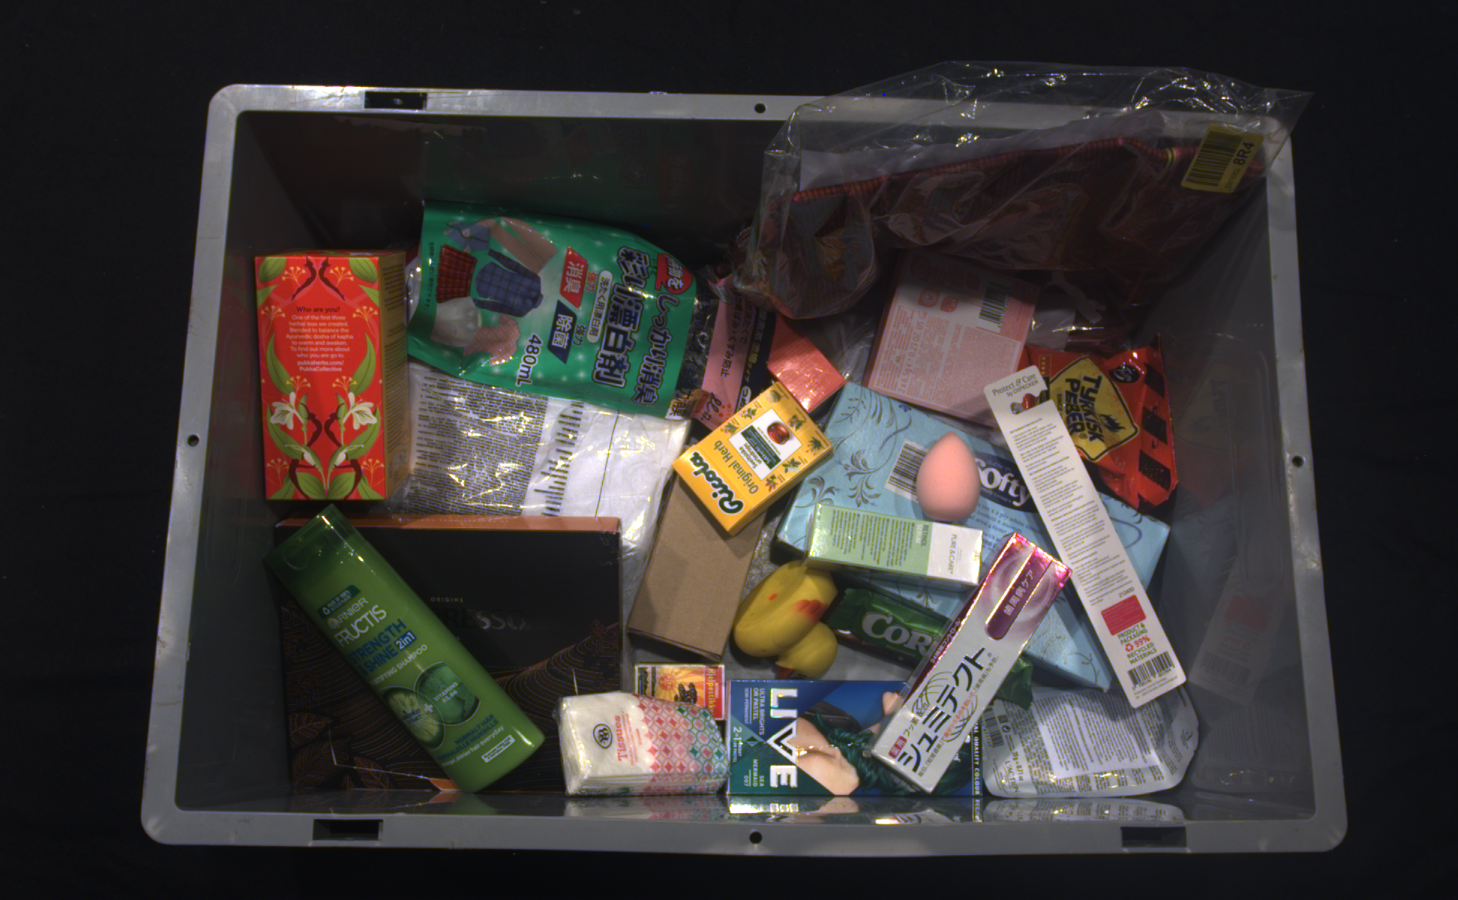
通过消费品的质量设置(Quality settings),相机覆盖了相当宽的动态范围,对各种物体都能提供良好的点云。在这种情况下,场景可以包含从明亮和反光的塑料包装物体和装载塑料袋中的物品到深色吸收材料中的任何物体。下图描绘了一个典型的需要质量设置的复杂消费品场景。
备注
如果您希望确保相机不会丢失任何物体的数据,请选择质量设置(Quality settings)。
设置选择表
下表是一个基于所需捕获时间预算的设置选择器工具。这张表格同时显示了可以满足您的捕获速度要求的 PC 的性能和成本。你可以转到 推荐的工业 PC 来查看高端、中端和低端PC配置的示例。
如果您 彩色图像中存在随机色调的色彩不一致 ,请选择您所在地区的电网频率预设值(50 Hz 或 60 Hz)。如果环境光没有问题,请选择 Off 以获得最佳性能。为了确保万无一失,您可以使用 Zivid 相机 检查场景中是否存在闪烁的光线 。
应用 |
捕获时间(2D + 3D) |
相机设置 |
||
|---|---|---|---|---|
高端电脑 |
中端电脑 |
低端电脑 |
||
消费品(质量/Quality) |
~250 毫秒 |
~850 毫秒 |
~1600 毫秒 |
|
消费品(快速/Fast) |
~150 毫秒 |
~250 毫秒 |
~430 毫秒 |
|
如需下载所需的设置文件,您还可以在 Zivid Studio 中连接到相机(您的特定型号),选择预设设置,打开环境光适应,然后导出设置。
小心
适应环境光频率的设置的捕获时间可能会更长。
应用
相机设置
消费品(质量/Quality)
消费品(快速/Fast)
如需下载所需的设置文件,您还可以在 Zivid Studio 中连接到相机(您的特定型号),选择预设设置,打开环境光适应,然后导出设置。
小心
适应环境光频率的设置的捕获时间可能会更长。
应用
相机设置
消费品(质量/Quality)
消费品(快速/Fast)
为了证实能够达到上述单品拣选应用的要求,我们在多种不同规格的PC上使用Zivid相机运行基准捕获程序(benchmark capture programs)。下表显示了其结果。
包裹分拣
根据场景复杂性和捕获时间,包裹分拣设置也分为两种设置。
Parcels(包裹) 快速设置旨在实现最短的循环时间。这些设置的动态范围有限,但对于相对容易成像的物体来说已经足够了,例如:
纸板箱
白色信封
亮光塑料袋
备注
如果您仅对箱子、包裹等进行成像,请选择包裹快速设置设置(Parcels Fast)。
小技巧
尝试增加曝光时间以获得对深色的镜面物体的更多数据覆盖或切换到包裹质量预设。
对于更具挑战性的场景,您应该尝试 Parcels(包裹) 质量设置。这些设置具有更大的动态范围,并且能够在以下对象上获得良好的表面覆盖:
黑色塑料袋
深色塑料袋
深色气泡膜
小技巧
如需减少捕获时间,可以将引擎从 Omni 切换为 Stripe, 但是请注意,这样可能对黑色包裹的成像产生影响。
设置选择表
如果您遇到 彩色图像中以随机色调形式出现的色彩不一致 或 整个点云中出现波纹/波浪式的伪影 ,请选择 50/60 Hz 以选择适应环境光(电网)频率的预设值。如果环境光没有问题,请将其设置为 Off 以获得最佳性能。为确保万无一失,您可以使用 Zivid 相机 检查场景中是否有闪烁的光线 。
应用 |
捕获时间(2D + 3D) |
相机设置 |
||
|---|---|---|---|---|
高端电脑 |
中端电脑 |
低端电脑 |
||
包裹(质量) |
~135 毫秒 |
~900 毫秒 |
~1600 毫秒 |
|
包裹(快速/Fast) |
~50 毫秒 |
~100 毫秒 |
~ 200毫秒 |
|
如需下载所需的设置文件,您还可以在 Zivid Studio 中连接到相机(您的特定型号),选择预设设置,打开环境光适应,然后导出设置。
小心
适应环境光频率的设置的捕获时间可能会更长。
应用
相机设置
包裹(质量/反光)
包裹(快速/哑光)
如需下载所需的设置文件,您还可以在 Zivid Studio 中连接到相机(您的特定型号),选择预设设置,打开环境光适应,然后导出设置。
小心
适应环境光频率的设置的捕获时间可能会更长。
应用
相机设置
包裹(质量/反光)
包裹(快速/哑光)
为了证明包裹预设设置能够达到上述要求,我们在各种 PC 上使用我们的相机不断运行基准捕获程序。下表显示了其结果。
测试3D设置
您可以使用 Zivid Studio 来测试 3D 设置。
可通过以下操作在Zivid Studio中导入设置:
点击 File → Import Capture Settings
导航到设置文件的位置
点击Open
您还可以将 YML 文件拖放到 Zivid Studio 中以导入设置。
您也可以使用 SDK 加载设置。
2D设置
我们为您的单品拣选应用提供三种获取 2D 设置的选项:
使用设置预设
使用Zivid标定板和代码示例来自动获取2D设置
手动调整 2D 设置
3D 设置预设也包括 2D 设置。因此,我们建议对 3D 和 2D 捕获使用相同的设置预设。如果这不能提供令人满意的结果,请查看以下选项。
自动 2D 设置
运行 auto_2d_settings.py 示例,使用 Zivid 标定板自动查找 2D 捕获的采集设置。将标定板放置在箱子的顶部或底部,并通过指定标定板位置和所需的对焦范围(箱子高度)作为命令行参数来运行示例。例如,如果您将标定板放置在箱子顶部,箱子高度为 400 毫米,则按如下方式运行示例:
python auto_2d_settings.py --desired-focus-range 400 --checkerboard-at-start-of-range --use-projector --no-color-balance
如果将标定板放在料箱底部,请运行:
python auto_2d_settings.py --desired-focus-range 400 --checkerboard-at-end-of-range --use-projector --no-color-balance
手动调整 2D 设置
如果 2D 设置预设或自动调整无法提供足够的 2D 质量,您可以通过调整色彩平衡和伽马参数来手动调整颜色设置。伽马校正可用于使图像变暗或变亮。颜色通道参数使彩色图像看起来更自然。
有关如何优化颜色的深入教程,请参阅 优化彩色图像 。
测试2D设置
要测试 2D 设置,您可以使用 Zivid Studio 中的 2D 捕获模式或运行我们的一个代码示例。
可通过以下操作在Zivid Studio中导入设置:
点击 File → Import Capture Settings
导航到设置文件的位置
点击Open
您还可以将 YML 文件拖放到 Zivid Studio 中以导入设置。
以下代码展示了如何在 API 中使用导出的设置。

auto camera = zivid.connectCamera();
const auto settings = Zivid::Settings(settingsPath);
    const auto frame2D = camera.capture2D(settings);
var camera = zivid.ConnectCamera();
var settings = new Zivid.NET.Settings(settingsFile);
using (var frame2D = camera.Capture2D(settings))
完成捕获后,可以选择保存为 线性 RGB(linear RGB) 或 sRGB 格式的图像。
const auto imageRGBA = frame2D.imageRGBA();
const auto imageFile = "ImageRGBA_linear.png";
std::cout << "Saving 2D color image (Linear RGB) to file: " << imageFile << std::endl;
imageRGBA.save(imageFile);
var imageRGBA = frame2D.ImageRGBA();
var imageFile = "ImageRGBA_linear.png";
Console.WriteLine($"Saving 2D color image (Linear RGB) to file: {imageFile}");
imageRGBA.Save(imageFile);
const auto imageSRGB = frame2D.imageRGBA_SRGB();
const auto imageFile = "ImageRGBA_sRGB.png";
std::cout << "Saving 2D color image (sRGB color space) to file: " << imageFile << std::endl;
imageSRGB.save(imageFile);
var imageSRGB = frame2D.ImageRGBA_SRGB();
var imageFile = "ImageRGBA_sRGB.png";
Console.WriteLine($"Saving 2D color image (sRGB color space) to file: {imageFile}");
imageSRGB.Save(imageFile);
备注
我们在低环境光(~300 lx)和高环境光(~1000 lx)条件下测试了我们为上述典型场景推荐的3D和2D设置。我们已经完成了我们在相机选择器章节中指定的距离范围,以及场景中的所有项目的测试。因此,我们相信这些设置将适用于属于这些类别的大多数场景。但是,如果您确切地知道场景中的项目是什么,并且您是专业的相机使用者,则可以手动配置设置以针对您的情况来优化它们。您可以查看 捕获高质量的点云 来了解如何做到这一点。
避免闪烁光的干扰
闪烁光源(10-1000 Hz),例如条形码阅读器和荧光灯管,可能会干扰 Zivid 相机。这种干扰可能表现为 彩色图像中出现颜色不一致 。为避免这种情况,请确保闪烁光源符合以下其中一个条件:
连续且频率与 Zivid 相机曝光时间相关
连续且频率与 Zivid 相机采样间隔相关
在Zivid相机采集期间处于非活动状态
在有光源的情况下进行配置
第一步是确定光源的频率。如果您不确定频率,可以使用 Zivid 相机进行测量。
检测和测量环境光频率
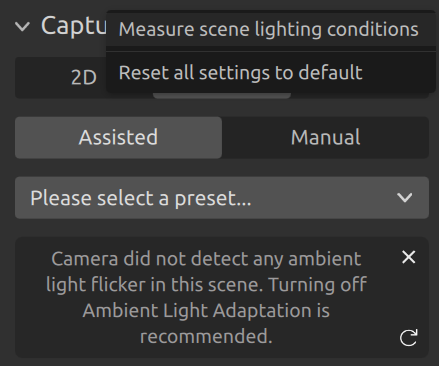
打开 Zivid Studio 并连接到您的相机。点击 Capture 部分中的三个点。然后点击 Measure scene lighting conditions 。软件将显示检测到的环境光闪烁频率。
或者,您可以使用 SDK 来测量环境光照条件。此方法将报告是否检测到明显的环境光闪烁,以及它是否对应于 50 Hz 或 60 Hz 的电网。
std::cout << "Measuring scene conditions" << std::endl;
auto sceneConditions = camera.measureSceneConditions();
auto flickerClassification = sceneConditions.ambientLight().flickerClassification().toString();
std::cout << "Flicker classification: " << flickerClassification << std::endl;
    auto flickerFrequency = sceneConditions.ambientLight().flickerFrequency();
    std::cout << "Measured flickering frequency in the scene: " << flickerFrequency << " Hz." << std::endl;
Console.WriteLine("Measuring scene conditions");
var sceneConditions = camera.MeasureSceneConditions();
var flickerClassification = sceneConditions.AmbientLight.FlickerClassification.ToString();
Console.WriteLine("Flicker classification: " + flickerClassification);
    var flickerFrequency = sceneConditions.AmbientLight.FlickerFrequency;
    Console.WriteLine($"Measured flickering frequency in the scene: {flickerFrequency} Hz.");
print("Measuring scene conditions")
scene_conditions = camera.measure_scene_conditions()
flicker_classification = scene_conditions.ambient_light.flicker_classification
print(f"Flicker classification: {flicker_classification}")
    flicker_frequency = scene_conditions.ambient_light.flicker_frequency
    print(f"The measured flickering frequency in the scene: {flicker_frequency} Hz.")
如果只测量一个光源(例如条形码扫描器),请关闭场景中的所有其他光源(例如环境光)。
然后,您可以选择配置主动光源或 Zivid 相机设置,以避免干扰。
使用以下方法将活动光源(例如,条形码扫描仪)频率( \(f_c\) )与 Zivid 相机曝光时间( \(t_z\) )进行匹配:
例如:
使用以下公式将 Zivid 相机的曝光时间 ( \(t_z\) ) 与活动光源(例如条形码扫描器)的频率 ( \(f_c\) ) 相匹配:
例如:
如果计算出的曝光时间不可行,则使用相同的公式将 2D 采样间隔 ( \(t_z\) ) 设置为与活动光源频率 ( \(f_c\) ) 相匹配:
例如:
例如,当为了补偿较长的曝光时间而过度降低投影仪亮度时,就会出现这种情况,从而导致彩色图像出现明显的噪点。这种情况在使用了 Settings2D::Sampling::Color 下的 rgb 模式时会出现,而使用 rgbStrongAmbientLight 模式则不会。另一个例子是过曝,如果无法通过其他采集设置(例如增益或投影仪亮度)充分补偿较长的曝光时间,就会发生过曝。
在同时存在活动和闪烁的交流电源的情况下进行配置
使用电网线频率调制(例如,美国为 60 Hz,欧盟为 50 Hz)的强且不可控的光源会带来额外的挑战。由于无法更改交流电源光源(例如荧光灯管)的频率,因此您需要调整 Zivid 相机的设置以及正在使用的光源的频率。
配置 Zivid 相机
为了减轻 环境光的干扰 ,应将 Zivid 相机的曝光时间设置为电网频率的倍数。
10 000 µs or 20 000 µs in the presence of 50 Hz grid frequency.
8 333 µs or 16 667 µs in the presence of 60 Hz grid frequency.
如果由于 2D 图像过度曝光而无法调整曝光时间以匹配电网频率,则启用 2D 采样间隔(sampling interval) 并将其与您所在区域的电网频率同步。
10 000 µs in the presence of 50 Hz grid frequency.
8 333 µs in the presence of 60 Hz grid frequency.
必须配置 2D 采集的曝光时间或 2D 采样间隔持续时间,以避免 颜色不一致(随机色调) 。对于3D 采集,除非观察到 环境光干扰产生的波纹 问题,否则无需进行此操作。
与 2D 采样间隔匹配相比,曝光时间匹配方案更受欢迎,因为它能提供更好的性能和更一致的捕获时间。
配置主动光源
最后,与 Zivid 相机曝光时间相匹配的主动闪烁光源的频率可按以下方式计算:
在下一章节中,我们将介绍如何通过使用多线程来 优化机器人循环时间 。
版本历史
SDK |
变更 |
|---|---|
2.17.0 |
增加了对 Zivid 3 相机和采样间隔(Sampling Interval)设置的支持。 |
2.16.0 |
增加了对测量环境光频率的支持以及避免环境光干扰的指南。 |
2.12.0 |
Zivid One+ 已达到其生命周期的终点并且不再受支持。 |