Projector Brightness(投影仪亮度)
介绍
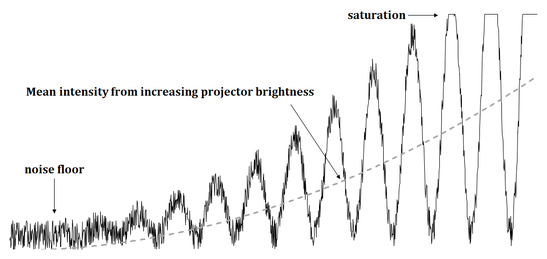
投影仪亮度可以通过控制输出功率,从而控制投影仪发出的光子数量。使用投影仪的亮度是最大化信噪比( SNR )的最有效方法。 最大化投影仪的亮度将最大化相机的信号幅度,只要来自投影仪的反射光不会使像素过饱和,就可以最大程度地降低噪声的影响。在增加峰值信号幅度的同时,增加的亮度也会影响图像的平均强度。这也意味着投影仪亮度可用于控制曝光(以曝光等级来测量)。
投影仪
投影仪亮度数值基于控制投影仪发出的流明量的相对应的数值。下表显示了 Zivid 相机中可用的投影仪亮度与曝光等级的关系。将投影仪亮度调至 0 将关闭投影仪。
亮度 |
0.25 |
0.50 |
1.00 |
1.80 |
2.00 |
2.50 |
3.00 |
Stops |
-2 |
-1 |
0 |
+0.85 |
+1 |
+1.32 |
+1.58 |
亮度(Brightness)与曝光等级(stops)之间的关系由以下公式给出: \(\text{Stops} = \log_2(\text{Brightness})\) 。例如,当投影仪亮度从 0.50 提高到 1.00 时,图像的平均强度将增加 1 档(1 stop)。
Thermal throttling(热节流)
为防止投影仪过热,相机会在采集捕获过程中自动限制其占空比(duty cycle)。这意味着相机可能会在两次采集之间暂停,以进行冷却后再继续工作。
哪些因素会影响热节流?
投影仪的最大占空比(即投影仪可以保持工作状态的时间比例)会随着其温度升高而降低。该温度受以下因素影响:
投影仪亮度
环境温度
投影仪占空比取决于:
所使用的视觉引擎(某些引擎使用更多的投影图案)
每次捕获的采集次数
每次采集的曝光时间
用户看到的是什么样的?
当发生热节流时:
捕获过程中,相机会暂停片刻进行冷却。
在 Zivid Studio 中,您将看到节流时间的显示。
在 SDK 中,您可以检查 frame 的元数据,以查看是否发生了节流(throttling)。
对于 Zivid 2+ MR130、MR60 和 LR110 相机在 2D 捕获模式下,热节流(thermal throttling):
仅在极高的环境温度下才会激活
不受投影仪亮度影响
如何检查捕获后是否发生了热节流:
在 Zivid Studio 中,检查信息面板( View → Information )。
在 SDK 中,检查 frame 的元数据以获取热节流时间。

std::cout << "Thermal throttling time:" << std::endl;
std::cout << std::chrono::duration_cast<std::chrono::milliseconds>(frameInfo.metrics().throttlingTime().value())
                 .count()
          << " ms" << std::endl;
Console.WriteLine("Thermal throttling time:");
Console.WriteLine(frameInfo.Metrics.ThrottlingTime.Milliseconds + " ms");
Zivid 2+ (M60/M130/L110) 投影仪最大亮度限制
默认情况下,Zivid 2+ M60/M130/L110 相机的最大投影仪亮度取决于投影仪所用光线的颜色。对于 3D 捕获,光信号的颜色由 Sampling::Pixel 设置决定。对于 2D 捕获,投影颜色始终为白色。
- 使用以下
Zivid::Settings::Sampling::Pixel选项,blueSubsample2x2,redSubsample2x2,blueSubsample4x4,redSubsample4x4 投影仪最大亮度为2.5。
- 使用
Zivid::Settings::Sampling::Pixel::all或在 2D 捕获中 最大投影仪亮度上限为 2.2,以将相机运行期间的功耗保持在 100 W 以下。
如果您的应用允许超过 100 W 的功耗,您可以通过配置文件更改此限制,以允许投影仪亮度可设置为 2.5,它将在 Zivid::Settings::Sampling::Pixel::all 时或 2D 捕获中生效。
如何提高 Zivid 2+ M60/M130/L110 的最大投影仪亮度限制
您可以通过更新 Config.yml 文件来增加投影仪亮度限制。如果该文件已存在且位于 %LOCALAPPDATA%\Zivid\API (Windows)或 "${XDG_CONFIG_HOME-$HOME/.config}"/Zivid/API (Ubuntu)中,请使用以下信息进行更新:
__version__:
    serializer: 1
    data: 18
Configuration:
    Camera:
        Power:
            Limit: unlimited
备注
确保
__version__部分中的数据编号为18或更高。
如果文件不存在:
下载
Config.yml文件。将下载的配置文件放在以下目录中。
mkdir %LOCALAPPDATA%\Zivid\API
move %HOMEPATH%\Downloads\Config.yml %LOCALAPPDATA%\Zivid\API\
mkdir --parents "${XDG_CONFIG_HOME-$HOME/.config}"/Zivid/API
mv ~/Downloads/Config.yml "${XDG_CONFIG_HOME-$HOME/.config}"/Zivid/API/
小心
任何现有的配置文件都将被覆盖。
小心
Zivid 配置文件必须使用 .yml 文件扩展名(而不是 .yaml )。
版本历史
SDK |
变更 |
|---|---|
2.17 |
增加了对捕获后获取节流时间的支持。 |
2.10.1 |
使用白光捕获时,Zivid 2+ 的最大投影仪亮度默认受到限制,可以选择使用 Config.yml 更改该限制。 |
2.10.0 |
添加了 Zivid 2+ 系列。 |
2.9.0 |
改进了热节流功能,可以在预测时间范围内的采集之间进行热节流,而不是暂停完整的捕获。 |