使用可选依赖项配置 C++ 示例
本教程介绍如何使用 CMake 为 Zivid C++ 示例配置可选依赖项。
要求
可选要求
一些示例依赖于外部库,特别是:
备注
以下说明已使用这些版本的依赖项进行了测试:
Visual Studio 2019 及更高版本
CMake 3.24 及更高版本
PCL 1.12.1
Eigen 3.4.0
OpenCV 4.7.0
如果您使用其他版本,您可能会遇到问题。
根据您要运行的示例程序安装所需的依赖项;请参阅下表。
示例程序 |
PCL |
Eigen |
OpenCV |
OpenCV (CUDA) |
Halcon |
|---|---|---|---|---|---|
ReadPCLVis3D |
YES |
||||
CaptureWritePCLVis3D |
YES |
||||
CaptureAndVisualizeNormals |
YES |
||||
StitchByTransformation |
YES |
||||
StitchByTransformationFromZDF |
YES |
||||
StitchViaLocalPointCloudRegistration |
YES |
||||
StitchContinuouslyRotatingObject |
YES |
||||
StitchUsingRobotMountedCamera |
YES |
||||
MaskPointCloud |
YES |
||||
Capture2DAnd3D |
YES |
YES |
|||
ROIBoxViaCheckerboard |
YES |
||||
UtilizeHandEyeCalibration |
YES |
||||
PoseConversions |
YES |
||||
ROIBoxViaArucoMarker |
YES |
||||
CaptureUndistort2D |
YES |
||||
CreateDepthMap |
YES |
||||
ProjectAndFindMarker |
YES |
||||
ReprojectPoints |
YES |
||||
ReadProjectAndCaptureImage |
YES |
||||
GammaCorrection |
YES |
||||
AllocateMemoryForPointCloudData |
YES |
||||
CaptureAndConvertImageWithOpenCVOnCuda |
YES |
||||
TransformPointCloudViaCheckerboard |
YES |
||||
TransformPointCloudViaArucoMarker |
YES |
||||
CaptureHalconViaGenICam |
YES |
||||
CaptureHalconViaZivid |
YES |
Ubuntu
Eigen
通过运行以下命令从包管理器安装 Eigen 3:
sudo apt install libeigen3-dev
导航到您在 zivid-cpp-samples 中创建的构建目录并运行
mkdir build
cd build
cmake -DEIGEN3_INCLUDE_DIR=/usr/include/eigen3 -DUSE_OPENCV=OFF -DUSE_PCL=OFF ../source
cmake --build .
PCL
通过运行以下命令从包管理器安装 PCL:
sudo apt install libpcl-dev
导航到您在 zivid-cpp-samples 中创建的构建目录并运行
mkdir build
cd build
cmake -DUSE_PCL=ON -DUSE_EIGEN3=OFF -DUSE_OPENCV=OFF ../source
cmake --build .
OpenCV
通过运行以下命令从包管理器安装 OpenCV:
sudo apt install libopencv-dev clang-tidy
导航到您在 zivid-cpp-samples 中创建的构建目录并运行
mkdir build
cd build
cmake -DUSE_OPENCV=ON -DUSE_EIGEN3=OFF -DUSE_PCL=OFF ../source
cmake --build .
OpenCV (CUDA)
要安装 CUDA,请按照 NVIDIA linux guide 中的说明操作。
较旧的显卡可能不支持所需的所有 CUDA 指令,需要额外的配置。您可以在官方的 OpenCV CUDA introduction 和 OpenCV contrib repository 中找到更多信息。
警告
如果在使用 cmake --build . 时遇到系统随机冻结的情况,请尝试添加 --parallel n 选项,并将 n 设置为低于您的 CPU 核心数。
运行以下命令安装构建带 CUDA 支持的 OpenCV 所需的工具:
sudo apt install clang-tidy ninja-build cmake
构建带 CUDA 支持的 OpenCV:
wget https://github.com/opencv/opencv/archive/refs/tags/4.13.0.zip
unzip 4.13.0.zip -d opencv
rm 4.13.0.zip
wget https://github.com/opencv/opencv_contrib/archive/refs/tags/4.13.0.zip
unzip 4.13.0.zip -d opencv
rm 4.13.0.zip
cd opencv/opencv-4.13.0
mkdir build
cd build
cmake -S .. -D WITH_CUDA=ON -G Ninja -D CMAKE_BUILD_TYPE=Release -D OPENCV_EXTRA_MODULES_PATH=../../opencv_contrib-4.13.0/modules/ -D ENABLE_CUDA_FIRST_CLASS_LANGUAGE=ON -D CUDAToolkit_ROOT=/usr/local/cuda
cmake --build .
cmake --install . --prefix local/
导航到您在 zivid-cpp-samples 中创建的构建目录并运行:
mkdir build
cd build
cmake -S ../source -D CMAKE_PREFIX_PATH=<path-to-opencv-build>/local/lib/cmake/opencv4 -D USE_OPENCV=ON -D USE_CUDA=ON -D USE_OPENCV_CUDA=ON -D EIGEN3_INCLUDE_DIR=/usr/include/eigen3 -D CUDAToolkit_ROOT=/usr/local/cuda -G Ninja -D CMAKE_BUILD_TYPE=Release -D CMAKE_EXPORT_COMPILE_COMMANDS=ON
cmake --build .
运行 CUDA 示例时,请将构建好的 OpenCV 库包含在 LD_LIBRARY_PATH 中:
export LD_LIBRARY_PATH=<path-to-opencv-build>/local/lib:$LD_LIBRARY_PATH
HALCON
您需要在电脑上安装 Halcon 才能运行 Halcon C++ 示例。请参阅 Install Zivid + HALCON for Linux 获取更多说明。
安装 Halcon 后,配置 CMake 以使用 Halcon 示例。
导航到您在 zivid-cpp-samples 中创建的构建目录并运行
mkdir build
cd build
cmake -DUSE_HALCON=ON -DUSE_EIGEN3=OFF -DUSE_OPENCV=OFF -DUSE_PCL=OFF ../source
cmake --build .
Windows
Eigen
从 https://libeigen.gitlab.io/ 下载 Eigen 的最新稳定版本,并将文件夹解压到所需的位置。配置 CMake 项目时,请包含 Eigen 以配置依赖它的示例。
Command Prompt
导航到您在 zivid-cpp-samples 中创建的构建目录并运行
cmake -DEIGEN3_INCLUDE_DIR=<path> -DUSE_OPENCV=OFF -DUSE_PCL=OFF ../source
其中 <path> 是安装 Eigen 的完整路径,例如 C:/Program Files/Eigen 。
CMake GUI
在 CMake GUI 中,点击 Add Entry 添加 Eigen 的路径。添加 EIGEN3_INCLUDE_DIR ,并将值指向解压文件夹的位置。
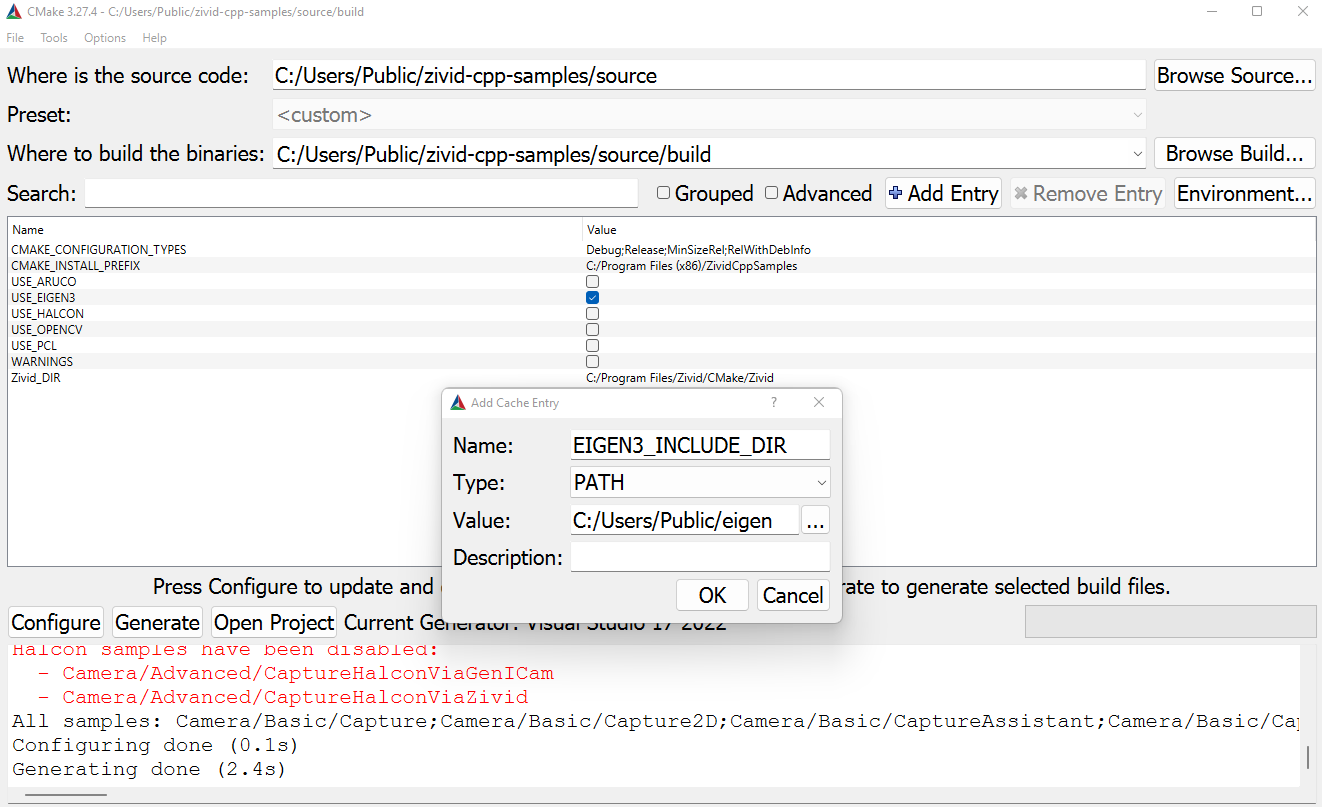
确保选中 USE_EIGEN3 ,然后点击 Configure 。然后点击 Generate 和 Open Project 打开 Visual Studio 解决方案。
PCL
在 https://github.com/PointCloudLibrary/pcl/releases 中选择 .exe 下载并安装预构建的 PCL 二进制文件。勾选安装第三方库的选项。
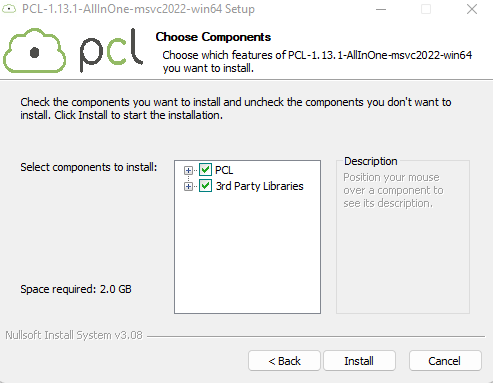
在配置 Zivid PCL 代码示例之前,必须将一些设置添加到 PATH 系统变量中。在您的电脑上,导航至 Control Panel → System and Security → System → Advanced System Settings → Environment Variables 。在 系统变量 下,选择 Path 变量,然后点击 Edit 。
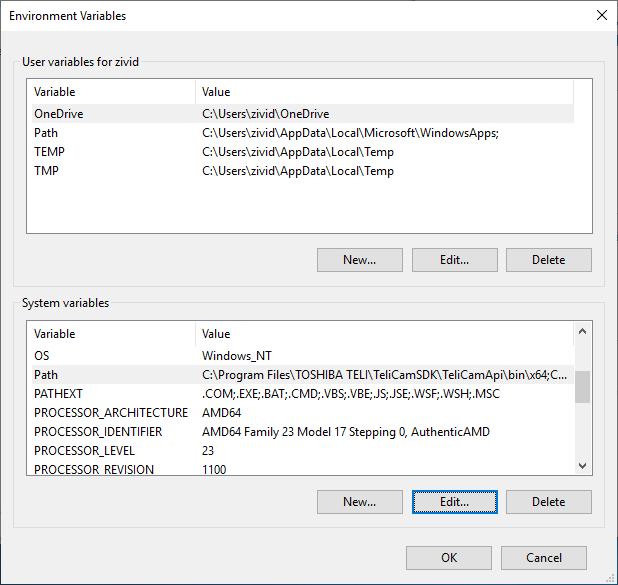
在 Edit environment variable 窗口中,单击 New 并添加 PCL 二进制文件和 OpenNI2(第三方库)的路径,例如:
C:\Program Files\PCL 1.12.1\bin
C:\Program Files\OpenNI2\Tools
如果您已在 Program Files 中安装了 PCL 1.12.1 和 OpenNI2,则可能需要退出 Windows 帐户并重新登录才能使更改生效。
警告
您可能需要手动链接到某些第三方 PCL 库,例如 VTK。如果遇到错误,请在 PATH 系统变量中添加库二进制文件的路径。例如,对于 VTK,如果您在 Program Files 中安装了 PCL 1.12.1,则需要添加 C:/Program Files/PCL 1.12.1/3rdParty/VTK/bin 。
配置 CMake 项目时,应该已经配置了 PCL 的路径。
Command Prompt
导航到您在 zivid-cpp-samples 中创建的构建目录并运行
cmake -DUSE_PCL=ON -DUSE_EIGEN3=OFF -DUSE_OPENCV=OFF ../source
CMake GUI
在 CMake GUI 中,确保选中 USE_PCL 框并单击 Configure 。
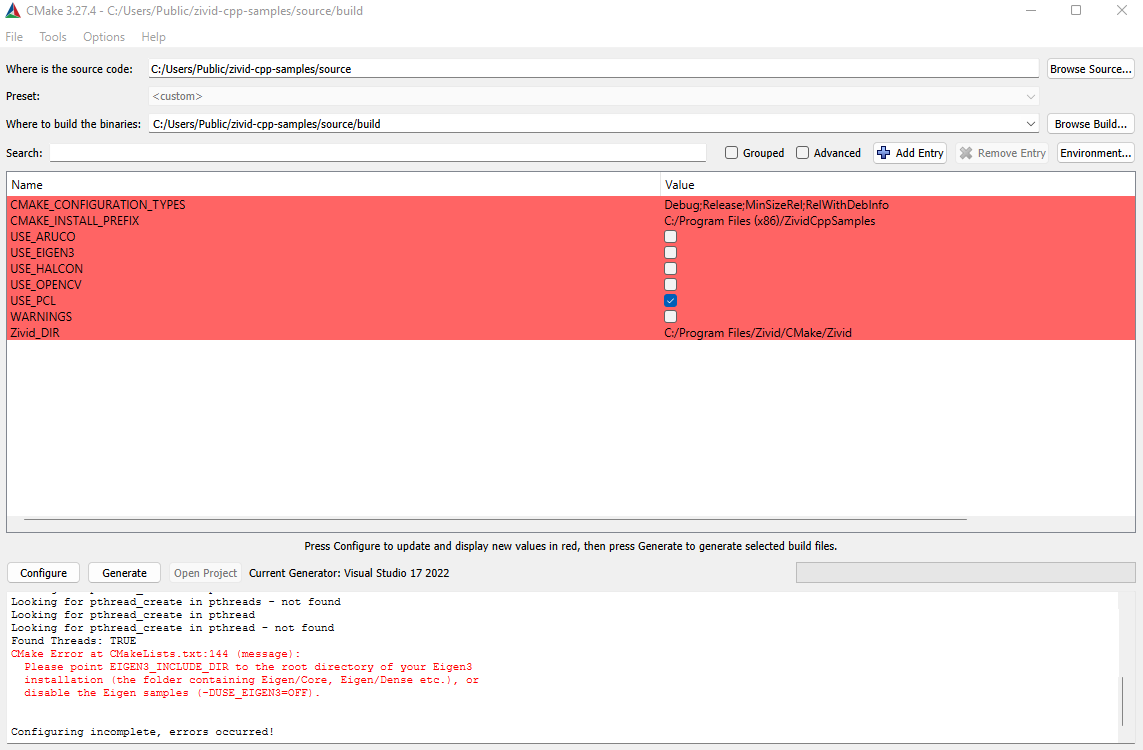
单击 Generate 和 Open Project 以打开 Visual Studio 解决方案。
OpenCV
从 https://opencv.org/releases/ 下载并安装预编译的 OpenCV 二进制文件。解压到你想要的路径,例如
C:\Users\Public
在配置 Zivid OpenCV 代码示例之前,必须将一些设置添加到 PATH 系统变量中。在您的电脑上,导航至 Control Panel → System and Security → System → Advanced System Settings → Environment Variables 。在 系统变量 下,选择 Path 变量,然后点击 Edit 。
在 Edit environment variable 窗口中,单击 New 并添加 OpenCV 二进制文件的路径,例如
C:\Program Files\opencv\build\x64\vc16\bin
如果您已经安装了 OpenCV 4.7.0 并将其解压到 C:/Program Files/opencv 。
警告
您可能需要退出 Windows 帐户并再次登录才能使更改生效。
配置 CMake 项目时,包含 OpenCV 来配置依赖于它的示例。
Command Prompt
导航到您在 zivid-cpp-samples 中创建的构建目录并运行
cmake -DOpenCV_DIR=<path> -DUSE_EIGEN3=OFF -DUSE_PCL=OFF ../source
其中 <path> 是 OpenCV 构建文件夹的完整路径,例如 C:/Program Files/opencv/build 。
CMake GUI
在 CMake GUI 中,点击 Add Entry 添加 OpenCV 的路径。添加 OpenCV_DIR 并将值指向 OpenCV 的构建文件夹。
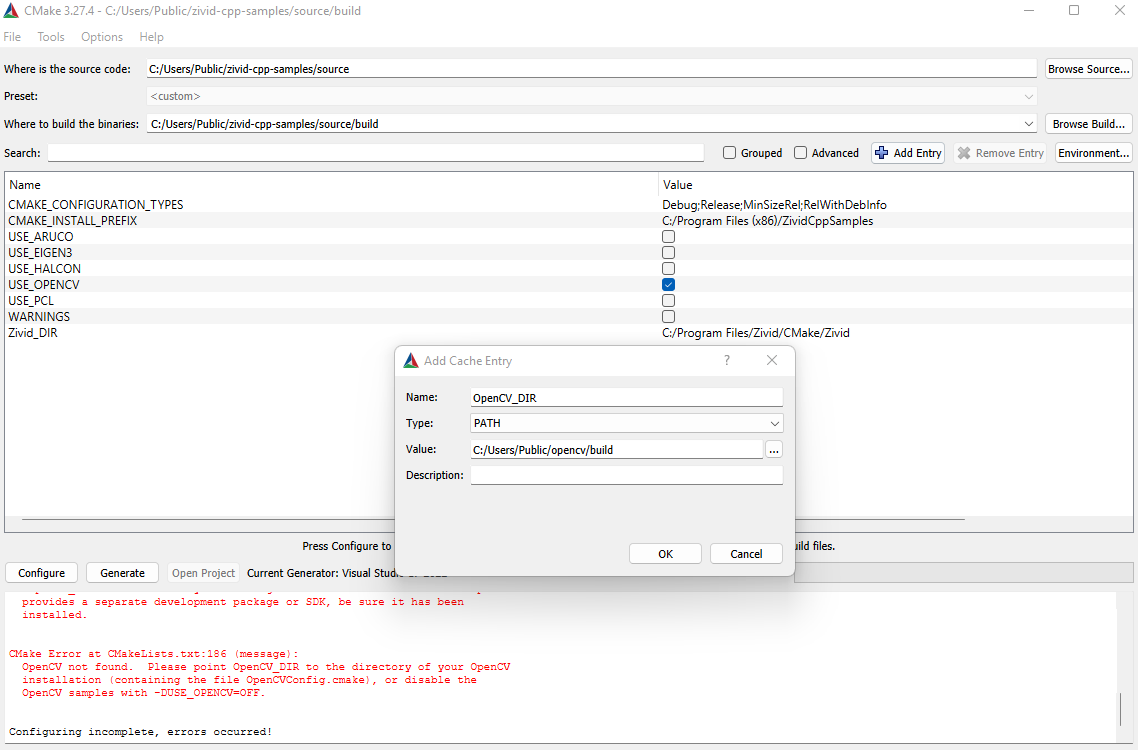
确保勾选了 USE_OPENCV ,然后点击 Configure 。然后点击 Generate 和 Open Project 打开 Visual Studio 解决方案。
HALCON
您需要在电脑上安装 Halcon 才能运行 Halcon C++ 示例。请参阅 在 Windows 中安装 Zivid + HALCON 获取更多说明。
安装 Halcon 后,配置 CMake 以使用 Halcon 示例。
Command Prompt
导航到您在 zivid-cpp-samples 中创建的构建目录并运行
cmake -DUSE_HALCON=ON -DUSE_EIGEN3=OFF -DUSE_OPENCV=OFF -DUSE_PCL=OFF ../source
CMake GUI
确保选中 USE_HALCON 框并单击 Configure 。
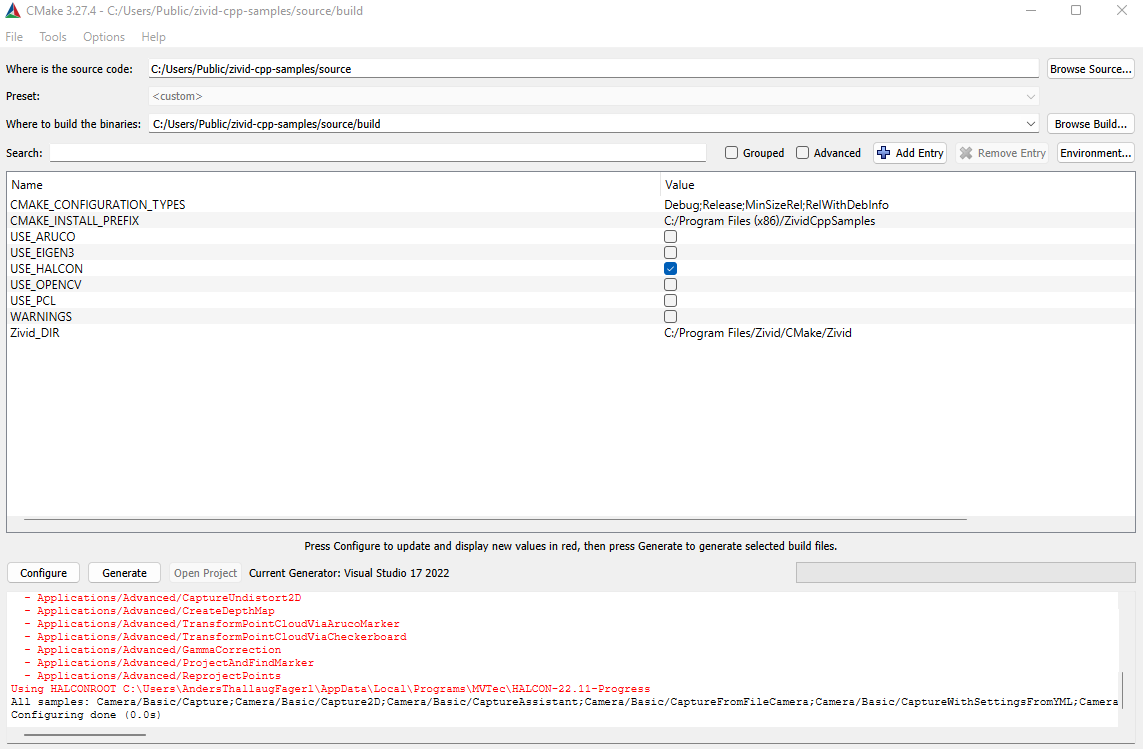
然后单击 Generate 和 Open Project 以打开 Visual Studio 解决方案。
如果要一次性配置多个依赖项,只需在 CMake 中同时添加多个依赖项即可。例如,如果要使用所有需要 Eigen、PCL 和 OpenCV 的示例,可以运行以下命令:
cmake -DEIGEN3_INCLUDE_DIR=<path-to-eigen> -DUSE_PCL=ON -DOpenCV_DIR=<path-to-opencv> ../source
其中 <path-to-eigen> 和 <path-to-opencv> 分别是 Eigen 和 OpenCV 文件夹的路径。