通过棋盘格定义的 ROI 盒
本教程演示了如何使用 Zivid calibration board (7x8 30mm, 300x300mm) 找到 ROI 框参数,以及如何使用该参数过滤料箱内容。我们假设标定板放置在料箱的右下角。料箱尺寸也假定为已知,并用于设置 ROI 盒的尺寸。这样您就可以在相机坐标系中自动找到 ROI 参数。
备注
本教程使用了一个档案相机(file camera)对下图中的场景进行演示。
首先,我们需要捕获棋盘格的点云。

const auto fileCamera = std::string(ZIVID_SAMPLE_DATA_DIR) + "/BinWithCalibrationBoard.zdf";
const auto loadedFrameWithDiagnostics = Zivid::Frame(fileCamera);

std::cout << "Creating virtual camera using file: " << fileCamera << std::endl;
auto camera = zivid.createFileCamera(loadedFrameWithDiagnostics);

auto settings = loadedFrameWithDiagnostics.settings();

const auto originalFrame = camera.capture2D3D(settings);
auto pointCloud = originalFrame.pointCloud();
string fileCamera = Environment.GetFolderPath(Environment.SpecialFolder.CommonApplicationData) + "/Zivid/BinWithCalibrationBoard.zdf";
var loadedFrameWithDiagnostics = new Zivid.NET.Frame(fileCamera);

Console.WriteLine("Creating virtual camera using file: " + fileCamera);
var camera = zivid.CreateFileCamera(loadedFrameWithDiagnostics);

var settings = loadedFrameWithDiagnostics.Settings;

using (var originalFrame = camera.Capture2D3D(settings))
{
    var pointCloud = originalFrame.PointCloud;
file_camera = get_sample_data_path() / "BinWithCalibrationBoard.zdf"
loaded_frame_with_diagnostics = zivid.Frame(file_camera)

print(f"Creating virtual camera using file: {file_camera}")
camera = app.create_file_camera(loaded_frame_with_diagnostics)

settings = loaded_frame_with_diagnostics.settings

original_frame = camera.capture_2d_3d(settings)
point_cloud = original_frame.point_cloud()
棋盘格坐标系的原点位于棋盘格左上角的四个格子之间的交叉点。
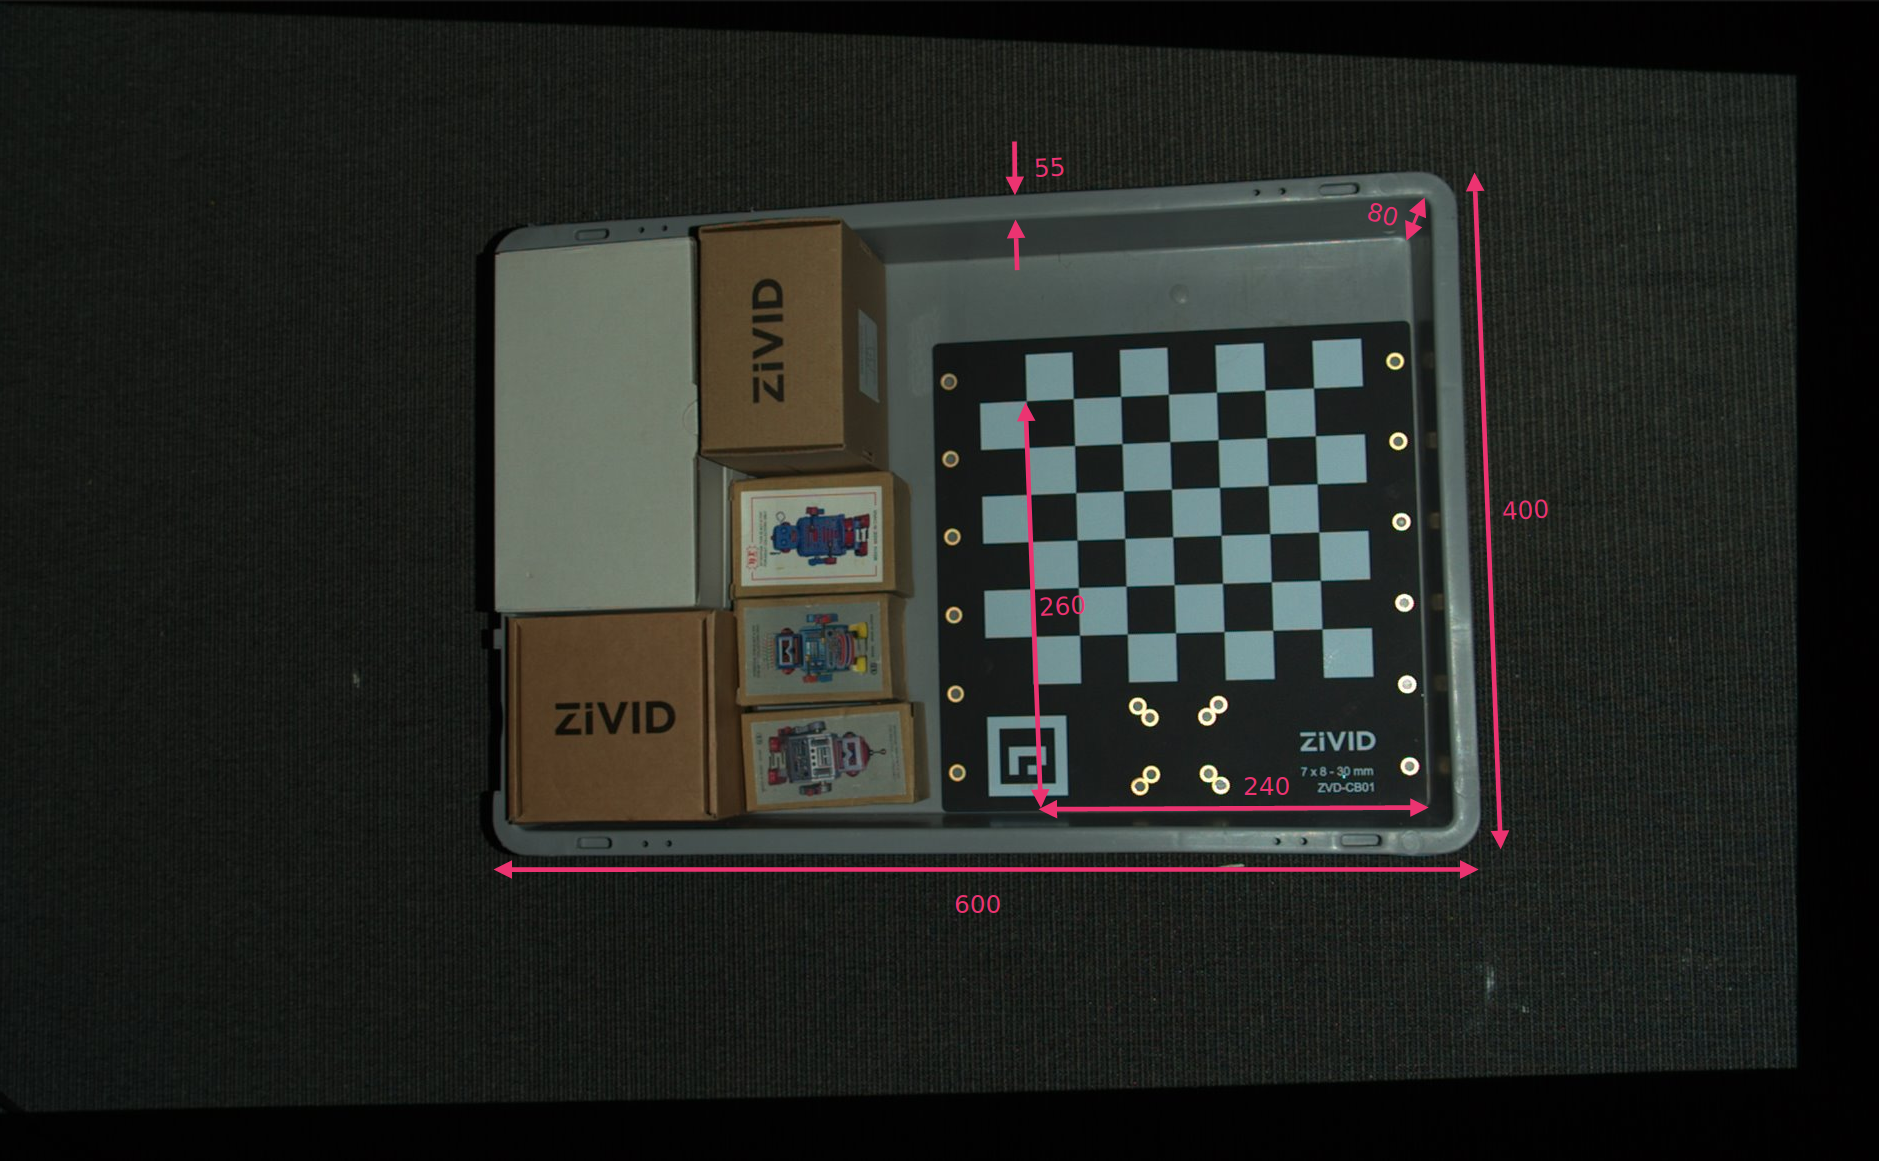
我们定义了 ROI 盒右下角相对于棋盘坐标系的位置,以及 ROI 盒尺寸。然后我们从长度和宽度中减去箱边缘的宽度以移除箱壁。
// Coordinates are relative to the checkerboard origin which lies in the intersection between the four checkers
// in the top-left corner of the checkerboard: Positive x-axis is "East", y-axis is "South" and z-axis is "Down"
const Zivid::PointXYZ roiBoxLowerRightCornerInCheckerboardFrame{ 240.F, 260.F, 5.F };
const Zivid::PointXYZ roiBoxUpperRightCornerInCheckerboardFrame{ roiBoxLowerRightCornerInCheckerboardFrame.x,
                                                                 roiBoxLowerRightCornerInCheckerboardFrame.y
                                                                     - roiBoxWidth,
                                                                 roiBoxLowerRightCornerInCheckerboardFrame.z };
const Zivid::PointXYZ roiBoxLowerLeftCornerInCheckerboardFrame{ roiBoxLowerRightCornerInCheckerboardFrame.x
                                                                    - roiBoxLength,
                                                                roiBoxLowerRightCornerInCheckerboardFrame.y,
                                                                roiBoxLowerRightCornerInCheckerboardFrame.z };
const float roiBoxLength = 545.F;
const float roiBoxWidth = 345.F;
const float roiBoxHeight = 150.F;
// Coordinates are relative to the checkerboard origin which lies in the intersection between the four checkers
// in the top-left corner of the checkerboard: Positive x-axis is "East", y-axis is "South" and z-axis is "Down"
var roiBoxLowerRightCornerInCheckerboardFrame = new Zivid.NET.PointXYZ
{
    x = 240F,
    y = 260F,
    z = 5F
};
var roiBoxUpperRightCornerInCheckerboardFrame = new Zivid.NET.PointXYZ
{
    x = roiBoxLowerRightCornerInCheckerboardFrame.x,
    y = roiBoxLowerRightCornerInCheckerboardFrame.y - roiBoxWidth,
    z = roiBoxLowerRightCornerInCheckerboardFrame.z
};
var roiBoxLowerLeftCornerInCheckerboardFrame = new Zivid.NET.PointXYZ
{
    x = roiBoxLowerRightCornerInCheckerboardFrame.x - roiBoxLength,
    y = roiBoxLowerRightCornerInCheckerboardFrame.y,
    z = roiBoxLowerRightCornerInCheckerboardFrame.z

};
float roiBoxLength = 545F;
float roiBoxWidth = 345F;
float roiBoxHeight = 150F;
roi_box_lower_right_corner = np.array([240, 260, 0.5])
roi_box_upper_right_corner = np.array(
    [
        roi_box_lower_right_corner[0],
        roi_box_lower_right_corner[1] - roi_box_width,
        roi_box_lower_right_corner[2],
    ]
)
roi_box_lower_left_corner = np.array(
    [
        roi_box_lower_right_corner[0] - roi_box_length,
        roi_box_lower_right_corner[1],
        roi_box_lower_right_corner[2],
    ]
)
roi_box_length = 545
roi_box_width = 345
roi_box_height = 150
然后可以设置定义 ROI 盒基坐标系的三个点。
const Zivid::PointXYZ pointOInCheckerboardFrame = roiBoxLowerRightCornerInCheckerboardFrame;
const Zivid::PointXYZ pointAInCheckerboardFrame = roiBoxUpperRightCornerInCheckerboardFrame;
const Zivid::PointXYZ pointBInCheckerboardFrame = roiBoxLowerLeftCornerInCheckerboardFrame;
var pointOInCheckerboardFrame = roiBoxLowerRightCornerInCheckerboardFrame;
var pointAInCheckerboardFrame = roiBoxUpperRightCornerInCheckerboardFrame;
var pointBInCheckerboardFrame = roiBoxLowerLeftCornerInCheckerboardFrame;
然后我们需要估计棋盘格的位姿,将这三个点转换到相机参考系。
std::cout << "Detecting and estimating pose of the Zivid checkerboard in the camera frame" << std::endl;
const auto detectionResult = Zivid::Calibration::detectCalibrationBoard(originalFrame);

if(!detectionResult.valid())
{
    std::cout << "Detection failed. " << detectionResult.statusDescription() << std::endl;
    return EXIT_FAILURE;
}

const auto transformCameraToCheckerboard = detectionResult.pose().toMatrix();

std::cout << "Transforming the ROI base frame points to the camera frame" << std::endl;
const auto roiPointsInCameraFrame = transformPoints(
    std::vector<Zivid::PointXYZ>{
        pointOInCheckerboardFrame, pointAInCheckerboardFrame, pointBInCheckerboardFrame },
    transformCameraToCheckerboard);
Console.WriteLine("Detecting and estimating pose of the Zivid checkerboard in the camera frame");
var detectionResult = Detector.DetectCalibrationBoard(originalFrame);
var cameraToCheckerboardTransform = new Zivid.NET.Matrix4x4(detectionResult.Pose().ToMatrix());

Console.WriteLine("Transforming the ROI base frame points to the camera frame");
var roiPointsInCameraFrame = TransformPoints(
    new List<Zivid.NET.PointXYZ> { pointOInCheckerboardFrame, pointAInCheckerboardFrame, pointBInCheckerboardFrame },
    cameraToCheckerboardTransform);
print("Detecting and estimating pose of the Zivid checkerboard in the camera frame")
detection_result = zivid.calibration.detect_calibration_board(original_frame)
camera_to_checkerboard_transform = detection_result.pose().to_matrix()

print("Transforming the ROI base frame points to the camera frame")
roi_points_in_camera_frame = _transform_points(
    [point_o_in_checkerboard_frame, point_a_in_checkerboard_frame, point_b_in_checkerboard_frame],
    camera_to_checkerboard_transform,
)
提示
详细了解 位置、方向和坐标变换 来了解其工作原理。
现在我们可以根据 ROI 盒的大小和位置过滤点云。将第一个范围(extent)设置为一个较小的负数值来避免过滤掉底板,第二个范围(extent)设置为所需的盒子高度。
const auto roiSettings = Zivid::Settings::RegionOfInterest::Box{
    Zivid::Settings::RegionOfInterest::Box::Enabled::yes,
    Zivid::Settings::RegionOfInterest::Box::PointO{ roiPointsInCameraFrame[0] },
    Zivid::Settings::RegionOfInterest::Box::PointA{ roiPointsInCameraFrame[1] },
    Zivid::Settings::RegionOfInterest::Box::PointB{ roiPointsInCameraFrame[2] },
    Zivid::Settings::RegionOfInterest::Box::Extents{ -10, roiBoxHeight }
};
var roiSettings = new Zivid.NET.Settings.RegionOfInterestGroup.BoxGroup
{
    Enabled = true,
    PointO = roiPointsInCameraFrame[0],
    PointA = roiPointsInCameraFrame[1],
    PointB = roiPointsInCameraFrame[2]
};
roiSettings.Extents = new Zivid.NET.Range<double>(-10, roiBoxHeight);
现在,我们可以利用感兴趣区域(ROI)对捕获的点云进行掩膜处理,并可视化最终结果。
std::cout << "Creating a masked version of the point cloud based on ROI" << std::endl;
const auto roiPointCloud = pointCloud.maskedByRegionOfInterest(roiSettings);

std::cout << "Displaying the ROI-filtered point cloud" << std::endl;
visualizeZividPointCloud(roiPointCloud);
using (var roiPointCloud = pointCloud.MaskedByRegionOfInterest(roiSettings))
{
    Console.WriteLine("Displaying the ROI-filtered point cloud");
    VisualizeZividPointCloud(roiPointCloud);
}
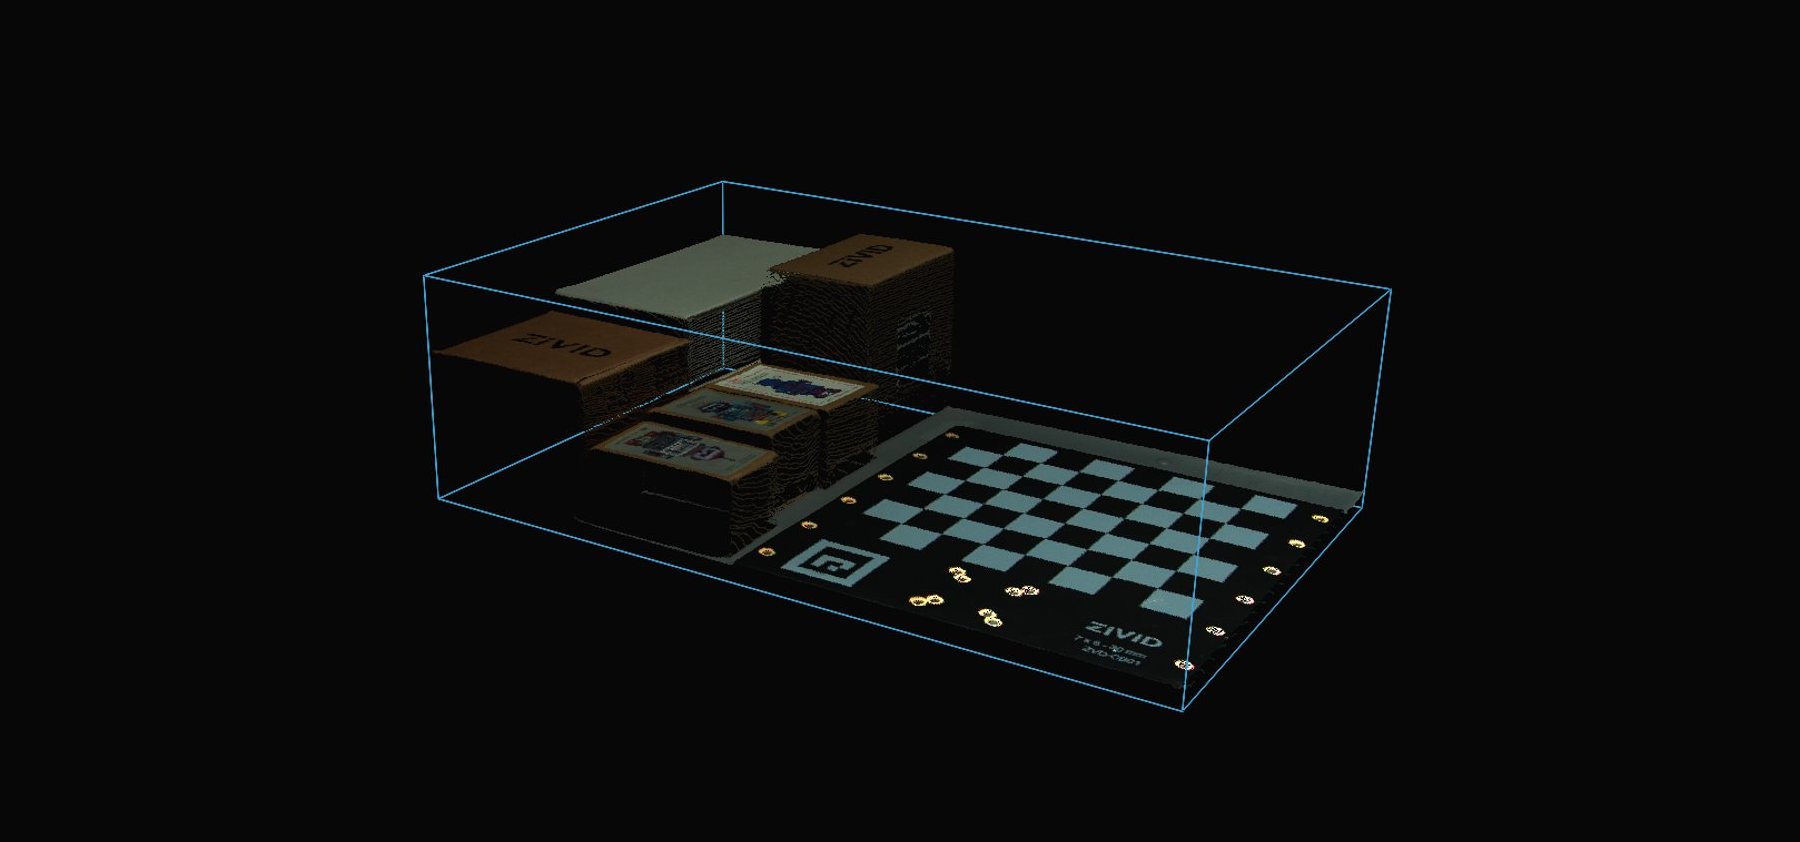
最后,我们将 ROI 框添加到捕获设置中,直接应用 ROI 过滤器来捕获点云。这种方法比捕获后再进行掩膜处理速度更快,并且允许您保存包含 ROI 参数的捕获设置,以便在移除标定板后重复使用。
std::cout << "Adding the ROI box to the capture settings and capturing again" << std::endl;
settings.set(Zivid::Settings::RegionOfInterest{ roiSettings });

const auto roiFrame = camera.capture2D3D(settings);

std::cout << "Displaying the ROI-filtered point cloud from the new capture" << std::endl;
visualizeZividPointCloud(roiFrame.pointCloud());
Console.WriteLine("Adding the ROI box to the capture settings and capturing again");
settings.RegionOfInterest.Box = roiSettings;

using (var roiFrame = camera.Capture2D3D(settings))
{
    Console.WriteLine("Displaying the ROI-filtered point cloud from the new capture");
    VisualizeZividPointCloud(roiFrame);
}
print("Adding the ROI box to the capture settings and capturing again")
settings.region_of_interest.box = roi_settings

roi_frame_point_cloud = camera.capture_2d_3d(settings).point_cloud()
print("Displaying the ROI-filtered point cloud from the new capture")
display_pointcloud(roi_frame_point_cloud)
如需要根据 ROI 盒过滤点云,您可以运行我们的代码示例。
./ROIBoxViaCheckerboard
./ROIBoxViaCheckerboard
示例: roi_box_via_checkerboard.py
python roi_box_via_checkerboard.py
小技巧
如果您希望在自己的设置中使用它,您可以自行修改代码示例:
用您的实际相机和设置替换档案相机。
将棋盘格放在料箱的右下角。
将 ROI 盒尺寸修改为您的料箱的尺寸。
运行示例!
您现在可以保存包含了 ROI 参数的捕获设置了,然后拿走棋盘格并在整个料箱上使用该设置。
版本历史
SDK |
更改 |
|---|---|
2.18.0 |
使用 ROI 框对已捕获的点云进行掩膜处理,而不是重新捕获。 |