ROI Box via Checkerboard
This tutorial demonstrates how to find the ROI box parameters using the Zivid calibration board (7x8 30mm, 300x300mm) and how to filter the contents of a bin using it. We assume the calibration board is placed in the bottom right corner of the bin. The bin size is also assumed known and is used to set the dimensions of the ROI box. This way you can automatically find the ROI parameters in the camera frame.
참고
이 튜토리얼에서는 데모를 위해 아래 이미지의 장면에 파일 카메라를 사용합니다.
먼저 체커보드의 포인트 클라우드를 캡처합니다.

const auto fileCamera = std::string(ZIVID_SAMPLE_DATA_DIR) + "/BinWithCalibrationBoard.zdf";
const auto loadedFrameWithDiagnostics = Zivid::Frame(fileCamera);

std::cout << "Creating virtual camera using file: " << fileCamera << std::endl;
auto camera = zivid.createFileCamera(loadedFrameWithDiagnostics);

auto settings = loadedFrameWithDiagnostics.settings();

const auto originalFrame = camera.capture2D3D(settings);
auto pointCloud = originalFrame.pointCloud();
string fileCamera = Environment.GetFolderPath(Environment.SpecialFolder.CommonApplicationData) + "/Zivid/BinWithCalibrationBoard.zdf";
var loadedFrameWithDiagnostics = new Zivid.NET.Frame(fileCamera);

Console.WriteLine("Creating virtual camera using file: " + fileCamera);
var camera = zivid.CreateFileCamera(loadedFrameWithDiagnostics);

var settings = loadedFrameWithDiagnostics.Settings;

using (var originalFrame = camera.Capture2D3D(settings))
{
    var pointCloud = originalFrame.PointCloud;
file_camera = get_sample_data_path() / "BinWithCalibrationBoard.zdf"
loaded_frame_with_diagnostics = zivid.Frame(file_camera)

print(f"Creating virtual camera using file: {file_camera}")
camera = app.create_file_camera(loaded_frame_with_diagnostics)

settings = loaded_frame_with_diagnostics.settings

original_frame = camera.capture_2d_3d(settings)
point_cloud = original_frame.point_cloud()
체커보드 프레임은 보드의 왼쪽 상단 모서리에 있는 4개의 체커 사이의 교차점에 원점이 있습니다.
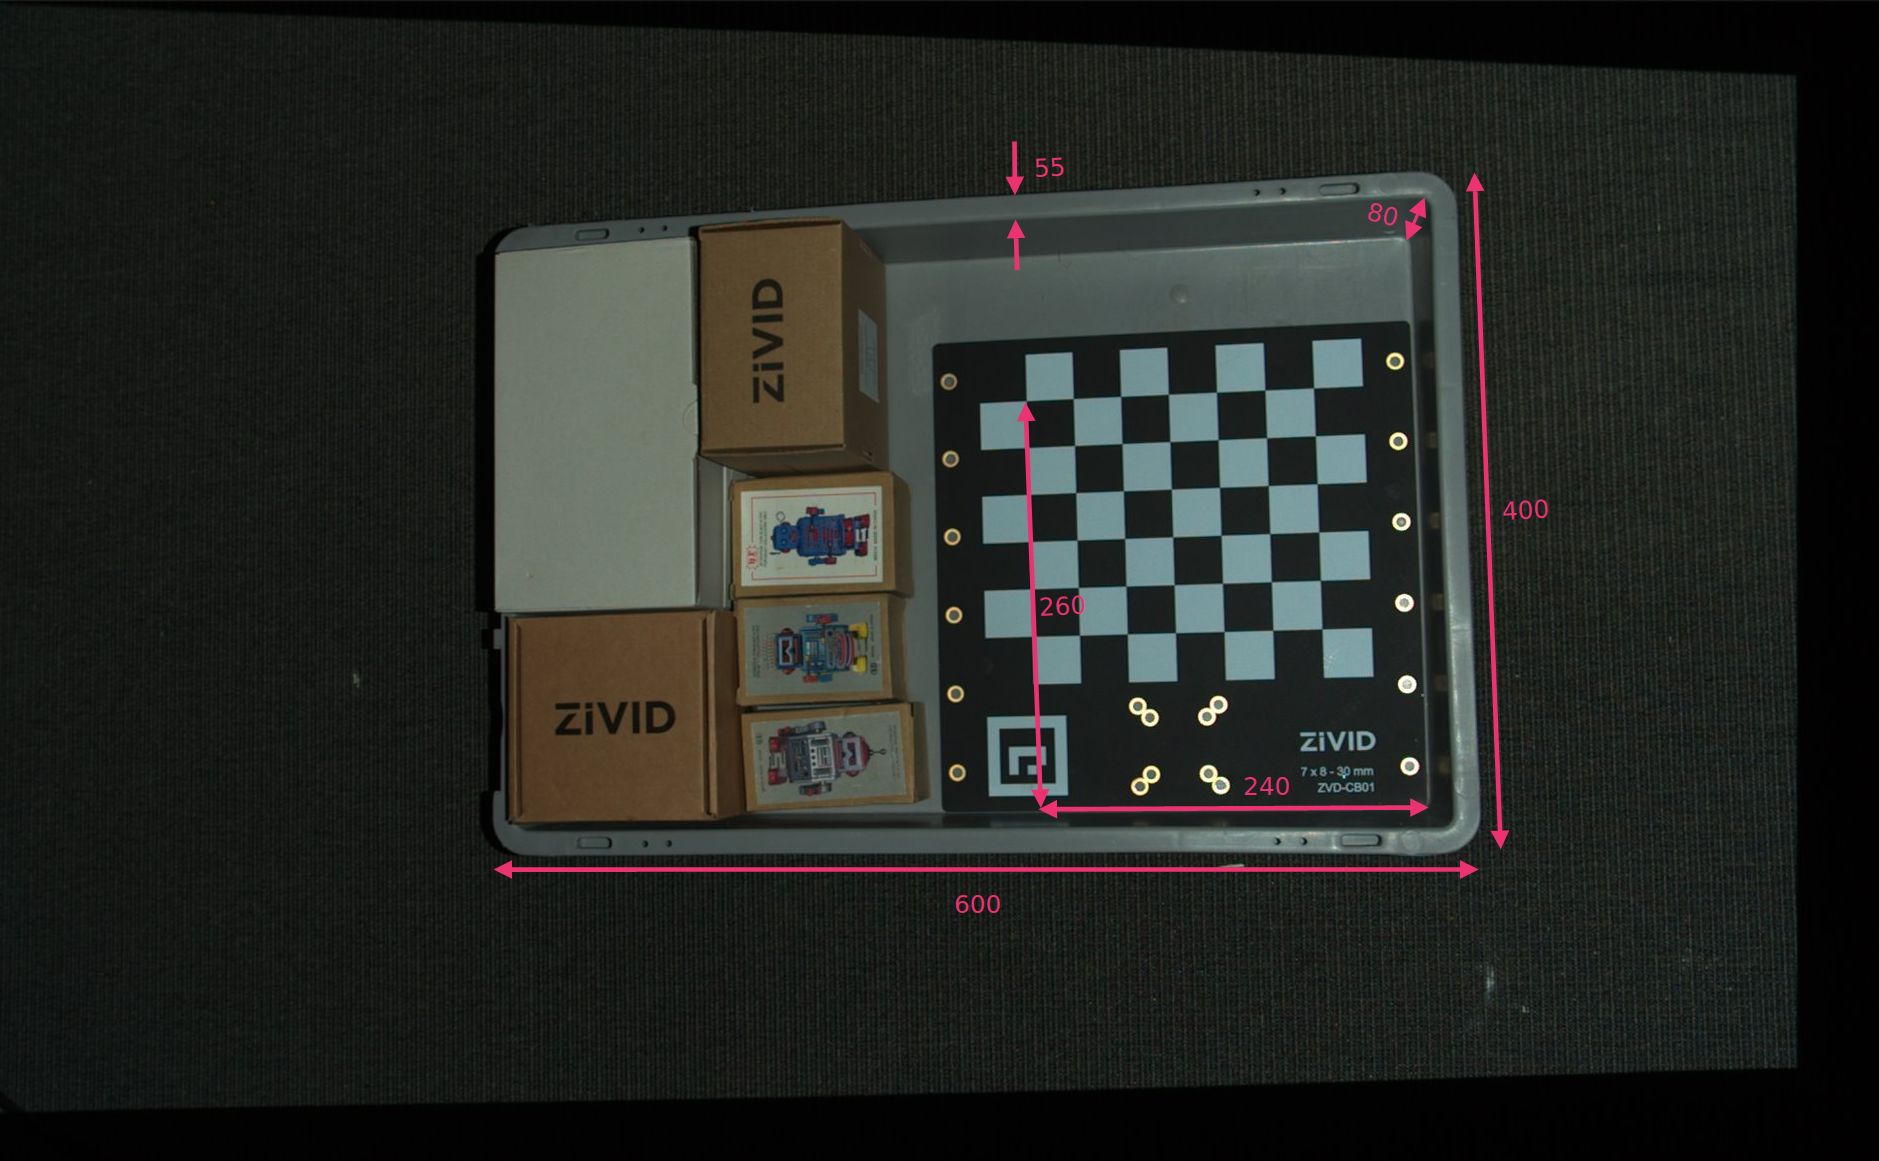
체커보드 프레임과 ROI 상자 크기를 기준으로 ROI 상자의 오른쪽 하단 모서리 위치를 정의합니다. 그런 다음 길이와 너비에서 빈 가장자리의 너비를 빼서 빈 벽을 제거합니다.
// Coordinates are relative to the checkerboard origin which lies in the intersection between the four checkers
// in the top-left corner of the checkerboard: Positive x-axis is "East", y-axis is "South" and z-axis is "Down"
const Zivid::PointXYZ roiBoxLowerRightCornerInCheckerboardFrame{ 240.F, 260.F, 5.F };
const Zivid::PointXYZ roiBoxUpperRightCornerInCheckerboardFrame{ roiBoxLowerRightCornerInCheckerboardFrame.x,
                                                                 roiBoxLowerRightCornerInCheckerboardFrame.y
                                                                     - roiBoxWidth,
                                                                 roiBoxLowerRightCornerInCheckerboardFrame.z };
const Zivid::PointXYZ roiBoxLowerLeftCornerInCheckerboardFrame{ roiBoxLowerRightCornerInCheckerboardFrame.x
                                                                    - roiBoxLength,
                                                                roiBoxLowerRightCornerInCheckerboardFrame.y,
                                                                roiBoxLowerRightCornerInCheckerboardFrame.z };
const float roiBoxLength = 545.F;
const float roiBoxWidth = 345.F;
const float roiBoxHeight = 150.F;
// Coordinates are relative to the checkerboard origin which lies in the intersection between the four checkers
// in the top-left corner of the checkerboard: Positive x-axis is "East", y-axis is "South" and z-axis is "Down"
var roiBoxLowerRightCornerInCheckerboardFrame = new Zivid.NET.PointXYZ
{
    x = 240F,
    y = 260F,
    z = 5F
};
var roiBoxUpperRightCornerInCheckerboardFrame = new Zivid.NET.PointXYZ
{
    x = roiBoxLowerRightCornerInCheckerboardFrame.x,
    y = roiBoxLowerRightCornerInCheckerboardFrame.y - roiBoxWidth,
    z = roiBoxLowerRightCornerInCheckerboardFrame.z
};
var roiBoxLowerLeftCornerInCheckerboardFrame = new Zivid.NET.PointXYZ
{
    x = roiBoxLowerRightCornerInCheckerboardFrame.x - roiBoxLength,
    y = roiBoxLowerRightCornerInCheckerboardFrame.y,
    z = roiBoxLowerRightCornerInCheckerboardFrame.z

};
float roiBoxLength = 545F;
float roiBoxWidth = 345F;
float roiBoxHeight = 150F;
roi_box_lower_right_corner = np.array([240, 260, 0.5])
roi_box_upper_right_corner = np.array(
    [
        roi_box_lower_right_corner[0],
        roi_box_lower_right_corner[1] - roi_box_width,
        roi_box_lower_right_corner[2],
    ]
)
roi_box_lower_left_corner = np.array(
    [
        roi_box_lower_right_corner[0] - roi_box_length,
        roi_box_lower_right_corner[1],
        roi_box_lower_right_corner[2],
    ]
)
roi_box_length = 545
roi_box_width = 345
roi_box_height = 150
그런 다음 ROI 상자의 기본 프레임을 정의하는 세 지점을 설정할 수 있습니다.
const Zivid::PointXYZ pointOInCheckerboardFrame = roiBoxLowerRightCornerInCheckerboardFrame;
const Zivid::PointXYZ pointAInCheckerboardFrame = roiBoxUpperRightCornerInCheckerboardFrame;
const Zivid::PointXYZ pointBInCheckerboardFrame = roiBoxLowerLeftCornerInCheckerboardFrame;
var pointOInCheckerboardFrame = roiBoxLowerRightCornerInCheckerboardFrame;
var pointAInCheckerboardFrame = roiBoxUpperRightCornerInCheckerboardFrame;
var pointBInCheckerboardFrame = roiBoxLowerLeftCornerInCheckerboardFrame;
그런 다음 체커보드의 포즈를 추정하여 세 지점을 카메라 기준 프레임으로 변환합니다.
std::cout << "Detecting and estimating pose of the Zivid checkerboard in the camera frame" << std::endl;
const auto detectionResult = Zivid::Calibration::detectCalibrationBoard(originalFrame);

if(!detectionResult.valid())
{
    std::cout << "Detection failed. " << detectionResult.statusDescription() << std::endl;
    return EXIT_FAILURE;
}

const auto transformCameraToCheckerboard = detectionResult.pose().toMatrix();

std::cout << "Transforming the ROI base frame points to the camera frame" << std::endl;
const auto roiPointsInCameraFrame = transformPoints(
    std::vector<Zivid::PointXYZ>{
        pointOInCheckerboardFrame, pointAInCheckerboardFrame, pointBInCheckerboardFrame },
    transformCameraToCheckerboard);
Console.WriteLine("Detecting and estimating pose of the Zivid checkerboard in the camera frame");
var detectionResult = Detector.DetectCalibrationBoard(originalFrame);
var cameraToCheckerboardTransform = new Zivid.NET.Matrix4x4(detectionResult.Pose().ToMatrix());

Console.WriteLine("Transforming the ROI base frame points to the camera frame");
var roiPointsInCameraFrame = TransformPoints(
    new List<Zivid.NET.PointXYZ> { pointOInCheckerboardFrame, pointAInCheckerboardFrame, pointBInCheckerboardFrame },
    cameraToCheckerboardTransform);
print("Detecting and estimating pose of the Zivid checkerboard in the camera frame")
detection_result = zivid.calibration.detect_calibration_board(original_frame)
camera_to_checkerboard_transform = detection_result.pose().to_matrix()

print("Transforming the ROI base frame points to the camera frame")
roi_points_in_camera_frame = _transform_points(
    [point_o_in_checkerboard_frame, point_a_in_checkerboard_frame, point_b_in_checkerboard_frame],
    camera_to_checkerboard_transform,
)
힌트
작동 방식이 궁금하다면 Position, Orientation and Coordinate Transformations 에 대해 자세히 알아보세요.
이제 ROI 상자의 크기와 위치를 기반으로 포인트 클라우드를 필터링할 수 있습니다. 첫 번째 범위는 바닥을 포함하도록 작은 음수 값으로 설정되고 두 번째 범위는 상자의 원하는 높이로 설정됩니다.
const auto roiSettings = Zivid::Settings::RegionOfInterest::Box{
    Zivid::Settings::RegionOfInterest::Box::Enabled::yes,
    Zivid::Settings::RegionOfInterest::Box::PointO{ roiPointsInCameraFrame[0] },
    Zivid::Settings::RegionOfInterest::Box::PointA{ roiPointsInCameraFrame[1] },
    Zivid::Settings::RegionOfInterest::Box::PointB{ roiPointsInCameraFrame[2] },
    Zivid::Settings::RegionOfInterest::Box::Extents{ -10, roiBoxHeight }
};
var roiSettings = new Zivid.NET.Settings.RegionOfInterestGroup.BoxGroup
{
    Enabled = true,
    PointO = roiPointsInCameraFrame[0],
    PointA = roiPointsInCameraFrame[1],
    PointB = roiPointsInCameraFrame[2]
};
roiSettings.Extents = new Zivid.NET.Range<double>(-10, roiBoxHeight);
이제 ROI를 이용하여 캡처된 포인트 클라우드를 마스킹하고 결과를 시각화할 수 있습니다.
std::cout << "Creating a masked version of the point cloud based on ROI" << std::endl;
const auto roiPointCloud = pointCloud.maskedByRegionOfInterest(roiSettings);

std::cout << "Displaying the ROI-filtered point cloud" << std::endl;
visualizeZividPointCloud(roiPointCloud);
using (var roiPointCloud = pointCloud.MaskedByRegionOfInterest(roiSettings))
{
    Console.WriteLine("Displaying the ROI-filtered point cloud");
    VisualizeZividPointCloud(roiPointCloud);
}
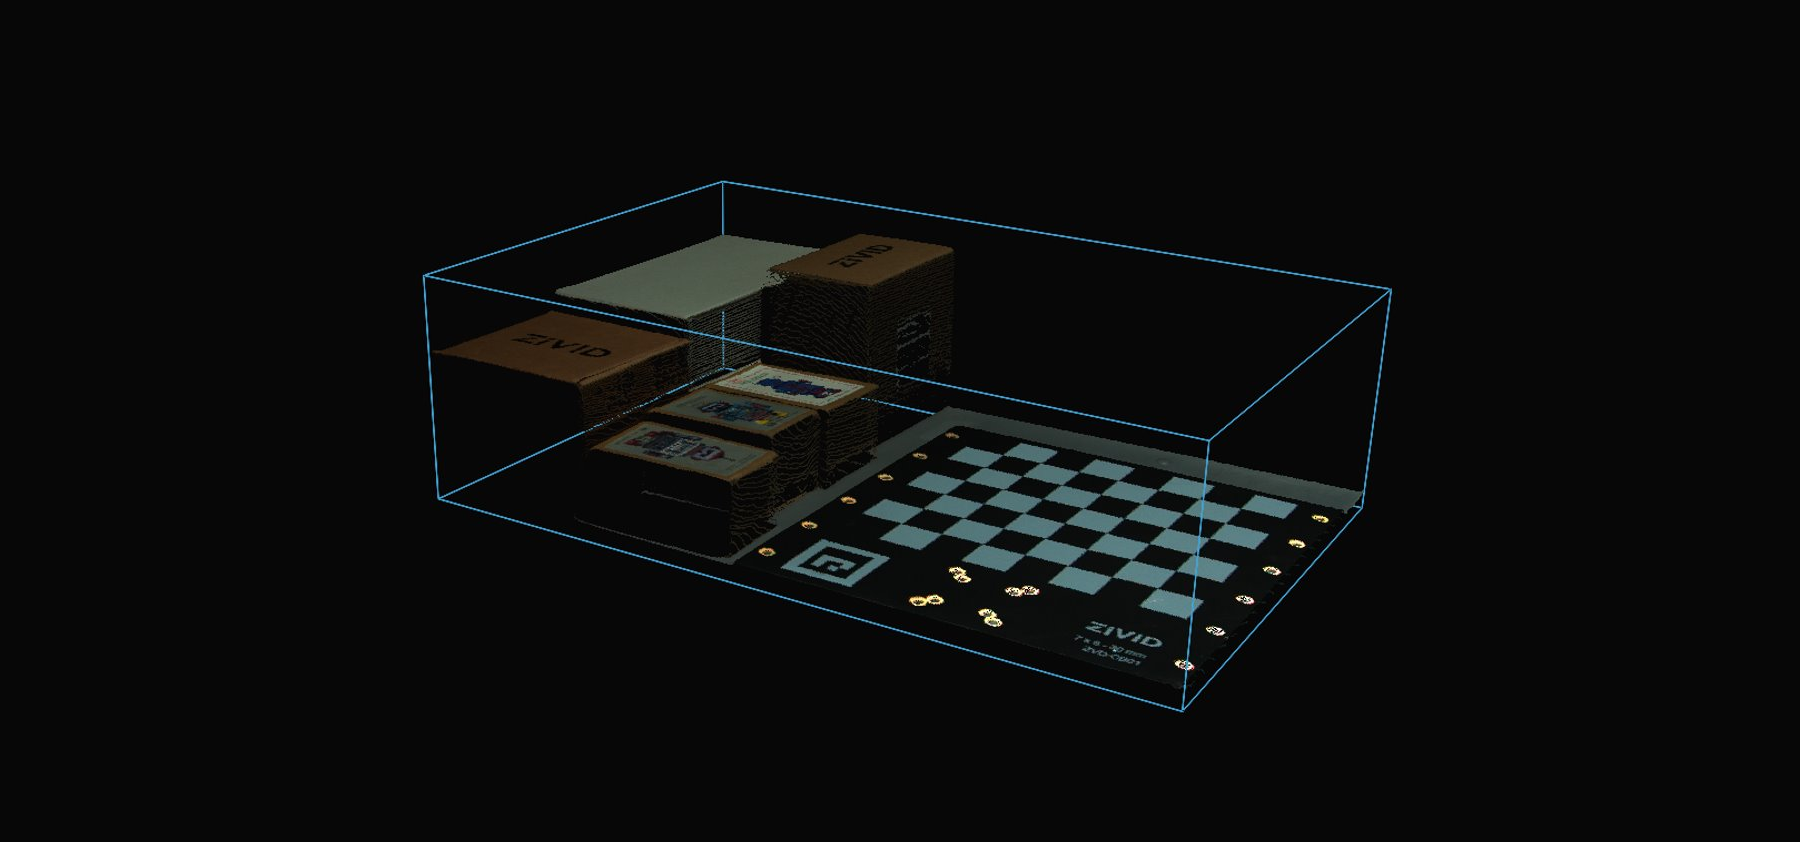
마지막으로, 캡처 설정에 ROI 상자를 추가하고 ROI 필터링이 직접 적용된 포인트 클라우드를 캡처합니다. 이는 캡처 후 마스킹하는 것보다 빠르며, 보정 보드 없이도 ROI 매개변수가 포함된 캡처 설정을 저장하여 재사용할 수 있습니다.
std::cout << "Adding the ROI box to the capture settings and capturing again" << std::endl;
settings.set(Zivid::Settings::RegionOfInterest{ roiSettings });

const auto roiFrame = camera.capture2D3D(settings);

std::cout << "Displaying the ROI-filtered point cloud from the new capture" << std::endl;
visualizeZividPointCloud(roiFrame.pointCloud());
Console.WriteLine("Adding the ROI box to the capture settings and capturing again");
settings.RegionOfInterest.Box = roiSettings;

using (var roiFrame = camera.Capture2D3D(settings))
{
    Console.WriteLine("Displaying the ROI-filtered point cloud from the new capture");
    VisualizeZividPointCloud(roiFrame);
}
print("Adding the ROI box to the capture settings and capturing again")
settings.region_of_interest.box = roi_settings

roi_frame_point_cloud = camera.capture_2d_3d(settings).point_cloud()
print("Displaying the ROI-filtered point cloud from the new capture")
display_pointcloud(roi_frame_point_cloud)
ROI 상자를 기반으로 포인트 클라우드를 필터링하려면 다음 코드 샘플을 실행합니다.
Sample: ROIBoxViaCheckerboard.cpp
./ROIBoxViaCheckerboard
Sample: ROIBoxViaCheckerboard.cs
./ROIBoxViaCheckerboard
Sample: roi_box_via_checkerboard.py
python roi_box_via_checkerboard.py
팁
자신의 설정에서 이것을 사용하려면 코드 샘플을 수정하십시오.
파일 카메라를 실제 카메라 및 설정으로 교체하십시오.
빈의 오른쪽 하단 모서리에 체커보드를 놓습니다.
ROI 상자 크기를 실제 사용하는 빈의 크기로 수정합니다.
샘플 실행합니다!
이제 ROI 매개변수로 캡처 설정을 저장하고 캘리브레이션 보드를 제거하고 전체 빈의 설정을 사용할 수 있습니다.
Version History
SDK |
Changes |
|---|---|
2.18.0 |
Mask the captured point cloud by the ROI box instead of re-capturing. |