ArUco マーカーによる ROI ボックス
このチュートリアルでは、ArUco マーカーを使用して ROI ボックスパラメータを見つける方法と、それを使用してビンの内容をフィルタリングする方法を説明します。ここでは、Zivid calibration board (7x8 30mm, 300x300mm) 上の ArUco マーカーを使用し、キャリブレーションボードがビンの右下隅に配置されていると仮定します。ビンのサイズも既知であると仮定し、それを使用して ROI ボックスの寸法を設定します。この方法により、カメラ フレーム内の ROI パラメータを自動的に見つけることができます。
注釈
このチュートリアルでは、デモンストレーションのために、下の画像のシーンにファイル カメラを使用します。
まず、ArUco マーカーの点群をキャプチャします。

const auto fileCamera = std::string(ZIVID_SAMPLE_DATA_DIR) + "/BinWithCalibrationBoard.zdf";
const auto loadedFrameWithDiagnostics = Zivid::Frame(fileCamera);

std::cout << "Creating virtual camera using file: " << fileCamera << std::endl;
auto camera = zivid.createFileCamera(loadedFrameWithDiagnostics);

auto settings = loadedFrameWithDiagnostics.settings();

const auto originalFrame = camera.capture2D3D(settings);
auto pointCloud = originalFrame.pointCloud();
string fileCamera = Environment.GetFolderPath(Environment.SpecialFolder.CommonApplicationData) + "/Zivid/BinWithCalibrationBoard.zdf";
var loadedFrameWithDiagnostics = new Zivid.NET.Frame(fileCamera);

Console.WriteLine("Creating virtual camera using file: " + fileCamera);
var camera = zivid.CreateFileCamera(loadedFrameWithDiagnostics);

var settings = loadedFrameWithDiagnostics.Settings;

using (var originalFrame = camera.Capture2D3D(settings))
{
    var pointCloud = originalFrame.PointCloud;
file_camera = get_sample_data_path() / "BinWithCalibrationBoard.zdf"
loaded_frame_with_diagnostics = zivid.Frame(file_camera)

print(f"Creating virtual camera using file: {file_camera}")
camera = app.create_file_camera(loaded_frame_with_diagnostics)

settings = loaded_frame_with_diagnostics.settings

original_frame = camera.capture_2d_3d(settings)
point_cloud = original_frame.point_cloud()
ArUco マーカー フレームの原点は ArUco マーカーの中心にあります。
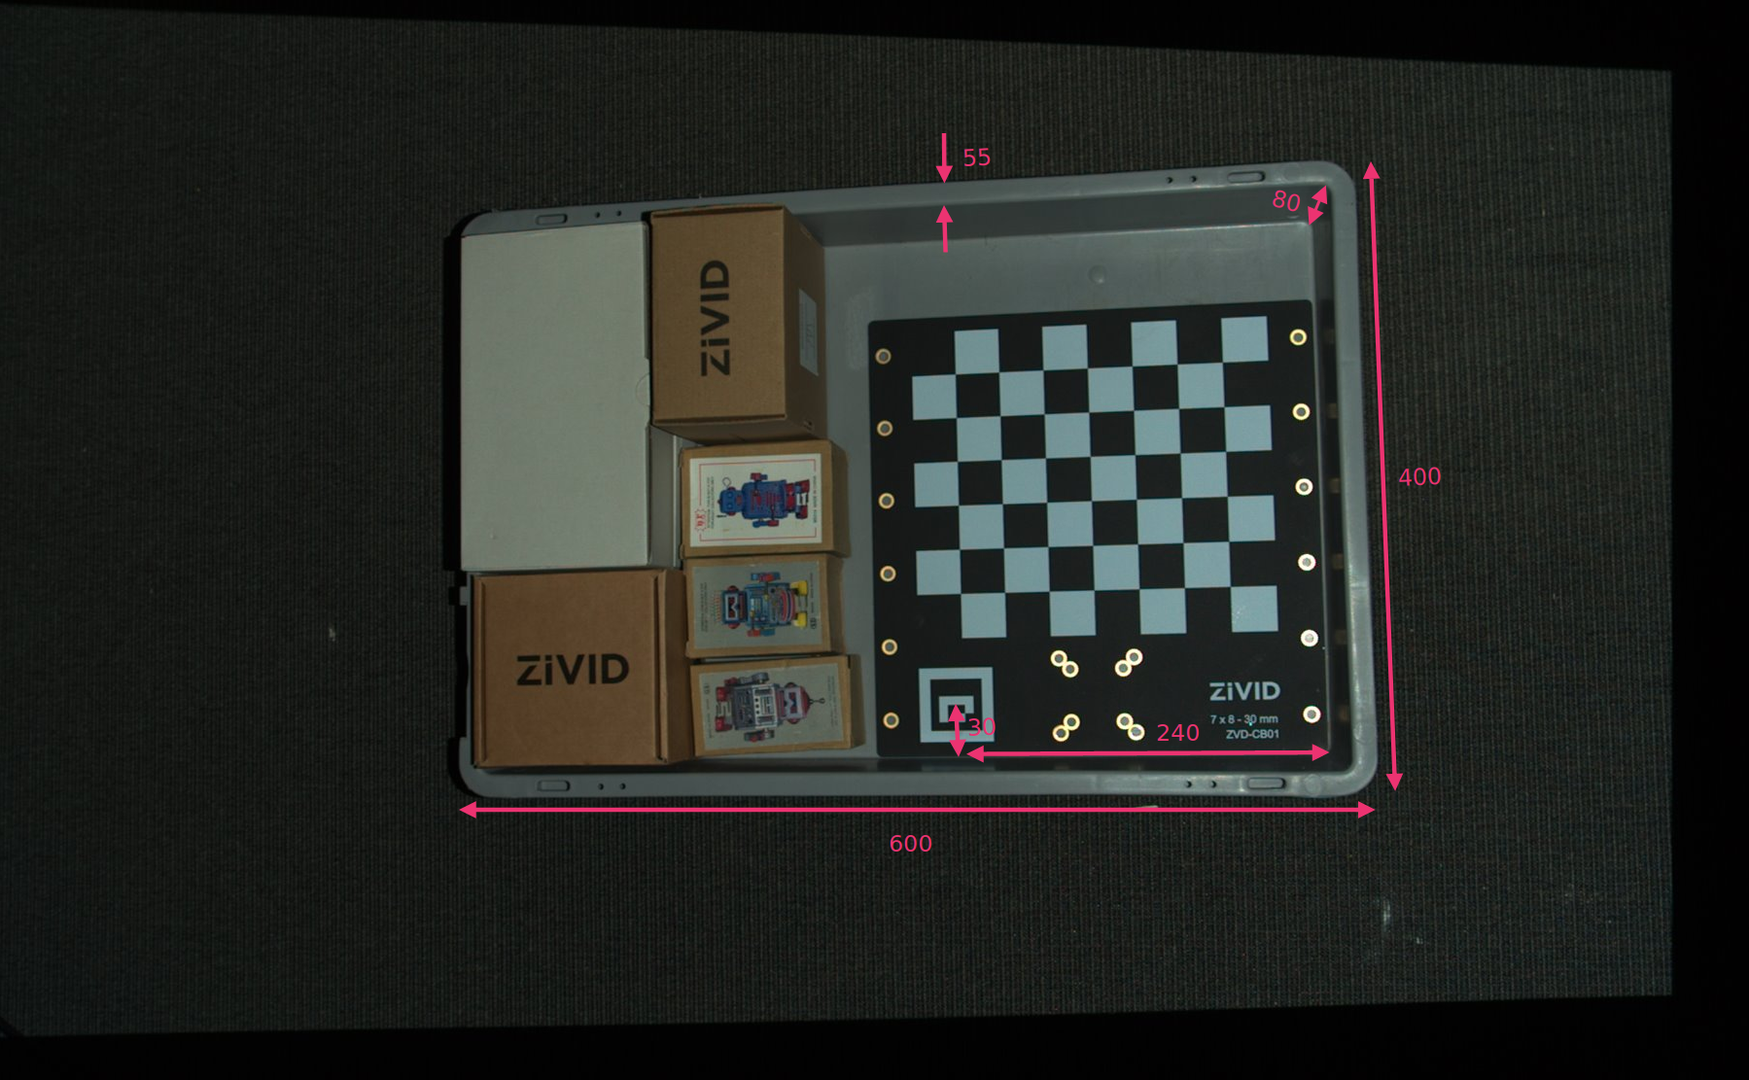
ArUco マーカー フレームに対する ROI ボックスの右下隅の位置と ROI ボックスのサイズを定義します。次に、長さと幅からビンの端の幅を引いて、ビンの壁を削除します。
const float roiBoxLength = 545.F;
const float roiBoxWidth = 345.F;
const float roiBoxHeight = 150.F;
// Coordinates are relative to the ArUco marker origin which lies in the center of the ArUco marker.
// Positive x-axis is "East", y-axis is "South" and z-axis is "Down".
const Zivid::PointXYZ roiBoxLowerRightCornerInArUcoFrame{ 240.F, 30.F, 5.F };
const Zivid::PointXYZ roiBoxUpperRightCornerInArUcoFrame{ roiBoxLowerRightCornerInArUcoFrame.x,
                                                          roiBoxLowerRightCornerInArUcoFrame.y - roiBoxWidth,
                                                          roiBoxLowerRightCornerInArUcoFrame.z };
const Zivid::PointXYZ roiBoxLowerLeftCornerInArUcoFrame{ roiBoxLowerRightCornerInArUcoFrame.x - roiBoxLength,
                                                         roiBoxLowerRightCornerInArUcoFrame.y,
                                                         roiBoxLowerRightCornerInArUcoFrame.z };
float roiBoxLength = 545F;
float roiBoxWidth = 345F;
float roiBoxHeight = 150F;
// Coordinates are relative to the checkerboard origin which lies in the intersection between the four checkers
// in the top-left corner of the checkerboard: Positive x-axis is "East", y-axis is "South" and z-axis is "Down"
var roiBoxLowerRightCornerInCheckerboardFrame = new Zivid.NET.PointXYZ
{
    x = 240F,
    y = 30F,
    z = 5F
};
var roiBoxUpperRightCornerInCheckerboardFrame = new Zivid.NET.PointXYZ
{
    x = roiBoxLowerRightCornerInCheckerboardFrame.x,
    y = roiBoxLowerRightCornerInCheckerboardFrame.y - roiBoxWidth,
    z = roiBoxLowerRightCornerInCheckerboardFrame.z
};
var roiBoxLowerLeftCornerInCheckerboardFrame = new Zivid.NET.PointXYZ
{
    x = roiBoxLowerRightCornerInCheckerboardFrame.x - roiBoxLength,
    y = roiBoxLowerRightCornerInCheckerboardFrame.y,
    z = roiBoxLowerRightCornerInCheckerboardFrame.z

};
roi_box_length = 545
roi_box_width = 345
roi_box_height = 150
roi_box_lower_right_corner_in_aruco_frame = np.array([240, 30, 5])
roi_box_upper_right_corner_in_aruco_frame = np.array(
    [
        roi_box_lower_right_corner_in_aruco_frame[0],
        roi_box_lower_right_corner_in_aruco_frame[1] - roi_box_width,
        roi_box_lower_right_corner_in_aruco_frame[2],
    ]
)
roi_box_lower_left_corner_in_aruco_frame = np.array(
    [
        roi_box_lower_right_corner_in_aruco_frame[0] - roi_box_length,
        roi_box_lower_right_corner_in_aruco_frame[1],
        roi_box_lower_right_corner_in_aruco_frame[2],
    ]
)
ROI ボックスのベース フレームを定義する 3 つの点を設定できます。
const Zivid::PointXYZ pointOInArUcoFrame = roiBoxLowerRightCornerInArUcoFrame;
const Zivid::PointXYZ pointAInArUcoFrame = roiBoxUpperRightCornerInArUcoFrame;
const Zivid::PointXYZ pointBInArUcoFrame = roiBoxLowerLeftCornerInArUcoFrame;
var pointOInCheckerboardFrame = roiBoxLowerRightCornerInCheckerboardFrame;
var pointAInCheckerboardFrame = roiBoxUpperRightCornerInCheckerboardFrame;
var pointBInCheckerboardFrame = roiBoxLowerLeftCornerInCheckerboardFrame;
次に、ArUco マーカーを設定します。
std::cout << "Configuring ArUco marker" << std::endl;
const auto markerDictionary = Zivid::Calibration::MarkerDictionary::aruco4x4_50;
std::vector<int> markerId = { 1 };
Console.WriteLine("Configuring ArUco marker");
var markerDictionary = Zivid.NET.MarkerDictionary.Aruco4x4_50;
var markerId = new List<int> { 1 };
次に、ArUco マーカーを検出します。
std::cout << "Detecting ArUco marker" << std::endl;
const auto detectionResult = Zivid::Calibration::detectMarkers(originalFrame, markerId, markerDictionary);
Console.WriteLine("Detecting ArUco marker");
var detectionResult = Detector.DetectMarkers(originalFrame, markerId, markerDictionary);
次に、ArUco マーカーの姿勢を推定して、3 点をカメラの基準フレームに変換します。
std::cout << "Estimating pose of detected ArUco marker" << std::endl;
const auto cameraToMarkerTransform = detectionResult.detectedMarkers()[0].pose().toMatrix();
std::cout << "Transforming the ROI base frame points to the camera frame" << std::endl;
const auto roiPointsInCameraFrame = transformPoints(
    std::vector<Zivid::PointXYZ>{ pointOInArUcoFrame, pointAInArUcoFrame, pointBInArUcoFrame },
    cameraToMarkerTransform);
Console.WriteLine("Estimating pose of detected ArUco marker");
var cameraToMarkerTransform = new Zivid.NET.Matrix4x4(detectionResult.DetectedMarkers()[0].Pose().ToMatrix());
Console.WriteLine("Transforming the ROI base frame points to the camera frame");
var roiPointsInCameraFrame = TransformPoints(
    new List<Zivid.NET.PointXYZ> { pointOInCheckerboardFrame, pointAInCheckerboardFrame, pointBInCheckerboardFrame },
    cameraToMarkerTransform);
print("Estimating pose of detected ArUco marker")
camera_to_marker_transform = detection_result.detected_markers()[0].pose.to_matrix()
print("Transforming the ROI base frame points to the camera frame")
roi_points_in_camera_frame = _transform_points(
    [point_o_in_aruco_frame, point_a_in_aruco_frame, point_b_in_aruco_frame],
    camera_to_marker_transform,
)
ヒント
これがどのように機能するかを理解するには 位置、方向、座標変換 について詳しく学習してください。
これで、ROI ボックスのサイズと位置に基づいて点群をフィルタリングできるようになりました。最初の範囲は床を含めるために小さな負の値に設定され、2 番目の範囲はボックスの目的の高さに設定されます。
const auto roiSettings = Zivid::Settings::RegionOfInterest::Box{
    Zivid::Settings::RegionOfInterest::Box::Enabled::yes,
    Zivid::Settings::RegionOfInterest::Box::PointO{ roiPointsInCameraFrame[0] },
    Zivid::Settings::RegionOfInterest::Box::PointA{ roiPointsInCameraFrame[1] },
    Zivid::Settings::RegionOfInterest::Box::PointB{ roiPointsInCameraFrame[2] },
    Zivid::Settings::RegionOfInterest::Box::Extents{ -10, roiBoxHeight }
};
var roiSettings = new Zivid.NET.Settings.RegionOfInterestGroup.BoxGroup
{
    Enabled = true,
    PointO = roiPointsInCameraFrame[0],
    PointA = roiPointsInCameraFrame[1],
    PointB = roiPointsInCameraFrame[2]
};
roiSettings.Extents = new Zivid.NET.Range<double>(-10, roiBoxHeight);
これで、取得した点群を ROI(関心領域)でマスクし、結果を視覚化できます。
const auto roiPointCloud = pointCloud.maskedByRegionOfInterest(roiSettings);

std::cout << "Displaying the ROI-filtered point cloud" << std::endl;
visualizeZividPointCloud(roiPointCloud);
using (var roiPointCloud = pointCloud.MaskedByRegionOfInterest(roiSettings))
{
    Console.WriteLine("Displaying the ROI-filtered point cloud");
    VisualizeZividPointCloud(roiPointCloud);
}
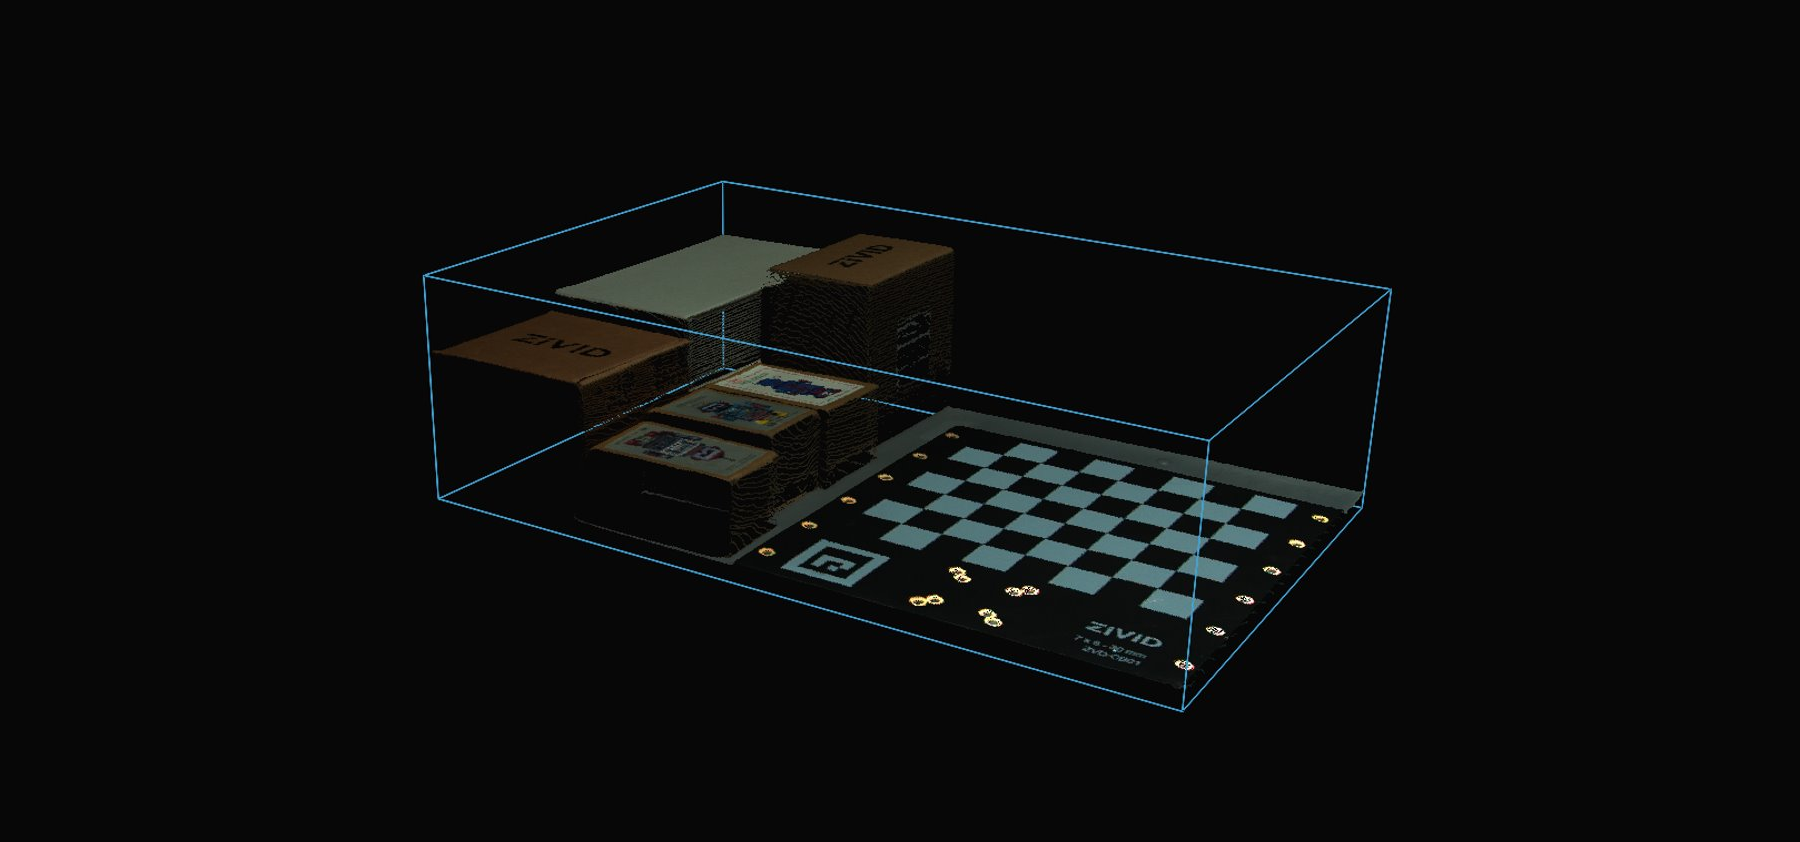
最後に、ROI ボックスをキャプチャ設定に追加し、ROI フィルタリングを直接適用した状態で点群をキャプチャします。これは、キャプチャ後にマスキングを行うよりも高速で、キャリブレーションボードを使用せずに ROI パラメータを含むキャプチャ設定を保存して再利用できます。
std::cout << "Adding the ROI box to the capture settings and capturing again" << std::endl;
settings.set(Zivid::Settings::RegionOfInterest{ roiSettings });

const auto roiFrame = camera.capture2D3D(settings);

std::cout << "Displaying the ROI-filtered point cloud from the new capture" << std::endl;
visualizeZividPointCloud(roiFrame.pointCloud());
Console.WriteLine("Adding the ROI box to the capture settings and capturing again");
settings.RegionOfInterest.Box = roiSettings;

using (var roiFrame = camera.Capture2D3D(settings))
{
    Console.WriteLine("Displaying the ROI-filtered point cloud from the new capture");
    VisualizeZividPointCloud(roiFrame);
}
print("Adding the ROI box to the capture settings and capturing again")
settings.region_of_interest.box = roi_settings

roi_frame_point_cloud = camera.capture_2d_3d(settings).point_cloud()
print("Displaying the ROI-filtered point cloud from the new capture")
display_pointcloud(roi_frame_point_cloud)
ROI ボックスに基づいて点群をフィルタリングするには、コード サンプルを実行できます。
サンプル: ROIBoxViaArucoMarker.cpp
./ROIBoxViaArucoMarker
サンプル: ROIBoxViaArucoMarker.cs
./ROIBoxViaArucoMarker
サンプル: roi_box_via_aruco_marker.py
python roi_box_via_aruco_marker.py
Tip
これを独自のセットアップで使用する場合は、コード サンプルを変更します。
ファイル カメラを実際のカメラと設定に置き換えます。
キャリブレーションボードをゴミ箱の右下隅に置きます。
ROI ボックスのサイズをビンのサイズに変更します。
サンプルを実行してください!
これで、ROI パラメータを含むキャプチャ設定を保存し、キャリブレーションボードを取り外して、ビン全体に対してその設定を使用できるようになりました。
バージョン履歴
SDK |
変更内容 |
|---|---|
2.18.0 |
再キャプチャする代わりに、取得した点群を ROI ボックスでマスクします。 |