关于 GPU
Zivid SDK requires a GPU on the host machine to run optimally. Both integrated and dedicated GPUs can work well with Zivid, where the difference in performance lies in the capture time you get.
See GPU Requirements for driver requirements per OS and GPU vendor.
See Performance Considerations for dedicated vs. integrated GPU recommendations.
See Selecting Compute Device if you need to target a specific GPU or run on an unsupported compute device.
GPU 的要求
Windows
为了获得最佳性能,独立或集成 GPU 应具有至少 3 GB 的可用 RAM。此外,要使用 Zivid,还需要 GPU 的 CUDA(12 或更高版本)或 OpenCL 驱动程序(1.2 或更高版本)。要使用 Zivid Studio 或 SDK 中的可视化工具,还需要 GPU 的 OpenGL 驱动程序(3.0 或更高版本);这通常会随 GPU 驱动程序一起安装,但较旧的驱动程序可能使用低于 3.0 的版本。请按照以下针对您的特定 GPU 的说明进行操作。
Intel
OpenCL 驱动程序通常与图形驱动程序一起安装,并且应该已经安装在 Windows 上。如果您想检查您已有的 GPU 驱动程序,请使用下面的下拉列表。如果没有,请从 Intel 下载并安装最新的显卡驱动程序。
检查 GPU 驱动程序
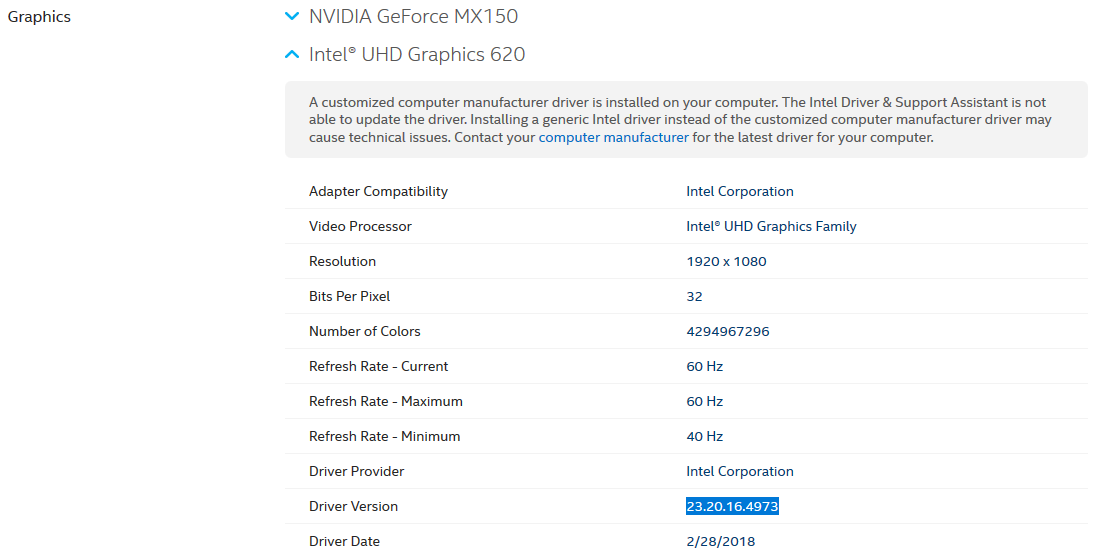
使用 Intel Driver & Support assistant 自动检测您的驱动程序版本或按照以下说明手动查找。
Start → Control Panel
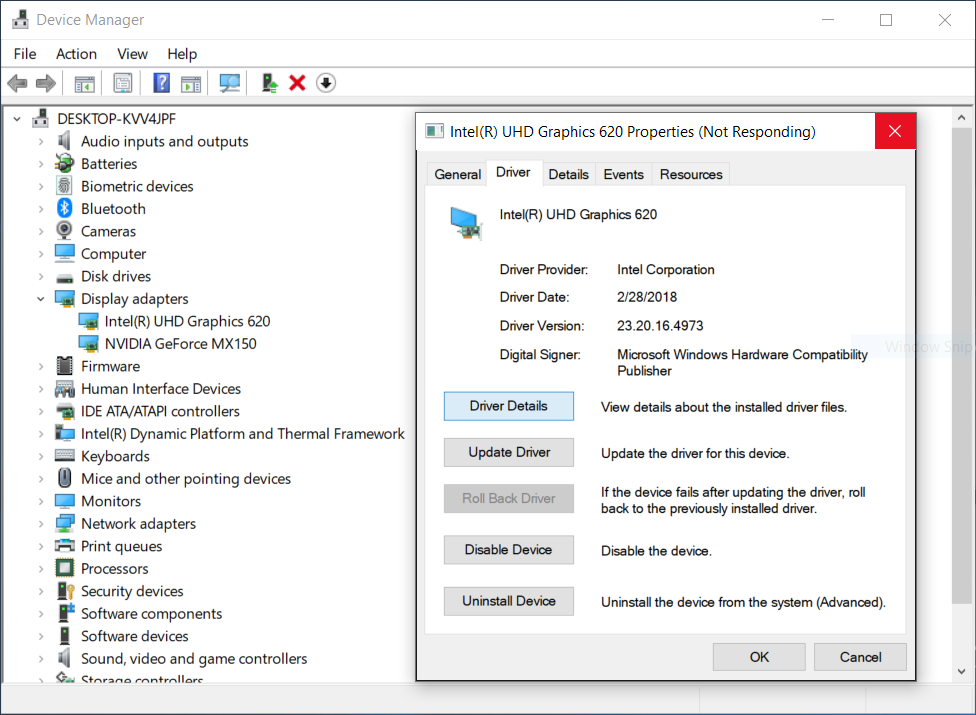
从列表中选择 Device Manager (如果需要,将 View 切换为 Small Icons )
展开 Display Adapter 部分并右键单击 Intel® Display Adapter 的 Properties
导航到 Driver 标签并记下显示的 Driver Version
安装图形驱动程序后,打开 Zivid Studio 并验证不会发生 OpenCL 错误。
NVIDIA
备注
The CUDA backend requires an NVIDIA GPU with compute capability 6.1 or higher. If this requirement is not fulfilled, the SDK will throw an exception:
Detected compute capability X.Y, which is not supported. Supported versions: (6.1, 7.0, 7.5, 8.0, 8.6)
The listed versions are the compute capabilities the installed package was built for.
Setting AllowUnsupported does not make the CUDA backend work below this minimum.
The packages contain no code for older architectures, so the capture fails later instead.
The OpenCL backend has no practical limit: it requires OpenCL 1.2 support, which every NVIDIA card new enough to have an OpenCL driver provides. A compute capability floor of 3.5 exists in the SDK, but no driver that meets the OpenCL requirement falls below it. A GPU below 6.1 therefore works with the OpenCL backend but not with the CUDA backend. Be aware that the OpenCL version of the SDK rejects every NVIDIA GPU regardless of compute capability until you opt in to unsupported compute devices in the Config.yml file.
有关 NVIDIA GPU 及其相应计算能力的概述,请访问 https://developer.nvidia.com/cuda-gpus。
CUDA
CUDA 后端需要支持 CUDA 12 或更新版本的 NVIDIA 驱动程序。
OpenCL
OpenCL 驱动程序通常与图形驱动程序一起安装。
警告
SDK 的 OpenCL 版本将 NVIDIA GPU 视为 不受支持的计算设备 。安装 SDK 的 OpenCL 版本后,您必须编辑 Config.yml 文件以启用它,否则 SDK 将出错并失败。Zivid 建议改为安装 CUDA 版本,该版本无需额外配置。
如果您想检查您已有的 GPU 驱动程序,请使用下面的下拉列表。如果没有,请从 NVIDIA 下载并安装适用于您的 GPU 的相关显卡驱动程序。
检查 GPU 驱动程序
使用 NVIDIA Smart Scan 自动检测您的驱动程序版本或按照以下说明手动查找。
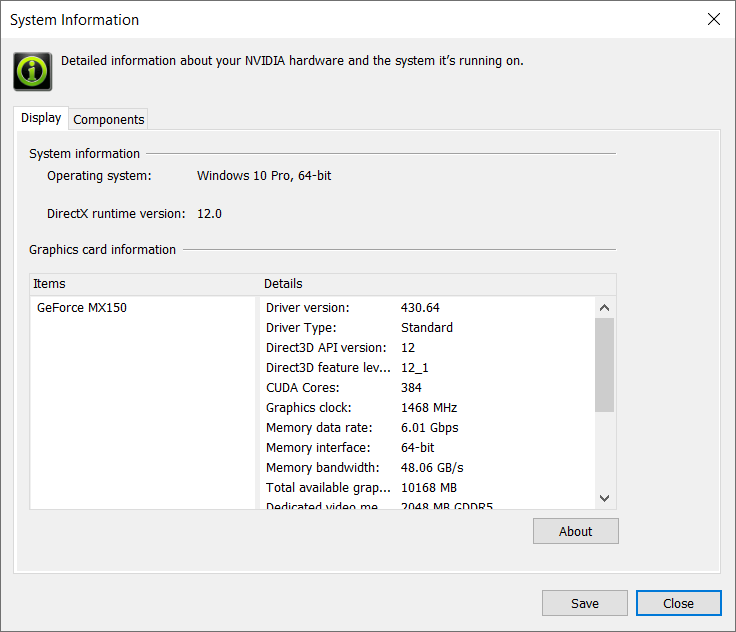
打开 NVIDIA Control Panel (右键单击 Desktop )。
单击 System Information (左下角)。
请记录 Driver version 中的 Details 。
安装图形驱动程序后,打开 Zivid Studio 并验证不会发生错误。
AMD
警告
自 SDK 2.10 起,由于驱动程序中的 OpenCL 稳定性问题,对 AMD 的支持已被移除。可以通过启用 Config.yml 文件中的一个选项,来 选择使用不受支持的计算设备运行 SDK 。然而,这样的设置可能会产生意外的结果和错误,并且未经 Zivid 测试。
警告
Radeon 在某些 GPU 上不再支持 SPIR,请验证您的 GPU 驱动程序是否支持 SPIR 以与 Zivid 兼容。
OpenCL 驱动程序通常与图形驱动程序一起安装。如果您想检查您已有的 GPU 驱动程序,请使用下面的下拉列表。如果没有,请从 AMD 下载并安装适用于您的 GPU 的相关显卡驱动程序。
检查 GPU 驱动程序
使用 AMD Driver Auto-detect tool 自动检测您的驱动程序版本或按照以下说明手动查找。
打开 AMD Radeon Settings (右键单击 Desktop )。
单击 System 可访问系统概述、软件和硬件详细信息。
选择 Software 标签以获取有关已安装图形驱动程序的详细信息。请记录 Driver Packaging Version 。
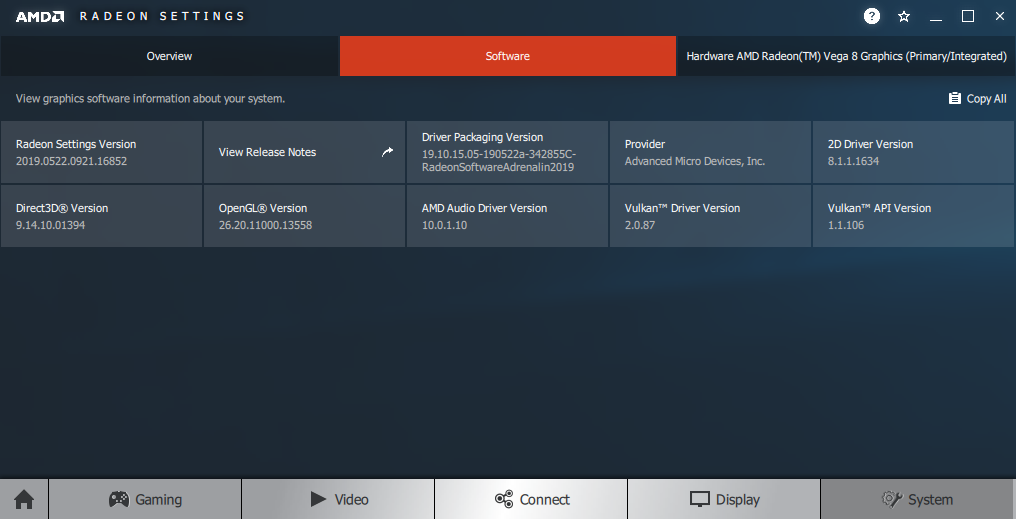
安装图形驱动程序后,打开 Zivid Studio 并验证不会发生 OpenCL 错误。
除了上述 OpenCL 或 CUDA 驱动程序外,Zivid Studio 和 SDK 的可视化工具还需要 OpenGL 驱动程序。
检查 OpenGL 驱动程序
安装、启动并检查 OpenGL 版本:
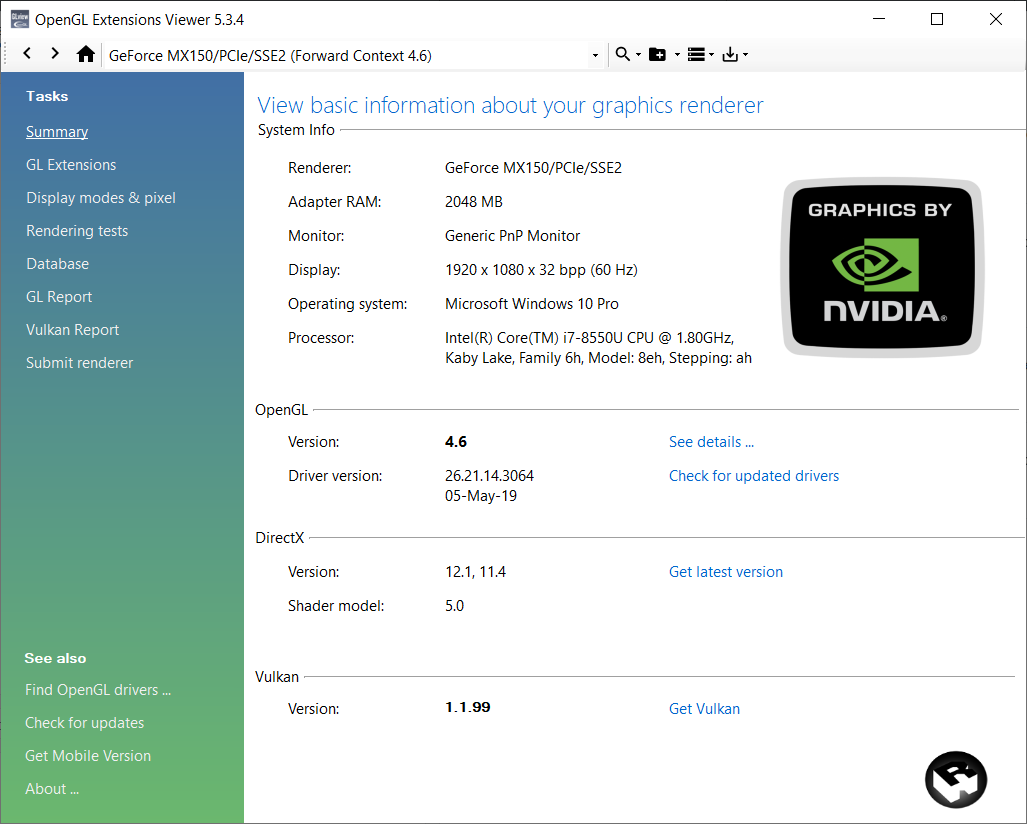
如果版本低于 3.0,则需要按照上面针对您的 GPU 的说明安装最新的 GPU 驱动程序。
Ubuntu
为了获得最佳性能,独立或集成 GPU 应具有至少 3 GB 的可用 RAM。此外,要使用 Zivid,还需要 GPU 的 CUDA(12 或更高版本)或 OpenCL 驱动程序(1.2 或更高版本)。要使用 Zivid Studio 或 SDK 中的可视化工具,还需要 GPU 的 OpenGL 驱动程序(3.0 或更高版本);这通常会随 GPU 驱动程序一起安装,但较旧的驱动程序可能使用低于 3.0 的版本。请按照以下针对您的特定 GPU 的说明进行操作。
Intel
Ubuntu 上应该已经安装了 Intel 的显卡驱动程序,但不一定包含 OpenCL 驱动程序。如果您想检查您的图形驱动程序是否存在,请使用下面的下拉菜单。
检查 GPU 驱动程序
按键盘上的 Ctrl + Alt + T 键打开终端窗口,并检查驱动程序是否存在。
lspci -k | grep -EA3 'VGA|3D|Display'
欲了解更多信息,请访问官方 Intel pages 。
按键盘上的 Ctrl + Alt + T 键打开终端窗口,然后安装 OpenCL 驱动程序。
Ubuntu 26.04
sudo apt update
sudo apt install intel-opencl-icd
Ubuntu 24.04
sudo apt update
sudo apt install intel-opencl-icd
Ubuntu 22.04
sudo apt update
sudo apt install intel-opencl-icd
Ubuntu 20.04
sudo apt update
sudo apt install intel-opencl-icd
Ubuntu 18.04
备注
自 SDK 2.10 起,移除了对 Ubuntu 18.04 的支持。如需查看早期 SDK 版本的 Ubuntu 18.04 说明,请更改左上角的知识库版本。
打开 Zivid Studio 并验证不会出现 OpenCL 错误。
备注
如果您碰到 OpenCL 错误,您可能必须 将您的用户添加到视频组 。
NVIDIA
备注
The CUDA backend requires an NVIDIA GPU with compute capability 6.1 or higher. If this requirement is not fulfilled, the SDK will throw an exception:
Detected compute capability X.Y, which is not supported. Supported versions: (6.1, 7.0, 7.5, 8.0, 8.6)
The listed versions are the compute capabilities the installed package was built for. Setting
AllowUnsupporteddoes not make the CUDA backend work below this minimum. The packages contain no code for older architectures, so the capture fails later instead.The OpenCL backend has no practical limit: it requires OpenCL 1.2 support, which every NVIDIA card new enough to have an OpenCL driver provides. A compute capability floor of 3.5 exists in the SDK, but no driver that meets the OpenCL requirement falls below it. A GPU below 6.1 therefore works with the OpenCL backend but not with the CUDA backend. Be aware that the OpenCL version of the SDK rejects every NVIDIA GPU regardless of compute capability until you opt in to unsupported compute devices in the Config.yml file.
有关 NVIDIA GPU 及其相应计算能力的概述,请访问 https://developer.nvidia.com/cuda-gpus。
CUDA
CUDA 后端需要支持 CUDA 12 或更新版本的 NVIDIA 驱动程序。
OpenCL
适用于 NVIDIA 的 OpenCL 驱动程序与图形驱动程序一起安装。
警告
SDK 的 OpenCL 版本将 NVIDIA GPU 视为 不受支持的计算设备 。安装 SDK 的 OpenCL 版本后,您必须编辑 Config.yml 文件以启用它,否则 SDK 将出错并失败。Zivid 建议改为安装 CUDA 版本,该版本无需额外配置。
如果您想检查您的图形驱动程序是否存在,请使用下面的下拉菜单,或者继续为您的系统安装最新的驱动程序。
检查 GPU 驱动程序
按键盘上的 Ctrl + Alt + T 键打开终端窗口,然后执行以下命令:
nvidia-smi
这将打印驱动程序版本。
将 NVIDIA GPU 驱动程序 PPA 添加到您的系统:
按键盘上的 Ctrl + Alt + T 键打开终端窗口,然后添加图形驱动程序 PPA。
sudo add-apt-repository ppa:graphics-drivers/ppa
这将使打包为
nvidia-xxx的最新长期支持驱动程序版本可供在下一步中安装。为您的系统安装最新的驱动程序:
Ubuntu 26.04
sudo apt update
sudo apt install nvidia-driver-xxx
Ubuntu 24.04
sudo apt update
sudo apt install nvidia-driver-xxx
Ubuntu 22.04
sudo apt update
sudo apt install nvidia-driver-xxx
Ubuntu 20.04
sudo apt update
sudo apt install nvidia-driver-xxx
Ubuntu 18.04
备注
自 SDK 2.10 起,移除了对 Ubuntu 18.04 的支持。如需查看早期 SDK 版本的 Ubuntu 18.04 说明,请更改左上角的知识库版本。
安装驱动程序后,重新启动系统。
sudo reboot打开 Zivid Studio 并验证不会出现 OpenCL 错误。
备注
如果您碰到 OpenCL 错误,您可能必须 将您的用户添加到视频组 。
AMD
警告
自 SDK 2.10 起,由于驱动程序中的 OpenCL 稳定性问题,对 AMD 的支持已被移除。可以通过启用 Config.yml 文件中的一个选项,来 选择使用不受支持的计算设备运行 SDK 。然而,这样的设置可能会产生意外的结果和错误,并且未经 Zivid 测试。
警告
Radeon 在某些 GPU 上不再支持 SPIR,请验证您的 GPU 驱动程序是否支持 SPIR 以与 Zivid 兼容。
下载、解压并安装适用于 Linux 的正确 Radeon Software:
Ubuntu 22.04
按键盘上的 Ctrl + Alt + T 键打开终端窗口,然后创建一个临时文件夹。
mkdir amd && cd amd
下载经过验证可用版本 22.20.3 的驱动程序安装包:
wget --referer http://support.amd.com http://repo.radeon.com/amdgpu-install/22.20.3/ubuntu/jammy/amdgpu-install_22.20.50203-1_all.deb
备注
AMD 的 release notes page 页面及其
/latest路径均链接到已损坏的安装程序。请改用上面固定的版本,Zivid 已验证该版本可正常使用。使用
apt安装此软件包:sudo apt update sudo apt install ./amdgpu-install_22.20.50203-1_all.deb
amdgpu-install --usecase=graphics,opencl --no-32 --no-dkms
备注
如果您需要安全启动,则可能必须包含 DKMS(在上述命令中删除
--no-dkms)。更多相关信息,请参阅 secure-boot-support 。现在将您的用户添加为
render和video组的成员。sudo gpasswd -a $USER render sudo gpasswd -a $USER video
您可能必须重新启动才能使更改生效。
sudo reboot您现在可以尝试打开 Zivid Studio 。如果失败,请按照下面的安全启动配置步骤进行操作。
Ubuntu 20.04
按键盘上的 Ctrl + Alt + T 键打开终端窗口,然后创建一个临时文件夹。
mkdir amd && cd amd
检查您的 Linux 内核版本:
uname -rKernel 5.4
对于 Linux Kernel version 5.4 (Ubuntu LTS),请下载适用于 Ubuntu 20.04 的 Radeon Software 20.45:
wget --referer http://support.amd.com https://drivers.amd.com/drivers/linux/amdgpu-pro-20.45-1188099-ubuntu-20.04.tar.xz
提取内容:
tar -Jxvf amdgpu-pro-20.45-1188099-ubuntu-20.04.tar.xz
cd amdgpu-pro-20.45-1188099-ubuntu-20.04
Kernel 5.8
对于 Linux Kernel version 5.8 (Ubuntu LTS HWE stacks),请下载适用于 Linux 20.04 的 Radeon Software 20.50:
wget --referer http://support.amd.com https://drivers.amd.com/drivers/linux/amdgpu-pro-20.50-1234664-ubuntu-20.04.tar.xz
提取内容:
tar -Jxvf amdgpu-pro-20.50-1234664-ubuntu-20.04.tar.xz
cd amdgpu-pro-20.50-1234664-ubuntu-20.04
./amdgpu-pro-install --opencl=pal
Ubuntu 18.04
备注
自 SDK 2.10 起,移除了对 Ubuntu 18.04 的支持。如需查看早期 SDK 版本的 Ubuntu 18.04 说明,请更改左上角的知识库版本。
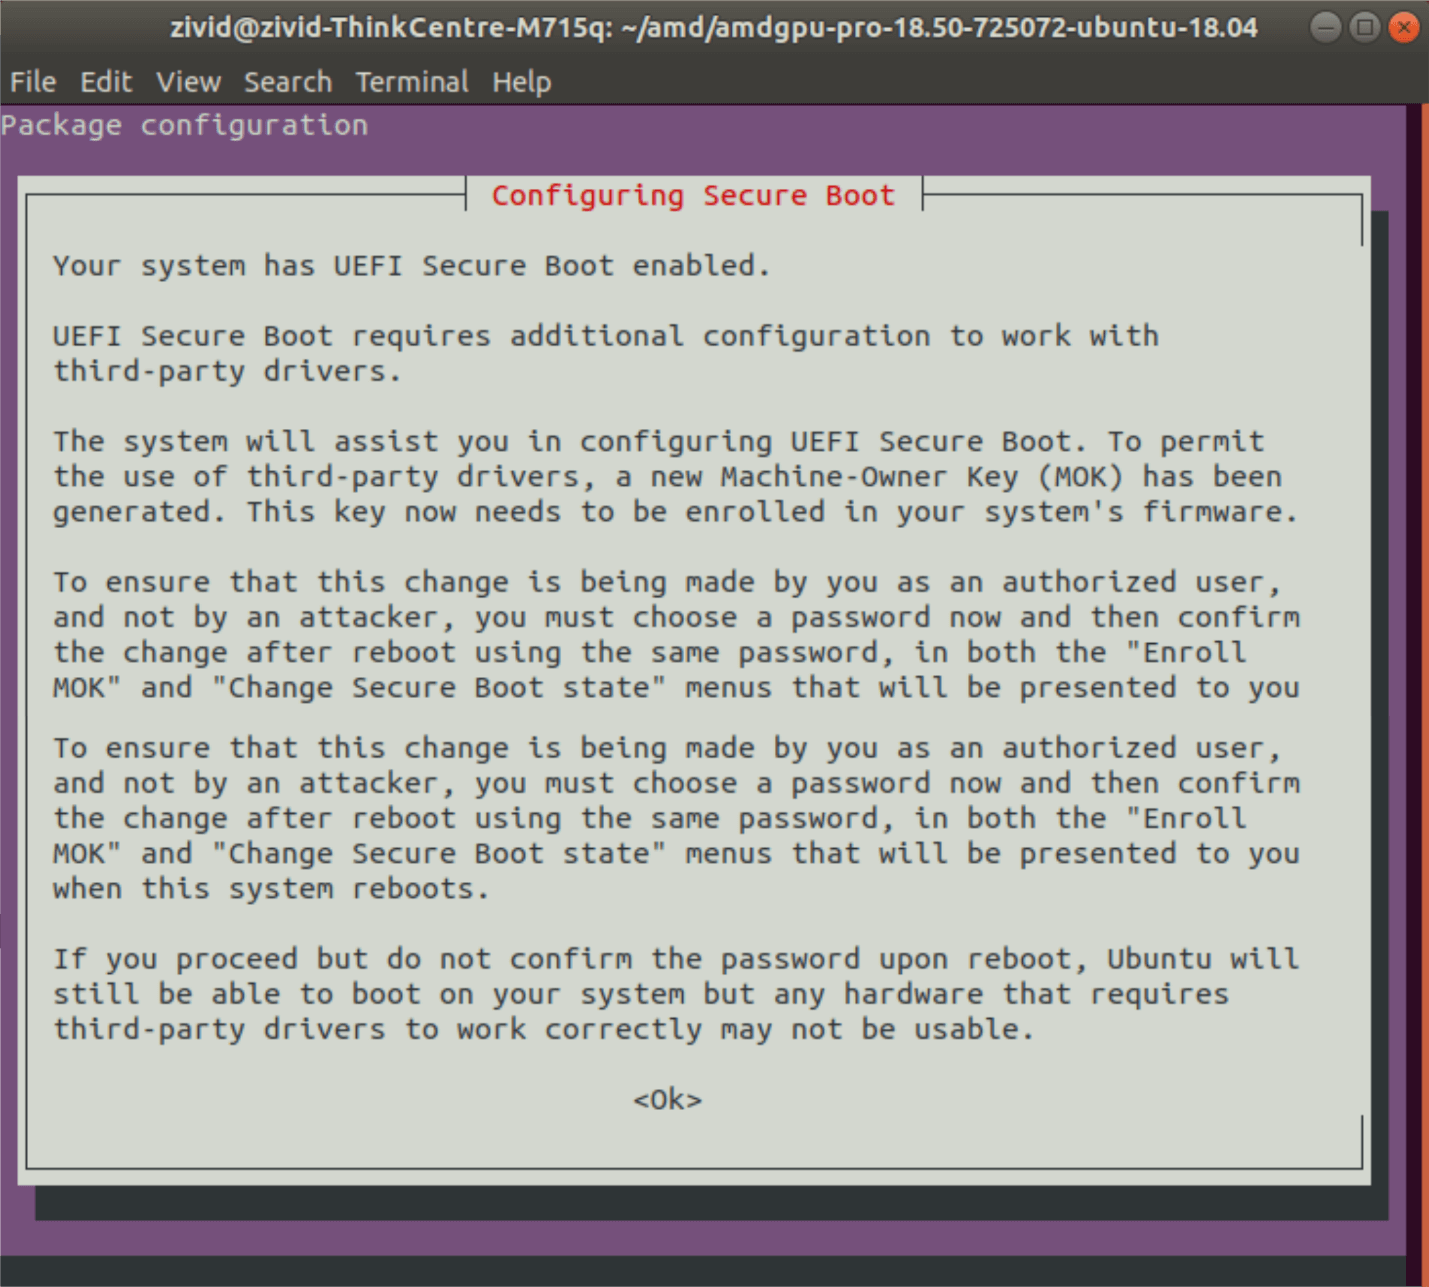
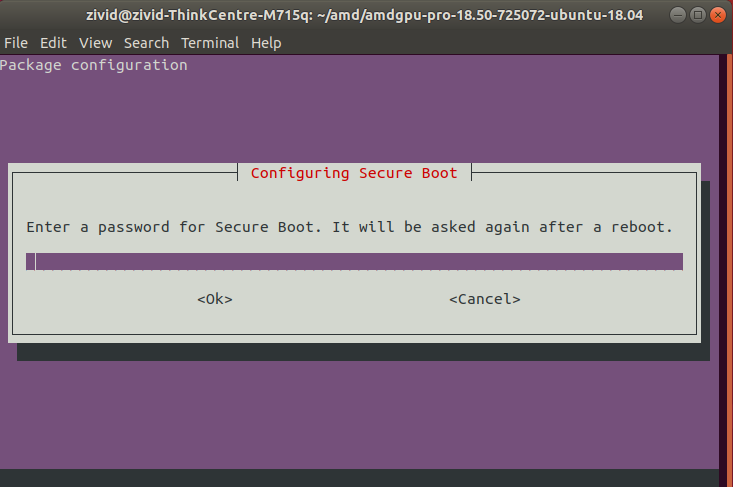
按照步骤配置安全启动(如果出现提示):
打开 Zivid Studio 并验证不会出现 OpenCL 错误。
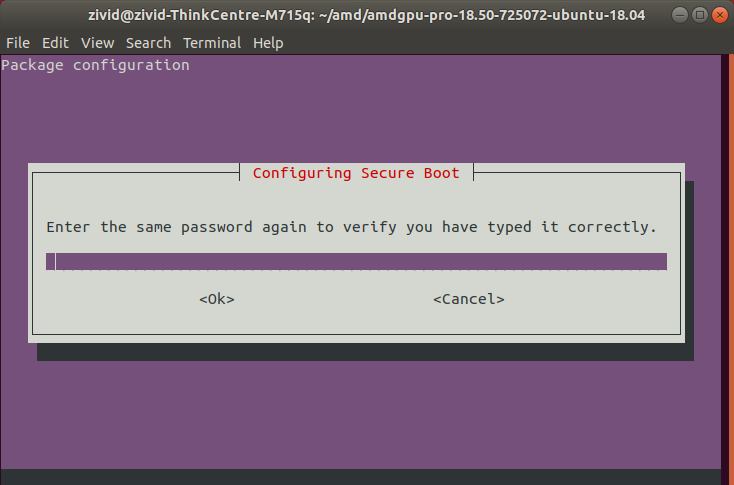
备注
如果您碰到 OpenCL 错误,您可能必须 将您的用户添加到视频组 。
除了上述 OpenCL 或 CUDA 驱动程序外,Zivid Studio 和 SDK 的可视化工具还需要 OpenGL 驱动程序。
检查 OpenGL 驱动程序
按键盘上的 Ctrl + Alt + T 键打开终端窗口,然后执行以下命令:
sudo apt install mesa-utils
glxinfo | grep "OpenGL version"
这将打印 OpenGL 版本。
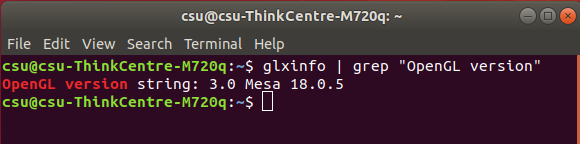
如果版本低于 3.0,则需要按照上面针对您的 GPU 的说明安装最新的 GPU 驱动程序。
Nvidia Jetson Linux
Nvidia Jetson Orin 和 Thor 具有支持 CUDA 的 Nvidia GPU。所有必需的 GPU 驱动程序均随操作系统一起安装。
Zivid Studio 和 SDK 的可视化工具还需要 OpenGL 驱动程序。
检查 OpenGL 驱动程序
Jetson Linux 系统自带兼容的 OpenGL 版本,因此无需执行任何操作。
性能考虑因素
独立 GPU
独立 GPU 可为 Zivid 提供最佳性能。如果 GPU 将用于 Zivid 以外的计算,这也是最佳选择。为获得最佳性能,需要至少具有 3 GB 内存的中高端 NVIDIA GPU。这是 Zivid 的首选解决方案。
建议:
NVIDIA GeForce GTX 1060 or newer for desktops
NVIDIA GeForce MX150 or newer for laptops
集成 GPU
这是 Zivid 最具成本效益的解决方案。集成 GPU 的优点是从 GPU 到 CPU 的数据传输速度快。它也有利于需要低功耗的应用,例如电池供电的移动平台。为了获得最佳性能,需要具有至少 3 GB 可用内存的高端集成 GPU。
建议:
配备 HD630 或更好 GPU 的 Intel i7
Nvidia Jetson
Zivid 建议使用具有至少 16GB RAM 的 Jetson 主板来运行 Zivid SDK 和其他软件。
虽然 Zivid SDK 支持 Jetson Orin Nano,但 Orin Nano 的总 RAM 只有 4GB/8GB,由 CPU 和 GPU 共享。4GB 通常不足以运行任何使用 Zivid SDK 的应用程序,而 8GB 在实践中对于许多用例而言也是不够的,尤其是在结合较长时间的捕获、Stripe/Omni engine 和许多过滤器时。因此,在使用 Orin Nano 时,必须仔细评估应用程序中的 RAM 使用情况。
Jetson Thor 模块(T4000/T5000)配备 64GB 或 128GB 的 RAM,远高于建议的最低要求。
警告
Jetson 主板可能以降低的功耗模式启动,这会显著降低 Zivid SDK 点云处理速度。请按照 在 Jetson Linux 上安装 Zivid 中的说明设置最大功耗模式。
选择计算设备
如果您有多个 GPU 并且希望 Zivid SDK 使用特定的 GPU,您可以在 Configuration file 中指定计算设备。您也可以配置 Zivid SDK 在 CPU 上运行,但 CPU 属于 不受支持的计算设备模式 。
CUDA 和 OpenCL
Zivid SDK 提供两个版本,一个 CUDA 版本和一个 OpenCL 版本。该版本在安装 SDK 时选择,而非在配置文件中选择。
CUDA 版本仅可在 NVIDIA GPU 上运行。OpenCL 版本可在 Intel GPU 上运行,也可作为 不受支持的计算设备 在 NVIDIA GPU 上运行。要将 NVIDIA GPU 用作受支持的计算设备,请安装 SDK 的 CUDA 版本。
配置文件
如果该文件不存在,请下载 Config.yml 文件并将其放置在以下目录中:
Windows
mkdir %LOCALAPPDATA%\Zivid\API
move %HOMEPATH%\Downloads\Config.yml %LOCALAPPDATA%\Zivid\API\
Ubuntu
mkdir --parents "${XDG_CONFIG_HOME-$HOME/.config}"/Zivid/API
mv ~/Downloads/Config.yml "${XDG_CONFIG_HOME-$HOME/.config}"/Zivid/API/
通过更改配置文件中的 ComputeDevice 参数来分配所需的 GPU。
单一供应商
如果您有来自单个供应商的多个 GPU(例如两个 Nvidia GPU), SelectionFilter 必须指定要使用哪个 GPU。我们将使用 clinfo 列出所有计算设备。请按照下面的下拉列表了解有关 clinfo 、如何安装以及如何使用它的更多信息。
clinfo
Windows
下载 clinfo Windows 二进制文件。
按键盘上的 Win + R 键启动命令提示符,然后输入
cmd并按 Enter 。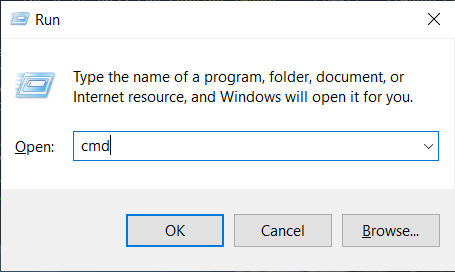
导航到包含下载文件 (clinfo.exe) 的目录并执行以下命令:
如需检查 OpenCL 驱动程序版本,请使用
clinfo并搜索 OpenCL 平台版本:clinfo.exe | findstr "Platform\ Version"
如果版本低于 OpenCL 1.2 ,则需要 更新您的图形驱动程序 。

Ubuntu
按键盘上的 Ctrl + Alt + T 键打开终端窗口并安装
clinfo。sudo apt install -y clinfo
运行
clinfo -l列出所有 OpenCL 平台。sudo /usr/bin/clinfo -l
这将打印有关系统上所有 OpenCL 平台及其公开的设备的所有可用信息。
如果您的 GPU 未列出,您可能需要 安装 OpenCL 驱动程序和/或图形驱动程序 。
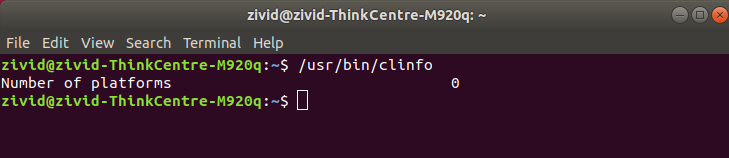
如需检查 OpenCL 驱动程序版本,请使用
clinfo并搜索 OpenCL 平台版本:sudo /usr/bin/clinfo | grep "Platform Version"
如果版本低于 OpenCL 1.2 ,您需要 更新您的 OpenCL 驱动程序和/或图形驱动程序 。
如需查找特定的 GPU 名称,请运行 clinfo 来列出您的计算设备。
clinfo -l
备注
clinfo 列出 OpenCL 设备,适用于 SDK 的 OpenCL 版本。对于 CUDA 版本,请改在终端中运行 nvidia-smi -L ,并使用 CUDA 设备名称中任何唯一的部分。这两个命令都可在 Windows 和 Ubuntu 上运行。在 Windows 上,clinfo 默认未安装,且 nvidia-smi 有时不在 PATH 中。
将配置文件中的 SelectionFilter 更改为所需设备名称的任何唯一部分。例如,当输入内容如下时,选择 NVIDIA GeForce RTX 3060
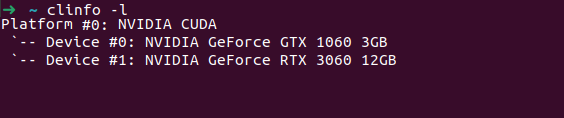
将 SelectionFilter 设置为
ComputeDevice:
    SelectionFilter: "RTX 3060"
    Type: Any
    Vendor: Any
多个供应商
如果您有来自多个供应商的多个 GPU(例如集成 Intel GPU 和独立 NVIDIA GPU),请将 Type 更改为 GPU 并将 Vendor 更改为 Nvidia 或 Intel ,例如
ComputeDevice:
    SelectionFilter: ""
    Type: GPU
    Vendor: Nvidia
启用不受支持的计算设备
启用不受支持的计算设备可以通过启用 Configuration file 中的选项来实现。然而,这样的设置可能会产生意外的结果和错误,并且未经 Zivid 测试。目前,不受支持的计算设备包括 AMD GPU、SDK OpenCL 版本上的 NVIDIA GPU,以及 CPU。请在下面为您的计算设备下载 Config.yml 文件:
启用 AMD
下载 Config.yml 文件,其包含以下信息,其中 AllowUnsupported: yes 用于启用不受支持的计算设备:
__version__:
    serializer: 1
    data: 19
Configuration:
    ComputeDevice:
        AllowUnsupported: yes
在 OpenCL 版本上启用 NVIDIA
SDK 的 OpenCL 版本将 NVIDIA GPU 视为不受支持的计算设备。如果您在 NVIDIA GPU 上安装 OpenCL 版本而不启用该选项,SDK 将出错并失败,提示不支持 NVIDIA 计算设备(有关确切的错误消息,请参阅 NVIDIA 计算设备不受 OpenCL 版本支持 )。请在下面下载 Config.yml 文件,其中 Vendor 设置为 Nvidia , AllowUnsupported 设置为 yes 。若要在 NVIDIA GPU 上使用受支持的配置,请改为安装 SDK 的 CUDA 版本。
__version__:
    serializer: 1
    data: 19
Configuration:
    ComputeDevice:
        Type: GPU
        Vendor: Nvidia
        AllowUnsupported: yes
启用 CPU
可以使用 CPU Runtime for OpenCL 在 Intel 芯片组上运行 Zivid SDK。请在下面下载 Config.yml 文件,其中计算设备的 Type 设置为 CPU , Vendor 设置为 Intel 。
__version__:
    serializer: 1
    data: 19
Configuration:
    ComputeDevice:
        Type: CPU
        Vendor: Intel
        AllowUnsupported: yes
警告
CPU 是一种不受支持的计算设备模式。使用 CPU 进行计算时,捕获时间会大大增加,对于大多数应用来说不推荐使用该模式。在混合 OpenCL 平台设置中,选择 CPU 还可能导致不稳定的行为,包括崩溃。
下载完成后,将 Config.yml 文件放置在以下目录中:
Windows
mkdir %LOCALAPPDATA%\Zivid\API
move %HOMEPATH%\Downloads\Config.yml %LOCALAPPDATA%\Zivid\API\
Ubuntu
mkdir --parents "${XDG_CONFIG_HOME-$HOME/.config}"/Zivid/API
mv ~/Downloads/Config.yml "${XDG_CONFIG_HOME-$HOME/.config}"/Zivid/API/
Version History
SDK |
变更 |
|---|---|
2.18.0 |
新增了对 NVIDIA GPU 的 CUDA 计算后端的支持。新增了对 Jetson Thor 的支持。新增了对 Ubuntu 26.04 的支持。 |
2.12.0 |
增加了 Jetson Orin 的支持。 |