Static IP Network Configuration - PC
조심
네트워크 구성에 대한 올바른 지침은 SDK 버전에 따라 다릅니다. 왼쪽 상단 드롭다운에서 SDK 버전을 선택합니다.
이 가이드에서는 카메라에 연결된 네트워크 카드의 고정 IP를 설정하는 방법을 안내합니다. 카메라의 기본 설정에 맞춰 설정하거나 사용자 지정 고정 IP로 설정할 수 있습니다.
아래와 같이 이동합니다:
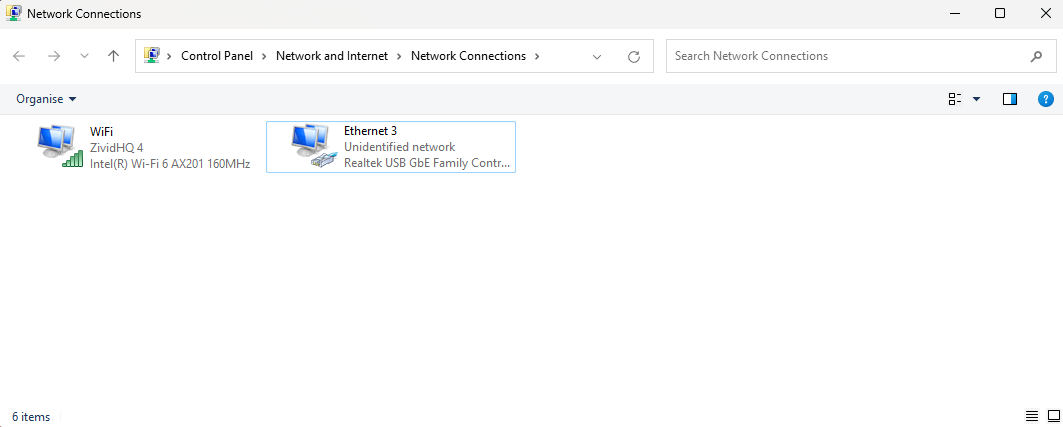
Control Panel → Network and Internet → Network and Sharing Center → Change adapter settings
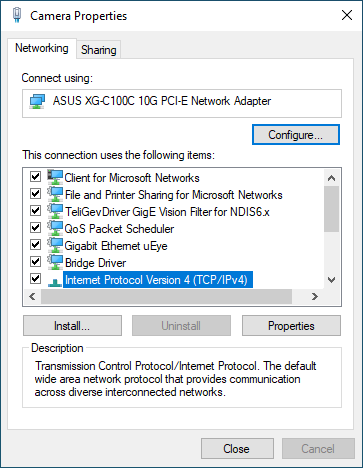
네트워크 연결을 마우스 오른쪽 버튼으로 클릭하고 Properties 를 선택합니다.
그런 다음 Internet Protocol Version 4(TCP/IPv4) 를 찾아 Properties 을 엽니다.
Use the following IP address 선택하고 네트워크 인터페이스(카드/어댑터)를 구성한 후, 카메라와 동일한 서브넷에 있는 IP 주소를 선택하세요. 기본 구성을 사용하는 카메라의 경우 다음과 같습니다.
IP 주소:
172.28.60.2서브넷 마스크:
255.255.255.0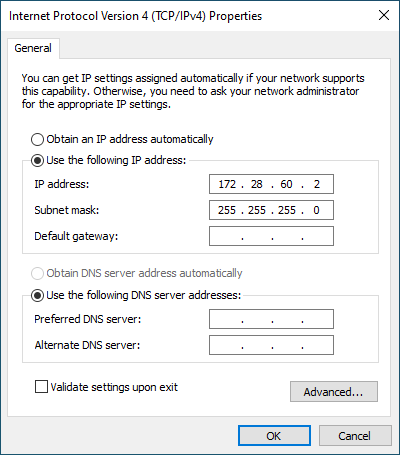
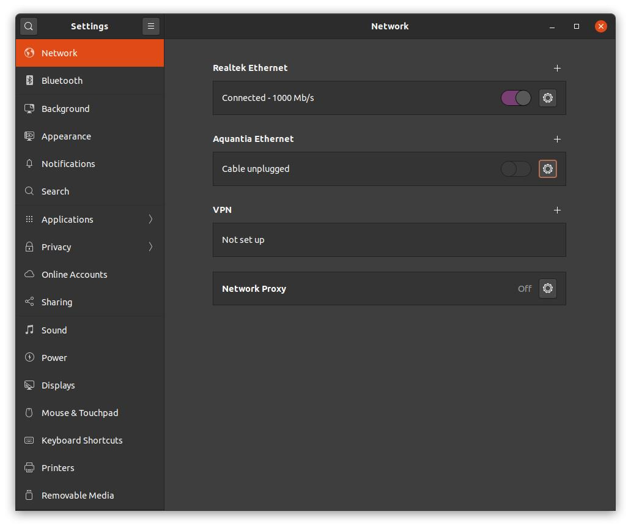
네트워크 설정으로 이동한 다음 연결되지 않은 네트워크 인터페이스(카드/어댑터)의 톱니바퀴를 클릭합니다. Ubuntu 20.04를 사용하는 경우 아래 스크린샷과 비슷해야 합니다.
IPv4 탭에서 네트워크 구성을 설정합니다. IPv4 Method 수동으로 설정하고 카메라와 동일한 서브넷에 있는 IP 주소를 선택합니다. 기본 구성을 사용하는 카메라의 경우 다음과 같습니다.
IP 주소:
172.28.60.2넷마스크:
255.255.255.0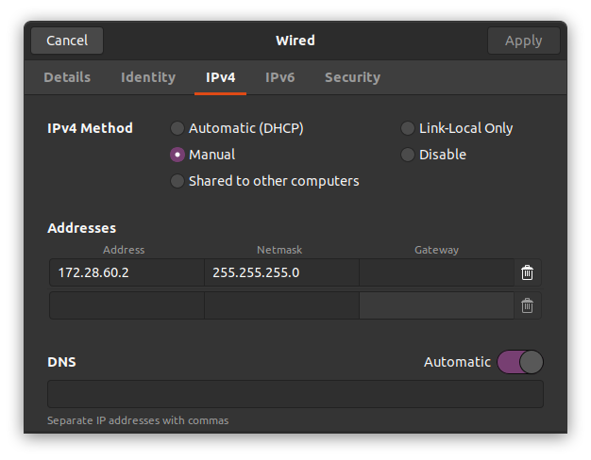
조심
이 단계 후에 네트워크 인터페이스를 가동 중지 및 가동해야 할 수도 있습니다(첫 번째 스크린샷의 첫 번째 토글 버튼을 켜기 및 끄기로 설정).
현재 인터페이스 및 설정을 찾습니다.
ip addrExample output for ip addrzivid@se-zivid-xps15:~$ ip addr 1: lo: <LOOPBACK,UP,LOWER_UP> mtu 65536 qdisc noqueue state UNKNOWN group default qlen 1000 link/loopback 00:00:00:00:00:00 brd 00:00:00:00:00:00 inet 127.0.0.1/8 scope host lo valid_lft forever preferred_lft forever inet6 ::1/128 scope host valid_lft forever preferred_lft forever 8: eth0: <BROADCAST,MULTICAST,UP,LOWER_UP> mtu 1500 qdisc fq_codel state UP group default qlen 1000 link/ether 48:65:ee:1c:12:ba brd ff:ff:ff:ff:ff:ff inet 172.21.96.50/24 brd 172.28.60.255 scope global noprefixroute eth0 valid_lft forever preferred_lft forever inet6 fe80::4a65:eeff:fe1c:12ba/64 scope link valid_lft forever preferred_lft forever
현재 IP 주소는
172.21.96.50/24입니다. 카메라의 IP 주소가 동일한 서브넷에 있지 않으면 작동하지 않습니다. 기본 구성을 사용하는 카메라의 경우 IP 주소는172.28.60.5와 동일한 서브넷에 있어야 합니다.netplan 사용하여 이 인터페이스의 IP 주소를 업데이트합니다. 먼저, 현재 구성을 확인하세요.
ls /etc/netplan기본적으로 01-network-manager-all.yaml과 같은 이름의 .yaml 파일이 표시되어야 합니다. 그런 다음 내용을 나열합니다. 예:
cat /etc/netplan/01-netcfg.yaml
# Let NetworkManager manage all devices on this system
network:
  version: 2
  renderer: NetworkManager
안전을 위해 다음과 같이 설정을 업데이트하기 전에 파일을 복사하십시오.
sudo nano /etc/netplan/01-netcfg.yaml

network:
    version: 2
    renderer: networkd
    ethernets:
        eth0:
            dhcp4: no
            addresses:
                - 172.28.60.2/24
            gateway4: 172.28.60.1
변경을 적용합니다.
sudo netplan apply
IP 주소가 올바르게 업데이트되었는지 확인합니다.
Example output for ip addrzivid@se-zivid-xps15:~$ ip addr 1: lo: <LOOPBACK,UP,LOWER_UP> mtu 65536 qdisc noqueue state UNKNOWN group default qlen 1000 link/loopback 00:00:00:00:00:00 brd 00:00:00:00:00:00 inet 127.0.0.1/8 scope host lo valid_lft forever preferred_lft forever inet6 ::1/128 scope host valid_lft forever preferred_lft forever 8: eth0: <BROADCAST,MULTICAST,UP,LOWER_UP> mtu 1500 qdisc fq_codel state UP group default qlen 1000 link/ether 48:65:ee:1c:12:ba brd ff:ff:ff:ff:ff:ff inet 172.28.60.2/24 brd 172.28.60.255 scope global noprefixroute eth0 valid_lft forever preferred_lft forever inet6 fe80::4a65:eeff:fe1c:12ba/64 scope link valid_lft forever preferred_lft forever
PC의 고정 IP가 카메라와 동일한 서브넷에 있도록 구성했으면 Connecting to the camera 로 돌아갑니다.
Multiple cameras
다중 카메라 설정에는 두 가지 경우가 있습니다.
여러 네트워크 카드에 연결된 여러 카메라
스위치를 통해 동일한 네트워크 카드에 연결된 여러 대의 카메라
두 경우 모두 카메라를 사용자 정의하여 구성해야 합니다.
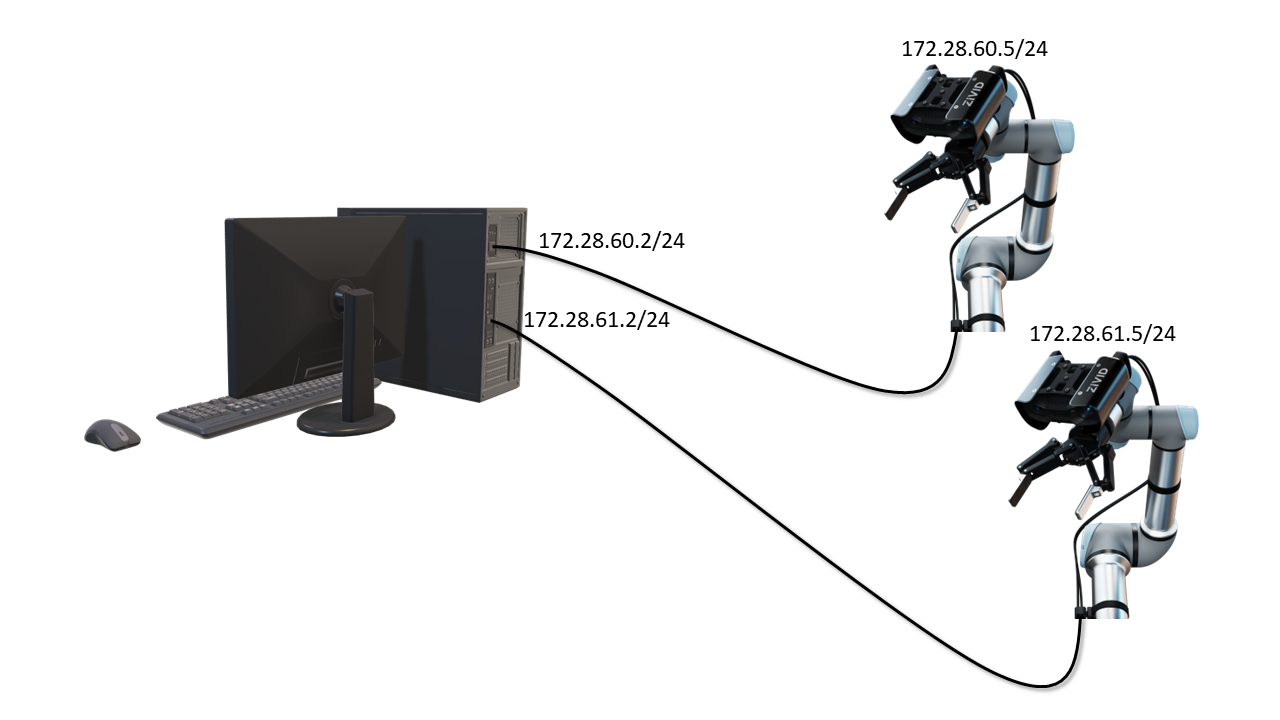
여러 네트워크 인터페이스 카드에 연결된 여러 카메라를 사용하는 경우 동일한 서브넷에 존재하지 않아야 합니다. 예를 들어 서브넷 마스크가 255.255.255.0 인 경우 처음 24비트 중 적어도 하나의 비트는 달라야 합니다. 기본 구성을 예로 사용하면 네트워크 카드 구성은 다음과 같습니다.
네트워크 인터페이스 카드 1:
IP 주소:
172.28.60.2넷마스크 대상:
255.255.255.0
네트워크 인터페이스 카드 2:
주소:
172.28.61.2넷마스크 대상:
255.255.255.0
네트워크 인터페이스 카드 2의 경우, 카메라의 IP 주소도 서브넷 범위에 포함되도록 구성해야 합니다. 이 작업을 수행하려면 Static IP Network Configuration - Camera 를 참조하세요.
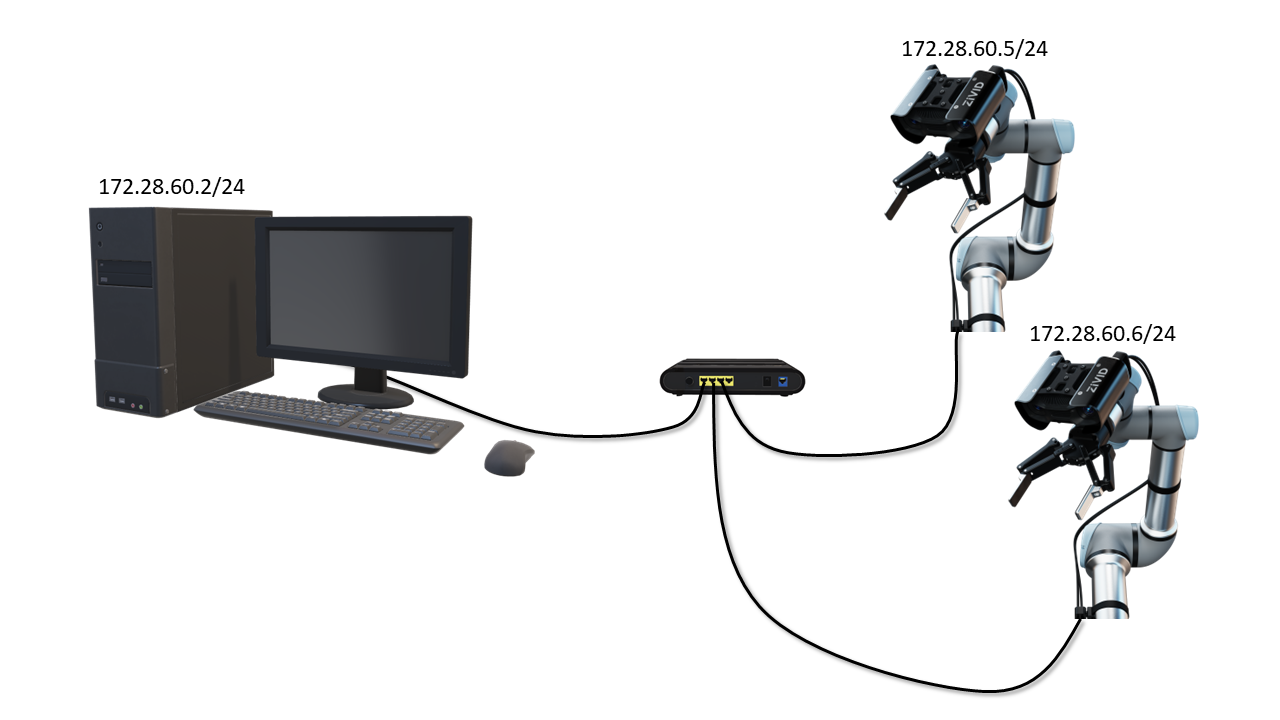
스위치를 통해 동일한 네트워크 카드에 연결된 여러 대의 카메라를 사용하는 경우 네트워크 카드와 동일한 서브넷의 다른 IP로 카메라를 구성해야 합니다. 기본 구성을 예로 사용하면 카메라를 다음과 같이 구성해야 합니다.
카메라 1:
주소
172.28.60.5(이미 default로 설정됨)
카메라 2:
주소
172.28.60.6
이 작업은 카메라 3, 4 등에 대해서도 반복할 수 있습니다. 이 작업을 수행하려면 Static IP Network Configuration - Camera 를 참조하세요.
참고
여러 개의 네트워크 인터페이스 카드를 사용하면 스위치보다 더 빠른 속도를 제공할 수 있습니다. 네트워크 대역폭을 공유할 필요가 없기 때문입니다.
PC의 정적 IP를 카메라와 동일한 서브넷에 있도록 구성한 후 Connecting to the camera 로 돌아갑니다.
