Robot Mounting
All Zivid 3D camera models can be mounted on a robot using the Zivid On-Arm Mount, with an optional Zivid On-Arm Mount Extender.
Zivid On-Arm Mount
Zivid On-Arm Mount is a mount for attaching a Zivid camera to industrial and collaborative robots. Zivid 2 and Zivid 2+ models are especially suited for on-arm mounting because of their compact size, light weight, capture speed, and specialized field of view.
왜 Zivid On-Arm Mounting 솔루션을 사용해야 하나요?
Lightweight
Zivid On-Arm 마운트는 로봇 팔의 운반 능력에 낮은 영향을 미치도록 설계되었으며 협동 로봇 및 작은 산업용 로봇에 특히 중요합니다. 이를 통해 더 무거운 도구와 그리퍼를 사용할 수 있을 뿐만 아니라 시스템에서 최대한의 페이로드를 얻을 수 있습니다.
Modularity
One Zivid On-Arm Mount camera bracket fits all our camera models, and replacing the camera is possible without complete disassembly.
Integrated cable management
Zivid On-Arm Mount는 케이블이 얽힌 경우 커넥터를 보호하는 카메라 끝에 스트레인 릴리프가 있습니다. 카메라 후면 또는 양쪽에 설치할 수 있어 각각의 고유한 장착 시나리오에 적응할 수 있습니다.
Occlusion prevention
Two Zivid On-Arm Mount camera bracket options give the choice of flat or 15-degree tilted mounting, suitable for large grippers that occlude the camera view.
Flexibility and collision prevention
Zivid On-Arm Mount는 높이가 낮기 때문에 다른 물체와의 충돌 위험을 줄이고 그리퍼와 로봇 팔의 충분한 간격을 제공합니다. 익스텐더와 유연한 구성을 통해 다양한 장착 자세가 가능합니다. 예를 들어 카메라 브래킷의 방향을 두 가지 방향으로 설정할 수 있습니다. 이러한 설정을 통해 카메라는 대형 그리퍼를 피하고 까다로운 로봇 움직임을 위한 여유 공간을 확보하여 자체 충돌을 방지할 수 있습니다. 기울어진 카메라 브래킷을 뒤쪽 방향으로 장착하면 카메라가 그리퍼 쪽으로 더 많이 보이도록 하여 잠재적으로 필요한 로봇 동작을 줄일 수 있습니다.
Adaptability
다양한 옵션으로 제공되기 때문에 Zivid On-Arm Mount는 다양한 로봇을 지원합니다. 또한 모듈식 설계를 통해 더 많은 로봇에 맞게 어댑터를 쉽게 사용자 지정할 수 있습니다.
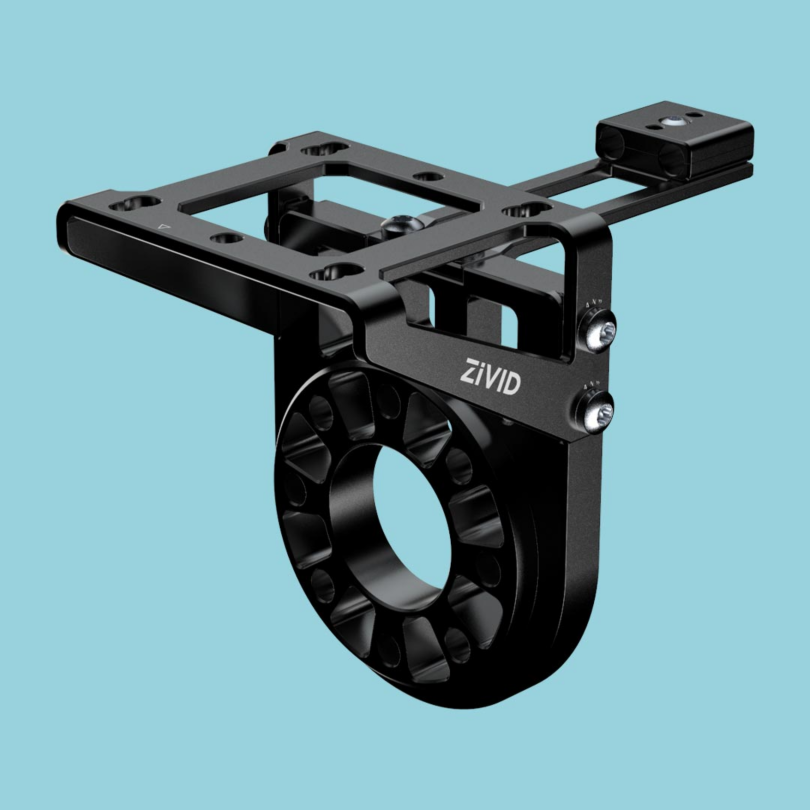
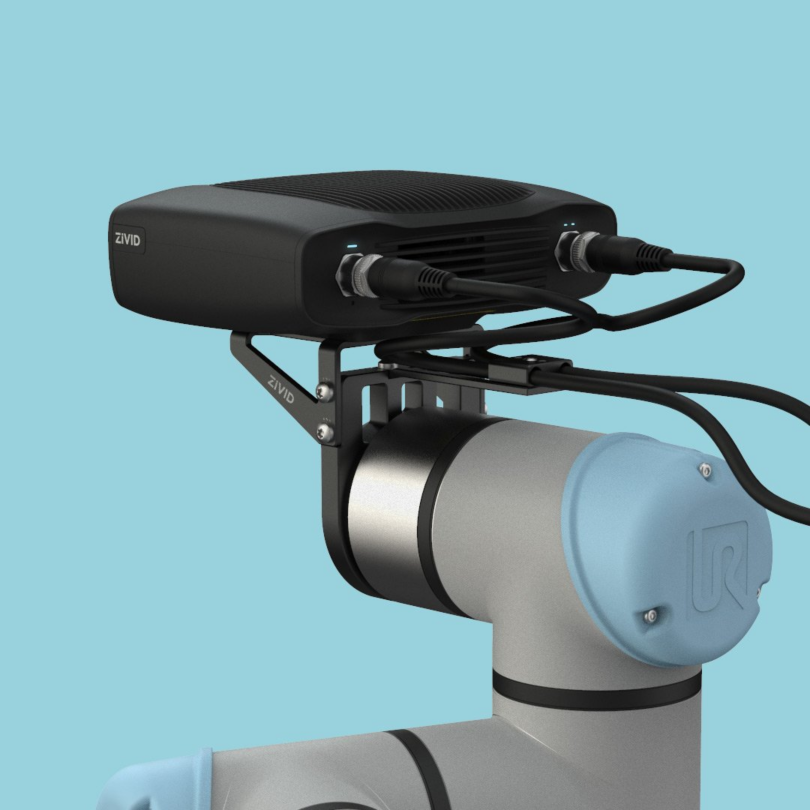
Zivid 온암 마운트 종류
Zivid On-Arm Mount에는 네 가지 옵션이 있습니다.
- ZVDA-MNT-OA111
스트레이트 카메라 브래킷
ISO 9409-1-50-4-M6 플랜지 호환 어댑터(UR, Omron, Doosan, ++)
- ZVDA-MNT-OA121
카메라 브래킷에서 15도 기울기를 가집니다(occlusion이 생성할 수 있는 그리퍼를 사용할 때 권장).
ISO 9409-1-50-4-M6 플랜지 호환 어댑터(UR, Omron, Doosan, ++)
- ZVDA-MNT-OA211
스트레이트 카메라 브래킷
ISO 9409-1-63-4-M6 플랜지 호환 어댑터(Yaskawa, Kawasaki, ++)
- ZVDA-MNT-OA221
카메라 브래킷에서 15도 기울기를 가집니다(occlusion이 생성할 수 있는 그리퍼를 사용할 때 권장).
ISO 9409-1-63-4-M6 플랜지 호환 어댑터(Yaskawa, Kawasaki, ++)
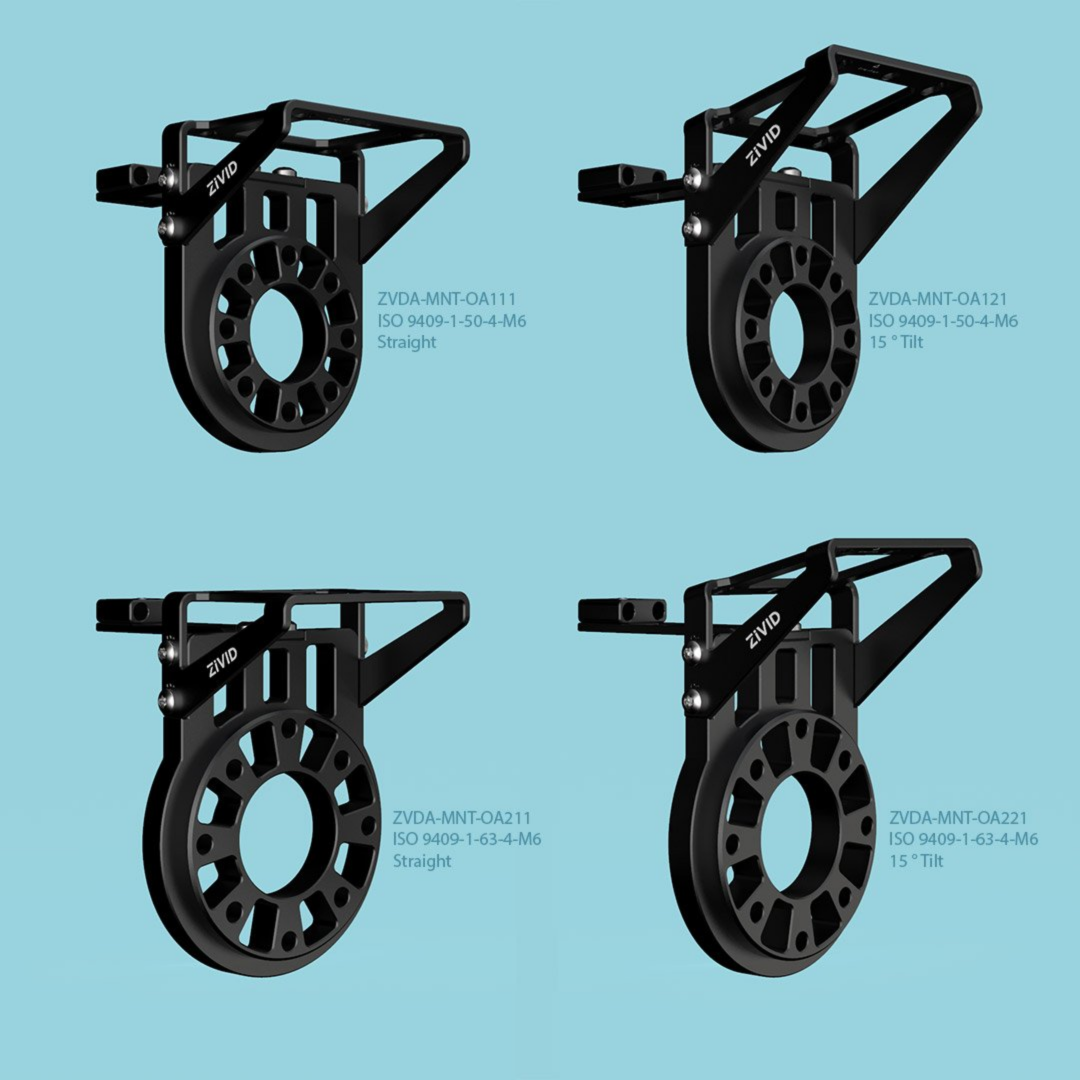
데이터시트 및 사용자 가이드 PDF 및 CAD 파일은 Accessories Downloads 에서 찾을 수 있습니다.
Zivid On-Arm Mount Extender
Zivid On-Arm Mount Extender 는 장착 유연성을 추가하는 별도(옵션) 제품입니다.
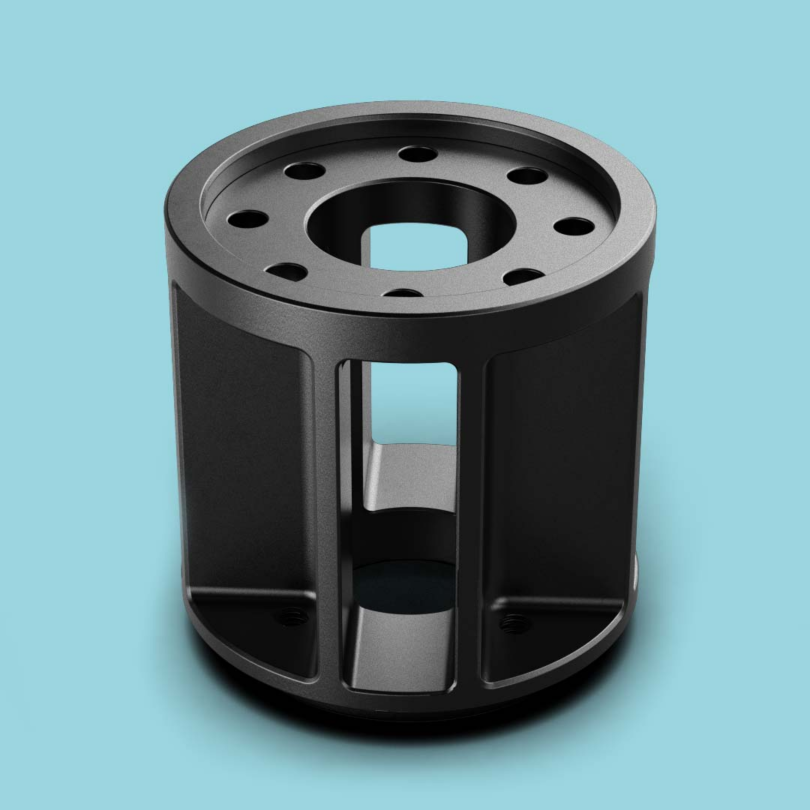
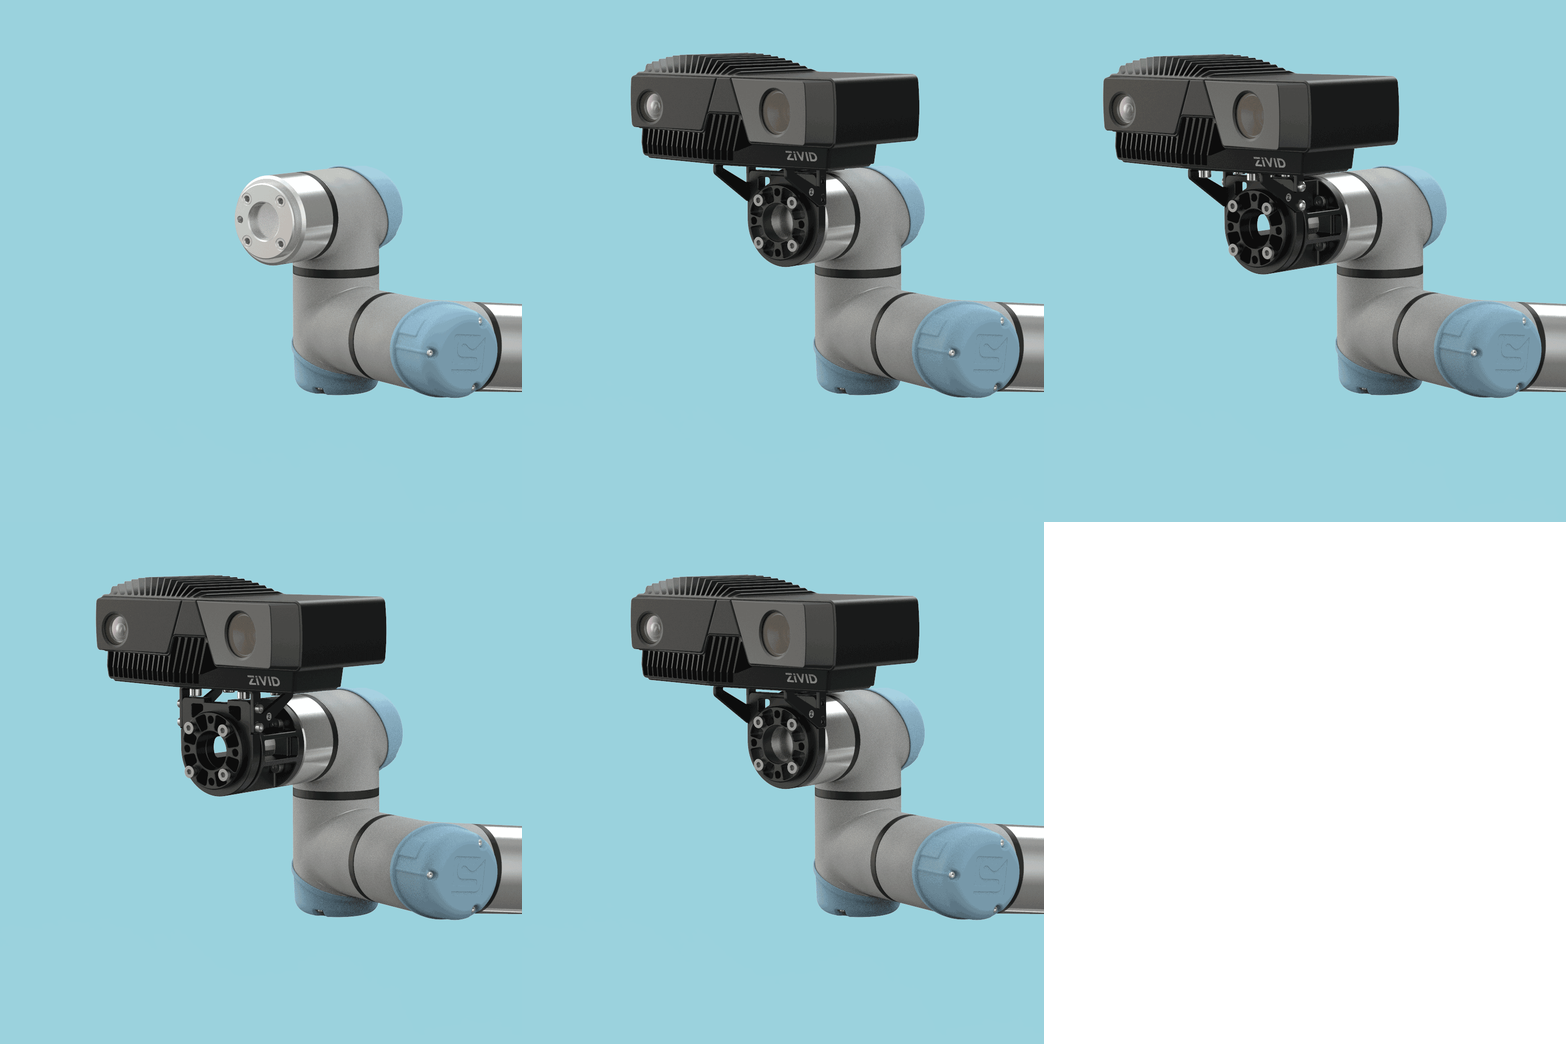
Zivid 온암 마운트 익스텐더 종류
익스텐더에는 두 가지 변형이 있습니다.
- ZVDA-MNT-OA01E
ISO 9409-1-50-4-M6 플랜지 호환(UR, Omron, Doosan, ++)
- ZVDA-MNT-OA02E
ISO9409-1-63-4-M6 플랜지 호환(Yaskawa, Kawasaki, ++)
데이터시트는 Accessories Downloads 에서 찾을 수 있습니다.
Mounting Instructions
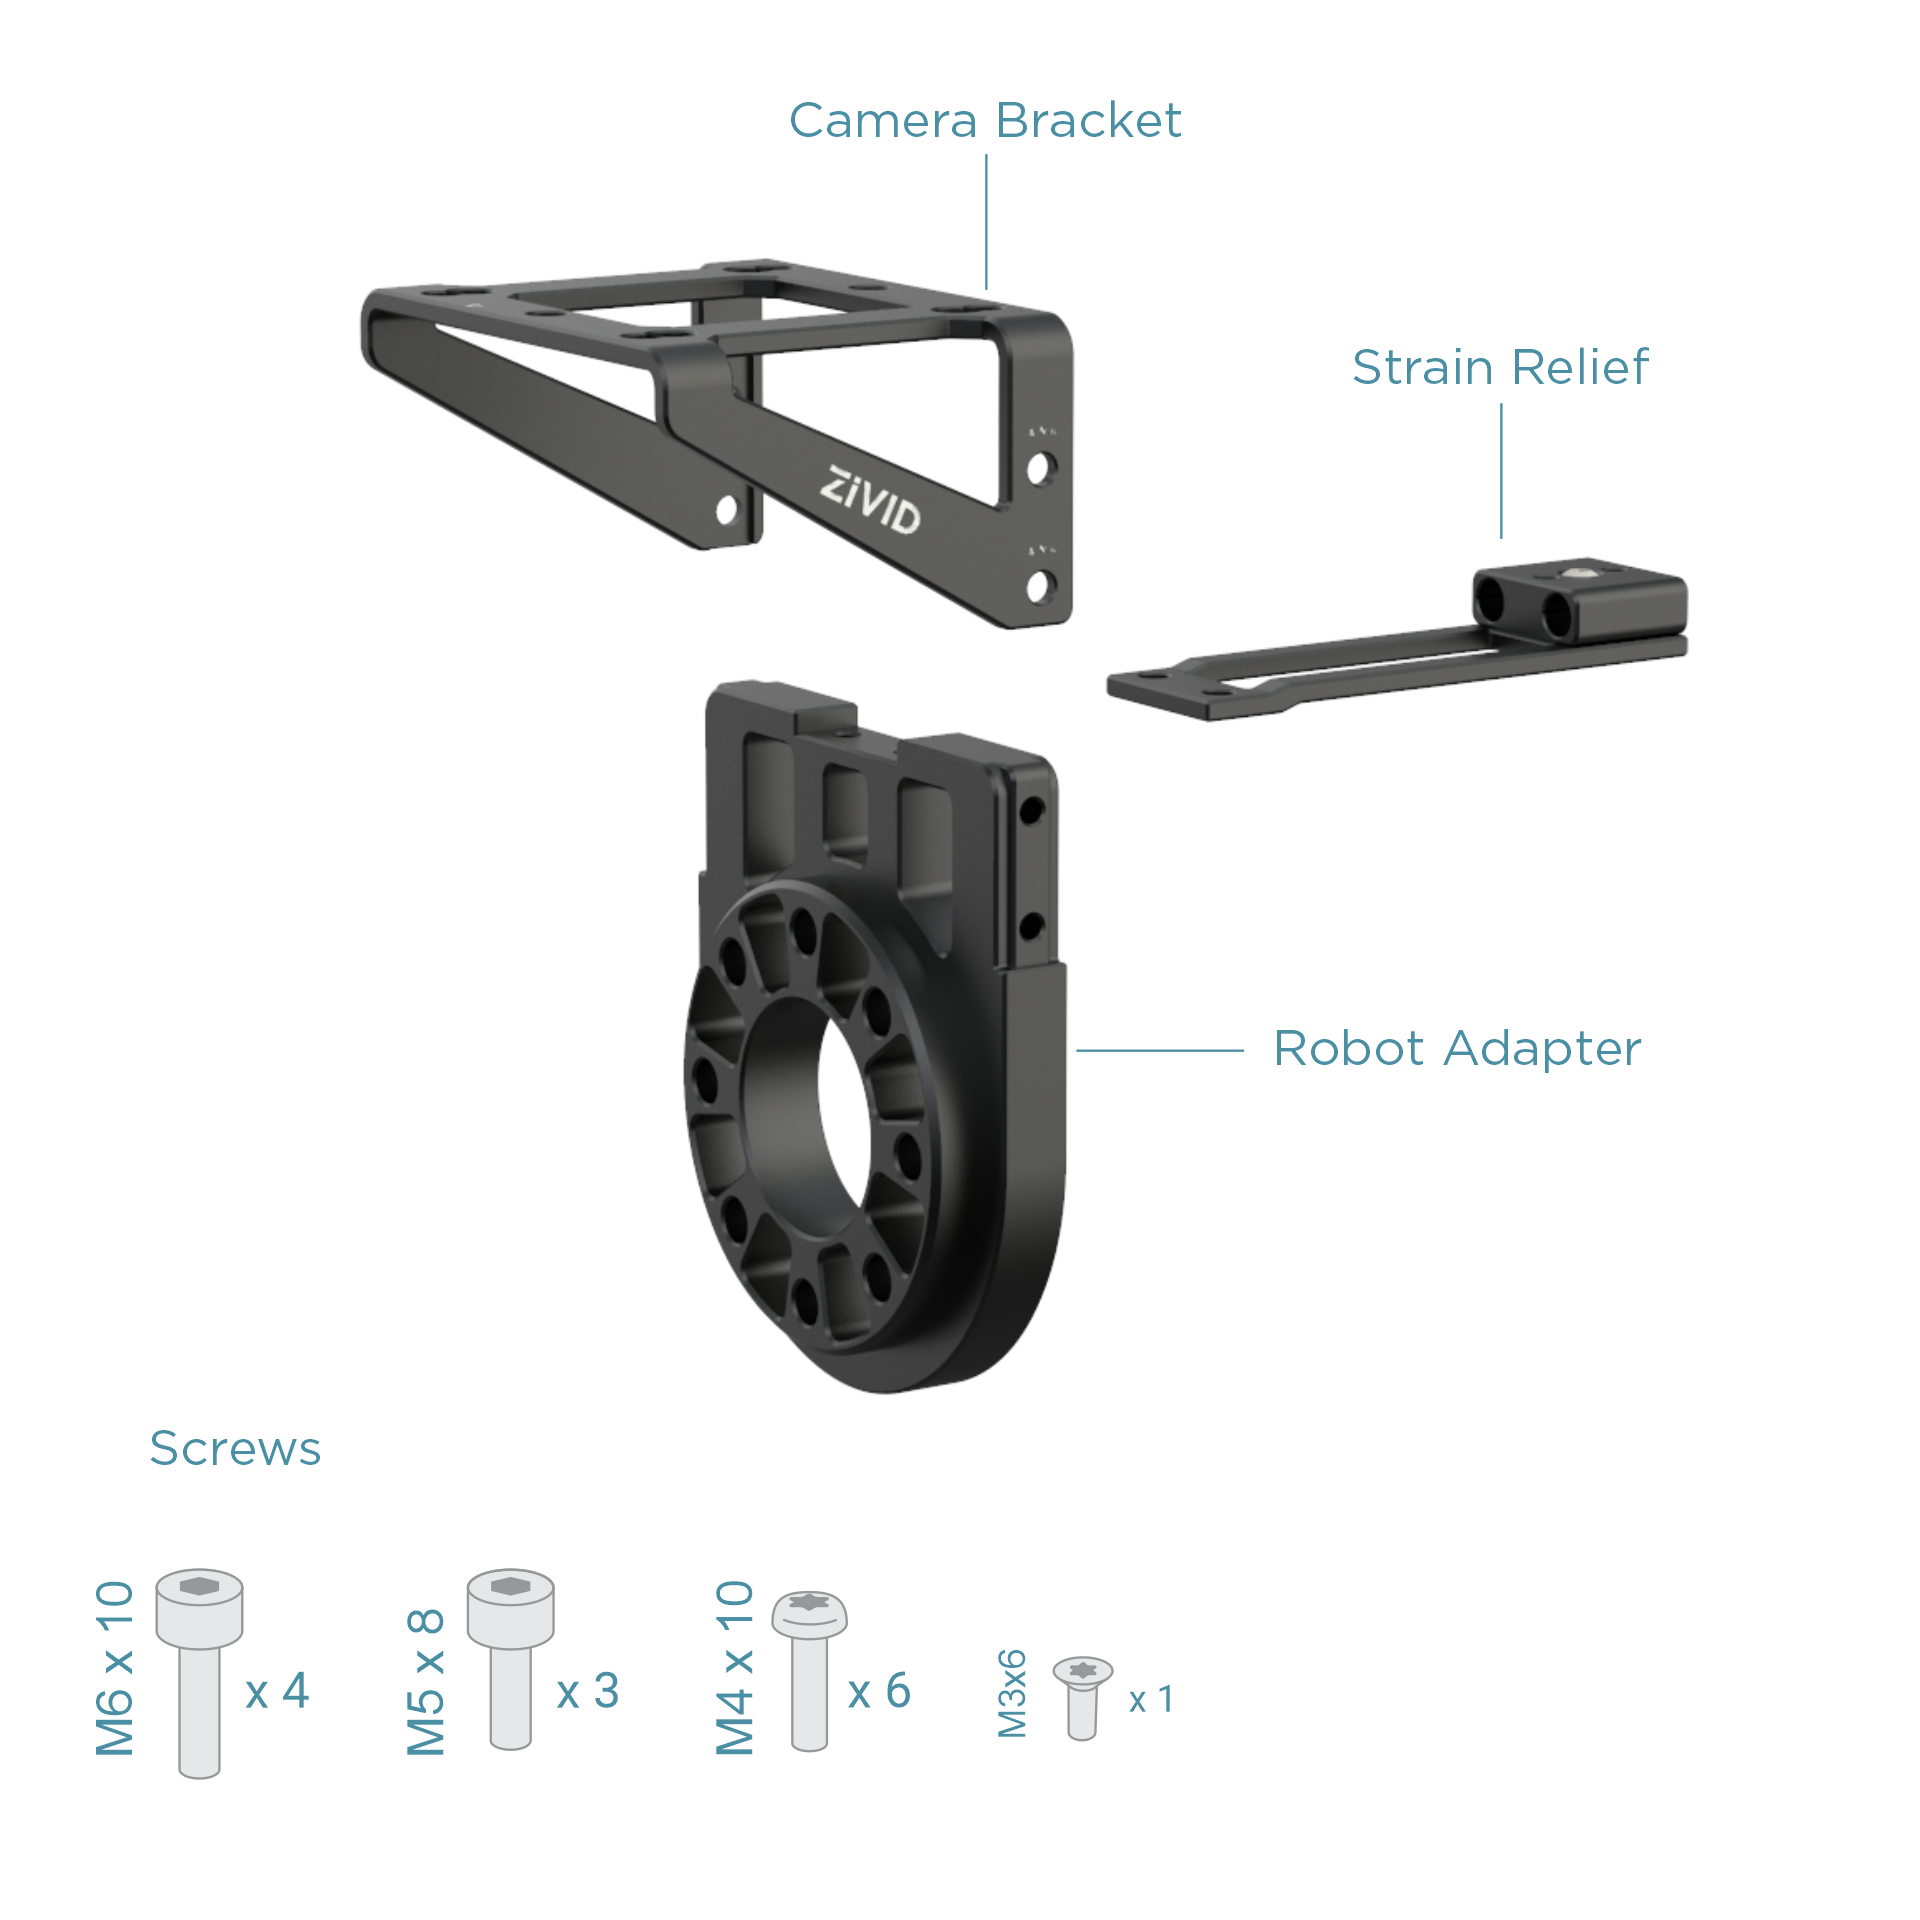
상자에는 카메라 브래킷, 케이블 관리용 스트레인 릴리프, 로봇 플랜지 어댑터 및 장착 나사가 있습니다.
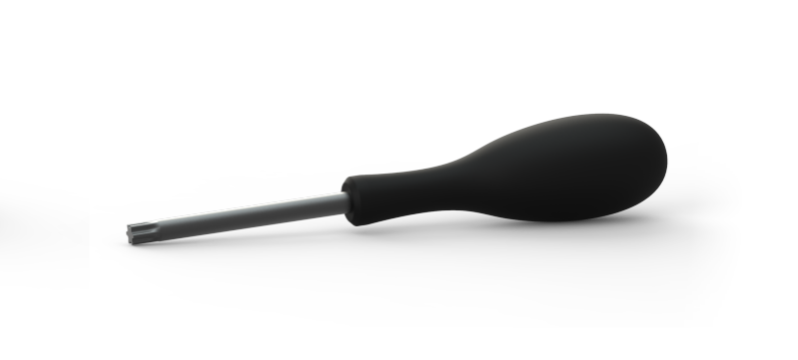
설치에는 다음 도구가 필요합니다.
Torx 20, 25, 30
Robot Adapter and Extender
옵션 익스텐더는 로봇 어댑터의 뒤나 앞에 설치할 수 있습니다. 카메라를 그리퍼에서 더 멀리 유지하기 위해 전면에 설치하여 피킹 중 충돌 위험(예, Bin 가장자리와 충돌)을 최소화합니다. 로봇 어댑터 뒤에 익스텐더를 설치하면 일부 로봇의 로봇 자체 충돌 위험을 줄이는 데 적합하며 케이블 관리에도 좋습니다.
The screw and dowel pin depths below are Zivid’s recommendations. Always check your robot’s own documentation for its recommended screw type, torque values, and hole depths before installing, since these can vary by robot.
Regardless of which mount component you are fixing to the robot flange, install it with four screws. We recommend using screws in stainless steel (A2 or A4). The extender comes with stainless steel mounting screws. However, the on-arm mount is not supplied with mounting screws.
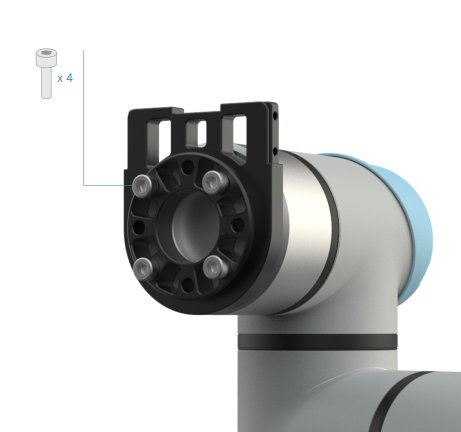
The robot adapter adds 12.5 mm of length needed for the screws. A screw depth of approximately 5 mm is usually suitable.
유연성을 높이기 위해 더 많은 익스텐더를 추가할 수 있습니다. 그러나 로봇의 운반 능력을 염두에 두고 중심에서 벗어난 페이로드에 의해 생성된 관성력을 충분히 고려하십시오.
Locating Dowel Pin
로봇 플랜지가 있는 암 마운트를 고정하기 위해 h-tolerance가 있는 맞춤 핀을 사용하는 것이 좋습니다.
경고
m-tolerance 포지셔닝 핀을 사용하지 마십시오. 그들은 막힐 것입니다.
If installing the extender behind the robot adapter, use a Ø6 mm dowel pin for connecting the extender with the robot flange. Make sure the dowel pin enters the extender 6 mm deep; a 10 mm long dowel pin is usually suitable for entering the robot flange.
로봇 어댑터 앞에 익스텐더를 설치하는 경우 위치결정 맞춤핀이 통과해야 하기 때문에 20~22cm 길이가 되어야 합니다.
If not using the extender, make sure the dowel pin enters the robot adapter 5 mm deep.
팁
The locking dowel pin ensures good repeatability when reassembling the mount and no movement of adjoined components over time, even under significant vibration or mechanical stress.
Strain Relief
아래 이미지와 같이 스트레인 릴리프를 설치합니다.
참고
스트레인 릴리프는 그리퍼 쪽을 가리키는 케이블 클램프와 함께 전방을 향하게 설치할 수도 있습니다.
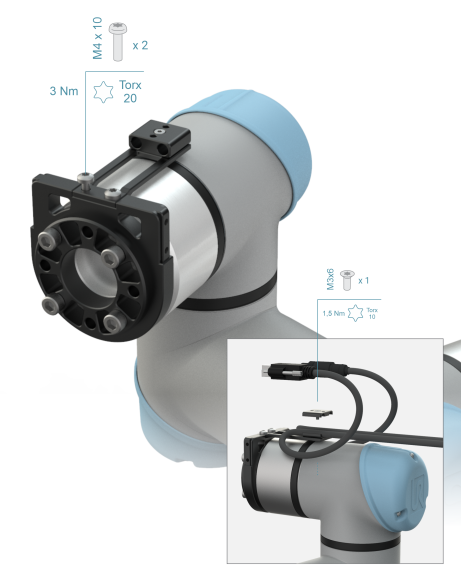
팁
스트레인 릴리프는 케이블 커넥터에 직접 힘이 가해져 커넥터가 물리적으로 손상될 위험을 최소화하여 케이블이 얽힌 경우 카메라 커넥터를 보호합니다. 스트레인 릴리프 구성 요소는 얽힌 케이블에서 오는 원치 않는 힘을 로봇 팔로 전달하여 움직임을 멈출 수 있는 기회를 제공합니다. 스트레인 릴리프 외에도 적절한 케이블 관리 시스템을 사용하십시오. 예: Igus Cable Management Solutions.
Camera Bracket
카메라 브래킷을 장착합니다.
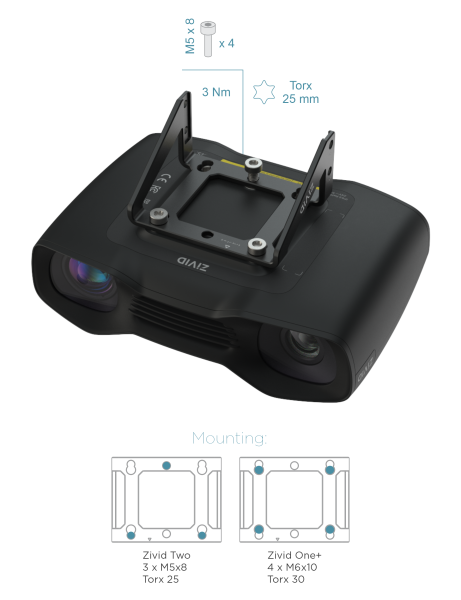
참고
카메라 장착 브래킷은 대칭형이므로 뒤쪽으로 장착할 수 있습니다(카메라 브래킷의 화살표가 뒤쪽을 향함). 이렇게 하면 그리퍼와 카메라 사이에 더 많은 공간이 생깁니다.
로봇 어댑터의 레일에 카메라 브래킷을 밀어 카메라를 장착합니다.
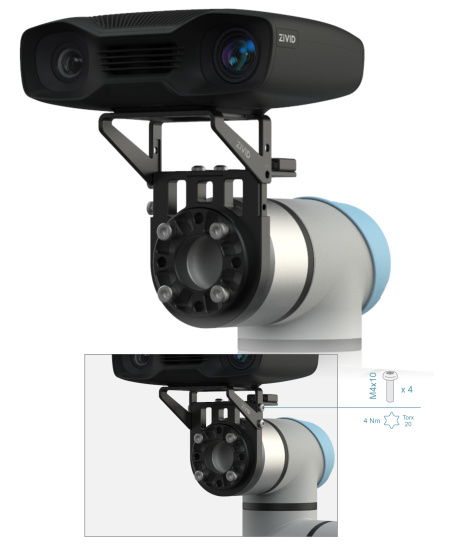
팁
나사가 느슨해지는 것을 방지하기 위한 추가적인 안전을 위해 Loctite (보라색 또는 파란색) 및 Nordlock 와셔를 사용하는 것이 좋습니다. 일반 평 와셔는 진동에 도움이 되지 않지만 특정 구성 요소에 들어가는 나사의 정확한 깊이를 보장하는 데 도움이 됩니다.
Cable Routing and Length
Keep the cable between the camera and the strain relief relatively loose to avoid constant static bending and twisting forces on the connectors, which damage them over time. Form a small loop in the cables going out of the camera before they enter the strain relief component.
When routing the cables through the strain relief directly, we recommend leaving 20-30 cm of the cable length between the camera and the strain relief component.
다른 옵션은 Zivid Mount Extender의 측면 개구부를 통해 케이블이 통과하는 것입니다. 이 경우 카메라와 스트레인 릴리프 구성 요소 사이의 케이블 길이는 30-40cm를 사용하십시오.
Attaching Cables
케이블을 연결하고 스트레인 릴리프를 통해 설치합니다. 케이블 클램프는 직경 5-7mm 케이블용으로 설계되었습니다.
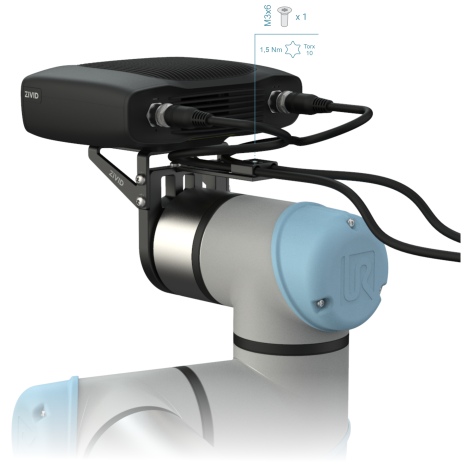
참고
Zivid On-Arm Mount의 스트레인 릴리프는 Zivid 전원 및 데이터 케이블과 함께 사용하도록 설계되었습니다. 더 두꺼운 타사 또는 맞춤형 케이블을 사용하는 것도 가능하지만 케이블 클램프를 사용하는 대신 케이블 타이를 사용하여 케이블을 스트레인 릴리프에 고정합니다.
경고
Zivid에서 제공하는 케이블 이외의 다른 케이블은 사용하지 않는 것을 추천드립니다.
Connector Recommendations
팁
90도 각진 커넥터를 가진 Power and Ethernet cables 은 Zivid On-Arm Mount에 적합합니다. 케이블이 아래쪽으로 향하고 공간을 거의 차지하지 않기 때문에 90도 커넥터를 사용하는 것이 얽힐 위험을 줄여주기 때문에 직선 커넥터보다 안전합니다.
참고
전방 또는 후방에 설치된 직선형 또는 각진 카메라 브래킷과 함께 Zivid On-Arm Mount의 스트레인 릴리프를 사용할 수 있습니다. 그러나 카메라 브래킷을 뒤쪽으로 설치하면 케이블 클램프의 나사에 접근할 수 없게 됩니다. 또는 Zivid On-Arm 마운트 측면에 스트레인 릴리프 구성 요소를 설치할 수 있습니다.
커넥터나 포트가 손상되는 것을 방지하기 위해 PC 측에 어떤 형태의 스트레인 릴리프를 권장합니다.
For additional collision protection, the Protective Housing reduces the risk of camera and cable damage from impacts.
See Mechanical Considerations for Robot Mounting for guidelines on avoiding common problems with on-arm mounted camera systems, such as collisions, cable strain, and vibration.
Tripod Mounting 에 대해서도 확인하십시오.