About GPU
Zivid SDK를 최적으로 실행하려면 호스트 머신에 GPU가 필요합니다. 내장 GPU와 전용 GPU 모두 Zivid와 호환되며, 성능 차이는 캡처 시간에 따라 달라집니다.
See GPU Requirements for driver requirements per OS and GPU vendor.
See Performance Considerations for dedicated vs. integrated GPU recommendations.
See Selecting Compute Device if you need to target a specific GPU or run on an unsupported compute device.
GPU Requirements
Windows
For optimal performance, the dedicated or integrated GPU should have at least 3 GB of RAM available. Additionally, either a CUDA (12 or later) or an OpenCL driver (1.2 or later) for the GPU is necessary to use Zivid. An OpenGL driver (3.0 or later) for the GPU is also necessary to use Zivid Studio or visualizers in the SDK; this is usually installed with the GPU driver, but older drivers can use a version below 3.0. Follow the instructions below for your specific GPU.
Intel
OpenCL 드라이버는 일반적으로 그래픽 드라이버와 함께 설치되며, Windows에는 이미 설치되어 있을 것입니다. 아래 드롭다운 메뉴를 사용하여 어떤 GPU 드라이버가 설치되어 있는지 확인하세요. 설치되어 있지 않다면 Intel 에서 최신 그래픽 드라이버를 다운로드하여 설치하세요.
Check GPU driver
Intel Driver & Support assistant 사용하면 드라이버 버전을 자동으로 감지하거나 아래 지침에 따라 수동으로 찾을 수 있습니다.
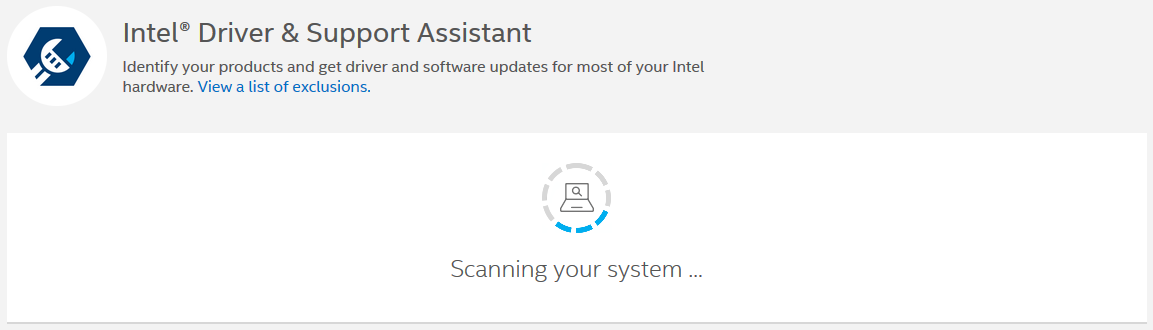
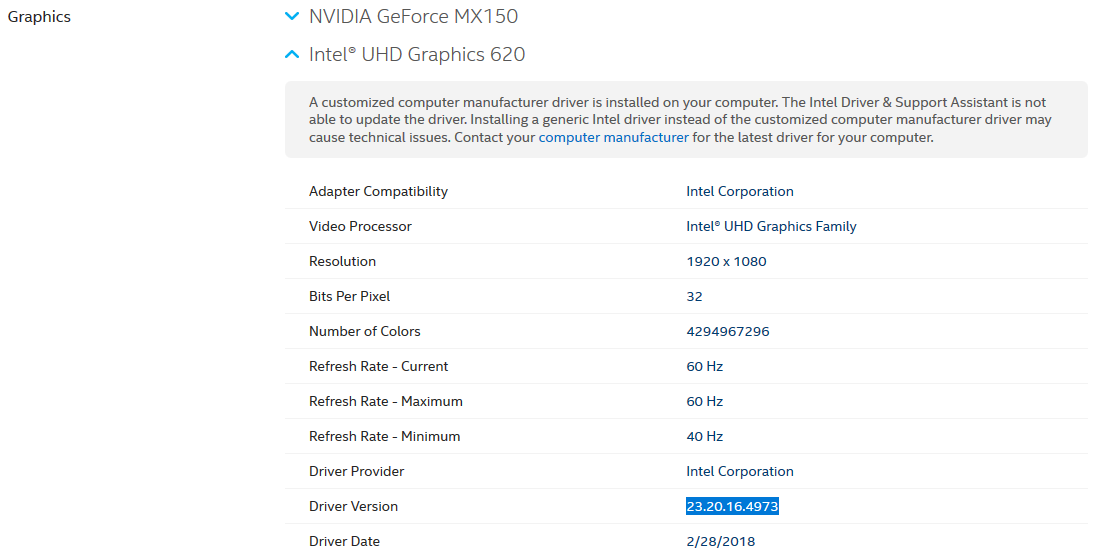
Start → Control Panel
목록에서 Device Manager 를 선택합니다 (필요한 경우 View 를 Small Icons 으로 전환합니다)
Display Adapter 섹션을 확장하고 Intel® Display Adapter 에서 Properties 를 마우스 오른쪽 버튼으로 클릭합니다.
Driver 탭으로 이동하여 표시된 Driver Version 확인하세요.
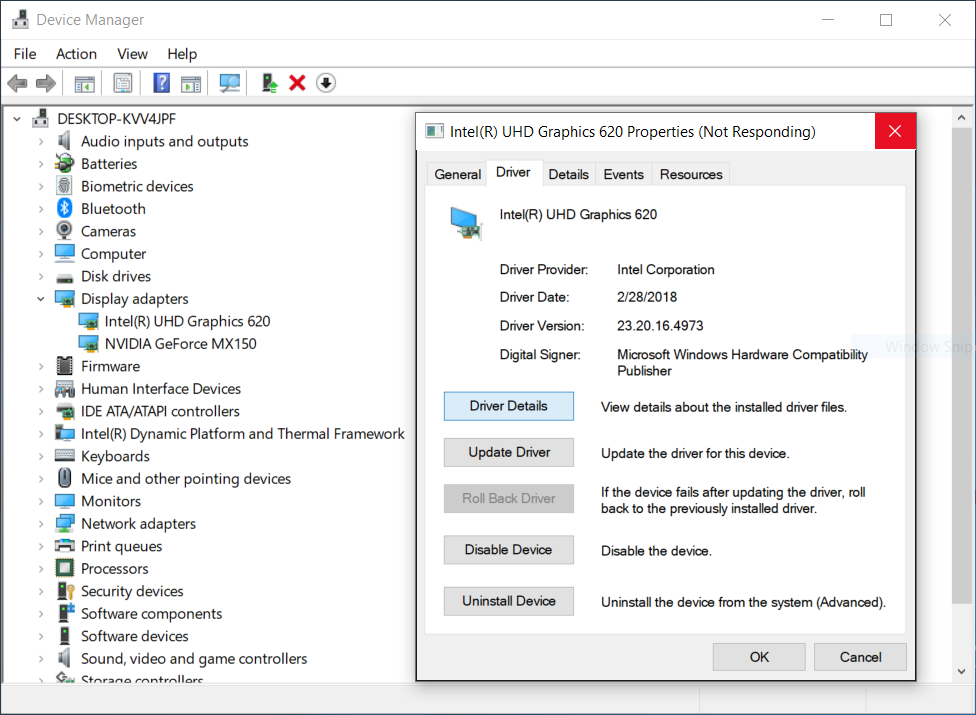
그래픽 드라이버를 설치한 후 Zivid Studio 를 열고 OpenCL 오류가 발생하지 않는지 확인하세요.
NVIDIA
참고
The CUDA backend requires an NVIDIA GPU with compute capability 6.1 or higher. If this requirement is not fulfilled, the SDK will throw an exception:
Detected compute capability X.Y, which is not supported. Supported versions: (6.1, 7.0, 7.5, 8.0, 8.6)
The listed versions are the compute capabilities the installed package was built for.
Setting AllowUnsupported does not make the CUDA backend work below this minimum.
The packages contain no code for older architectures, so the capture fails later instead.
The OpenCL backend has no practical limit: it requires OpenCL 1.2 support, which every NVIDIA card new enough to have an OpenCL driver provides. A compute capability floor of 3.5 exists in the SDK, but no driver that meets the OpenCL requirement falls below it. A GPU below 6.1 therefore works with the OpenCL backend but not with the CUDA backend. Be aware that the OpenCL version of the SDK rejects every NVIDIA GPU regardless of compute capability until you opt in to unsupported compute devices in the Config.yml file.
NVIDIA GPU와 해당 컴퓨팅 기능에 대한 개요는 https://developer.nvidia.com/cuda-gpus에서 확인할 수 있습니다.
CUDA
The CUDA backend requires an NVIDIA driver that supports CUDA 12 or newer.
OpenCL
The OpenCL driver is usually installed together with the graphics driver.
경고
The OpenCL version of the SDK treats NVIDIA GPUs as an unsupported compute device. After installing the OpenCL version of the SDK, you must edit the Config.yml file to allow it, or the SDK will fail with an error. Zivid recommends installing the CUDA version instead, which requires no extra configuration.
Use the dropdown below if you want to check which GPU driver you have. If not, download and install the relevant graphics driver for your GPU from NVIDIA.
Check GPU driver
NVIDIA Smart Scan 사용하여 드라이버 버전을 자동으로 감지하거나 아래 지침에 따라 수동으로 찾으세요.
NVIDIA Control Panel 을 엽니다 (Desktop 마우스 오른쪽 버튼으로 클릭).
System Information (왼쪽 하단 모서리)를 클릭합니다.
Details 에서 Driver version 을 확인하세요.
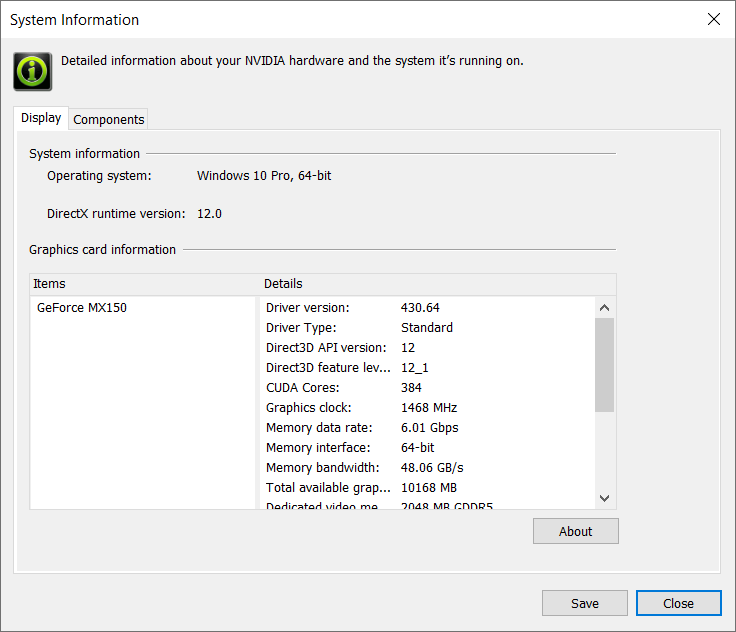
After installing the graphics drivers, open Zivid Studio and verify that no errors occur.
AMD
경고
Since SDK 2.10, support for AMD has been removed due to OpenCL stability issues in the drivers. It is possible to opt in to run the SDK with an unsupported compute device, by enabling an option in the Config.yml file. However, such a setup can give unexpected results and errors, and is not tested by Zivid.
경고
Radeon은 일부 GPU에서 더 이상 SPIR을 지원하지 않습니다. Zivid와 호환되려면 GPU 드라이버가 SPIR을 지원하는지 확인하세요.
OpenCL 드라이버는 일반적으로 그래픽 드라이버와 함께 설치됩니다. 아래 드롭다운 메뉴를 사용하여 어떤 GPU 드라이버가 설치되어 있는지 확인하세요. 설치되어 있지 않다면 AMD 에서 해당 GPU에 맞는 그래픽 드라이버를 다운로드하여 설치하세요.
Check GPU driver
AMD Driver Auto-detect tool 사용하여 드라이버 버전을 자동으로 감지하거나 아래 지침에 따라 수동으로 찾으세요.
AMD Radeon Settings 을 엽니다 (Desktop 마우스 오른쪽 버튼으로 클릭).
System 클릭하면 시스템 개요, 소프트웨어 및 하드웨어 세부 정보를 볼 수 있습니다.
Software 탭을 선택하면 설치된 그래픽 드라이버에 대한 자세한 정보를 확인할 수 있습니다. Driver Packaging Version 확인하세요.
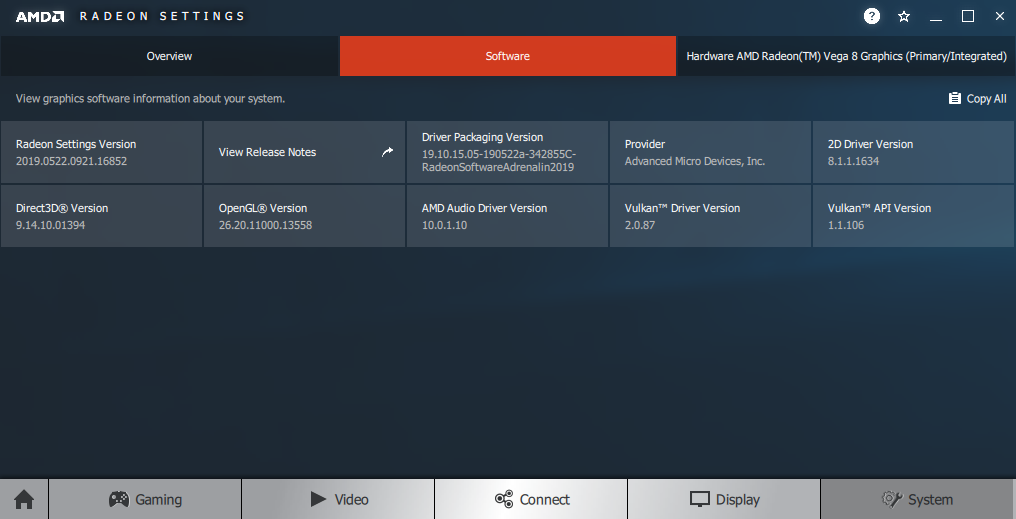
그래픽 드라이버를 설치한 후 Zivid Studio 를 열고 OpenCL 오류가 발생하지 않는지 확인하세요.
In addition to the OpenCL or CUDA driver above, Zivid Studio and the SDK’s visualizers also need an OpenGL driver.
Check OpenGL drivers
OpenGL Extensions Viewer 다운로드하세요.
설치하고 실행한 후 OpenGL 버전을 확인하세요.
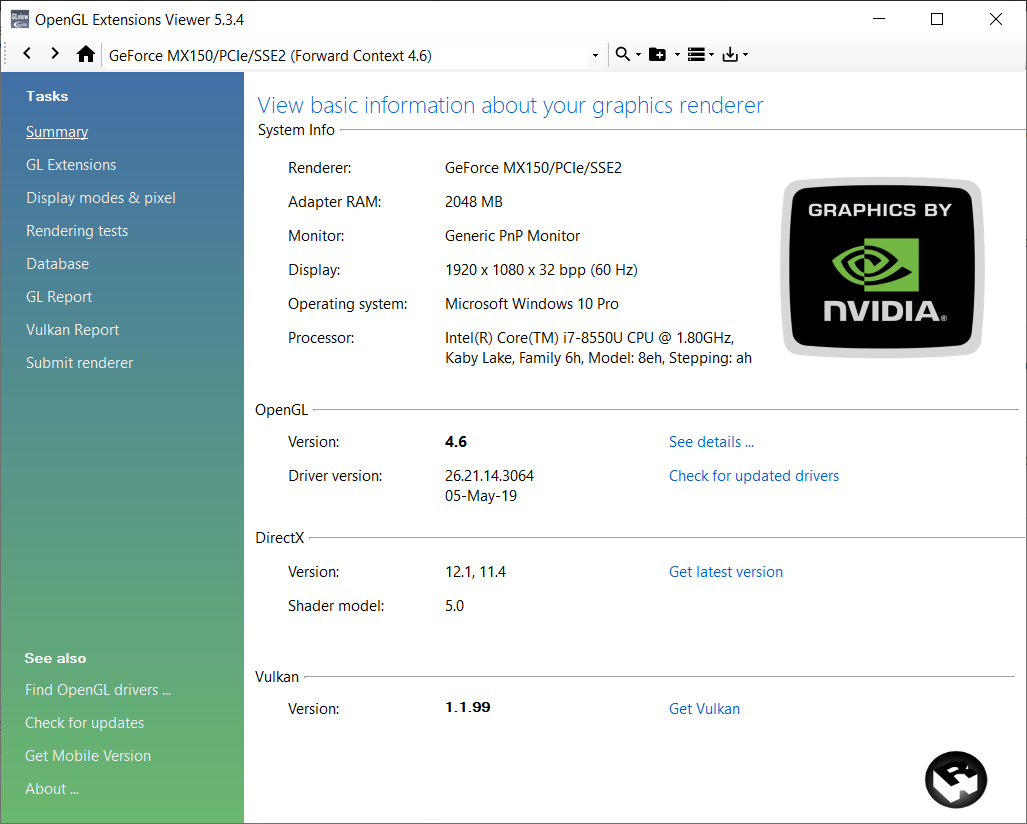
In case the version is below 3.0, you need to install the latest GPU driver following the instructions for your GPU above.
Ubuntu
For optimal performance, the dedicated or integrated GPU should have at least 3 GB of RAM available. Additionally, either a CUDA (12 or later) or an OpenCL driver (1.2 or later) for the GPU is necessary to use Zivid. An OpenGL driver (3.0 or later) for the GPU is also necessary to use Zivid Studio or visualizers in the SDK; this is usually installed with the GPU driver, but older drivers can use a version below 3.0. Follow the instructions below for your specific GPU.
Intel
Ubuntu에는 Intel 그래픽 드라이버가 이미 설치되어 있어야 하지만, OpenCL 드라이버는 반드시 설치되어 있을 필요는 없습니다. 그래픽 드라이버가 설치되어 있는지 확인하려면 아래 드롭다운을 사용하세요.
Check GPU driver
키보드에서 Ctrl + Alt + T 키를 눌러 터미널 창을 열고 드라이버가 있는지 확인하세요.
lspci -k | grep -EA3 'VGA|3D|Display'
자세한 내용은 공식 Intel pages 방문하세요.
키보드에서 Ctrl + Alt + T 키를 눌러 터미널 창을 열고 OpenCL 드라이버를 설치합니다.
Ubuntu 26.04
sudo apt update
sudo apt install intel-opencl-icd
Ubuntu 24.04
sudo apt update
sudo apt install intel-opencl-icd
Ubuntu 22.04
sudo apt update
sudo apt install intel-opencl-icd
Ubuntu 20.04
sudo apt update
sudo apt install intel-opencl-icd
Ubuntu 18.04
참고
SDK 2.10 이후 Ubuntu 18.04 지원이 중단되었습니다. 이전 SDK 버전에 대한 Ubuntu 18.04 지침을 보려면 왼쪽 상단의 Knowledge Base 버전을 변경하세요.
Zivid Studio 열고 OpenCL 오류가 발생하지 않는지 확인하세요.
참고
OpenCL 오류가 발생하는 경우 add your user to group Video 를 실행합니다.
NVIDIA
참고
The CUDA backend requires an NVIDIA GPU with compute capability 6.1 or higher. If this requirement is not fulfilled, the SDK will throw an exception:
Detected compute capability X.Y, which is not supported. Supported versions: (6.1, 7.0, 7.5, 8.0, 8.6)
The listed versions are the compute capabilities the installed package was built for. Setting
AllowUnsupporteddoes not make the CUDA backend work below this minimum. The packages contain no code for older architectures, so the capture fails later instead.The OpenCL backend has no practical limit: it requires OpenCL 1.2 support, which every NVIDIA card new enough to have an OpenCL driver provides. A compute capability floor of 3.5 exists in the SDK, but no driver that meets the OpenCL requirement falls below it. A GPU below 6.1 therefore works with the OpenCL backend but not with the CUDA backend. Be aware that the OpenCL version of the SDK rejects every NVIDIA GPU regardless of compute capability until you opt in to unsupported compute devices in the Config.yml file.
NVIDIA GPU와 해당 컴퓨팅 기능에 대한 개요는 https://developer.nvidia.com/cuda-gpus에서 확인할 수 있습니다.
CUDA
The CUDA backend requires an NVIDIA driver that supports CUDA 12 or newer.
OpenCL
The OpenCL driver for NVIDIA is installed with the graphics driver.
경고
The OpenCL version of the SDK treats NVIDIA GPUs as an unsupported compute device. After installing the OpenCL version of the SDK, you must edit the Config.yml file to allow it, or the SDK will fail with an error. Zivid recommends installing the CUDA version instead, which requires no extra configuration.
Use the dropdown below if you want to check if your graphics driver is present, or continue to install the latest driver for your system.
Check GPU driver
키보드에서 Ctrl + Alt + T 키를 눌러 터미널 창을 열고 다음 명령을 실행합니다.
nvidia-smi
드라이버 버전이 출력됩니다.
시스템에 NVIDIA GPU 드라이버 PPA를 추가하세요:
키보드에서 Ctrl + Alt + T 키를 눌러 터미널 창을 열고 그래픽 드라이버 PPA를 추가합니다.
sudo add-apt-repository ppa:graphics-drivers/ppa
This makes the latest long-lived driver release, packaged as
nvidia-xxx, available to install in the next step.시스템에 최신 드라이버를 설치하세요:
Ubuntu 26.04
sudo apt update
sudo apt install nvidia-driver-xxx
Ubuntu 24.04
sudo apt update
sudo apt install nvidia-driver-xxx
Ubuntu 22.04
sudo apt update
sudo apt install nvidia-driver-xxx
Ubuntu 20.04
sudo apt update
sudo apt install nvidia-driver-xxx
Ubuntu 18.04
참고
SDK 2.10 이후 Ubuntu 18.04 지원이 중단되었습니다. 이전 SDK 버전에 대한 Ubuntu 18.04 지침을 보려면 왼쪽 상단의 Knowledge Base 버전을 변경하세요.
드라이버를 설치한 후 시스템을 재부팅하세요.
sudo rebootZivid Studio 열고 OpenCL 오류가 발생하지 않는지 확인하세요.
참고
OpenCL 오류가 발생하는 경우 add your user to group Video 를 실행합니다.
AMD
경고
Since SDK 2.10, support for AMD has been removed due to OpenCL stability issues in the drivers. It is possible to opt in to run the SDK with an unsupported compute device, by enabling an option in the Config.yml file. However, such a setup can give unexpected results and errors, and is not tested by Zivid.
경고
Radeon은 일부 GPU에서 더 이상 SPIR을 지원하지 않습니다. Zivid와 호환되려면 GPU 드라이버가 SPIR을 지원하는지 확인하세요.
Download, extract, and install the correct Radeon Software for Linux:
Ubuntu 22.04
키보드에서 Ctrl + Alt + T 키를 눌러 터미널 창을 열고 임시 폴더를 만듭니다.
mkdir amd && cd amd
Download the driver installer package for the verified-working version, 22.20.3:
wget --referer http://support.amd.com http://repo.radeon.com/amdgpu-install/22.20.3/ubuntu/jammy/amdgpu-install_22.20.50203-1_all.deb
참고
AMD’s release notes page and its
/latestpath both link to a broken installer. Use the pinned version above instead, which Zivid has verified to work.apt사용하여 이 패키지를 설치하세요:sudo apt update sudo apt install ./amdgpu-install_22.20.50203-1_all.deb
amdgpu-install --usecase=graphics,opencl --no-32 --no-dkms
참고
보안 부팅이 필요한 경우 DKMS를 포함해야 할 수 있습니다(위 명령에서
--no-dkms제거하세요). 자세한 내용은 secure-boot-support 참조하세요.이제 사용자를
render그룹과video그룹 모두의 멤버로 추가합니다.sudo gpasswd -a $USER render sudo gpasswd -a $USER video
You may have to reboot for the changes to take effect.
sudo rebootYou can now try to open Zivid Studio. If it fails, follow the Secure Boot configuration step below.
Ubuntu 20.04
키보드에서 Ctrl + Alt + T 키를 눌러 터미널 창을 열고 임시 폴더를 만듭니다.
mkdir amd && cd amd
Linux 커널 버전을 확인하세요:
uname -rKernel 5.4
Linux Kernel 버전 5.4(Ubuntu LTS)의 경우 Ubuntu 20.04용 Radeon Software 20.45를 다운로드하세요.
wget --referer http://support.amd.com https://drivers.amd.com/drivers/linux/amdgpu-pro-20.45-1188099-ubuntu-20.04.tar.xz
내용을 추출하세요:
tar -Jxvf amdgpu-pro-20.45-1188099-ubuntu-20.04.tar.xz
cd amdgpu-pro-20.45-1188099-ubuntu-20.04
Kernel 5.8
Linux Kernel 버전 5.8(Ubuntu LTS HWE 스택)의 경우 Linux 20.04용 Radeon Software 20.50을 다운로드하세요.
wget --referer http://support.amd.com https://drivers.amd.com/drivers/linux/amdgpu-pro-20.50-1234664-ubuntu-20.04.tar.xz
내용을 추출하세요:
tar -Jxvf amdgpu-pro-20.50-1234664-ubuntu-20.04.tar.xz
cd amdgpu-pro-20.50-1234664-ubuntu-20.04
./amdgpu-pro-install --opencl=pal
Ubuntu 18.04
참고
SDK 2.10 이후 Ubuntu 18.04 지원이 중단되었습니다. 이전 SDK 버전에 대한 Ubuntu 18.04 지침을 보려면 왼쪽 상단의 Knowledge Base 버전을 변경하세요.
보안 부팅을 구성하려면 다음 단계를 따르세요(메시지가 표시되면):
Zivid Studio 열고 OpenCL 오류가 발생하지 않는지 확인하세요.
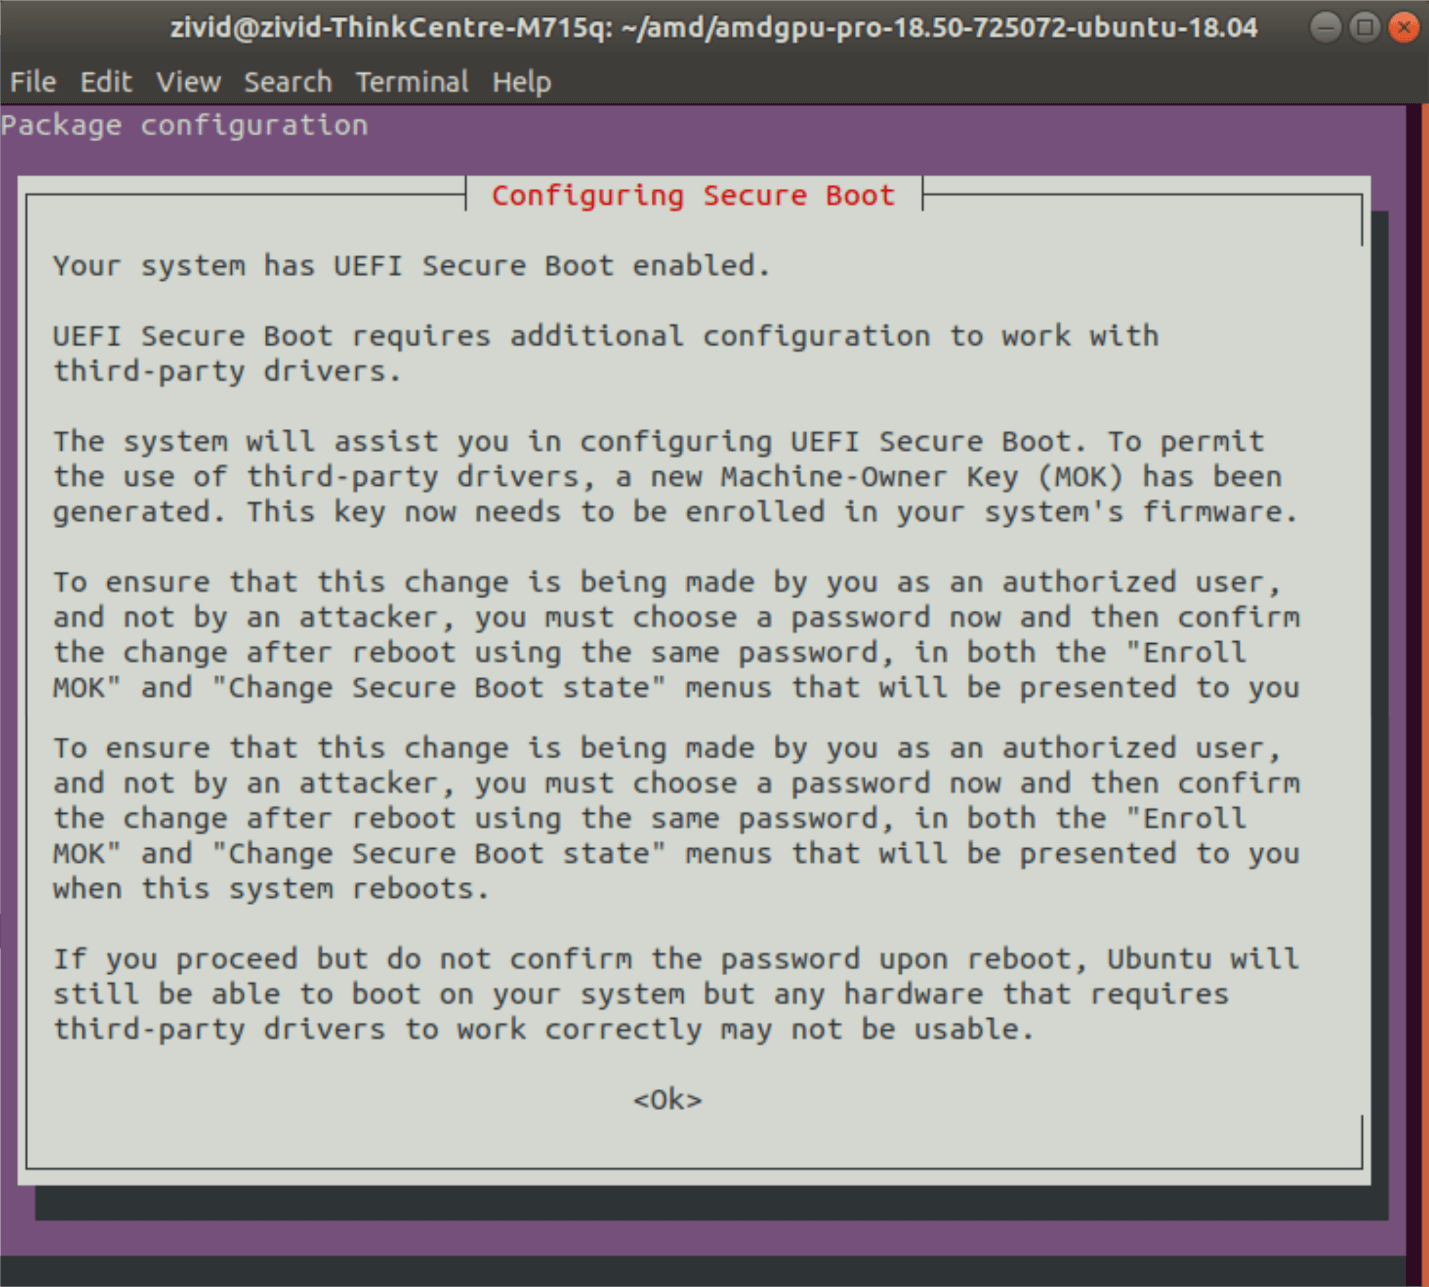
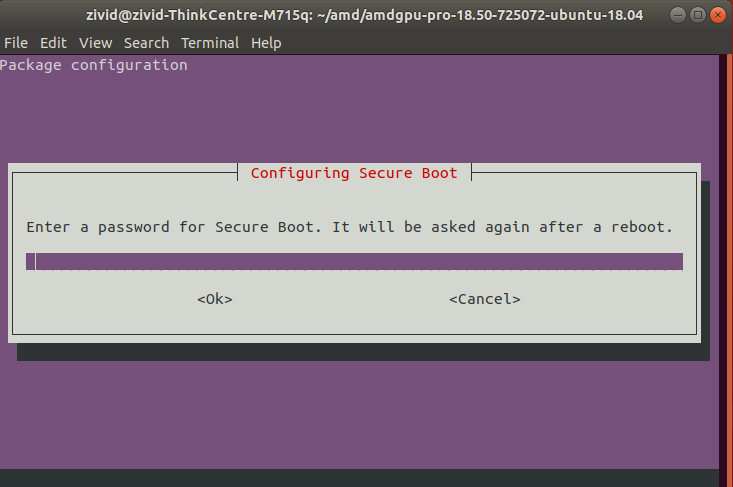
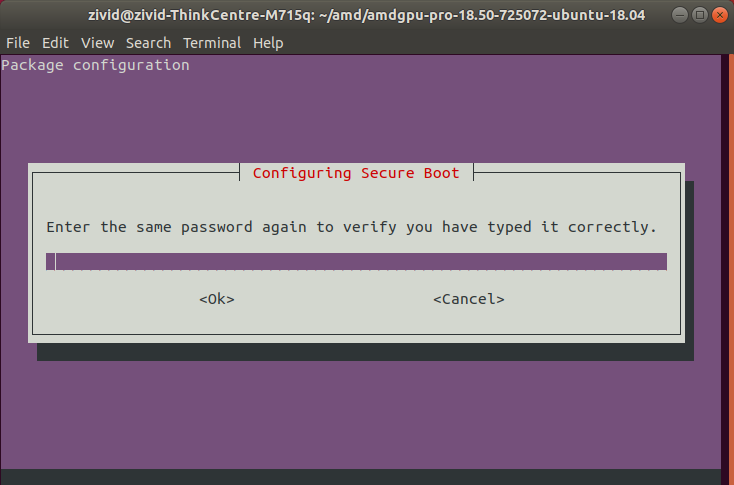
참고
OpenCL 오류가 발생하는 경우 add your user to group Video 를 실행합니다.
In addition to the OpenCL or CUDA driver above, Zivid Studio and the SDK’s visualizers also need an OpenGL driver.
Check OpenGL drivers
키보드에서 Ctrl + Alt + T 키를 눌러 터미널 창을 열고 다음 명령을 실행합니다.
sudo apt install mesa-utils
glxinfo | grep "OpenGL version"
OpenGL 버전이 출력됩니다.
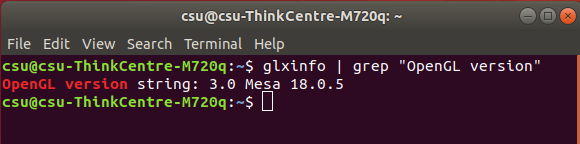
In case the version is below 3.0, you need to install the latest GPU driver following the instructions for your GPU above.
Nvidia Jetson Linux
Nvidia Jetson Orin and Thor have CUDA enabled Nvidia GPUs. All required GPU drivers are installed with the operating system.
Zivid Studio and the SDK’s visualizers also need an OpenGL driver.
Check OpenGL drivers
Jetson Linux에는 호환되는 OpenGL 버전이 제공되므로 별도의 조치가 필요하지 않습니다.
Performance Considerations
Dedicated GPU
A dedicated GPU gives the best performance with Zivid. It is also the best choice if the GPU will be used for more than Zivid’s computations. A medium to high-end NVIDIA GPU with at least 3 GB of memory is required for optimal performance. This is the preferred solution for Zivid.
Recommendations:
NVIDIA GeForce GTX 1060 or newer for desktops
NVIDIA GeForce MX150 or newer for laptops
Integrated GPU
This is the most cost-efficient solution for Zivid. The benefit of an integrated GPU is that the data transfer from GPU to CPU is fast. It is also beneficial for applications that require low power consumption, e.g., battery-powered mobile platforms. A high-end integrated GPU with at least 3 GB of memory available is required for optimal performance.
Recommendations:
HD630 이상의 Intel i7
Nvidia Jetson
Zivid recommends Jetson boards that have at least 16GB of RAM for running Zivid SDK and additional software.
While Zivid SDK supports Jetson Orin Nano, Orin Nano has only 4GB/8GB of total RAM, which is shared between the CPU and the GPU. 4GB is generally insufficient to run any application using Zivid SDK, while 8GB in practice is insufficient for many use cases, especially when combining longer captures, the Stripe/Omni engine, and many filters. Therefore, when using Orin Nano, RAM usage in your application must be carefully evaluated.
Jetson Thor modules (T4000/T5000) ship with 64GB or 128GB of RAM, well above the recommended minimum.
경고
Jetson boards may boot in a reduced power profile that significantly slows down Zivid SDK point cloud processing. Set the maximum power profile as described in Install Zivid on Jetson Linux.
Selecting Compute Device
여러 개의 GPU가 있고 Zivid SDK가 특정 GPU를 사용하도록 하려면 Configuration file 에서 컴퓨팅 장치를 지정할 수 있습니다. Zivid SDK를 CPU에서 실행하도록 구성할 수도 있지만, CPU는 지원되지 않는 컴퓨팅 장치 모드 입니다.
CUDA and OpenCL
Zivid SDK is available in two versions, a CUDA version and an OpenCL version. The version is selected when you install the SDK, not in the configuration file.
The CUDA version runs on NVIDIA GPUs only. The OpenCL version runs on Intel GPUs, and can run on NVIDIA GPUs as an unsupported compute device. To use an NVIDIA GPU as a supported compute device, install the CUDA version of the SDK.
Configuration file
해당 파일이 아직 없으면 Config.yml 파일을 다운로드하여 다음 디렉토리에 넣으세요.
Windows
mkdir %LOCALAPPDATA%\Zivid\API
move %HOMEPATH%\Downloads\Config.yml %LOCALAPPDATA%\Zivid\API\
Ubuntu
mkdir --parents "${XDG_CONFIG_HOME-$HOME/.config}"/Zivid/API
mv ~/Downloads/Config.yml "${XDG_CONFIG_HOME-$HOME/.config}"/Zivid/API/
The desired GPU is assigned by changing the ComputeDevice parameters in the configuration file.
Single vendor
단일 공급업체의 GPU가 여러 개 있는 경우(예: Nvidia GPU 두 개), SelectionFilter 사용할 GPU를 지정해야 합니다. clinfo 사용하여 모든 컴퓨팅 장치를 나열합니다. 아래 드롭다운을 따라 clinfo 에 대한 자세한 내용, 설치 방법 및 사용 방법을 확인하세요.
clinfo
Windows
clinfo Windows 바이너리 파일을 다운로드합니다.
키보드에서 Win + R 키를 눌러 명령 프롬프트를 실행한 다음
cmd입력하고 Enter 키를 누릅니다.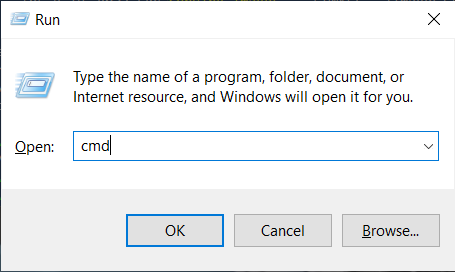
다운로드한 파일 (clinfo.exe) 이 있는 디렉토리로 이동하여 다음 명령을 실행합니다.
clinfo.exe -l
이렇게 하면 시스템의 모든 OpenCL 플랫폼과 해당 플랫폼이 노출하는 장치에 대한 사용 가능한 정보가 모두 인쇄됩니다.
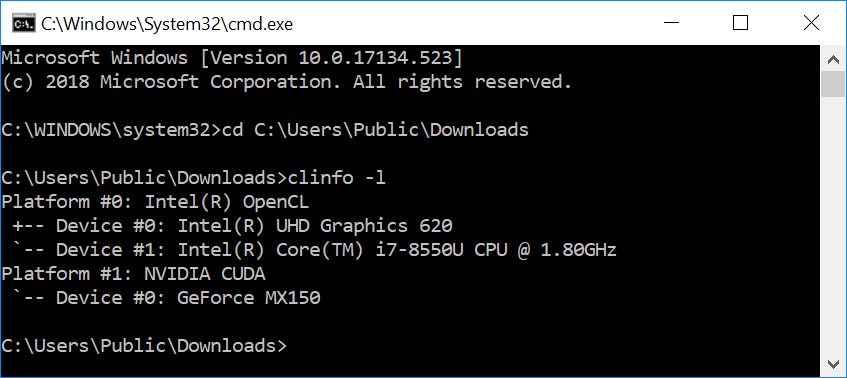
GPU가 나타나지 않은 경우 install the OpenCL drivers and/or graphics drivers 를 설치해야 할 수 있습니다.
OpenCL 드라이버 버전을 확인하려면
clinfo사용하여 OpenCL 플랫폼 버전을 검색하세요.clinfo.exe | findstr "Platform\ Version"
버전이 OpenCL 1.2 보다 낮으면 update your graphics drivers 를 업데이트해야 합니다.
Ubuntu
키보드의 Ctrl + Alt + T 키를 눌러 터미널 창을 열고
clinfo설치합니다.sudo apt install -y clinfo
clinfo -l실행하여 모든 OpenCL 플랫폼을 나열합니다.sudo /usr/bin/clinfo -l
이렇게 하면 시스템의 모든 OpenCL 플랫폼과 해당 플랫폼이 노출하는 장치에 대한 사용 가능한 정보가 모두 인쇄됩니다.
GPU가 나타나지 않은 경우 install the OpenCL drivers and/or graphics drivers 를 설치해야 할 수 있습니다.
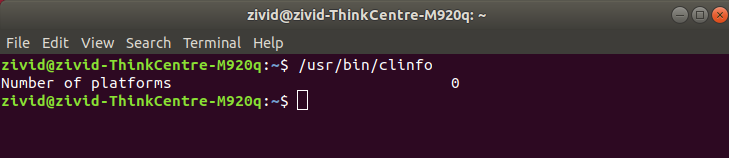
OpenCL 드라이버 버전을 확인하려면
clinfo사용하여 OpenCL 플랫폼 버전을 검색하세요.sudo /usr/bin/clinfo | grep "Platform Version"
버전이 OpenCL 1.2 보다 낮으면 update your OpenCL drivers and/or graphics drivers 이 필요합니다.
특정 GPU 이름을 찾으려면 clinfo 실행하여 컴퓨팅 장치를 나열하세요.
clinfo -l
참고
clinfo lists OpenCL devices and applies to the OpenCL version of the SDK.
With the CUDA version, run nvidia-smi -L in a terminal instead, and use any unique part of the CUDA device name.
Both commands run on Windows and Ubuntu.
On Windows, clinfo is not installed by default and nvidia-smi is sometimes not on the PATH.
구성 파일의 SelectionFilter 원하는 장치 이름의 고유한 부분으로 변경하세요. 예를 들어, 다음 출력에서 NVIDIA GeForce RTX 3060의 경우
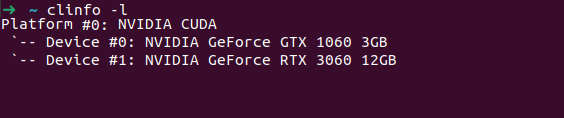
set SelectionFilter to
ComputeDevice:
    SelectionFilter: "RTX 3060"
    Type: Any
    Vendor: Any
Multiple vendors
If you have multiple GPUs from multiple vendors (e.g. an integrated Intel GPU and a dedicated NVIDIA GPU), change Type to GPU and Vendor to Nvidia or Intel, e.g.
ComputeDevice:
    SelectionFilter: ""
    Type: GPU
    Vendor: Nvidia
Enabling unsupported compute devices
Enabling unsupported compute devices can be done by enabling an option in the Configuration file.
However, such a setup can give unexpected results and errors, and is not tested by Zivid.
Currently, the unsupported compute devices are AMD GPUs, NVIDIA GPUs on the OpenCL version of the SDK, and CPUs.
Download the Config.yml file for your compute device below:
Enable AMD
Download the Config.yml file, which contains the following information, where AllowUnsupported: yes enables unsupported compute devices:
__version__:
    serializer: 1
    data: 19
Configuration:
    ComputeDevice:
        AllowUnsupported: yes
Enable NVIDIA on the OpenCL version
The OpenCL version of the SDK treats NVIDIA GPUs as unsupported compute devices.
If you install the OpenCL version on an NVIDIA GPU without enabling it, the SDK will fail with an error saying that NVIDIA compute devices are not supported (see NVIDIA Compute Devices Are Not Supported by the OpenCL Version for the exact error message).
Download the Config.yml file below, where Vendor is set to Nvidia and AllowUnsupported to yes.
For a supported setup on NVIDIA GPUs, install the CUDA version of the SDK instead.
__version__:
    serializer: 1
    data: 19
Configuration:
    ComputeDevice:
        Type: GPU
        Vendor: Nvidia
        AllowUnsupported: yes
Enable CPU
It is possible to run the Zivid SDK on an Intel chipset using their CPU Runtime for OpenCL.
Download the Config.yml file below, where the compute device Type is set to CPU, and Vendor to Intel.
__version__:
    serializer: 1
    data: 19
Configuration:
    ComputeDevice:
        Type: CPU
        Vendor: Intel
        AllowUnsupported: yes
경고
CPU는 지원되지 않는 컴퓨팅 장치 모드입니다. CPU를 사용하면 캡처 시간이 크게 늘어나므로 대부분의 애플리케이션에는 권장되지 않습니다. 여러 OpenCL 플랫폼이 혼합된 환경에서는 CPU 선택으로 인해 충돌을 포함한 불안정한 동작이 발생할 수 있습니다.
Once downloaded, place the Config.yml file in the following directory:
Windows
mkdir %LOCALAPPDATA%\Zivid\API
move %HOMEPATH%\Downloads\Config.yml %LOCALAPPDATA%\Zivid\API\
Ubuntu
mkdir --parents "${XDG_CONFIG_HOME-$HOME/.config}"/Zivid/API
mv ~/Downloads/Config.yml "${XDG_CONFIG_HOME-$HOME/.config}"/Zivid/API/
Version History
SDK |
Changes |
|---|---|
2.18.0 |
Added support for the CUDA compute backend for NVIDIA GPUs. Added Jetson Thor support. Added support for Ubuntu 26.04. |
2.12.0 |
Jetson Orin 지원이 추가되었습니다. |