Configure C++ Samples With CMake and Build Them in Visual Studio in Windows
To configure and build the Zivid C++ Samples on Windows, clone the samples repository, configure the solution with CMake, then build and run it in Visual Studio. This tutorial shows how to configure the Zivid C++ Samples with CMake and then build them with Visual Studio in Windows.
Requirements
Optional requirements
일부 샘플은 다음과 같은 외부 라이브러리가 필요합니다.
참고
다음 지침은 이러한 버전의 종속성으로 테스트되었습니다.
Visual Studio 2019 이상
CMake 3.24 이상
PCL 1.12.1
Eigen 3.4.0
OpenCV 4.7.0
다른 버전을 사용하는 경우 문제가 발생할 수 있습니다.
Instructions
Clone C++ Samples
GitHub Zivid C++ Samples 저장소를 복제하세요. 복제하려면 키보드에서 Win + R 키를 눌러 명령 프롬프트를 실행한 다음, cmd 를 입력하고 Enter 키를 누르세요.
저장소를 복제하려는 위치로 이동합니다. 예:
cd C:\Users\Public
그런 다음 다음 명령을 실행합니다:
git clone https://github.com/zivid/zivid-cpp-samples
Configure the solution with CMake
명령 프롬프트나 CMake GUI를 통해 CMake를 실행합니다.
Command Prompt
빌드 디렉토리를 Zivid-cpp-samples 디렉토리에 만들고 다음을 실행하여 솔루션을 구성합니다:
mkdir build && cd build
cmake -DUSE_EIGEN3=OFF -DUSE_OPENCV=OFF -DUSE_PCL=OFF ../source
팁
Make sure cmake is in your system PATH to use the cmake command.
See the “Add CMake to the system PATH” dropdown below for how to add CMake to your system PATH.
시스템 PATH에 CMake를 추가합니다.
PC에서 Control Panel → System and Security → System → Advanced System Settings → Environment Variables 로 이동합니다. 시스템 변수 에서 Path 변수를 선택하고 Edit 을 클릭합니다.
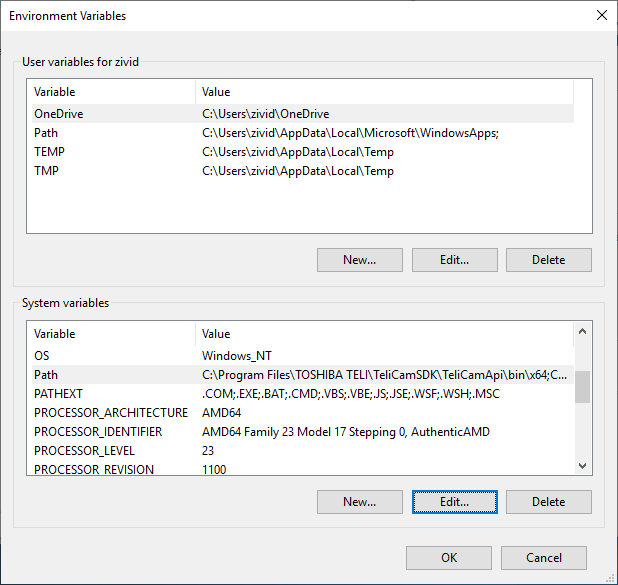
Edit environment variable 창에서 New 클릭하고 CMake 바이너리에 대한 경로를 추가합니다. 예:
C:\Program Files\CMake\bin
Program Files 에 CMake를 설치한 경우.
경고
변경 사항을 적용하려면 Windows 계정에서 로그아웃한 다음 다시 로그인해야 할 수도 있습니다.
생성된 Visual Studio 솔루션 ZividCppSamples.sln 파일 탐색기에서 열어 샘플을 추가로 빌드합니다.
CMake GUI
CMake GUI를 열고 빌드 폴더의 소스 폴더와 대상 폴더를 선택합니다.
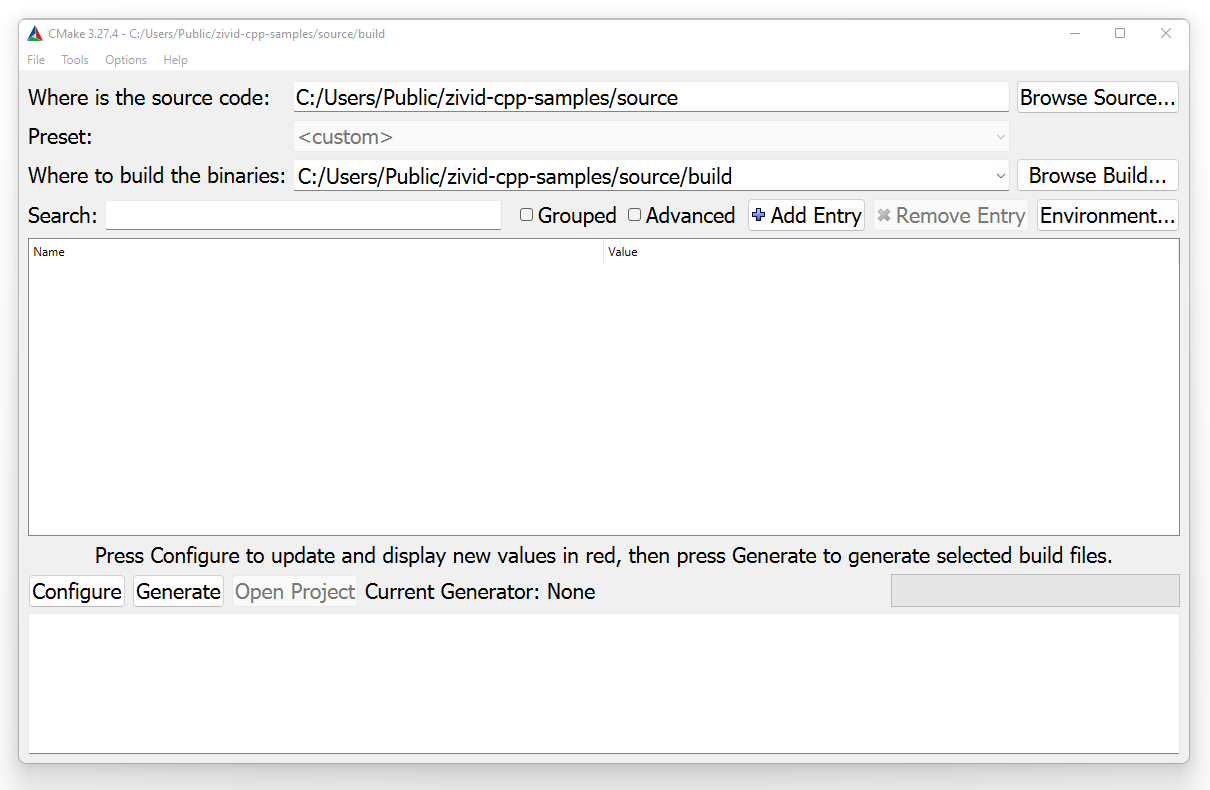
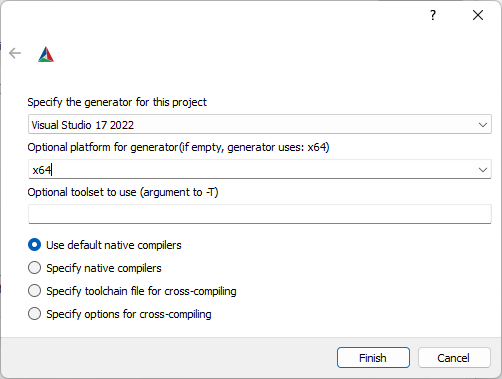
Configure 를 클릭합니다. 프로젝트에 사용할 생성기를 지정하고 (선택 사항) 플랫폼이 x64 인지 확인합니다. Finish 클릭합니다.
Configure 을 다시 클릭합니다.
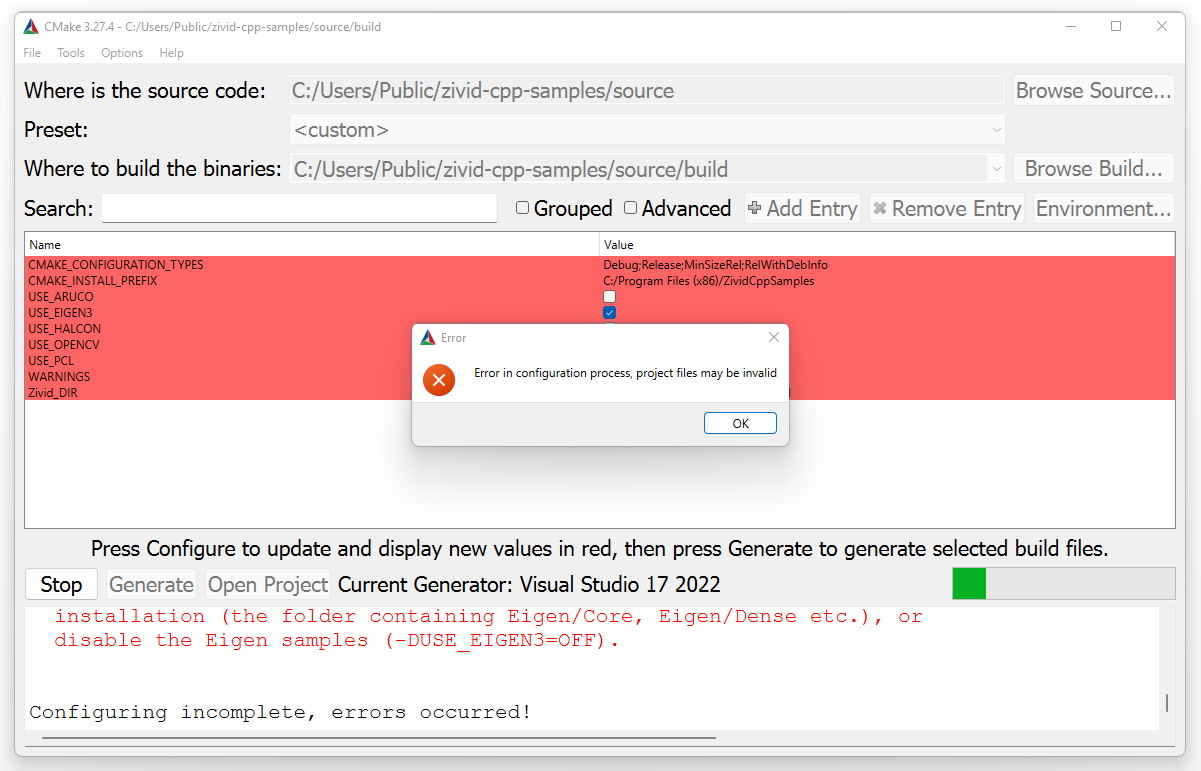
CMake 오류에서 OK 클릭하고 USE_EIGEN3 , USE_OPENCV 및 USE_PCL 변수를 비활성화하여 이러한 종속성 없이 솔루션을 구성합니다.
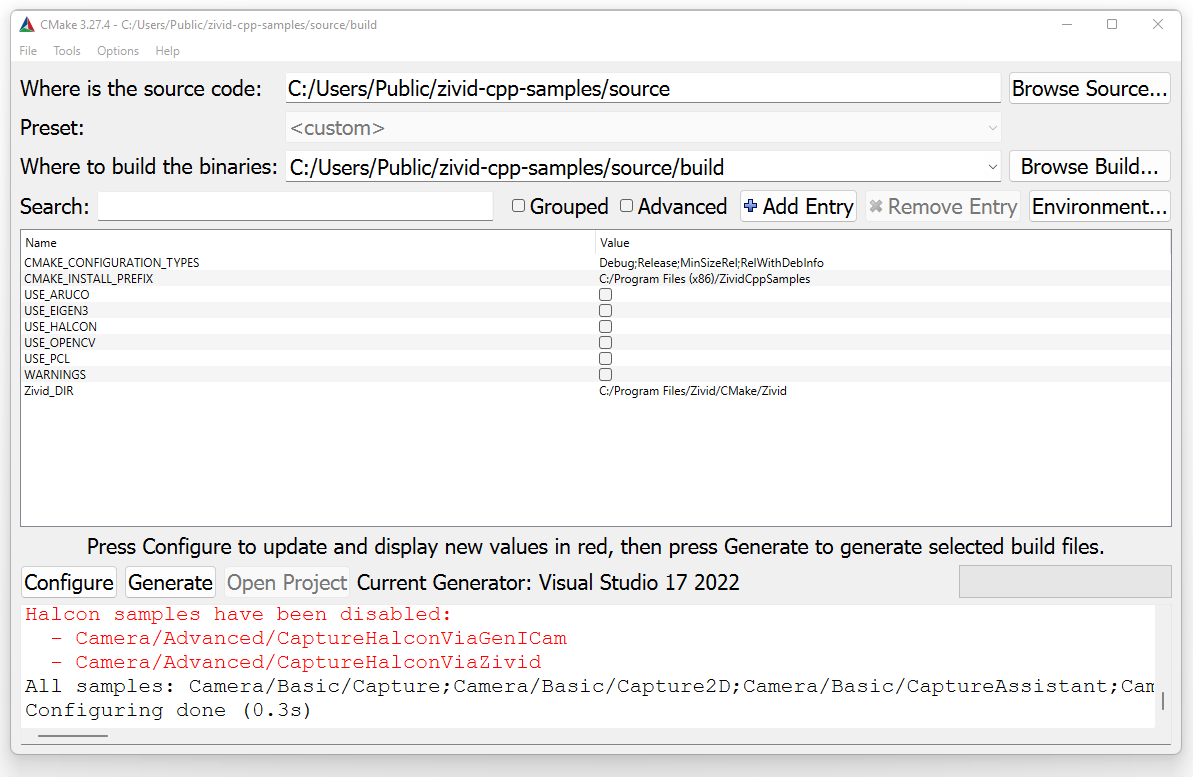
마지막으로 Configure 한 번 더 클릭하고 Generate 과 Open Project 를 클릭하여 Visual Studio 솔루션을 엽니다.
Build the solution
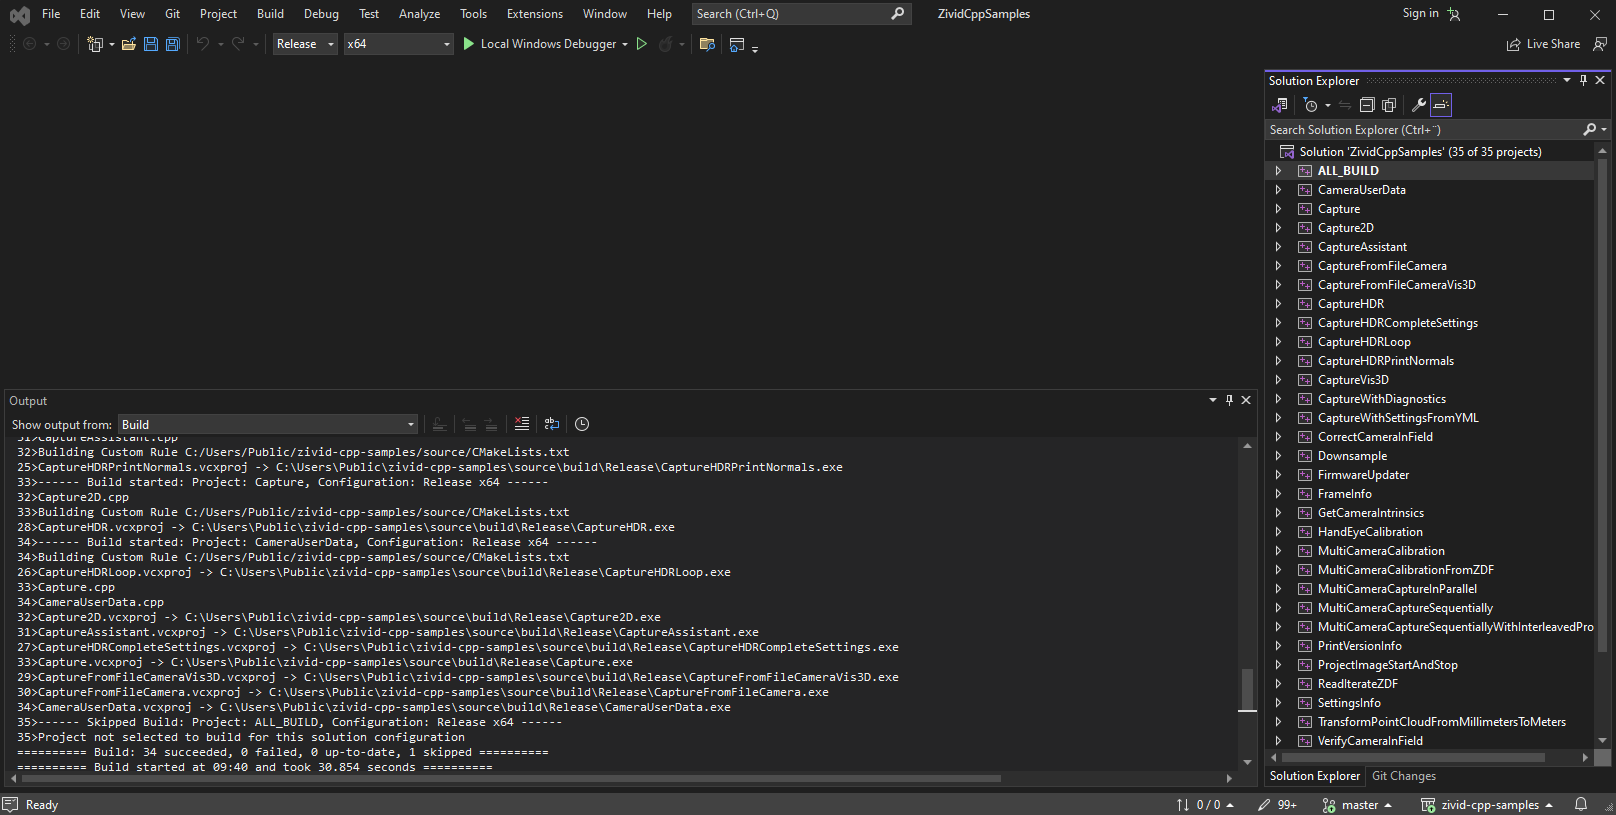
In Visual Studio, change the build configuration from Debug to Release. Debug builds disable compiler optimizations and significantly degrade performance, which is not suitable for benchmarking or production use.
Build the solution by pressing Ctrl + Shift + B.
Run the sample program
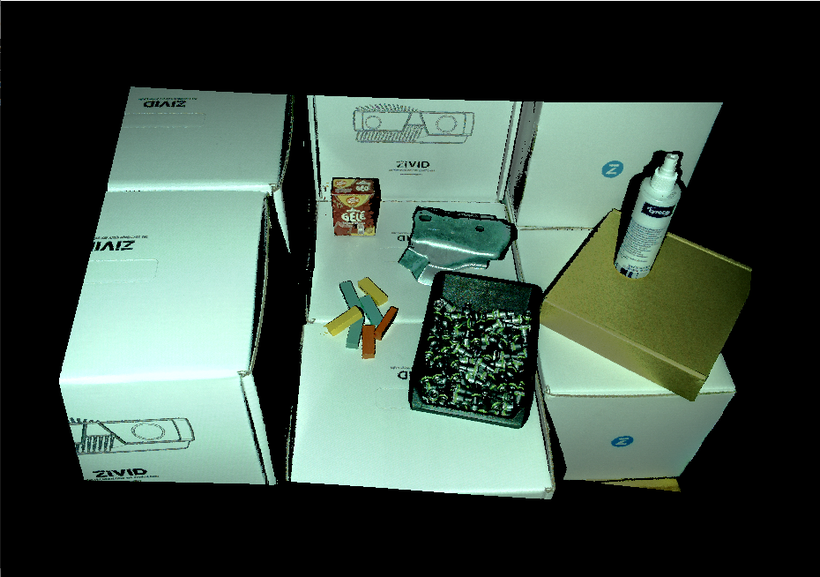
Release 폴더로 이동하여 파일 탐색기에서 exe 두 번 클릭하거나 명령 프롬프트를 사용하여 샘플 프로그램을 실행합니다. 예:
.\CaptureVis3D.exe
Running samples that require Sample Data
포인트 클라우드, 파일 카메라, 변환 등 일부 샘플을 실행하려면 추가 데이터가 필요합니다. 이러한 샘플을 다운로드하고 설치하는 방법에 대한 지침은 Sample Data 로 이동하세요.
Configuring the samples with optional dependencies
Some of the samples depend on Point Cloud Library, Eigen, OpenCV, and/or Halcon. If you want to run samples with one or more of these dependencies, follow the instructions in the “Optional dependencies” dropdown below.
Optional dependencies
실행하려는 샘플 프로그램에 따라 필요한 종속성을 설치하세요. 아래 표를 참조하세요.
Sample program |
PCL |
Eigen |
OpenCV |
OpenCV (CUDA) |
Halcon |
|---|---|---|---|---|---|
ReadPCLVis3D |
YES |
||||
CaptureWritePCLVis3D |
YES |
||||
CaptureAndVisualizeNormals |
YES |
||||
StitchByTransformation |
YES |
||||
StitchByTransformationFromZDF |
YES |
||||
StitchViaLocalPointCloudRegistration |
YES |
||||
StitchContinuouslyRoatingObject |
YES |
||||
로봇에 장착된 카메라를 사용하여 스티치하기 |
YES |
||||
MaskPointCloud |
YES |
||||
Capture2DAnd3D |
YES |
YES |
|||
ROIBoxViaCheckerboard |
YES |
||||
UtilizeHandEyeCalibration |
YES |
||||
PoseConversions |
YES |
||||
ROIBoxViaArucoMarker |
YES |
||||
CaptureUndistort2D |
YES |
||||
CreateDepthMap |
YES |
||||
ProjectAndFindMarker |
YES |
||||
ReprojectPoints |
YES |
||||
ReadProjectAndCaptureImage |
YES |
||||
GammaCorrection |
YES |
||||
AllocateMemoryForPointCloudData |
YES |
||||
CaptureAndConvertImageWithOpenCVOnCuda |
YES |
||||
TransformPointCloudViaCheckerboard |
YES |
||||
TransformPointCloudViaArucoMarker |
YES |
||||
CaptureHalconViaGenICam |
YES |
||||
CaptureHalconViaZivid |
YES |
Eigen
Download the latest stable release of Eigen from https://libeigen.gitlab.io/ and extract the folder to your desired destination. When configuring the CMake project, include Eigen to configure the samples that depend on it.
Command Prompt
zivid-cpp-samples 에서 생성한 빌드 디렉토리로 이동하여 다음을 실행합니다.
cmake -DEIGEN3_INCLUDE_DIR=<path> -DUSE_OPENCV=OFF -DUSE_PCL=OFF ../source여기서
<path>Eigen을 설치한 전체 경로입니다(예C:/Program Files/Eigen).CMake GUI
CMake GUI에서 Add Entry 클릭하여 Eigen 경로를 추가합니다.
EIGEN3_INCLUDE_DIR추가하고 값을 폴더 압축을 푼 위치로 지정합니다.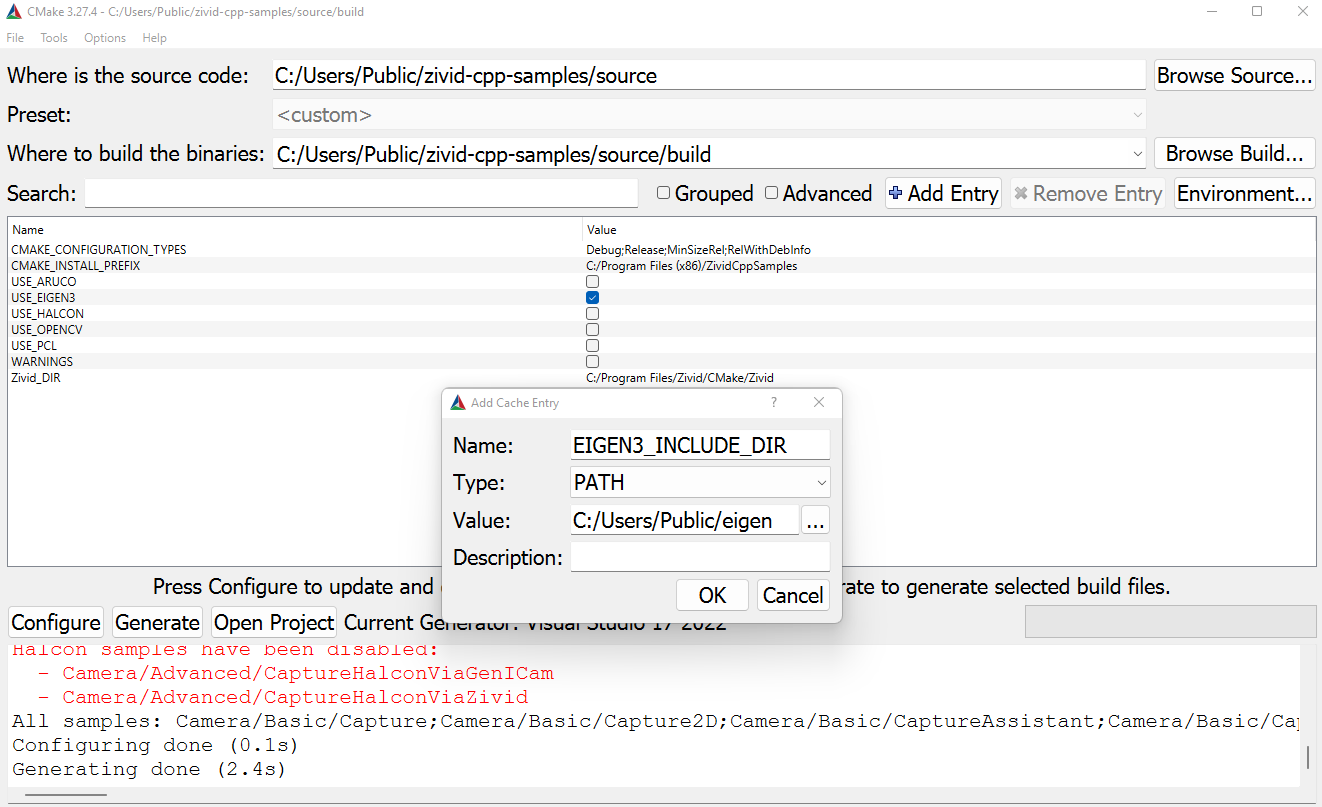
USE_EIGEN3상자가 선택되어 있는지 확인하고 Configure 클릭합니다. 그런 다음 Generate 과 Open Project 를 클릭하여 Visual Studio 솔루션을 엽니다.PCL
https://github.com/PointCloudLibrary/pcl/releases 에서
.exe선택하여 미리 빌드된 PCL 바이너리를 다운로드하고 설치하세요. 타사 라이브러리 설치 옵션을 선택하세요.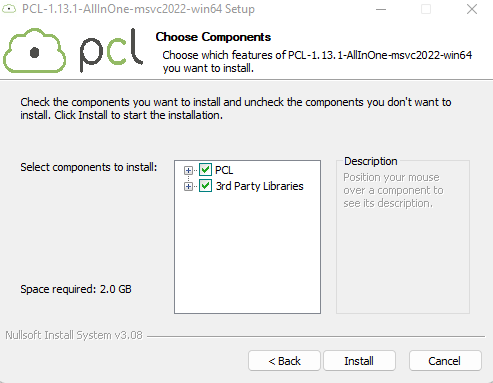
Zivid PCL 코드 샘플을 구성하려면 먼저 PATH 시스템 변수에 일부 설정을 포함해야 합니다. PC에서 Control Panel → System and Security → System → Advanced System Settings → Environment Variables 로 이동합니다. System variables 에서
Path변수를 선택하고 Edit 를 클릭합니다.Edit environment variable 창에서 New 클릭하고 PCL 바이너리 및 OpenNI2(타사 라이브러리)에 대한 경로를 추가합니다.
C:\Program Files\PCL 1.12.1\bin
C:\Program Files\OpenNI2\Tools
Program Files 에 PCL 1.12.1과 OpenNI2를 설치한 경우, 변경 사항을 적용하려면 Windows 계정에서 로그아웃했다가 다시 로그인해야 할 수 있습니다.
경고
VTK와 같은 일부 타사 PCL 라이브러리에 수동으로 연결해야 할 수도 있습니다. 오류가 발생하면 PATH 시스템 변수에 라이브러리 바이너리 경로를 추가하세요. 예를 들어 VTK의 경우, Program Files 에 PCL 1.12.1을 설치했다면
C:/Program Files/PCL 1.12.1/3rdParty/VTK/bin추가합니다.CMake 프로젝트를 구성할 때 PCL 경로는 이미 구성되어 있어야 합니다.
Command Prompt
zivid-cpp-samples 에서 생성한 빌드 디렉토리로 이동하여 다음을 실행합니다.
cmake -DUSE_PCL=ON -DUSE_EIGEN3=OFF -DUSE_OPENCV=OFF ../sourceCMake GUI
CMake GUI에서
USE_PCL상자가 선택되어 있는지 확인하고 Configure 를 클릭합니다.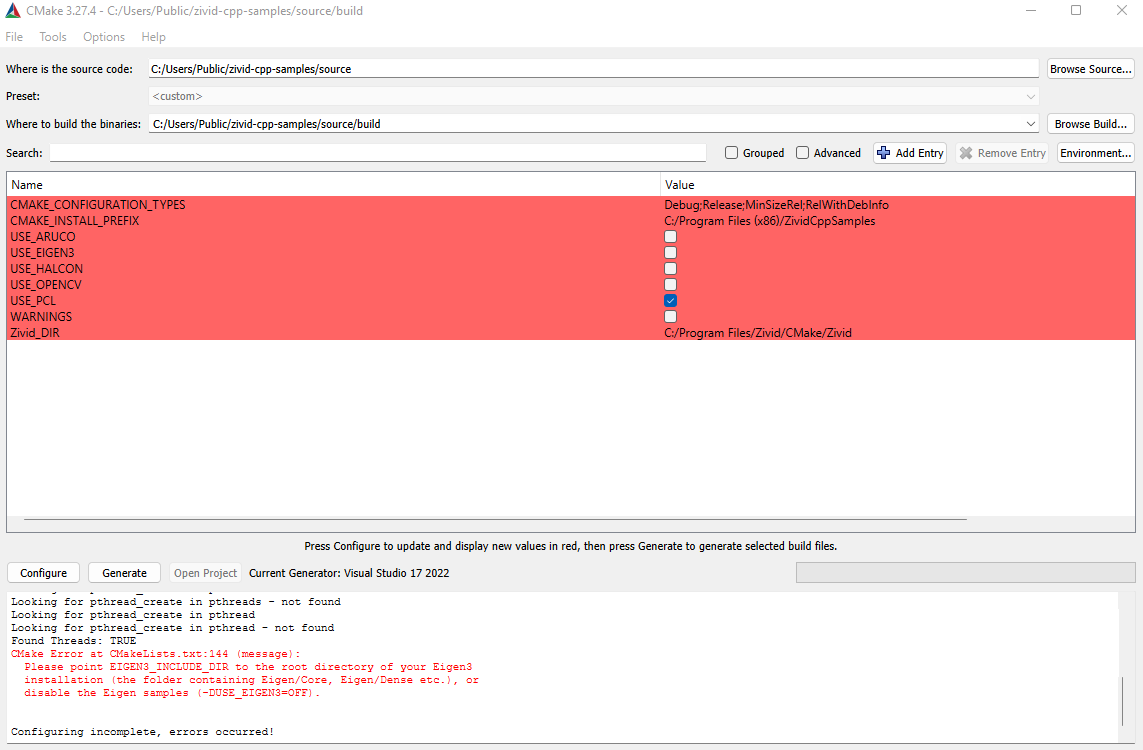
Generate 및 Open Project 를 클릭하여 Visual Studio 솔루션을 엽니다.
OpenCV
https://opencv.org/releases/ 에서 미리 빌드된 OpenCV 바이너리를 다운로드하여 설치합니다. 원하는 위치에 압축을 풉니다(예:
C:\Users\PublicZivid OpenCV 코드 샘플을 구성하려면 먼저 PATH 시스템 변수에 일부 설정을 포함해야 합니다. PC에서 Control Panel → System and Security → System → Advanced System Settings → Environment Variables 로 이동합니다. System variables 에서
Path변수를 선택하고 Edit 클릭합니다.Edit environment variable 창에서 New 클릭하고 OpenCV 바이너리에 대한 경로를 추가합니다. 예:
C:\Program Files\opencv\build\x64\vc16\binOpenCV 4.7.0을 설치하고
C:/Program Files/opencv에 압축을 풀었다면,경고
변경 사항을 적용하려면 Windows 계정에서 로그아웃한 다음 다시 로그인해야 할 수도 있습니다.
CMake 프로젝트를 구성할 때, 이에 종속된 샘플을 구성하기 위해 OpenCV를 포함합니다.
Command Prompt
zivid-cpp-samples 에서 생성한 빌드 디렉토리로 이동하여 다음을 실행합니다.
cmake -DOpenCV_DIR=<path> -DUSE_EIGEN3=OFF -DUSE_PCL=OFF ../source여기서
<path>OpenCV 빌드 폴더의 전체 경로입니다(예C:/Program Files/opencv/build).CMake GUI
CMake GUI에서 Add Entry 클릭하여 OpenCV 경로를 추가합니다.
OpenCV_DIR추가하고 값으로 OpenCV 빌드 폴더를 지정합니다.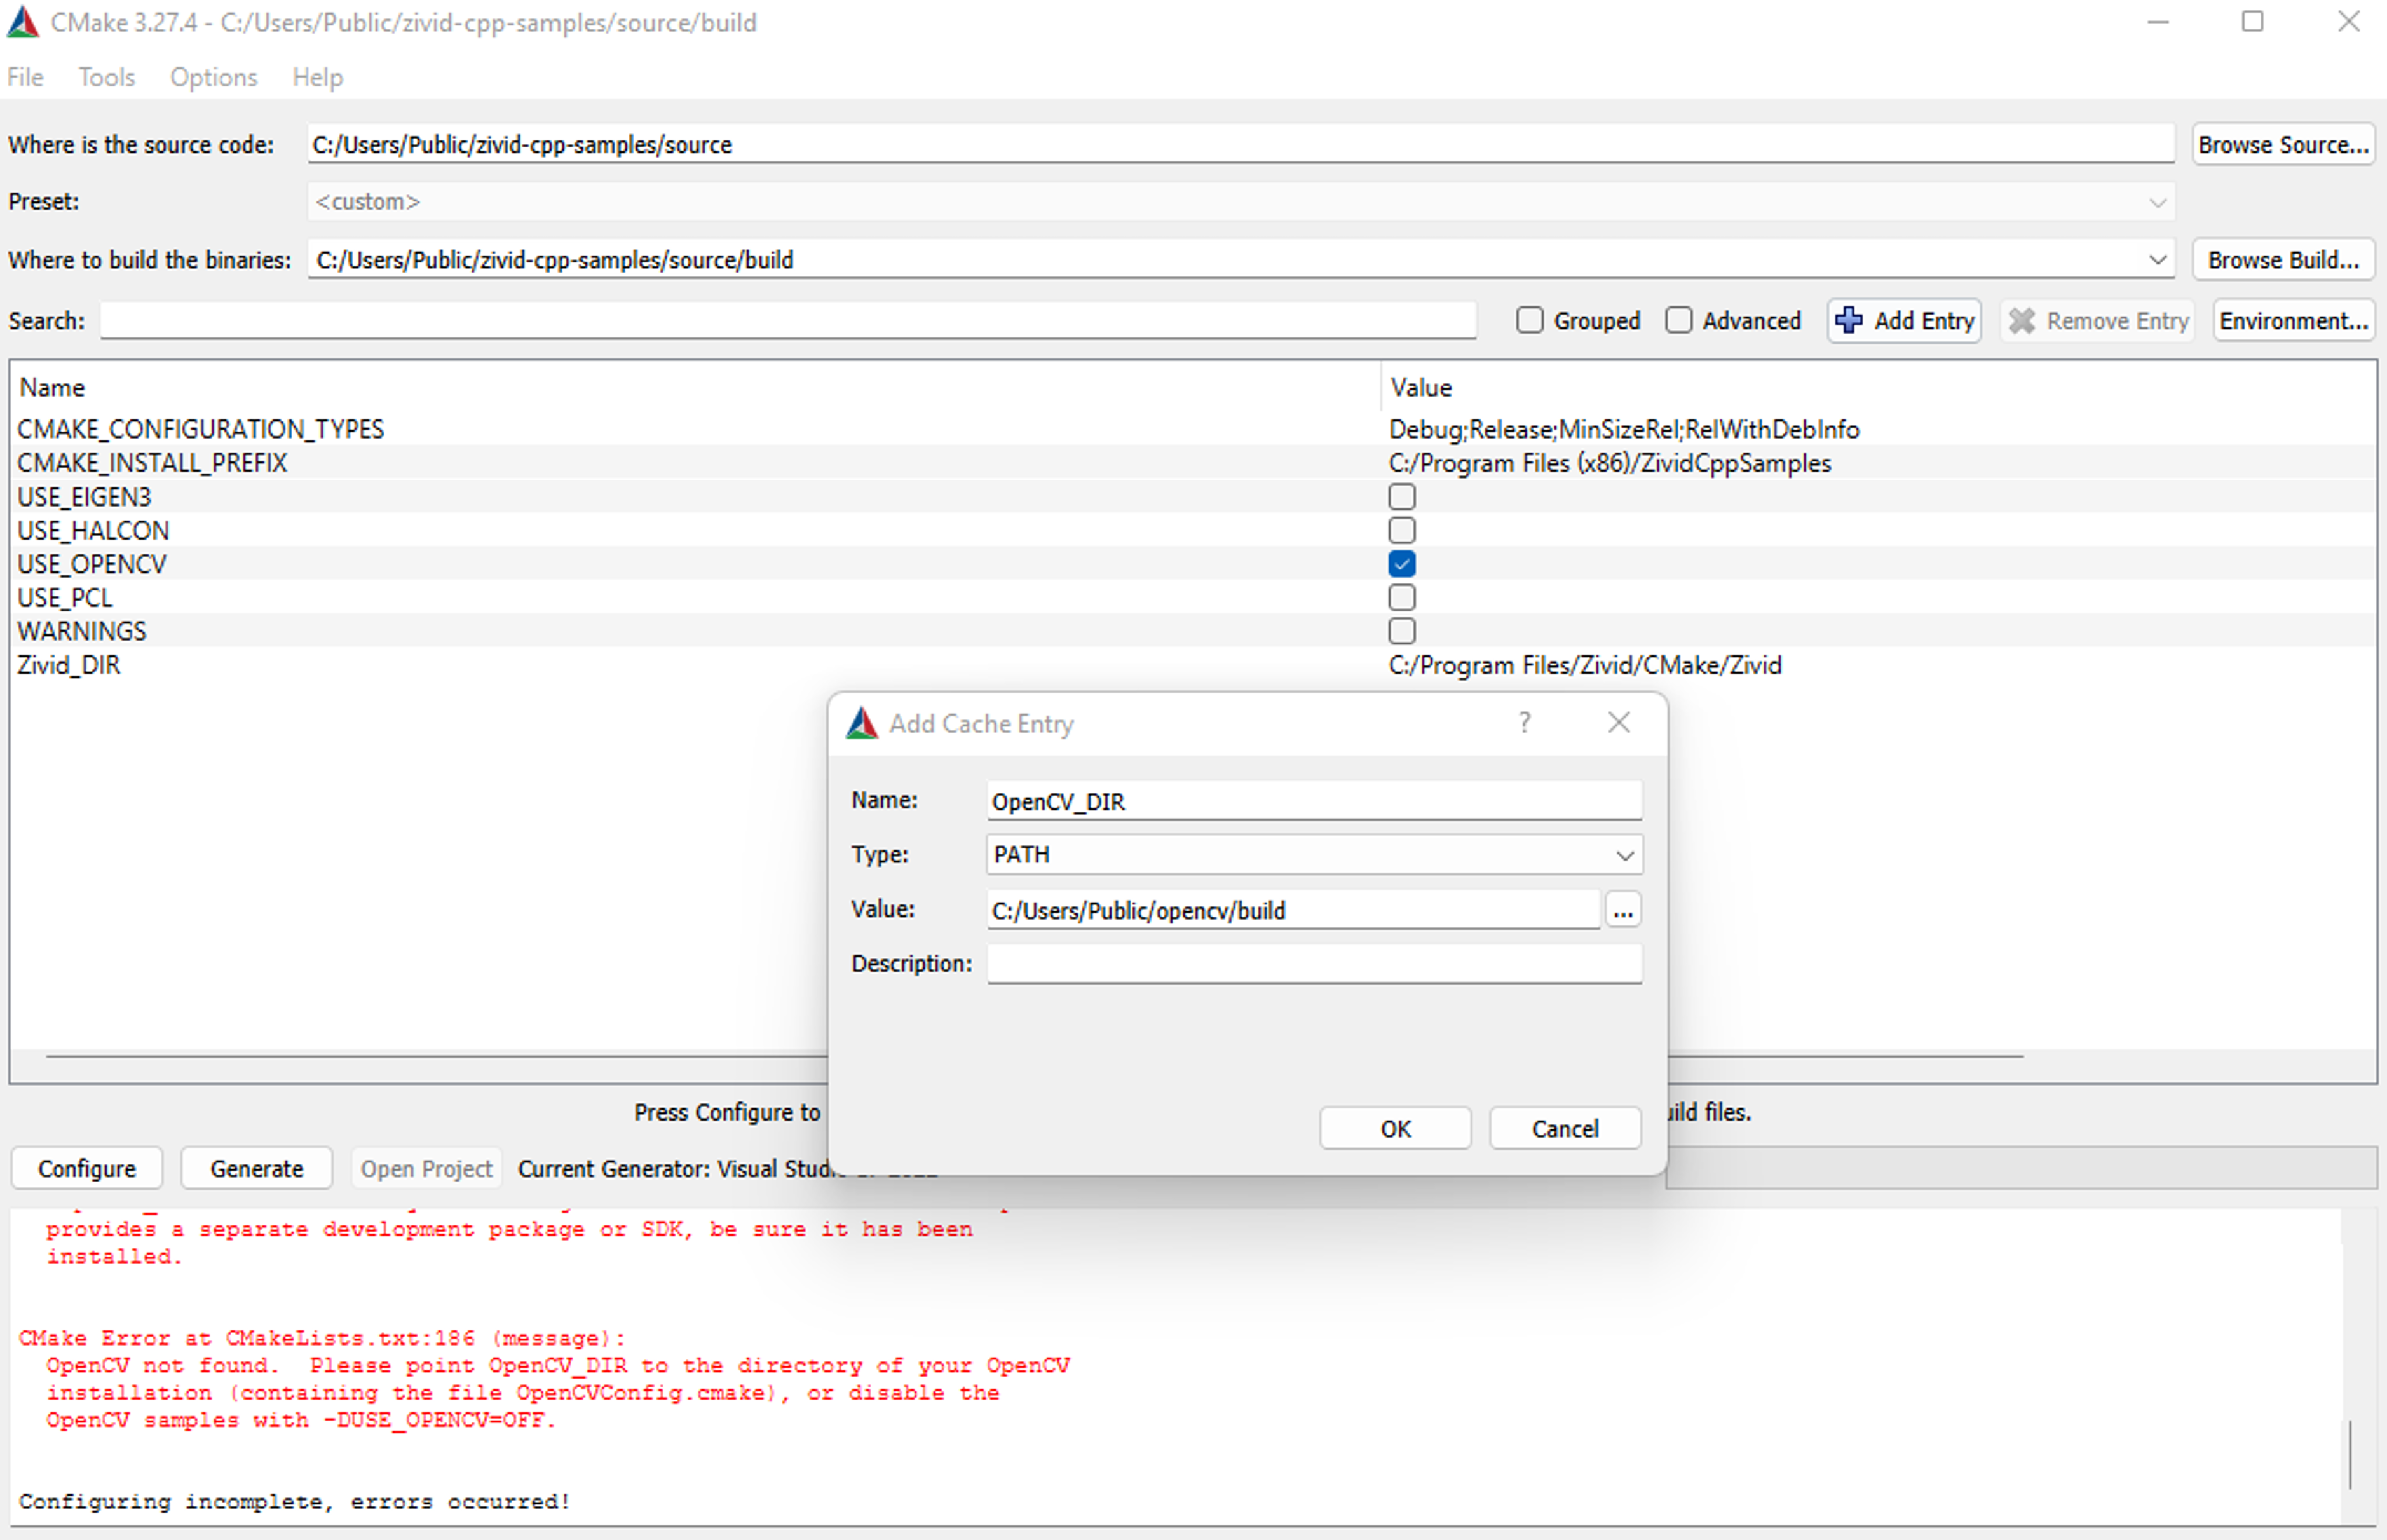
USE_OPENCV상자가 선택되어 있는지 확인하고 Configure 클릭합니다. 그런 다음 Generate 과 Open Project 를 클릭하여 Visual Studio 솔루션을 엽니다.HALCON
Halcon C++ 샘플을 실행하려면 PC에 Halcon이 설치되어 있어야 합니다. 자세한 내용은 Install Zivid + HALCON for Windows 를 참조하세요.
Halcon을 설치한 후 Halcon 샘플을 사용하도록 CMake를 구성합니다.
Command Prompt
zivid-cpp-samples 에서 생성한 빌드 디렉토리로 이동하여 다음을 실행합니다.
cmake -DUSE_HALCON=ON -DUSE_EIGEN3=OFF -DUSE_OPENCV=OFF -DUSE_PCL=OFF ../sourceCMake GUI
USE_HALCON상자가 선택되어 있는지 확인하고 Configure 클릭합니다.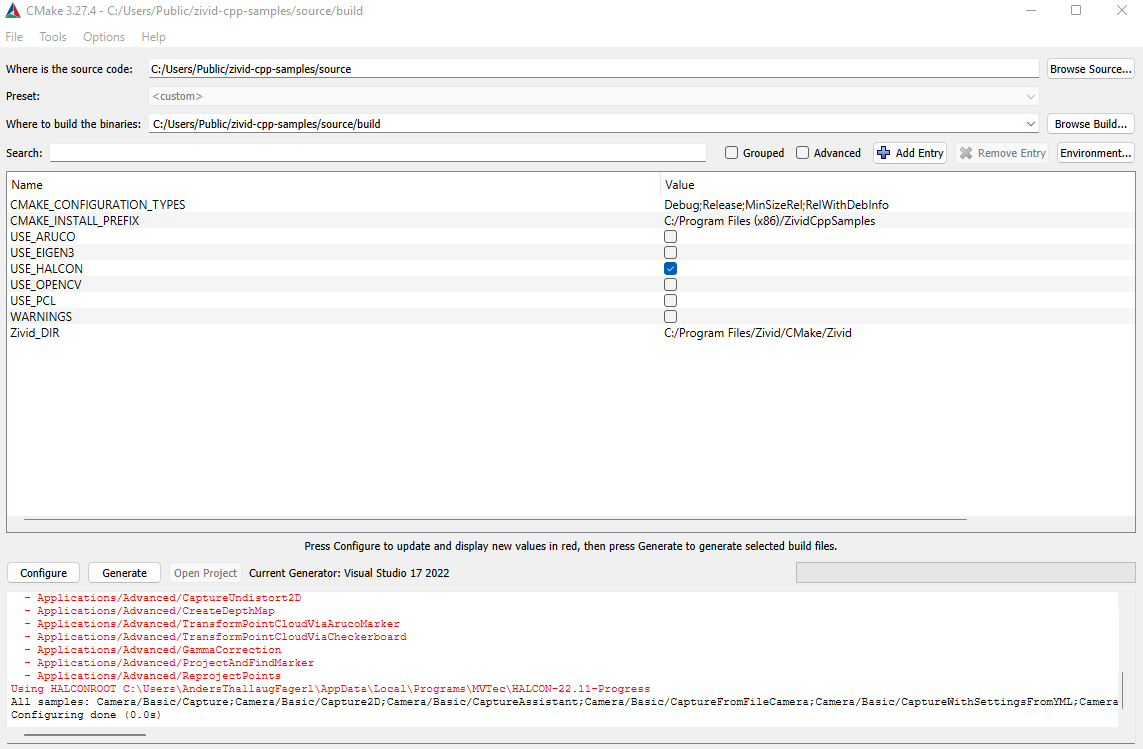
그런 다음 Generate 및 Open Project 를 클릭하여 Visual Studio 솔루션을 엽니다.
여러 종속성을 한 번에 구성하려면 CMake에서 여러 종속성을 동시에 추가하기만 하면 됩니다. 예를 들어 Eigen, PCL, OpenCV가 필요한 모든 샘플을 사용하려면 다음을 실행하면 됩니다.
cmake -DEIGEN3_INCLUDE_DIR=<path-to-eigen> -DUSE_PCL=ON -DOpenCV_DIR=<path-to-opencv> ../source
여기서 <path-to-eigen> 및 <path-to-opencv> 는 Eigen 및 OpenCV 폴더의 경로입니다.
Debug the sample program
To debug a sample you must add C:/Program Files/Zivid/bin_debug to your PATH environment variable.
Follow the instructions in the “Debugging a sample program” dropdown below to do this.
Debugging a sample program
PC에서 다음으로 이동합니다. Control Panel → System and Security → System → Advanced System Settings → Environment Variables.
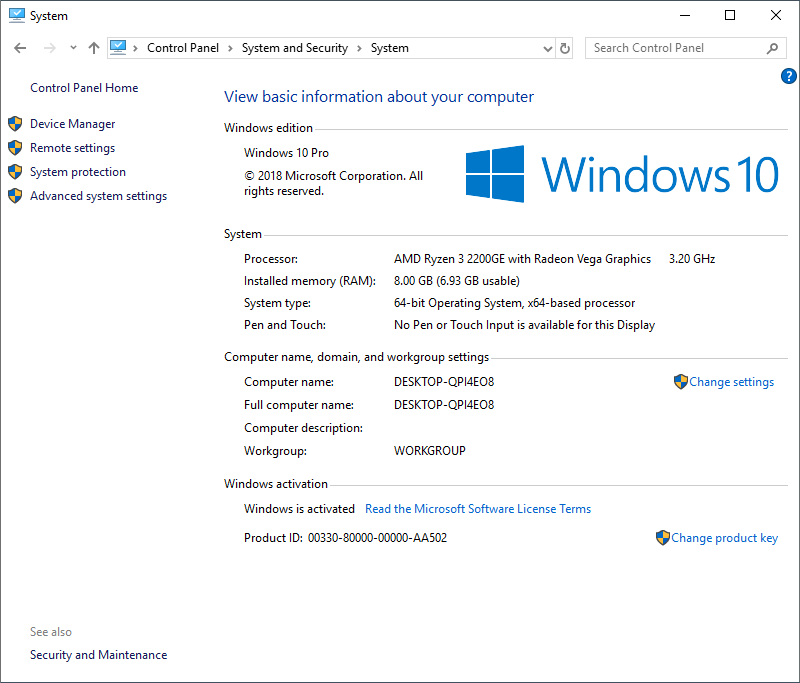
System variables 에서 Path 변수를 선택하고 Edit 클릭합니다.
Environment variables 창에서 New (창의 오른쪽 상단 모서리, 사용자 변수 섹션)를 클릭하고 다음 값을 추가합니다.
C:\Program Files\Zivid\bin_debug
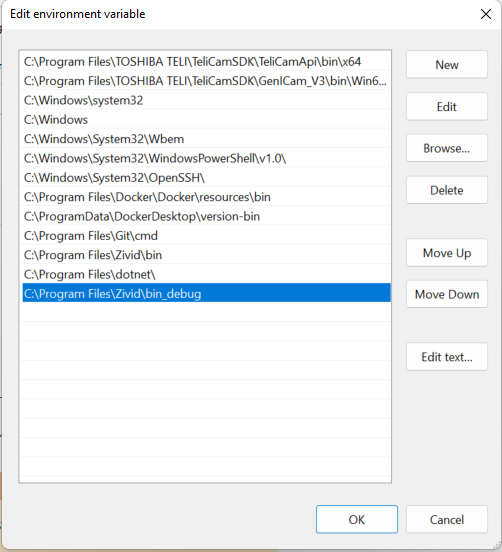
참고
입력 파일에 의존하는 프로그램을 디버깅하려면 작업 디렉터리를 ${TargetDir} 로 변경해야 합니다.
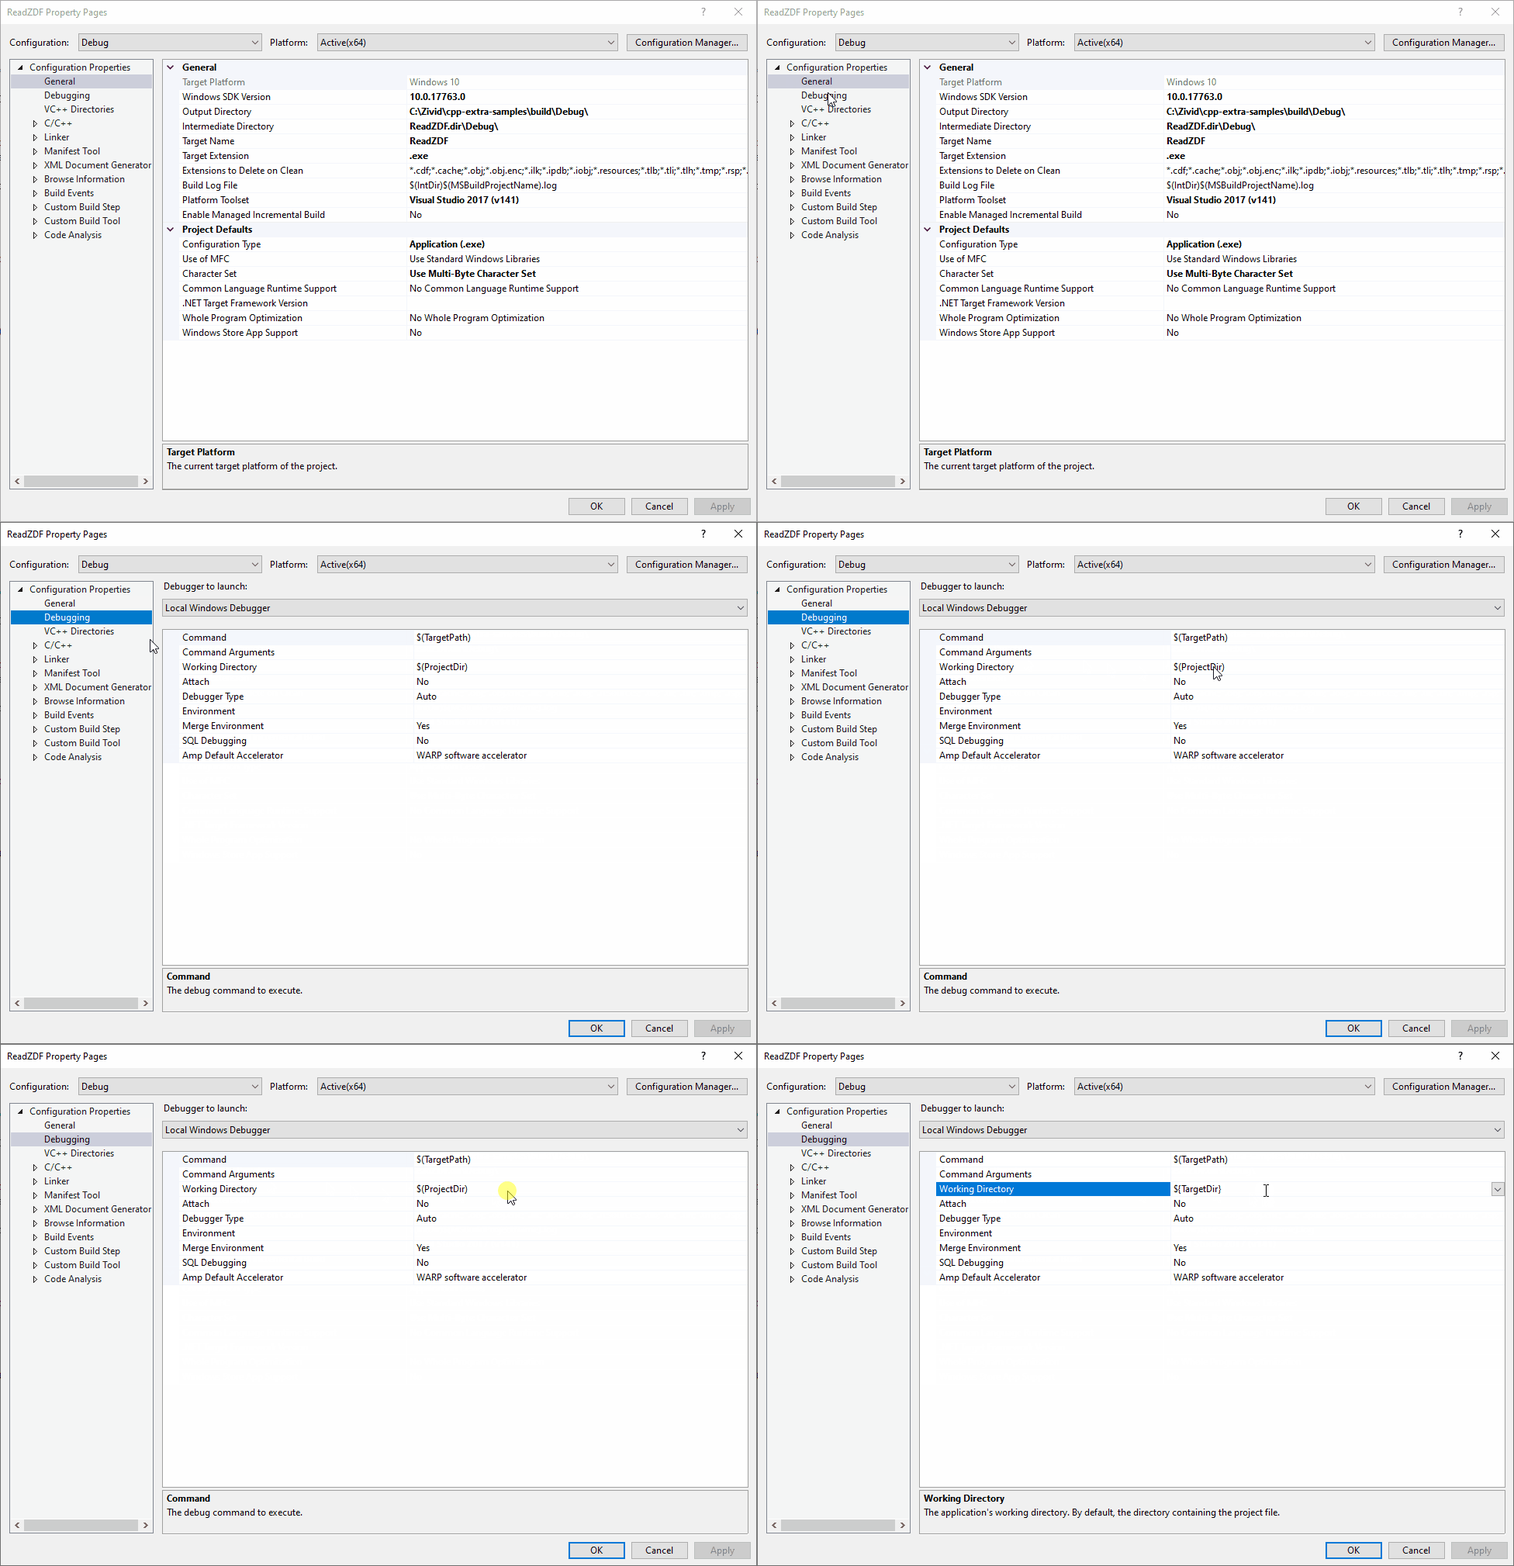
빌드 구성을 Release 에서 Debug 로 변경하세요. 그런 다음 F5 를 눌러 디버그 모드로 빌드하고 실행하세요.
Version History
SDK |
Changes |
|---|---|
2.17.0 |
정리되지 않은 포인트 클라우드의 시각화에 대한 기본 지원으로 인해 Open3D에 대한 종속성이 제거되었습니다. |
2.16.0 |
Ubuntu에서 선택적 종속성을 사용하여 C++ 샘플을 구성하는 방법을 추가했습니다. Ubuntu와 Windows 모두에서 Open3D를 구성하는 방법을 추가했습니다. |