基于捕获速度的设置选择器
本章节将根据您从触发采集到获得点云的时间预算来提供有关最佳相机设置的详细说明。同时,我们还会考虑您的PC规格,因为数据传输和点云处理也取决于此。我们通过优化3D捕获的设置来获得良好的点云,以及通过优化2D捕获的设置来获得良好的彩色图像。
在这之前,您已确定选择哪款Zivid相机用于您的单品拣选应用,并且已正确安装和定位它。下一步是根据您的PC规格选择满足您的周期时间要求的相机设置。如果您还没有准备好PC,本文也介绍了如何结合使用的设置找到满足您的捕获时间要求的PC规格。
3D设置
我们根据场景的复杂性将单品拣选应用分为两类。对于每个类别,我们指定并推荐满足给定成像要求和捕获速度要求的设置。
Consumer Goods
如果您的场景不包含非常明亮、反光和深色的物体,您可以选择适用于单品拣选的快速设置(Fast settings)来节省大量的循环时间。快速设置(Fast settings)覆盖了较窄的动态范围,但能够提供更快的捕获。这里有一个适合使用快速设置的场景示例。如您所见,里面没有导致强烈直接反射、高光和饱和度的物体,也没有颜色非常暗的物体。
小技巧
如果场景中没有明亮、反光和深色的物体,请选择快速设置。
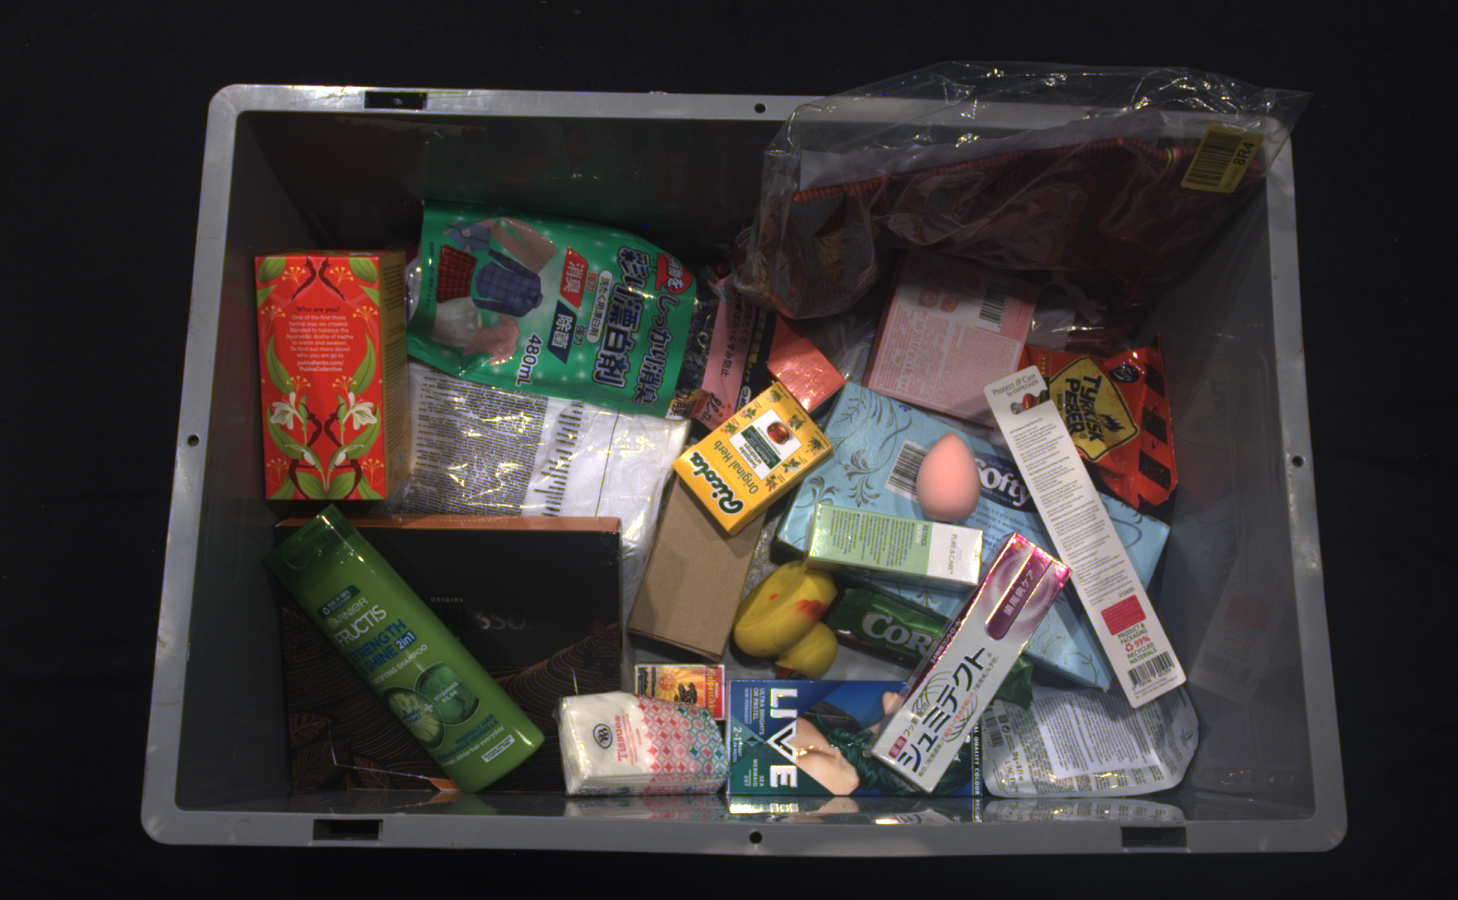
通过消费品的质量设置(Quality settings),相机覆盖了相当宽的动态范围,对各种物体都能提供良好的点云。在这种情况下,场景可以包含从明亮和反光的塑料包装物体和装载塑料袋中的物品到深色吸收材料中的任何物体。下图描绘了一个典型的需要质量设置的复杂消费品场景。
小技巧
如果您希望确保相机不会丢失任何物体的数据,请选择质量设置(Quality settings)。
设置选择表
下表是一个基于所需捕获时间预算的设置选择器工具。这张表格同时显示了可以满足您的捕获速度要求的 PC 的性能和成本。你可以转到 推荐的工业 PC 来查看高端、中端和低端PC配置的示例。
应用 |
捕获时间(2D + 3D) |
相机设置 |
||
|---|---|---|---|---|
高端电脑 |
中端电脑 |
低端电脑 |
||
消费品(质量/Quality) |
~1000 毫秒 |
~1250 ms |
~1500 ms |
|
消费品(快速/Fast) |
~500 毫秒 |
~750 毫秒 |
~1000 毫秒 |
|
To download the desired settings file, connect to the camera (your specific model) in Zivid Studio, select the preset settings, turn on Ambient Light Adaption, and export the settings. The capture time with settings adapted for ambient light frequency might be longer.
To download the desired settings file, connect to the camera (your specific model) in Zivid Studio, select the preset settings, turn on Ambient Light Adaption, and export the settings. The capture time with settings adapted for ambient light frequency might be longer.
备注
If you plan to take a separate 2D capture, then you can disable color in your 3D capture by setting Sampling::Color to disabled to save capture time.
The color in the preset settings is enabled by default.
为了证实能够达到上述单品拣选应用的要求,我们在多种不同规格的PC上使用Zivid相机运行基准捕获程序(benchmark capture programs)。下表显示了其结果。
消费品设置 |
Intel UHD i5G1 |
NVIDIA 4070 |
Intel UHD 770 |
|---|---|---|---|
Low-end [1] |
High-end [2] |
||
N/A |
N/A |
N/A |
|
1773 (±418) ms |
556 (±4) ms |
1211 (±3) ms |
|
1773 (±404) ms |
555 (±5) ms |
1210 (±3) ms |
|
N/A |
N/A |
N/A |
|
4309 (±305) ms |
1707 (±6) ms |
2726 (±5) ms |
|
4314 (±320) ms |
1707 (±6) ms |
2726 (±5) ms |
|
消费品设置 |
Intel UHD 750 |
Intel UHD i3G1 |
NVIDIA 3070 |
|---|---|---|---|
High-end [3] |
Low-end [4] |
High-end [5] |
|
757 (±15) ms |
1186 (±11) ms |
305 (±5) ms |
|
746 (±13) ms |
1184 (±11) ms |
305 (±6) ms |
|
934 (±8) ms |
1338 (±10) ms |
462 (±7) ms |
|
934 (±8) ms |
1339 (±10) ms |
462 (±6) ms |
Parcel Picking
Parcel is also split into two settings depending on scene complexity and capture time.
Parcels(包裹) Fast (Zivid 2+) / Matte (Zivid 2) settings are designed to achieve the shortest cycle times. These settings have a limited dynamic range but are good enough for objects that are relatively straightforward for imaging, for example:
纸板箱
白色信封
bright poly bags
小技巧
If you are only imaging boxes, parcels, satchels, etc., choose Parcels Fast (Zivid 2+) / Matte (Zivid 2) settings.
For more challenging scenes, you should try out Parcels(包裹) Quality (Zivid 2+) / Reflective (Zivid 2) settings. These settings have larger dynamic range and are capable of getting good surface coverage on objects such as:
black poly bags
dark plastic bags
dark plastic wrap
设置选择表
If you experience artifacts in the form of ripples/waves across the whole point cloud, choose 50/60 Hz to select presets adapted to the ambient light (grid) frequency. If the ambient light is unproblematic, select Off for optimal performance.
应用 |
捕获时间(2D + 3D) |
相机设置 |
||
|---|---|---|---|---|
高端电脑 |
中端电脑 |
低端电脑 |
||
Parcels (Quality/Reflective) |
~400 ms |
~600 毫秒 |
~800 ms |
|
Parcels (Fast/Matte) |
~200 ms |
~350 ms |
~500 毫秒 |
|
To download the desired settings file, connect to the camera (your specific model) in Zivid Studio, select the preset settings, turn on Ambient Light Adaption, and export the settings. The capture time with settings adapted for ambient light frequency might be longer.
To download the desired settings file, connect to the camera (your specific model) in Zivid Studio, select the preset settings, turn on Ambient Light Adaption, and export the settings. The capture time with settings adapted for ambient light frequency might be longer.
备注
If you plan to take a separate 2D capture, we recommend disabling color in your 3D capture by setting Sampling::Color to disabled.
This will reduce the capture time.
The color in the preset settings is enabled by default.
To demonstrate reaching the above requirements for parcels we continuously run benchmark capture programs with our cameras on various PCs. The following table shows the results.
Parcels Settings |
Intel UHD i5G1 |
NVIDIA 4070 |
Intel UHD 770 |
|---|---|---|---|
Low-end [9] |
High-end [10] |
||
612 (±6) ms |
185 (±2) ms |
345 (±2) ms |
|
611 (±5) ms |
186 (±2) ms |
345 (±2) ms |
|
817 (±15) ms |
345 (±2) ms |
581 (±3) ms |
|
818 (±13) ms |
345 (±2) ms |
581 (±4) ms |
|
测试3D设置
我们可以使用Zivid Studio来测试3D设置。
可通过以下操作在Zivid Studio中导入设置:
点击 File → Import Capture Settings
导航到设置文件的位置
点击Open
小技巧
将YML文件直接拖放至Zivid Studio界面也可以导入相机的3D设置 - 该功能自Zivid SDK 2.5起可以使用。
也可以使用Zivid SDK加载设置。

std::cout << "Loading settings from file" << std::endl;
const auto settingsFile =
    std::string(ZIVID_SAMPLE_DATA_DIR) + "/Settings/" + settingsFolder(camera) + "/Settings01.yml";
const auto settings = Zivid::Settings(settingsFile);
Console.WriteLine("Loading settings from file");
var settingsFile = Environment.GetFolderPath(Environment.SpecialFolder.CommonApplicationData)
                   + "/Zivid/Settings/" + SettingsFolder(camera) + "/Settings01.yml";
var settings = new Zivid.NET.Settings(settingsFile);
2D设置
虽然您可以通过3D捕获获得彩色图像,但可能因为相机投影仪发出的光线导致2D图像可能不足以满足您的2D应用需求。您可以在 2D+3D捕获策略 中阅读更多相关信息。我们为您的单品拣选应用提供了两个获取2D设置的选项:
使用Zivid标定板和代码示例来自动获取2D设置
使用查询表找到合适的2D设置
Manually tune 2D settings
Automatic 2D settings
您可以运行 auto_2d_settings.py 示例来使用Zivid标定板自动查找2D捕获的采集设置和色彩平衡。将标定板放放置在料箱的顶部或底部,并通过指定标定板的位置和所需的对焦范围(料箱高度)作为命令行参数来运行示例。例如,如果您将标定板放在箱子顶部,箱高为400毫米,则按以下方式运行样本:
python auto_2d_settings.py --desired-focus-range 400 --checkerboard-at-start-of-range
如果将标定板放在料箱底部,请运行:
python auto_2d_settings.py --desired-focus-range 400 --checkerboard-at-end-of-range
默认情况下,此示例在查找2D设置时不会使用相机内部投影仪,但这可以通过可选参数 --use-projector 进行设置。此外,您还可以通过可选参数 --no-color-balance 来选择不执行颜色平衡的查找算法。由于示例使用场景中的环境光进行校准,您应该在与实际应用类似的照明条件下运行该示例。
设置选择表
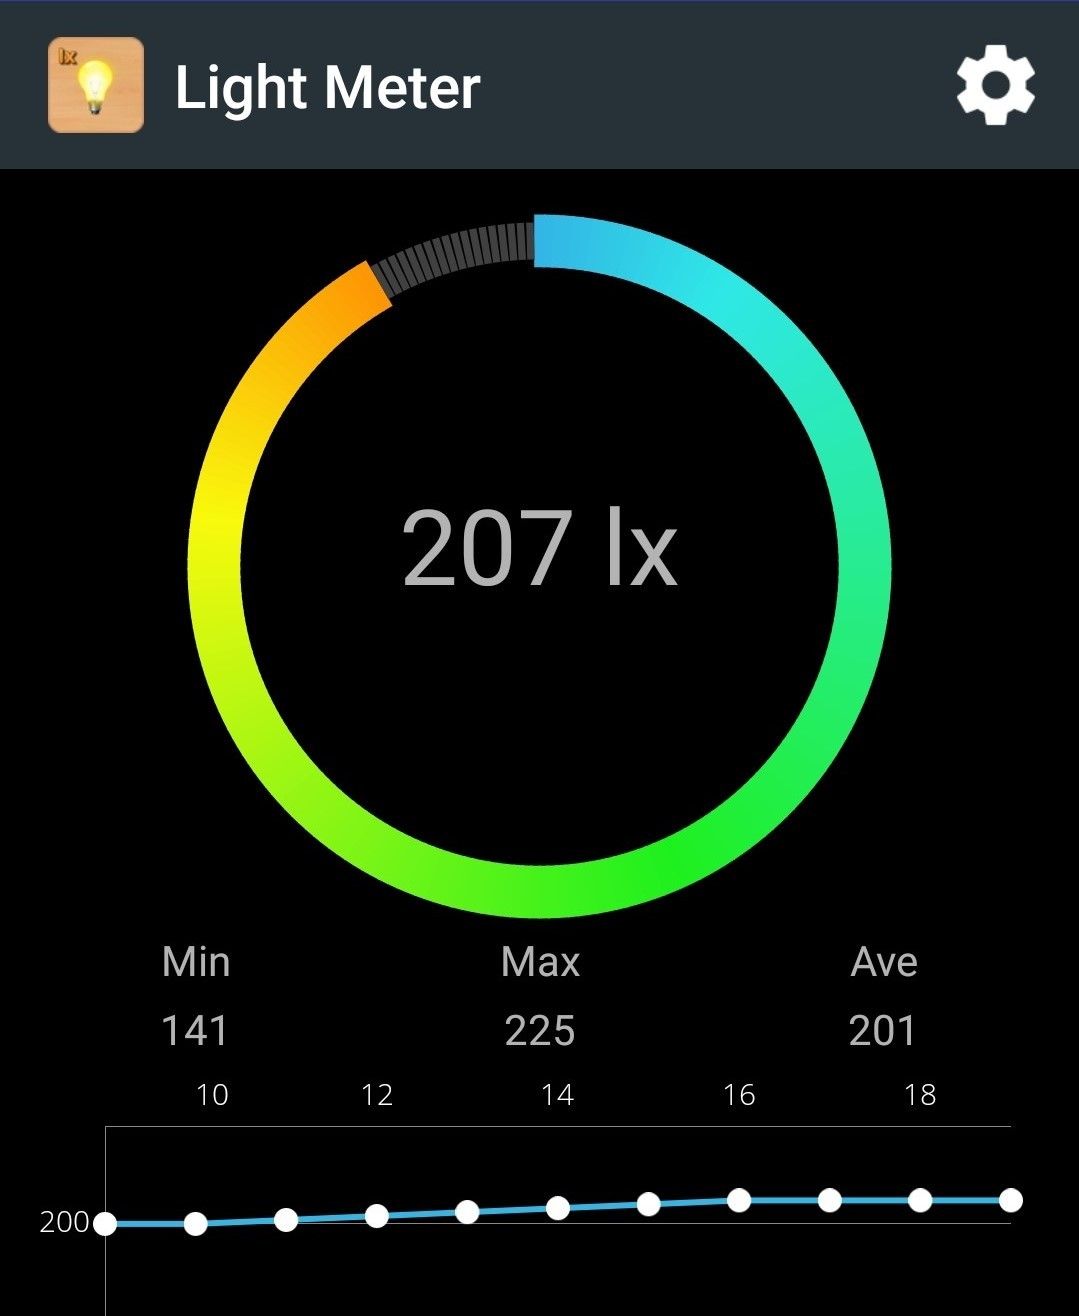
下表是一个设置选择器工具,用于根据料箱底部的照度和相机到料箱顶部的距离进行2D设置。这些2D设置适用于不使用相机投影仪作为光源,仅使用外部光源的情况。
使用该表格时,首先要在给定的预期照明条件的情况下确定料箱底部的照度。然后,根据从相机到料箱顶部的距离选择设置。
备注
照度的单位为勒克斯 (lx) ,是入射到单位面积表面上的总光功率。光功率的单位为流明 (lm) ,是单位时间内光源发出的可见光总量的量度。
料箱底部照度 |
相机到箱子顶部距离 |
|||||
|---|---|---|---|---|---|---|
600 毫米 |
800 毫米 |
1100 毫米 |
1400 毫米 |
1700 毫米 |
1900 毫米 |
|
~300 lx |
||||||
~1000 lx |
||||||
小技巧
您如果希望在您的PC上对3D和/或2D设置进行基准测试(benchmark),您可以从YML文件加载设置并运行 ZividBenchmark.cpp 示例。您可以打开 示例 ,然后选择C++标题来获取说明。
Manually tune 2D settings
If automatic tuning or the look-up table does not provide sufficient 2D quality, you can manually tune the color settings by adjusting the color balance and gamma parameters. Gamma correction can be used to either darken or brighten the image. The color channel parameters makes the color image look more natural. We recommend using our projector as a flash when capturing 2D images. IN this case, you do not need to adjust the color balance. If you choose to capture without the projector, you need to re-tune the white balance. We explain how to do this in Color Balance(色彩平衡) article.
For an in-depth tutorial on how to optimize for colors, see 优化彩色图像.
测试2D设置
To test 2D settings, you can either use the 2D capture mode in Zivid Studio or run our code sample.
可通过以下操作在Zivid Studio中导入设置:
点击 File → Import Capture Settings
导航到设置文件的位置
点击Open
小技巧
将YML文件直接拖放至Zivid Studio界面也可以导入相机的3D设置 - 该功能自Zivid SDK 2.5起可以使用。
也可以使用Zivid SDK加载设置。
Using our code sample, you can provide the path to the 2D acquisition settings YML file as an argument.
python capture_2d_with_settings_from_yml.py <path-to-2d-settings.yml>
The sample load the 2D settings, capture an image, displays it, and saves it.
user_options = _options()
camera = app.connect_camera()
settings_2d = zivid.Settings2D.load(user_options.path)
with camera.capture(settings_2d) as frame_2d:
    image = frame_2d.image_rgba()
    rgba = image.copy_data()
    display_rgb(rgba[:, :, 0:3], title="RGB image", block=True)
    image_file = "Image.png"
    print(f"Saving 2D color image to file: {image_file}")
    image.save(image_file)
备注
我们在低环境光(~300 lx)和高环境光(~1000 lx)条件下测试了我们为上述典型场景推荐的3D和2D设置。我们已经完成了我们在相机选择器章节中指定的距离范围,以及场景中的所有项目的测试。因此,我们相信这些设置将适用于属于这些类别的大多数场景。但是,如果您确切地知道场景中的项目是什么,并且您是专业的相机使用者,则可以手动配置设置以针对您的情况来优化它们。您可以查看 捕获高质量的点云 来了解如何做到这一点。
在下一章节中,我们将介绍如何通过使用多线程来 优化机器人循环时间 。