Region of Interest(感兴趣区域)
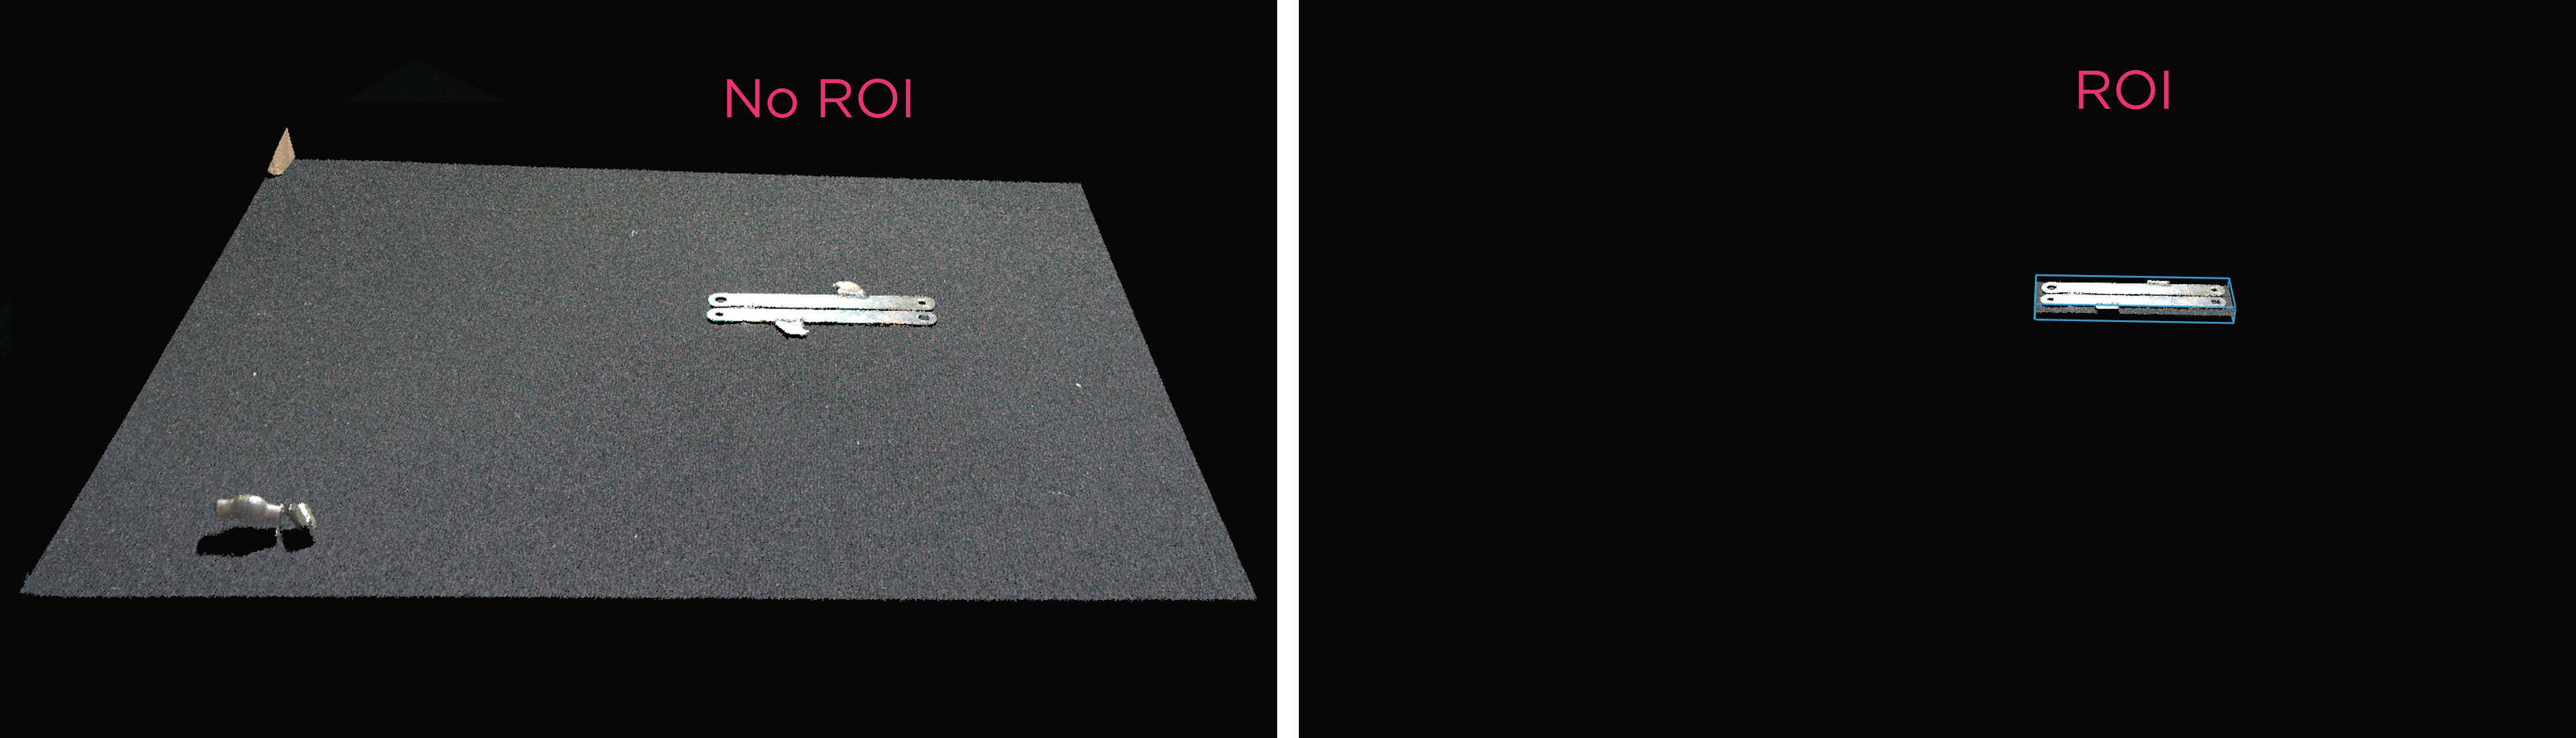
感兴趣区域 (ROI) 会移除用户定义感兴趣区域之外的点,从而缩短捕获时间。ROI 可以是 3D 中的框、相机的 z 值范围,或两者兼而有之。
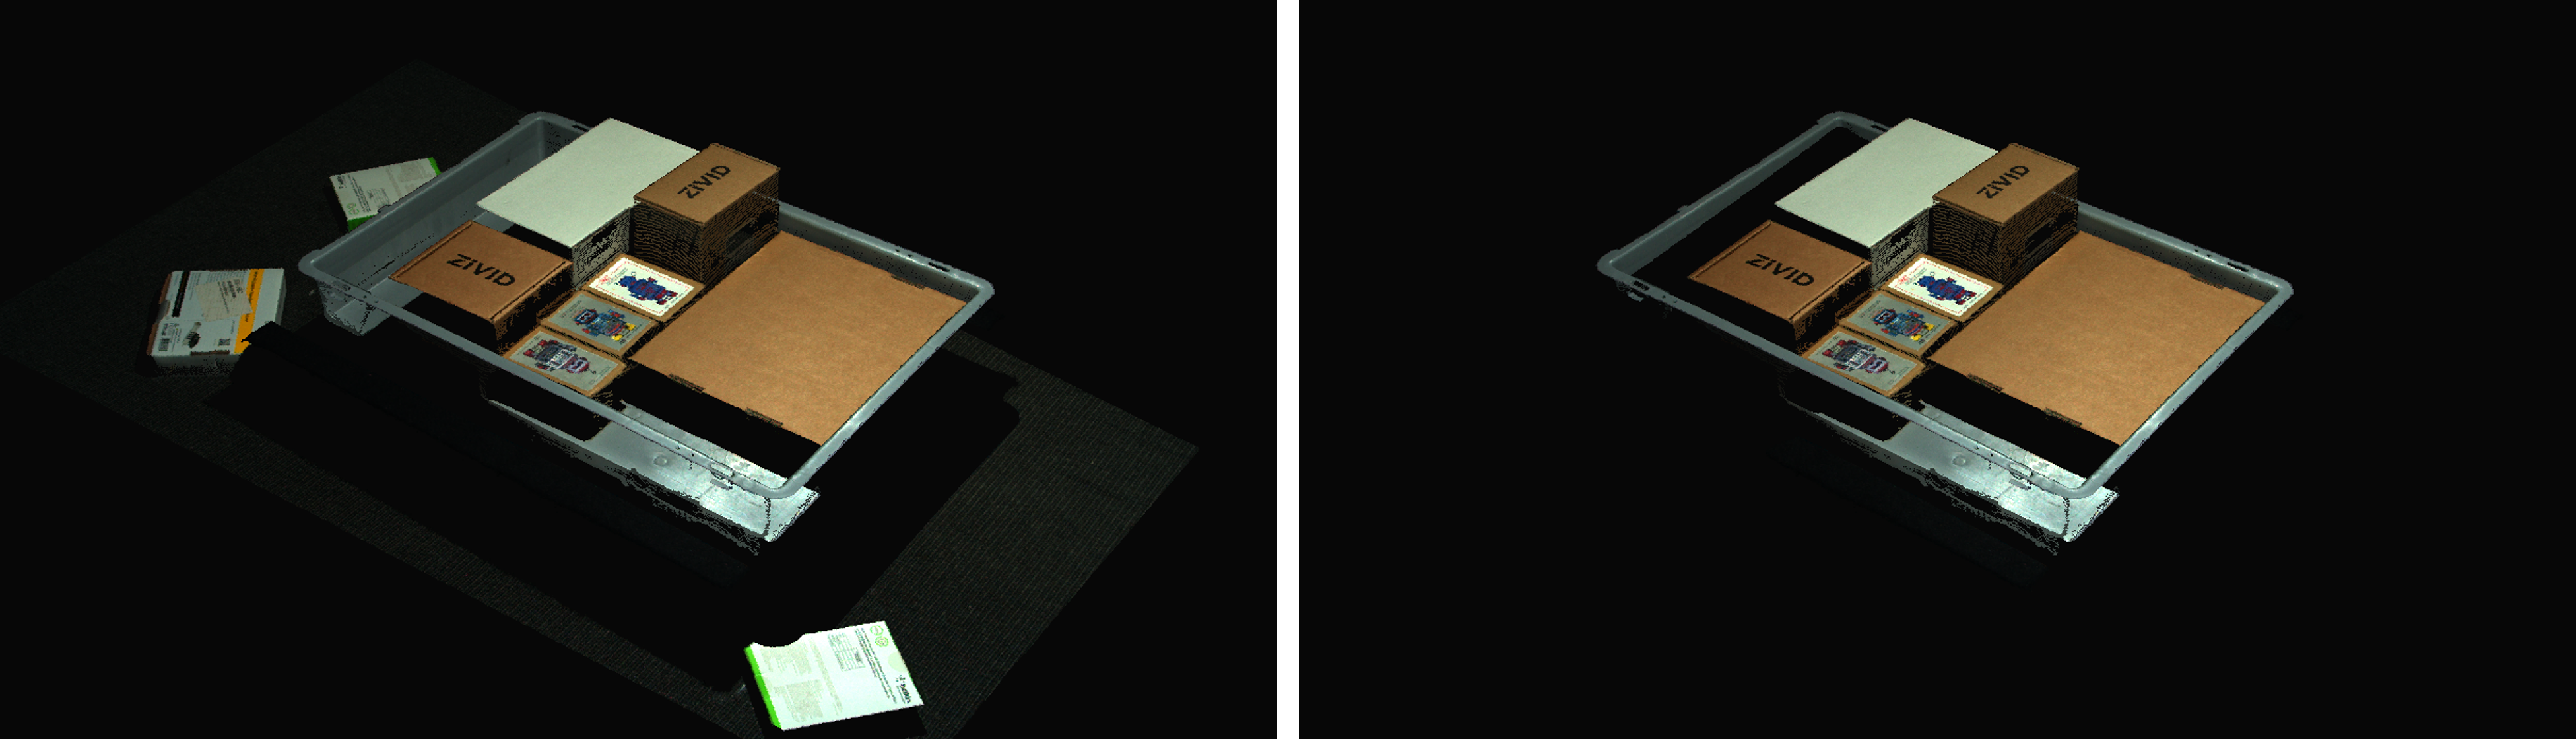
如果应用程序只需要一部分视野而不是整个场景,那么 ROI 功能会很有用。例如,如果您想要检测料箱中的零件,相对于针对真个场景进行检测,您的检测算法可能会受益于搜索空间减少的料箱*内部*空间。
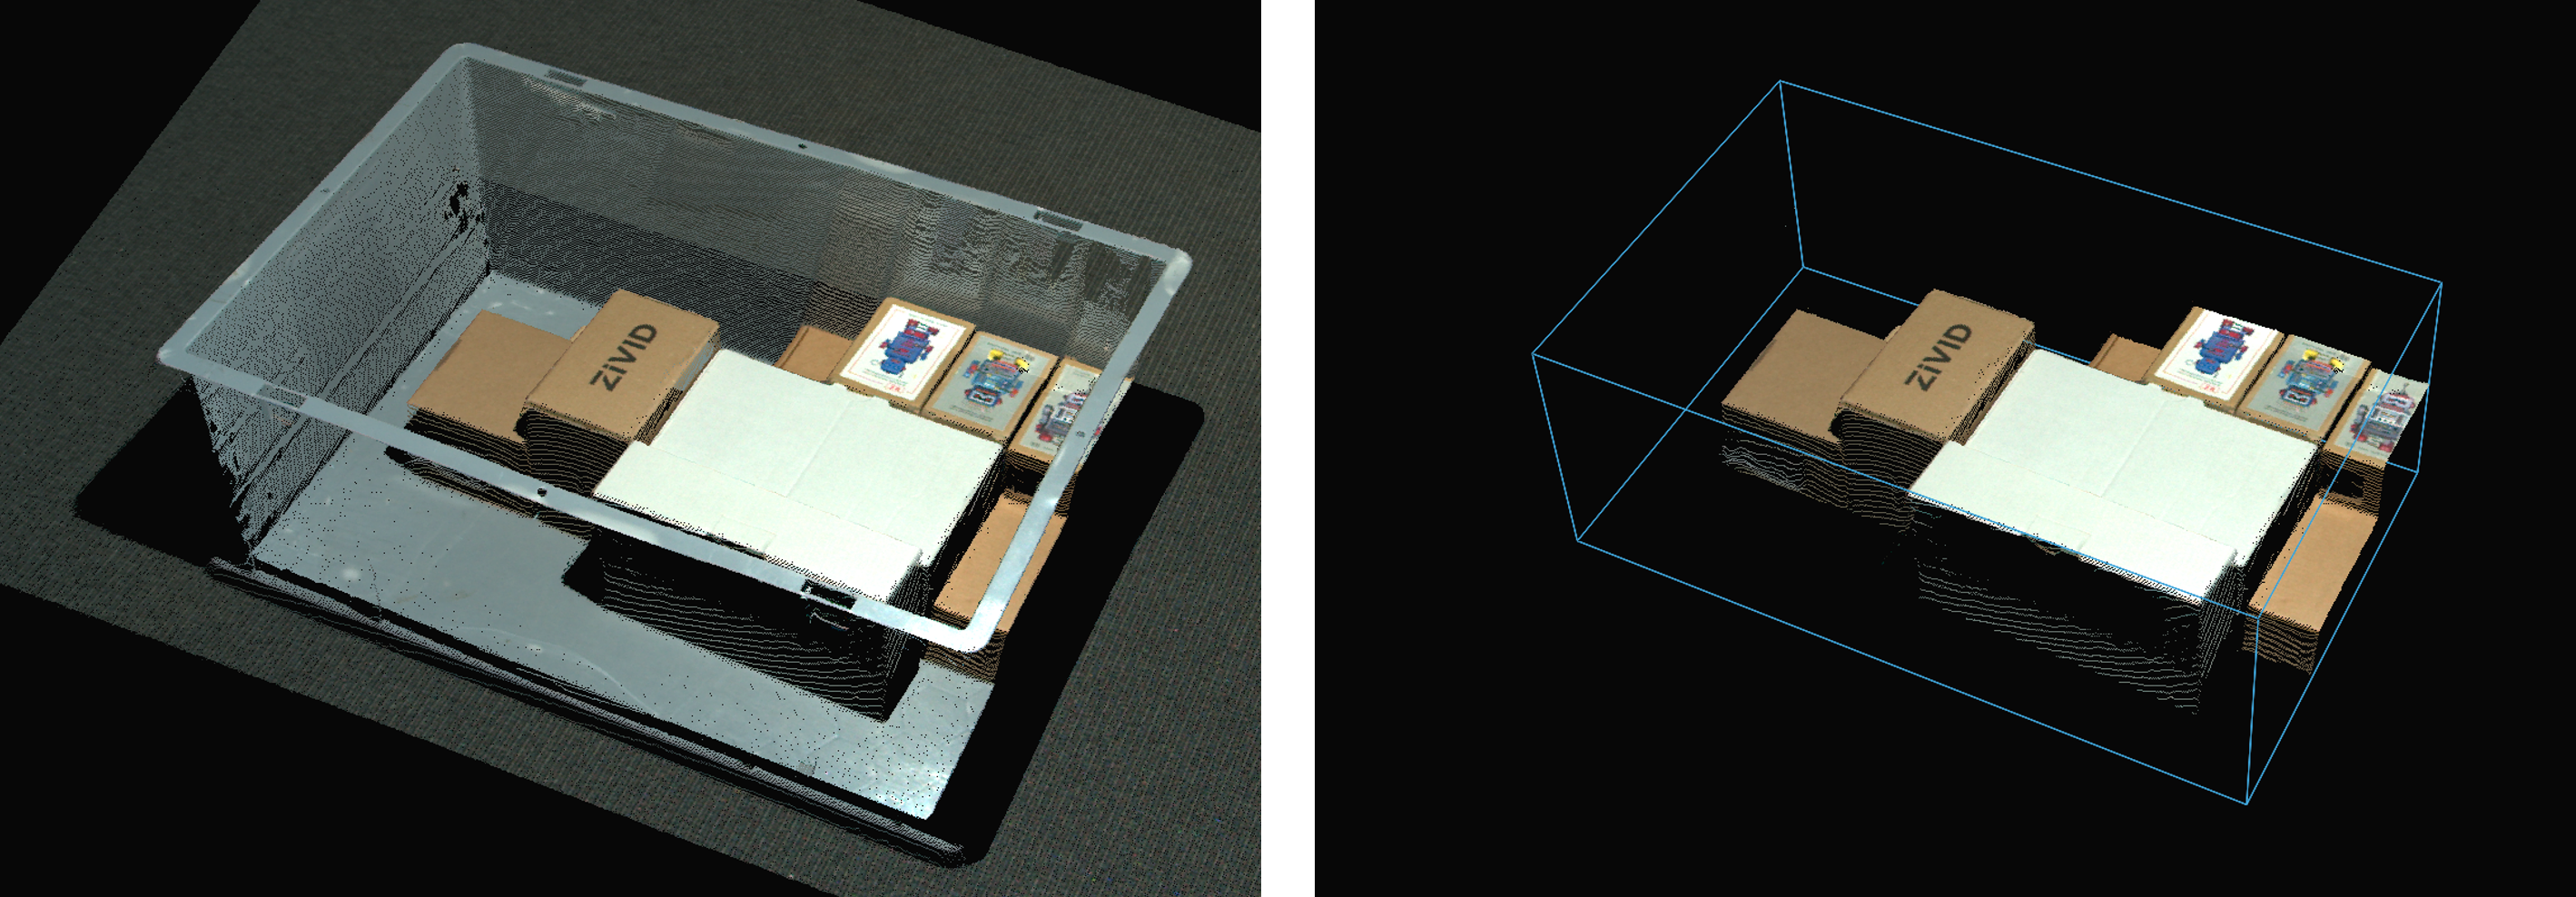
盒子定义的 ROI
ROI 框过滤的好处
ROI 框过滤提供以下一种或多种优势:
- 减少捕获时间(相同点云质量)
需要传输、复制和处理的数据更少;通过以下一项或两项操作可以显著提高速度:
性能较低的 GPU (Intel/Jetson)
繁重的点云处理工作(Omni/Stripe、5MP 分辨率、多采集 HDR)
- 更好的点云质量(相同的捕获时间)
可以使用不同的设置;例如:
使用 Stripe/Omni 引擎代替 Phase
使用 Sampling::Pixel 实现更高分辨率
在 HDR 中添加更多采集
- 更便宜的 GPU(相同的捕获时间)
由于需要处理的数据较少,因此您可以使用诸如以下的硬件:
使用 Intel/Jetson 代替 Nvidia 独立显卡
- 更便宜的网卡(相同的捕获时间)
由于需要传输的数据较少,您可能不会使网络饱和,从而可以使用例如:
1G 而非 2.5G/10G 网卡
2.5G 而非 10G 网卡
参数 Settings::RegionOfInterest::Box 允许将 ROI 设置为过滤框。三个点(point) 定义了框的底面,两个范围(extent) 定义了高度:
这三个点(
Box::PointO、Box::PointA、Box::PointB)在 3D 相机参考系中给出,并定义 ROI 框的基平面。系统会自动找到第四个点,将基平面绑定到坐标系中并完成矩形的设定。三点依次构成两个向量:点 O 是向量的原点。
点 A 定义了从原点生成的第一个向量。
点 B 定义了从原点生成的第二个向量。
两个范围(
Box::Extents)将基坐标系挤压成一个框。由点 O、点 A 和点 B 定义的向量 OA 和 OB 的叉积给出了范围(extent)的方向。因此,负范围(extent)将沿叉积的相反方向延伸。
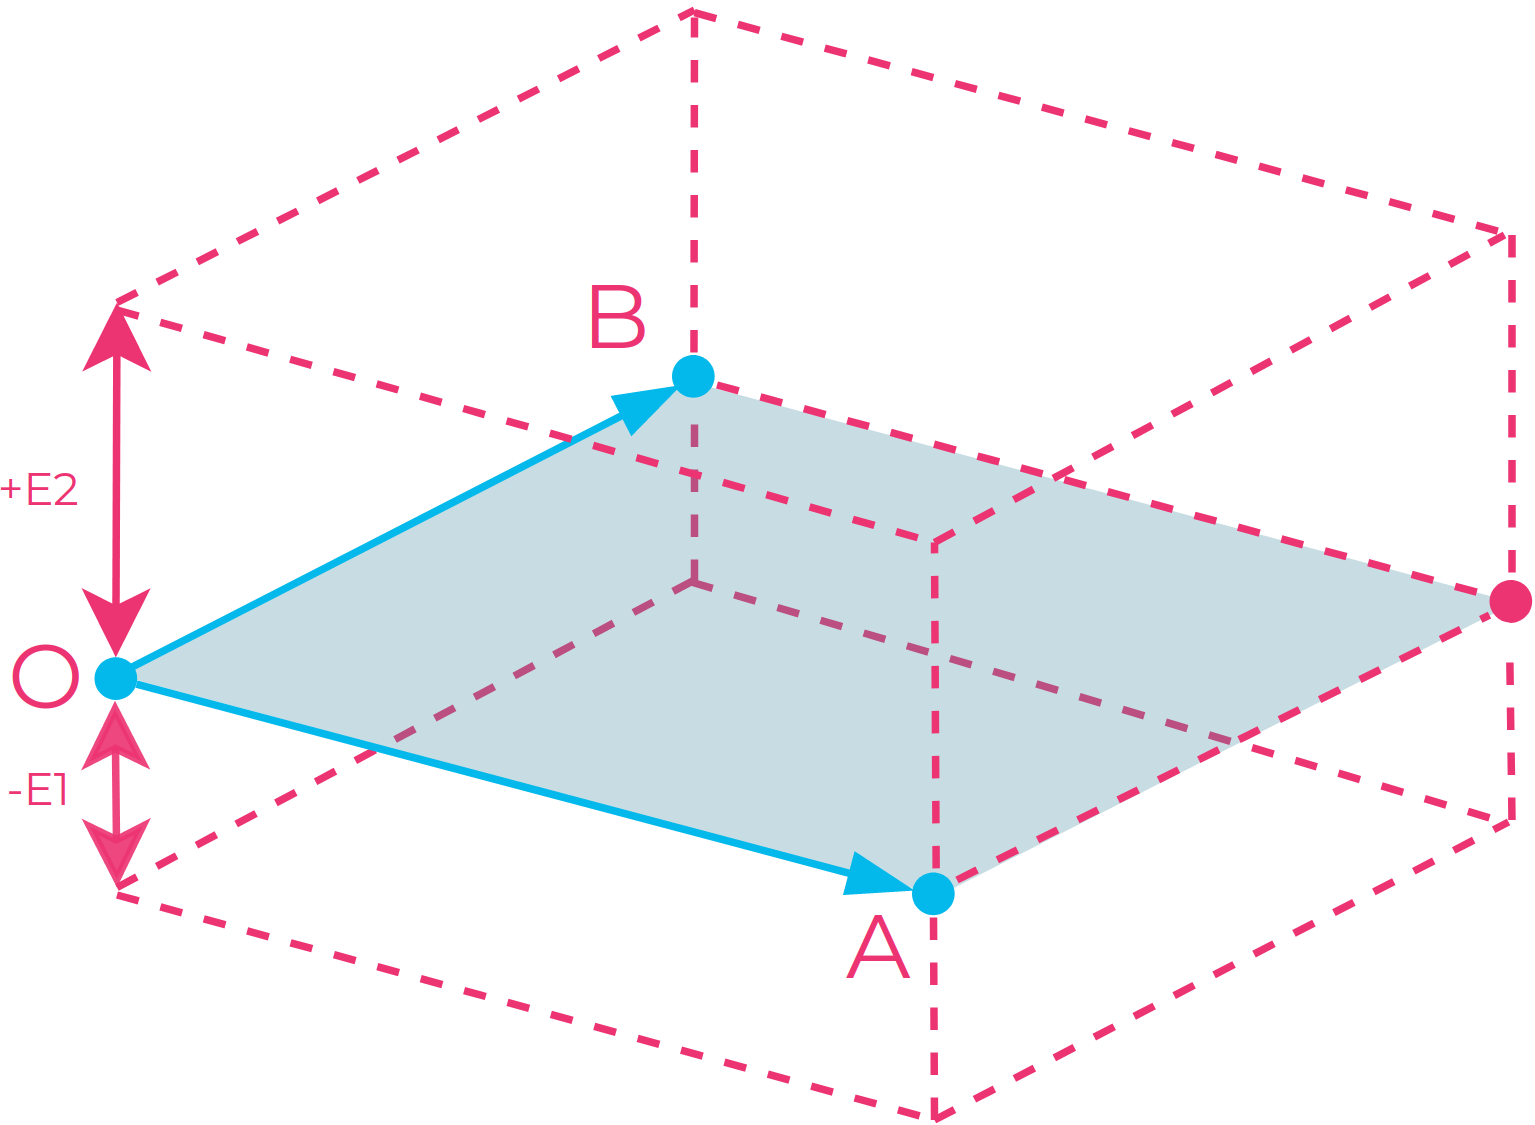
ROI 盒的示意图:三个点(O、A 和 B)定义了框的底部平面,并自动选择第四个点来完成矩形。然后可以向上 (+E2) 和向下 (-E1) 拉伸由四个点定义的有界平面以完成框的定义。
备注
ROI 盒的基坐标系 没有 被限制为一个角垂直的矩形。因此可以定义一个平行四边形作为底面,并定义一个平行六面体的 ROI 盒。
小技巧
请遵循以下经验法则来选择三个定义点:
在任意的一个角落选择点 O。
选择点 A,使点 B 位于相对于点 A 逆时针 方向的位置。
在点 A 逆时针方向的某个位置选择点 B。
这样,范围(extents)将具有朝向相机的正方向。
表现
ROI 框过滤可以显著减少捕获时间。使用下表中的一个或多个组件时,大部分时间节省都集中在点云处理上。对于低曝光时间(~<3000 us)的设置,还可以节省额外的捕获时间。
节省时间 |
GPU |
Vision Engine |
Sampling::Pixel |
HDR |
|---|---|---|---|---|
显著的 |
低端英特尔和 Jetson |
Omni |
全分辨率 |
采集越多,节约的时间越多 |
中等的 |
高端英特尔和 Jetson |
Stripe |
2x2 subsampled |
|
最小的 |
Nvidia 独立显卡 |
Phase |
4x4 subsampled |
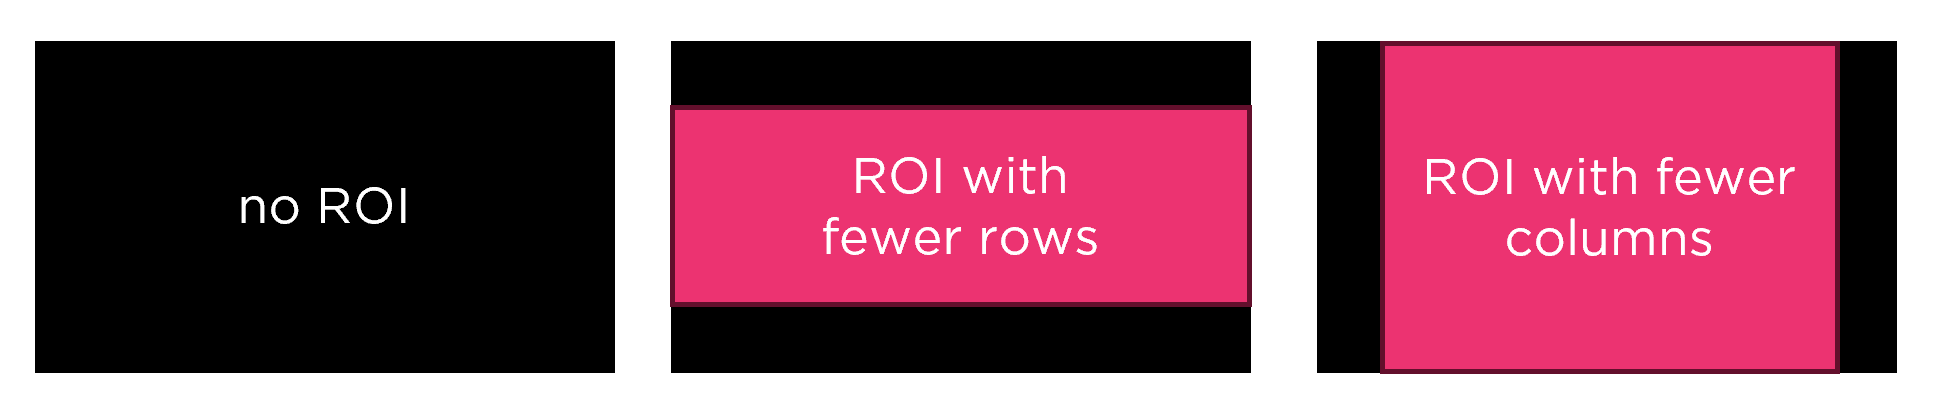
ROI 越小,捕获时间越短。与像素列较少的 ROI 相比,像素行较少的 ROI 的捕获速度稍快。
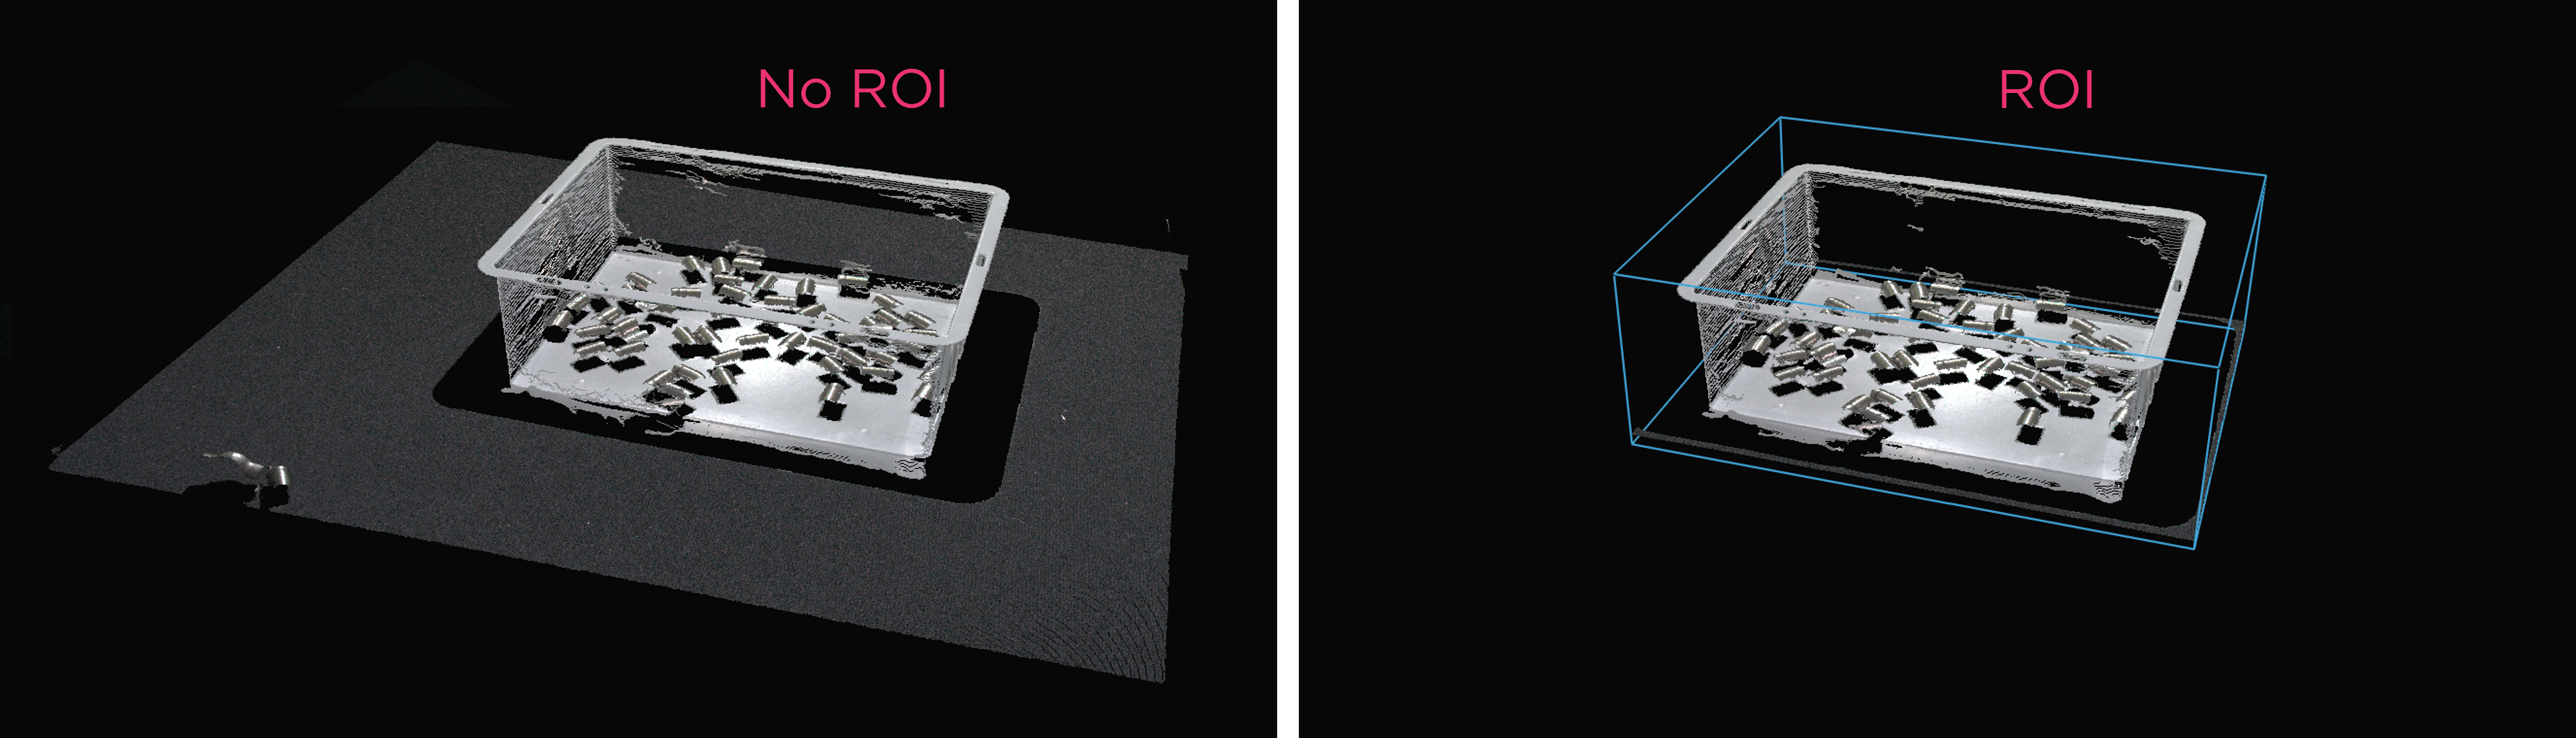
机器人拾取示例
下面是使用低端 PC(配备 Intel Iris Xe 笔记本电脑集成 GPU 和 1G 网卡)进行大规模点云处理的例子,在此场景中 ROI 框区域过滤技术极为有益。
想象一下,一个机器人用固定安装的 Zivid 2+ MR130 相机从 600 x 400 x 300 毫米的箱子中拾取物品。为了给机器人留出足够的空间,相机安装在距离箱子顶部 1700 毫米的位置,提供大约 1000 x 800 毫米的视场。当相机安装在这个距离时,大部分视场都在 ROI 之外,因此可以从每一侧裁剪约 20/25% 的像素列/行。从下表可以看出,使用 ROI 框过滤可以显著缩短捕获时间。
Zivid 2 -Presets |
采集时间 |
捕获时间 |
||
|---|---|---|---|---|
未设置 ROI |
设置了 ROI |
未设置 ROI |
设置了 ROI |
|
Manufacturing Specular |
0.64 s |
0.64 s |
2.1 s |
1.0 s |
Consumer Goods Quality |
0.90 s |
0.88 s |
5.0 s |
3.0 s |
机器人引导/装配示例
这是一个使用低端 PC(配备 Nvidia MX 250 笔记本 GPU 和 1G 网卡)进行大规模点云处理的例子,在此场景中 ROI 框区域过滤技术极为有益。
在某些机器人引导应用(如钻孔、焊接、涂胶)或装配应用(如插销入孔)中,相对于相机在成像距离下的视场(FOV),感兴趣的区域(ROI)可能非常小。在这种情况下,ROI 往往仅包含点云中 5-10% 的点,利用 ROI 框过滤可以大幅减少数据采集时间(见下表)。
Zivid 2 - Presets |
采集时间 |
捕获时间 |
||
|---|---|---|---|---|
未设置 ROI |
设置了 ROI |
未设置 ROI |
设置了 ROI |
|
Manufacturing Specular |
0.65 s |
0.63 s |
1.3 s |
0.7 s |
Manufacturing Small Features |
0.70 s |
0.65 s |
5.0 s |
0.8 s |
将 ROI 框应用为后处理
The ROI box filter can also be applied as a post-processing step on an already-captured point cloud, using PointCloud::maskByRegionOfInterest() (in-place) or PointCloud::maskedByRegionOfInterest() (returns a new copy).
This avoids the need to recapture when the ROI changes.
See the ROIBoxViaArucoMarker and ROIBoxViaCheckerboard samples for examples.

std::cout << "Creating a masked version of the point cloud based on ROI" << std::endl;
const auto roiPointCloud = pointCloud.maskedByRegionOfInterest(roiSettings);

std::cout << "Displaying the ROI-filtered point cloud" << std::endl;
visualizeZividPointCloud(roiPointCloud);
using (var roiPointCloud = pointCloud.MaskedByRegionOfInterest(roiSettings))
{
    Console.WriteLine("Displaying the ROI-filtered point cloud");
    VisualizeZividPointCloud(roiPointCloud);
}
这在手臂安装的场景中尤其有用,可以在机器人基坐标系中一次性定义工作空间 ROI 框,并将其应用于每次捕获,而无需考虑相机的视角。StitchUsingRobotMountedCamera 示例演示了这一点:将每个点云变换到基坐标系,然后使用固定的工作空间 ROI 框对其进行掩膜:
const auto smallWorkspaceRoiBox = Zivid::Settings::RegionOfInterest::Box{
    Zivid::Settings::RegionOfInterest::Box::Enabled::yes,
    Zivid::Settings::RegionOfInterest::Box::PointO{ -150, 300, 50 },
    Zivid::Settings::RegionOfInterest::Box::PointA{ -150, 600, 50 },
    Zivid::Settings::RegionOfInterest::Box::PointB{ 150, 300, 50 },
    Zivid::Settings::RegionOfInterest::Box::Extents{ -75, 40 },
};
    auto pointCloud = frame.pointCloud();
    pointCloud.transform(baseToCameraTransform);
    pointCloud.maskByRegionOfInterest(workspaceRoiBox);
var smallWorkspaceRoiBox = new Zivid.NET.Settings.RegionOfInterestGroup.BoxGroup
{
    Enabled = true,
    PointO = new Zivid.NET.PointXYZ { x = -150, y = 300, z = 50 },
    PointA = new Zivid.NET.PointXYZ { x = -150, y = 600, z = 50 },
    PointB = new Zivid.NET.PointXYZ { x = 150, y = 300, z = 50 },
};
smallWorkspaceRoiBox.Extents = new Zivid.NET.Range<double>(-75, 40);
    var pointCloud = frame.PointCloud;
    pointCloud.Transform(baseToCameraTransform);
    pointCloud.MaskByRegionOfInterest(workspaceRoiBox);
small_workspace_roi_box = zivid.Settings.RegionOfInterest.Box(
    enabled=True,
    point_o=[-150, 300, 50],
    point_a=[-150, 600, 50],
    point_b=[150, 300, 50],
    extents=(-75, 40),
)
    point_cloud = frame.point_cloud()
    point_cloud.transform(base_to_camera_transform)
    point_cloud.mask_by_region_of_interest(workspace_roi_box)
深度范围定义的 ROI
参数 Settings::RegionOfInterest::Depth 允许用户将 ROI 用作根据相机坐标系的一个 z 值范围来进行过滤,以下阈值范围内的点才会被保留:
最小深度阈值(
RegionOfInterest::Depth::minValue)最大深度阈值(
RegionOfInterest::Depth::maxValue)
如果场景的前方或后方有需要过滤的点,那么这种方式将会很有用。请注意,z 值是基于相机参考系给出的,即垂直于相机方向进行过滤。因此,如果相机垂直安装在您要拍摄的物体上,效果最佳。
表现
ROI 作为深度范围设置不会减少捕获时间。它是在后期处理阶段应用的,并且会增加几毫秒的捕获时间。然而,它是直接在 GPU 上应用的,因此可能比第三方实现更快。
ROI 作为深度范围设置会在每次 3D 捕获中增加以下处理时间:
查看 感兴趣区域(ROI)的使用教程 以获得有关在您的应用中使用 ROI 的更深入的教程。
版本历史
SDK |
变更 |
|---|---|
2.18.0 |
Added |
2.12.0 |
ROI 框过滤现在可以减少捕获时间。 |
2.9.0 |
新增了 ROI API。 |