Getting the Right Exposure for Good Point Clouds
Introduction
Zivid cameras have four acquisition settings that affect the exposure:
In this tutorial, we will use the SNR map in Zivid Studio to assess the quality of the point cloud as we find values for our acquisition settings. While we tune the settings, we will explore considerations to take when using different values for exposure variables.
Signal-to-Noise Ratio (SNR)
The SNR map in Zivid Studio shows the signal-to-noise ratio of each pixel in the image. You can read more about SNR in SNR Value, but the essence is that the higher the SNR, the better the quality of the point cloud.
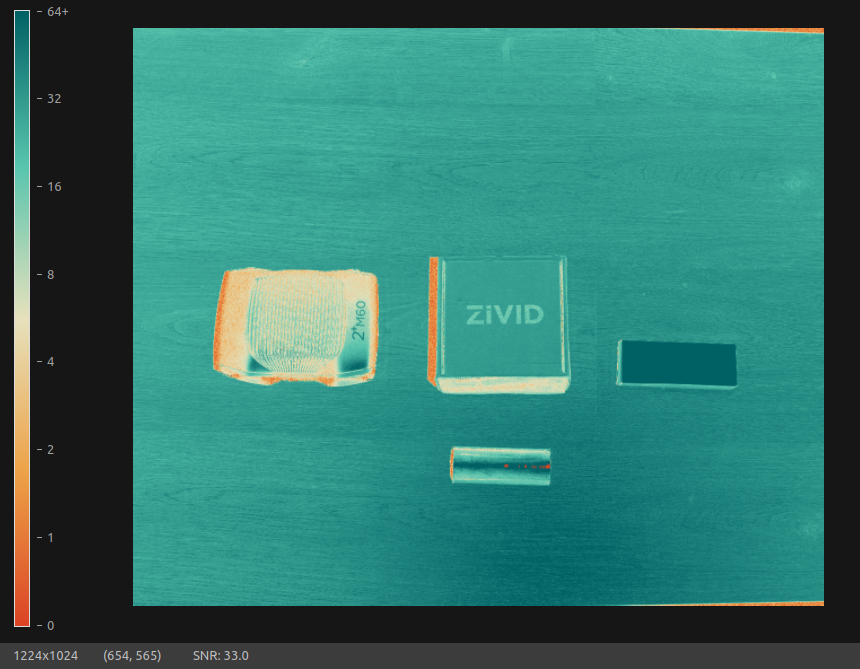
The SNR map in Zivid Studio, with the SNR value of a chosen pixel displayed in the lower left corner.
Regions in dark green have high SNR and regions in dark orange have low SNR, as seen in the above image. The goal is therefore to find the acquisition settings so as many pixels as possible lie within a green or dark green region.
In general, there are four main factors that affect the SNR:
Working distance
Ambient light
The acquisition settings we can control, the working distance and ambient light we can partly control, but the optical properties of the scene are typically fixed. Take the below scene as an example.
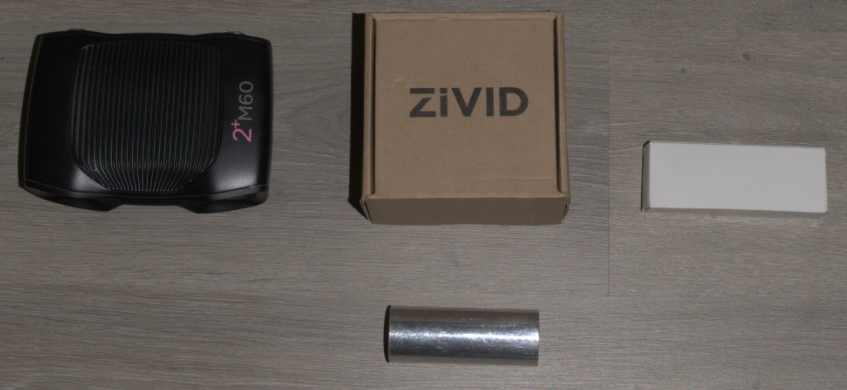
The box to the right has a white and diffuse surface, the camera to the left has a black and glossy surface, while the box in the middle is somewhere between. Lastly, the cylinder in the bottom has a shiny and reflective surface.
As the camera uses its projector as signal source for the point cloud generation, it favours areas with optical properties that easily reflect this signal back to the camera. In the above image, the white box would therefore be easiest to get high SNR on, while the black and glossy camera would be the hardest.
Relating this to the acquisition settings, which control the amount of light that reaches the camera, a brighter object would require lower exposure than a darker object, as it typically absorbs less light. Similarly, a diffuse object may require lower exposure than a specular object, as the specular object may reflect more light away from the camera, based on its shape and form. The sides of the cylinder in the above image is an example of this.
Note
Points with a low SNR are not necessarily bad, and may still remain true to the actual surface. Evaluate the point cloud together with the SNR map to determine if the quality is acceptable for your application.
A challenge for many vision systems are scenes with a high dynamic range, meaning it contains both bright and dark surfaces. They will typically expose well on one surface, but not on the other. In the above example, the white box would require low exposure as to not reflect too much light back and saturate the camera. On the other hand, the black and glossy camera would require high exposure to get enough light back to the camera.
Tuning Acquisition Settings
Zivid cameras have a high dynamic range, meaning they can cover both bright and dark scenes in a single acquisition. This means you will typically not need much manual tuning, and the Presets will often be sufficient. The following tutorial is therefore only intended when the presets do not give you the desired results.
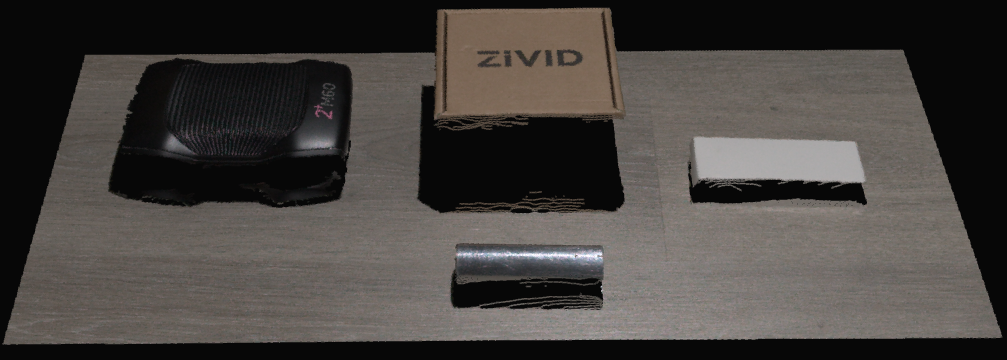
The camera can capture both the bright and dark surfaces in a single acquisition.
For the projector brightness and gain we typically always use the following:
Projector brightness: Max available
Gain: Min available
Tuning acquisition settings is therefore mainly about finding the right exposure time and aperture (if the camera supports aperture adjustment).
Step 0: Vision engine
The chosen Vision Engine greatly affects dynamic range of a single acquisition, and therefore also the SNR. Engines like Stripe and Omni have a higher dynamic range than for example Phase, and could therefore use a single acquisition where Phase would potentially need two. Before tuning acquisition settings, select the engine that best suits your needs.
Step 1: Default settings
The default acquisition settings are often a good starting point, and will set reasonable values for the exposure variables. You can find the default settings for your specific camera model in Default Settings, or by going straight into Manual Mode when starting Zivid Studio. This will give settings for a single acquisition. Remember to keep the same engine as selected in the previous step.
Do a capture with the default settings.
Tip
Turn off the Noise Repair filter when using the SNR map to assess the quality of the point cloud, as this filter will affect the SNR.
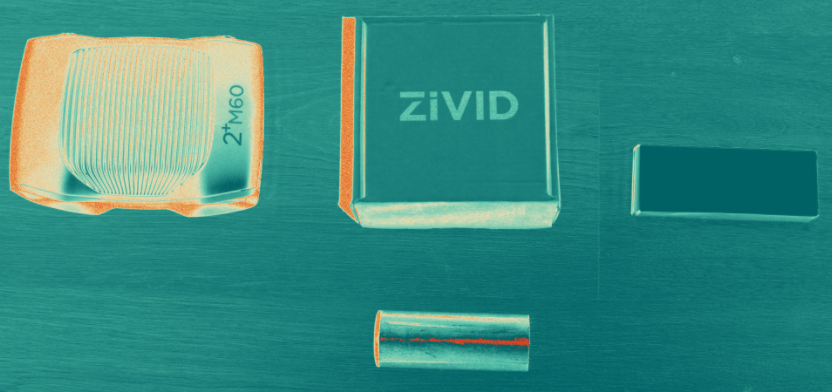
SNR map from default acquisition settings.
Check the SNR map in Zivid Studio to see how the well exposed the scene is. Look for orange and dark orange areas, as that indicates low SNR and possibly missing data. This can either be due to overexposed areas, or underexposed areas.
In the above example, we see an orange line across the cylinder. Since the cylinder is highly reflective, we can assume that we are overexposed in this area. On the other hand, we also see orange spots on the camera to the left. Since the camera is dark, we can assume that we are underexposed in this area. You can use a 2D capture with the same acquisition settings, together with the SNR map, to verify which areas are prone to overexposure (high pixel intensities) or underexposed (low pixel intensities).
Note
Areas that are occluded, like the left side of the middle box in the above image, will naturally have low SNR as the projector light does not reach the camera. There is not much we can do about these areas, other than repositioning the camera if possible.
Step 2: Adjusting for highlights
We will start by adjusting the acquisition for the highlights in the scene, like the cylinder in the above example. Lower the exposure time until the orange areas subject to overexposure start appearing more green. If necessary, lower the aperture as well (higher f-number), assuming the camera supports aperture adjustment.
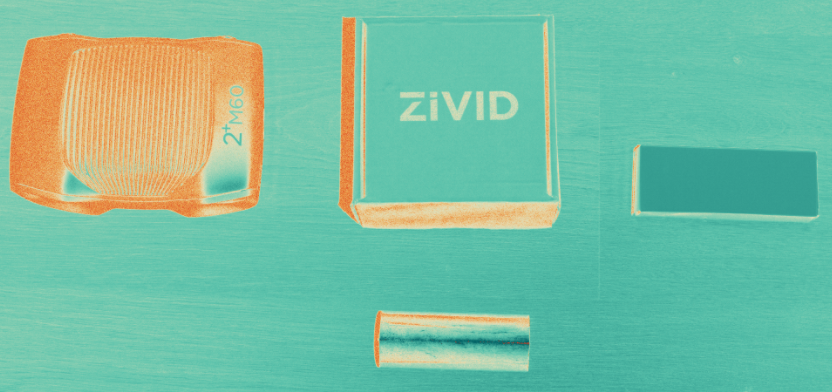
SNR map for the highlight acquisition.
Notice that the SNR on all other regions got lower, but that we got signal on the previously overexposed region of the cylinder. In this case, we are now getting data on a region we were previously not. We call this the highlight acquisition as it is optimized for the bright areas in the scene.
But what about the rest of the scene, in particular the darker lowlight areas? We cannot adjust for both highlights and lowlights in a single acquisition, but will do so with another separate acquisition.
Step 3: Adjusting for lowlights
Add a new acquisition in Zivid Studio with default settings, and disable the previous acquisition. We will use this acquisition to adjust for the lowlight areas in the scene, like the dark camera or the upper/lower sides of the cylinder in this example. Increase the exposure time until the orange areas subject to underexposure start appearing more green.
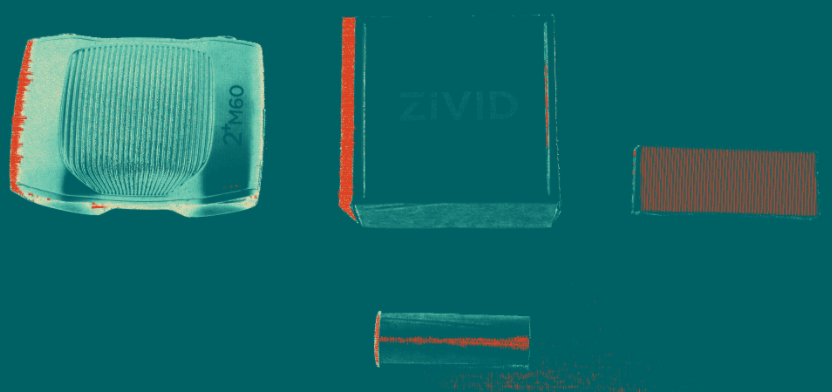
SNR map for the lowlight acquisition.
Notice that the SNR got higher overall, except on the highlight regions. With this acquisition, we are exposing well for the dark camera and cylinder sides, but not on the cylinder top or the white box, as they reflect too much light back.
How can we now get both the highlights and the lowlights?
Step 4: HDR
Enable both acquisitions in Zivid Studio to do a High Dynamic Range (HDR) capture. This will combine the two acquisitions to get the best of both, and expose well for both highlights and lowlights.
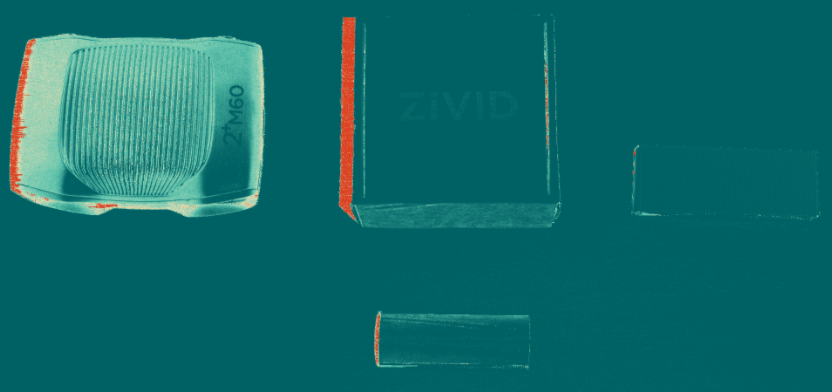
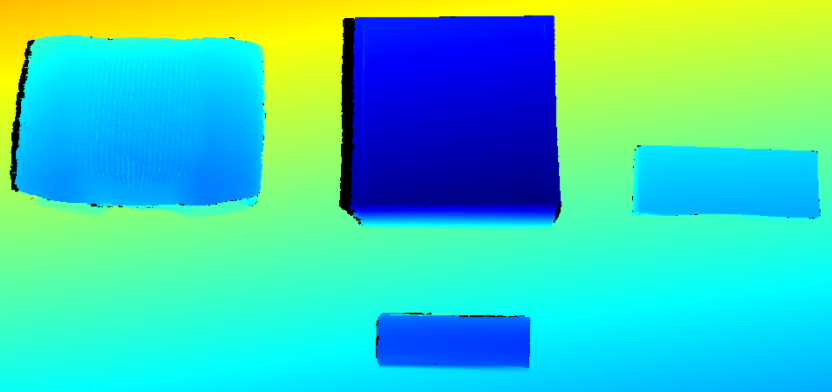
SNR map (top) and depth map (bottom) for the HDR capture.
If you still have regions with SNR around zero, modify one of the existing acquisitions or add another one for that specific region. Remember that the optical properties of that region determine if you need to adjust for a highlight or lowlight.
Check regions with low SNR in the point cloud to see if the noise level is acceptable for your application. Even points with SNR close to zero can have high precision, but this must be evaluated in the point cloud.
In the above example, we ended up with two acquisitions with following settings on a Zivid 2+ M130:
Setting |
Acquisition 1 |
Acquisition 2 |
|---|---|---|
Exposure time |
1677 µs |
30 000 µs |
Aperture |
f/2.83 |
f/2.83 |
Brightness |
2.5 |
2.5 |
Gain |
1.0 |
1.0 |
Additional considerations
The acquisition settings are the main factors that affect how well we can expose the scene, and subsequently how good SNR we can get, but they are not the only ones. Additionally, there are trade-offs between the acquisition settings that should be considered for the application.
In the below dropdown we outline some of the additional considerations when getting the right exposure for good point clouds.
Additional considerations
Exposure time vs. aperture trade-off
Note
Zivid 3 does not have an adjustable aperture. The following information about aperture tuning applies only to Zivid 2 and Zivid 2+ cameras.
We typically use either exposure time or aperture to control the SNR, but they have their trade-offs.
Changing exposure time has little compromise on the point cloud quality, but it will increase the time it takes to capture. If you prioritize speed, consider increasing aperture instead of exposure time.
On the other hand, changing aperture has little compromise on the capture time, but it may affect the point cloud quality in certain regions. Aperture determines how well focused the images are, where blurry images cause distortion in contrast-heavy areas of the scene. Additionally, if you have multiple acquisitions with different apertures, there will be a time-penalty when switching aperture due to the mechanically moving iris. Evaluate the focus of the images, and consider using the same aperture values for all acquisitions.
Sampling mode
The overall exposure of some Zivid camera models depends on the chosen Sampling Pixel. When switching from a subsampled resolution to full resolution, you will need to increase the exposure time or aperture to retain the same SNR. This does not apply to Zivid 2 and Zivid 2+ M130, M60 and L110.
Working distance
The closer the camera is to the scene, the more projector light it will get back. If possible, consider moving closer to the scene if you have low SNR and can’t afford to change other parameters that affect SNR.

SNR is higher when the camera is closer (left) than further (right) to the scene.
Ambient light
Ambient light acts as noise to the camera. Although Zivid cameras are robust against ambient light, it can still affect the SNR towards lower values. If you aim to get the best SNR, consider reducing the ambient light in the scene if possible.

SNR is higher in low ambient light (left) than high ambient light (right).
Surface orientation
As SNR depends on how much projector light is reflected back to the camera, surfaces facing the camera will typically have higher SNR than surfaces facing away. This is especially important for dark and specular surfaces which are challenging to get enough signal on. Consider placing the camera perpendicular to the surface to get the best SNR, and take care to not overexpose the surface.
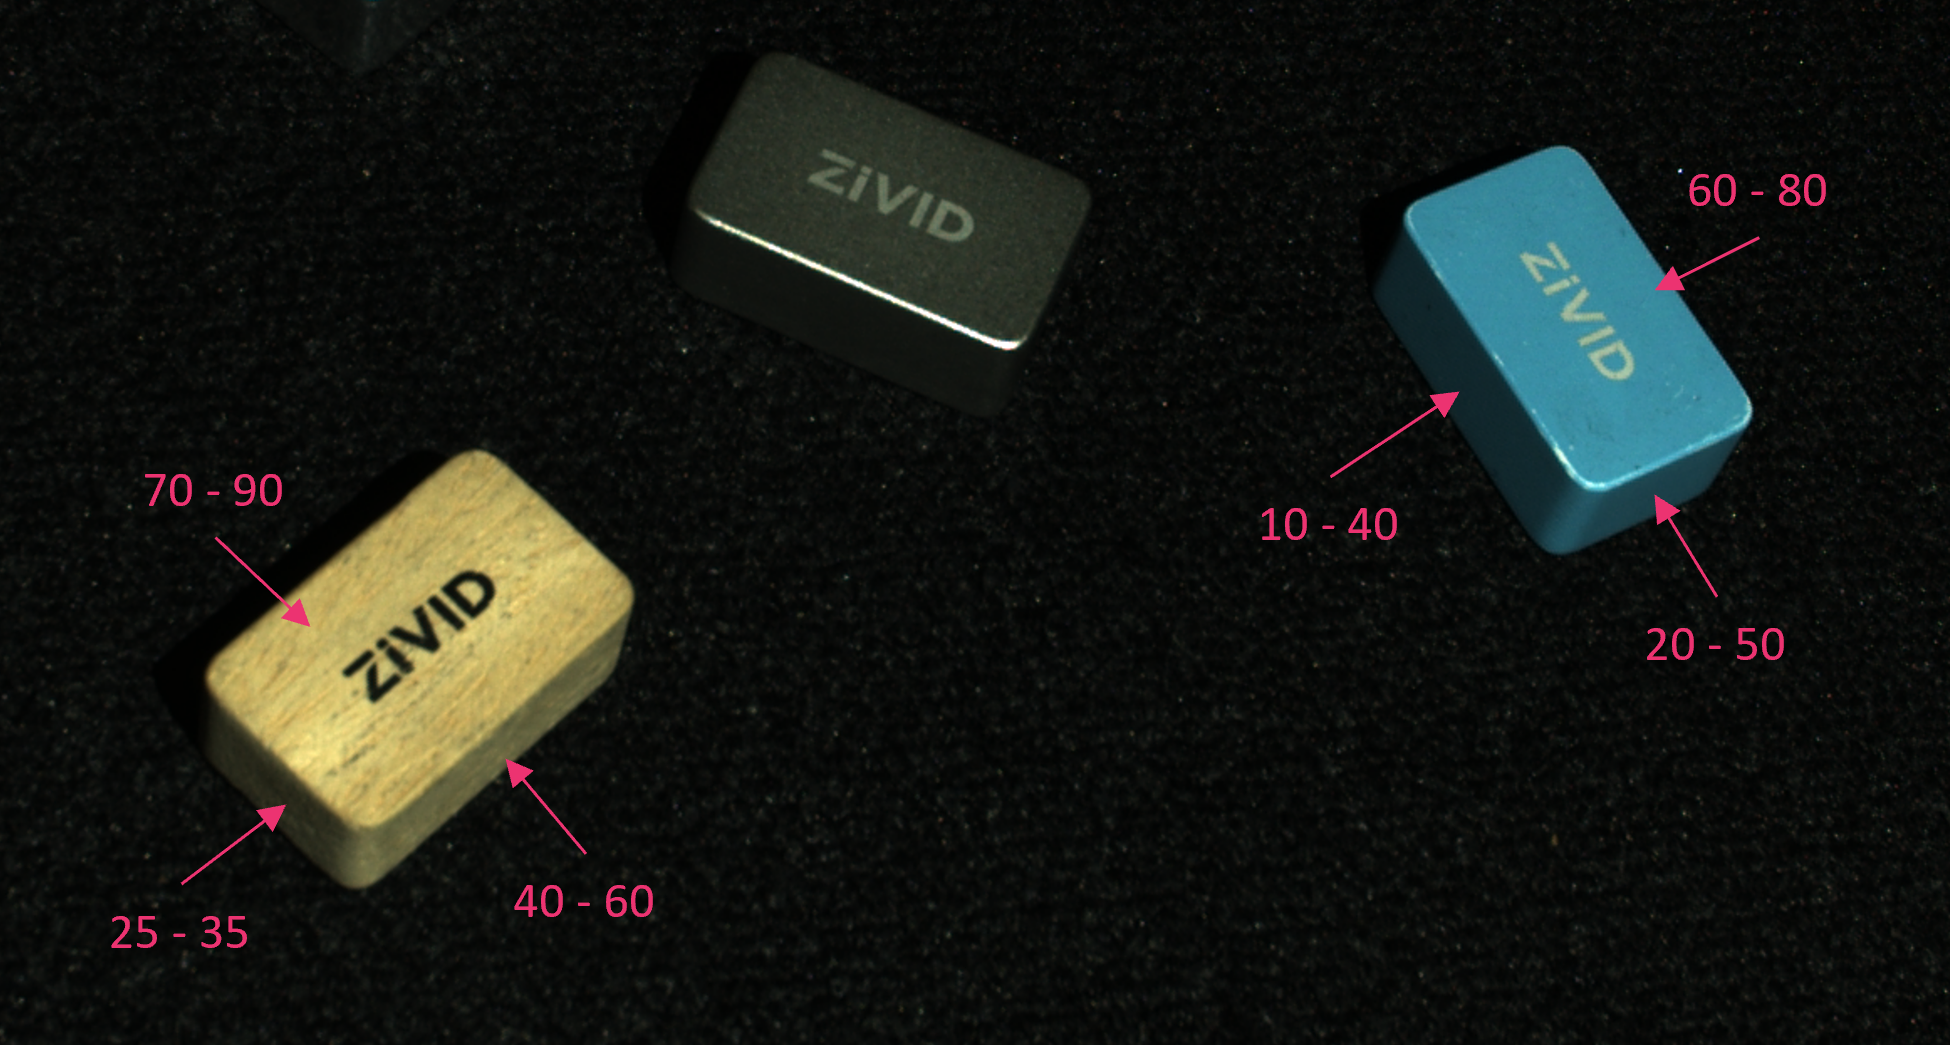
SNR is higher on surfaces facing the camera than surfaces facing away.
Cloned acquisitions
If you have a large time budget, you can clone acquisitions to increase the SNR. This will effectively average out noise in the point cloud at the expense of time.

SNR is lower on a single acquisition (left), higher on two cloned acquisitions (middle), and highest on three cloned acquisitions (right).
Further reading
We now have a good starting point for getting high quality point clouds. Looking at the point cloud quality, you may still discover noise, artifacts or missing data. It is then time to adjust the filters as described in Adjusting Filters.
Version History
SDK |
Changes |
|---|---|
2.14.0 |
Changed method from using histogram to SNR map. |
2.12.0 |
Zivid One+ has reached its End-of-Life and is no longer supported. |