Downsampling Theory
Introduction
이 문서에서는 Zivid 포인트 클라우드를 다운샘플링하는 방법에 대한 이론을 설명합니다. SDK 구현에 관심이 있으시면 Downsample 문서를 참조하세요.
Why Not Keep Every Nth Pixel?
이미지를 다운샘플링할 때 목표는 가능한 한 품질을 유지하면서 이미지 크기를 줄이는 것입니다.
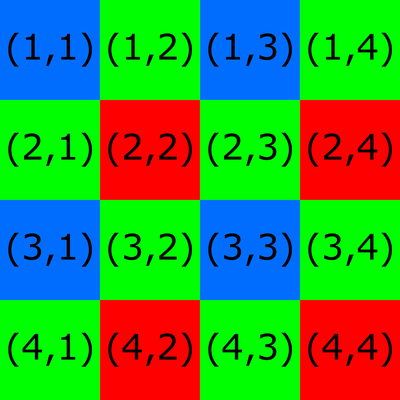
다운샘플링의 일반적인 접근법은 두 번째, 세 번째, 네 번째 등의 모든 픽셀을 유지하고 나머지는 버리는 것입니다. 하지만 센서의 색상 필터 때문에 이 방법이 반드시 이상적인 것은 아닙니다. Bayer filter mosaic 예로 들어 보겠습니다. 4x4 이미지의 바이어 필터 모자이크 그리드는 아래와 같습니다.

참고
Zivid 포인트 클라우드 좌표계는 (0,0)으로 시작합니다.
이 필터를 사용하면 카메라의 각 픽셀이 모자이크의 한 색상 필터에 해당합니다.
픽셀을 하나씩 빼고 유지하는 다운샘플링 알고리즘을 생각해 보겠습니다. 유지되는 모든 픽셀은 동일한 색상 필터에 대응합니다.
(1,1) (1,3) (3,1) (3,3) → Blue
(2,1) (2,3) (4,1) (4,3) → Green
(1,2) (1,4) (3,2) (3,4) → Green
(2,2) (2,4) (4,2) (4,4) → Red
Recommended Downsampling Procedure
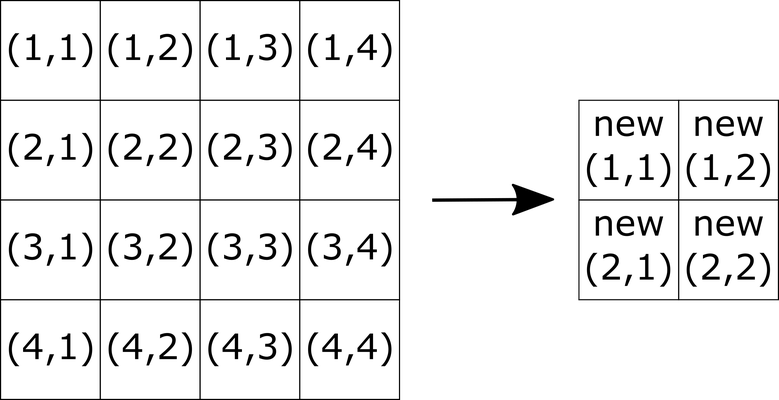
데이터 품질을 유지하려면 모든 픽셀을 고려하여 균일한 픽셀 그리드(2x2, 4x4, 6x6 등)에서 다운샘플링을 수행해야 합니다. 이미지 크기를 절반으로 줄이는 권장 절차는 다음과 같습니다(예: 4x4에서 2x2로).

Downsampling RGB values (color image)
R, G, B 채널별로 초기 이미지의 2x2 픽셀 그리드를 평균하여 새 이미지의 각 픽셀 값을 계산합니다. 예를 들어, 새 R 값을 계산하려면 다음과 같이 합니다.
G 및 B 값에 대해서도 동일한 과정을 반복합니다.
Downsampling XYZ values (point cloud)
포인트 클라우드 데이터의 경우 NaN 값도 처리해야 합니다. R, G, B 색상 값과 마찬가지로, 새 이미지의 X, Y, Z 픽셀 값은 초기 이미지의 모든 2x2 픽셀 그리드를 사용하여 계산해야 합니다. 일반적인 평균 대신 각 좌표에 대해 SNR 가중 평균값을 사용하세요. Zivid에서 SNR을 사용하는 방식에 대한 자세한 내용은 SNR page 를 참조하세요.
픽셀의 X, Y, Z 좌표는 NaN 값을 가질 수 있지만 해당 픽셀의 SNR 은 NaN이 아닌 경우가 있습니다. 픽셀이 좌표 중 하나에 대해 NaN 값을 갖는지 확인하기 위해 기본 검사를 수행하여 이를 처리할 수 있습니다. X, Y, Z 좌표 중 하나에 대해 NaN 값이 있는 픽셀이 있는지 확인합니다. 그렇다면 해당 픽셀의 SNR 값을 0으로 바꿉니다. 이것은 예를 들어 다음과 같은 픽셀을 선택하여 수행할 수 있습니다. Z 좌표는 NaN이며 SNR 값을 0으로 설정합니다.
여기서 \(isNAN()\) 은 입력 좌표가 NaN인 픽셀만 선택하는 논리 마스킹 함수입니다.
다음 단계는 모든 2x2 픽셀 그리드에 대한 SNR 값의 합계를 계산하는 것입니다.
그런 다음 초기 이미지의 각 픽셀에 대한 가중치를 계산합니다.
\(NaN \cdot 0 = 0\) 대신에 \(NaN \cdot 0 = NaN\) 으로 처리해야 하는 상황을 피하기 위해 다음을 수행하는 것이 좋습니다.
마지막으로 X, Y, Z 좌표 값을 계산할 수 있습니다. 다음은 새로운 X 를 계산하는 예입니다.
Y 및 Z 값에 대해서도 동일한 작업을 수행해야 합니다.