Monochrome Capture
Introduction
The Zivid 3D cameras allow subsampling on the camera side. We call this monochrome capture and it provides the following benefits:
- Speed
Less data to transfer and process leads to faster captures.
- Narrow band
Improved ambient light resiliency.
- Increased distance between pixels
Reduced 对比度失真 and highlight effects.
Resolution
The following illustration shows the bayer filter grid and associated indices.
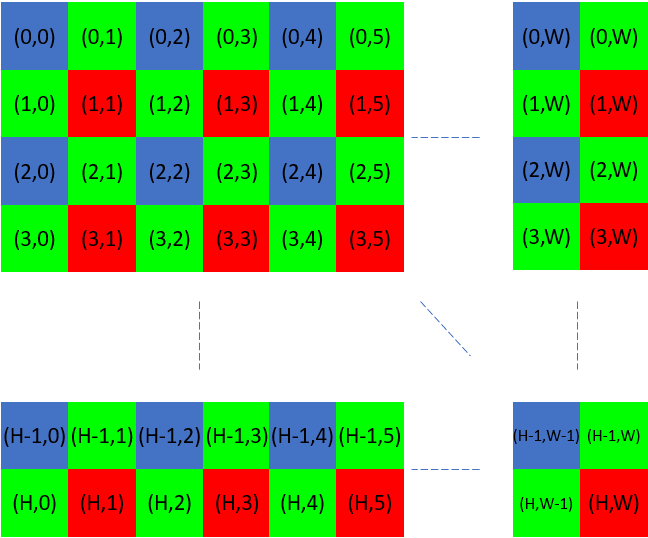
When we only use e.g. the ‘Blue’ pixels we get 1/4 of the original number of points.
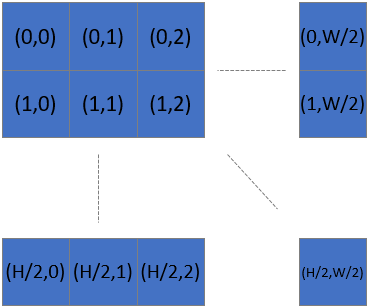
This means that after subsampling, the number of points along x and y axis is divided by 2.
For example, for Zivid 2+ M130 the spatial distance between two pixels is 0.32 mm @ 1300 mm working distance. With 2x2 subsampling, this distance is doubled to 0.64 mm at the same working distance.
This does not affect the resolution in depth; the point precision determines this.
2D resolution
Full Resolution - 2D

Quarter Resolution - 2D


3D resolution
Full Resolution - 3D
Quarter Resolution - 3D
Speed
TL;DR: Subsampling with monochrome capture provides significant speed improvements.
By reading out only 25% of the pixels there is less data to transfer and less data to process to generate a point cloud. Additionally, hardware subsampling eliminates the need to downsample the data to transform it to a more manageable size and thus reduces the storage and post-processing requirements. With a quarter of the data, Zivid post-processing (such as 法线 and 转换) and user post-processing (e.g., CAD matching) become faster.
Quality
2D
When you take a separate 2D capture in combination with 3D, where 3D is a monochrome capture, then there are some special considerations. Mapping between 2D and 3D is not 1-to-1, unless we change the resolution of the 2D image or otherwise map the indices.
When you subsample the 2D data you get direct 1-to-1 mapping between 2D and 3D. However, you may find the downsampled variant subjectively better (see below).
Full Resolution
Subsampled
Downsampled

Which of these are better is a function of your algorithm or personal preference.
3D
Regarding 3D quality there are in particular two improvements with monochrome capture.
- Narrow band
Improved ambient light resiliency.
- Increased distance between pixels
Reduced 对比度失真 and highlight effects.
The increased distance between pixels reduces the amount of signal leakage from neighboring pixels. This is the primary source of the two negative effects:
Mapping between a full-resolution 2D image and a subsampled point cloud
In many applications, it is common to capture a 3D point cloud separately using Monochrome capture, along with a 2D image using a dedicated 2D capture.
This approach offers several benefits.
Firstly, it allows for independent optimization of the 2D settings for the image and the 3D settings for the point cloud.
Additionally, by disabling color data processing with Sampling::Color::disabled, the processing to get the point cloud becomes faster.
In the described scenario, while the 2D capture remains at full resolution, the 3D point cloud is subsampled. To establish a correlation between the full-resolution 2D image and the subsampled point cloud, a specific mapping technique is required. This process involves extracting RGB values from the pixels that correspond to the Blue or Red pixels from the Bayer grid.
备注
Subsampling or downsampling in user code is only necessary if you want to have 1-to-1 pixel correspondence when you capture and copy 2D and 3D with different resolutions.
The following illustration shows the Bayer filter grid and associated indices.
In order to extract all the RGB values which correspond to the blue pixels we use the indices:
In order to extract all the RGB values which correspond to the red pixels we use the indices:
In code this looks like:

std::cout << "Pixels to sample: " << pixelsToSample << std::endl;
const int subsampleDivider =
    (pixelsToSample.value() == Zivid::Settings::Sampling::Pixel::ValueType::all) ? 1 : 2;
int offset = (pixelsToSample.value() == Zivid::Settings::Sampling::Pixel::ValueType::blueSubsample2x2) ? 0 : 1;
cv::Mat
    mappedBGR(fullResolutionBGR.rows / subsampleDivider, fullResolutionBGR.cols / subsampleDivider, CV_8UC3);
std::cout << "Mapped width: " << mappedBGR.cols << ", height: " << mappedBGR.rows << std::endl;
for(size_t row = 0; row < static_cast<size_t>(fullResolutionBGR.rows - offset); row += subsampleDivider)
{
    for(size_t col = 0; col < static_cast<size_t>(fullResolutionBGR.cols - offset); col += subsampleDivider)
    {
        mappedBGR.at<cv::Vec3b>(row / subsampleDivider, col / subsampleDivider) =
            fullResolutionBGR.at<cv::Vec3b>(row + offset, col + offset);
    }
}
return mappedBGR;
if pixels_to_sample == zivid.Settings.Sampling.Pixel.blueSubsample2x2:
    return rgba[::2, ::2, 0:3]
if pixels_to_sample == zivid.Settings.Sampling.Pixel.redSubsample2x2:
    return rgba[1::2, 1::2, 0:3]
if pixels_to_sample == zivid.Settings.Sampling.Pixel.all:
    return rgba[:, :, 0:3]
raise RuntimeError(f"Invalid pixels to sample: {pixels_to_sample}")