2D Image Projection (LED)
Introduction
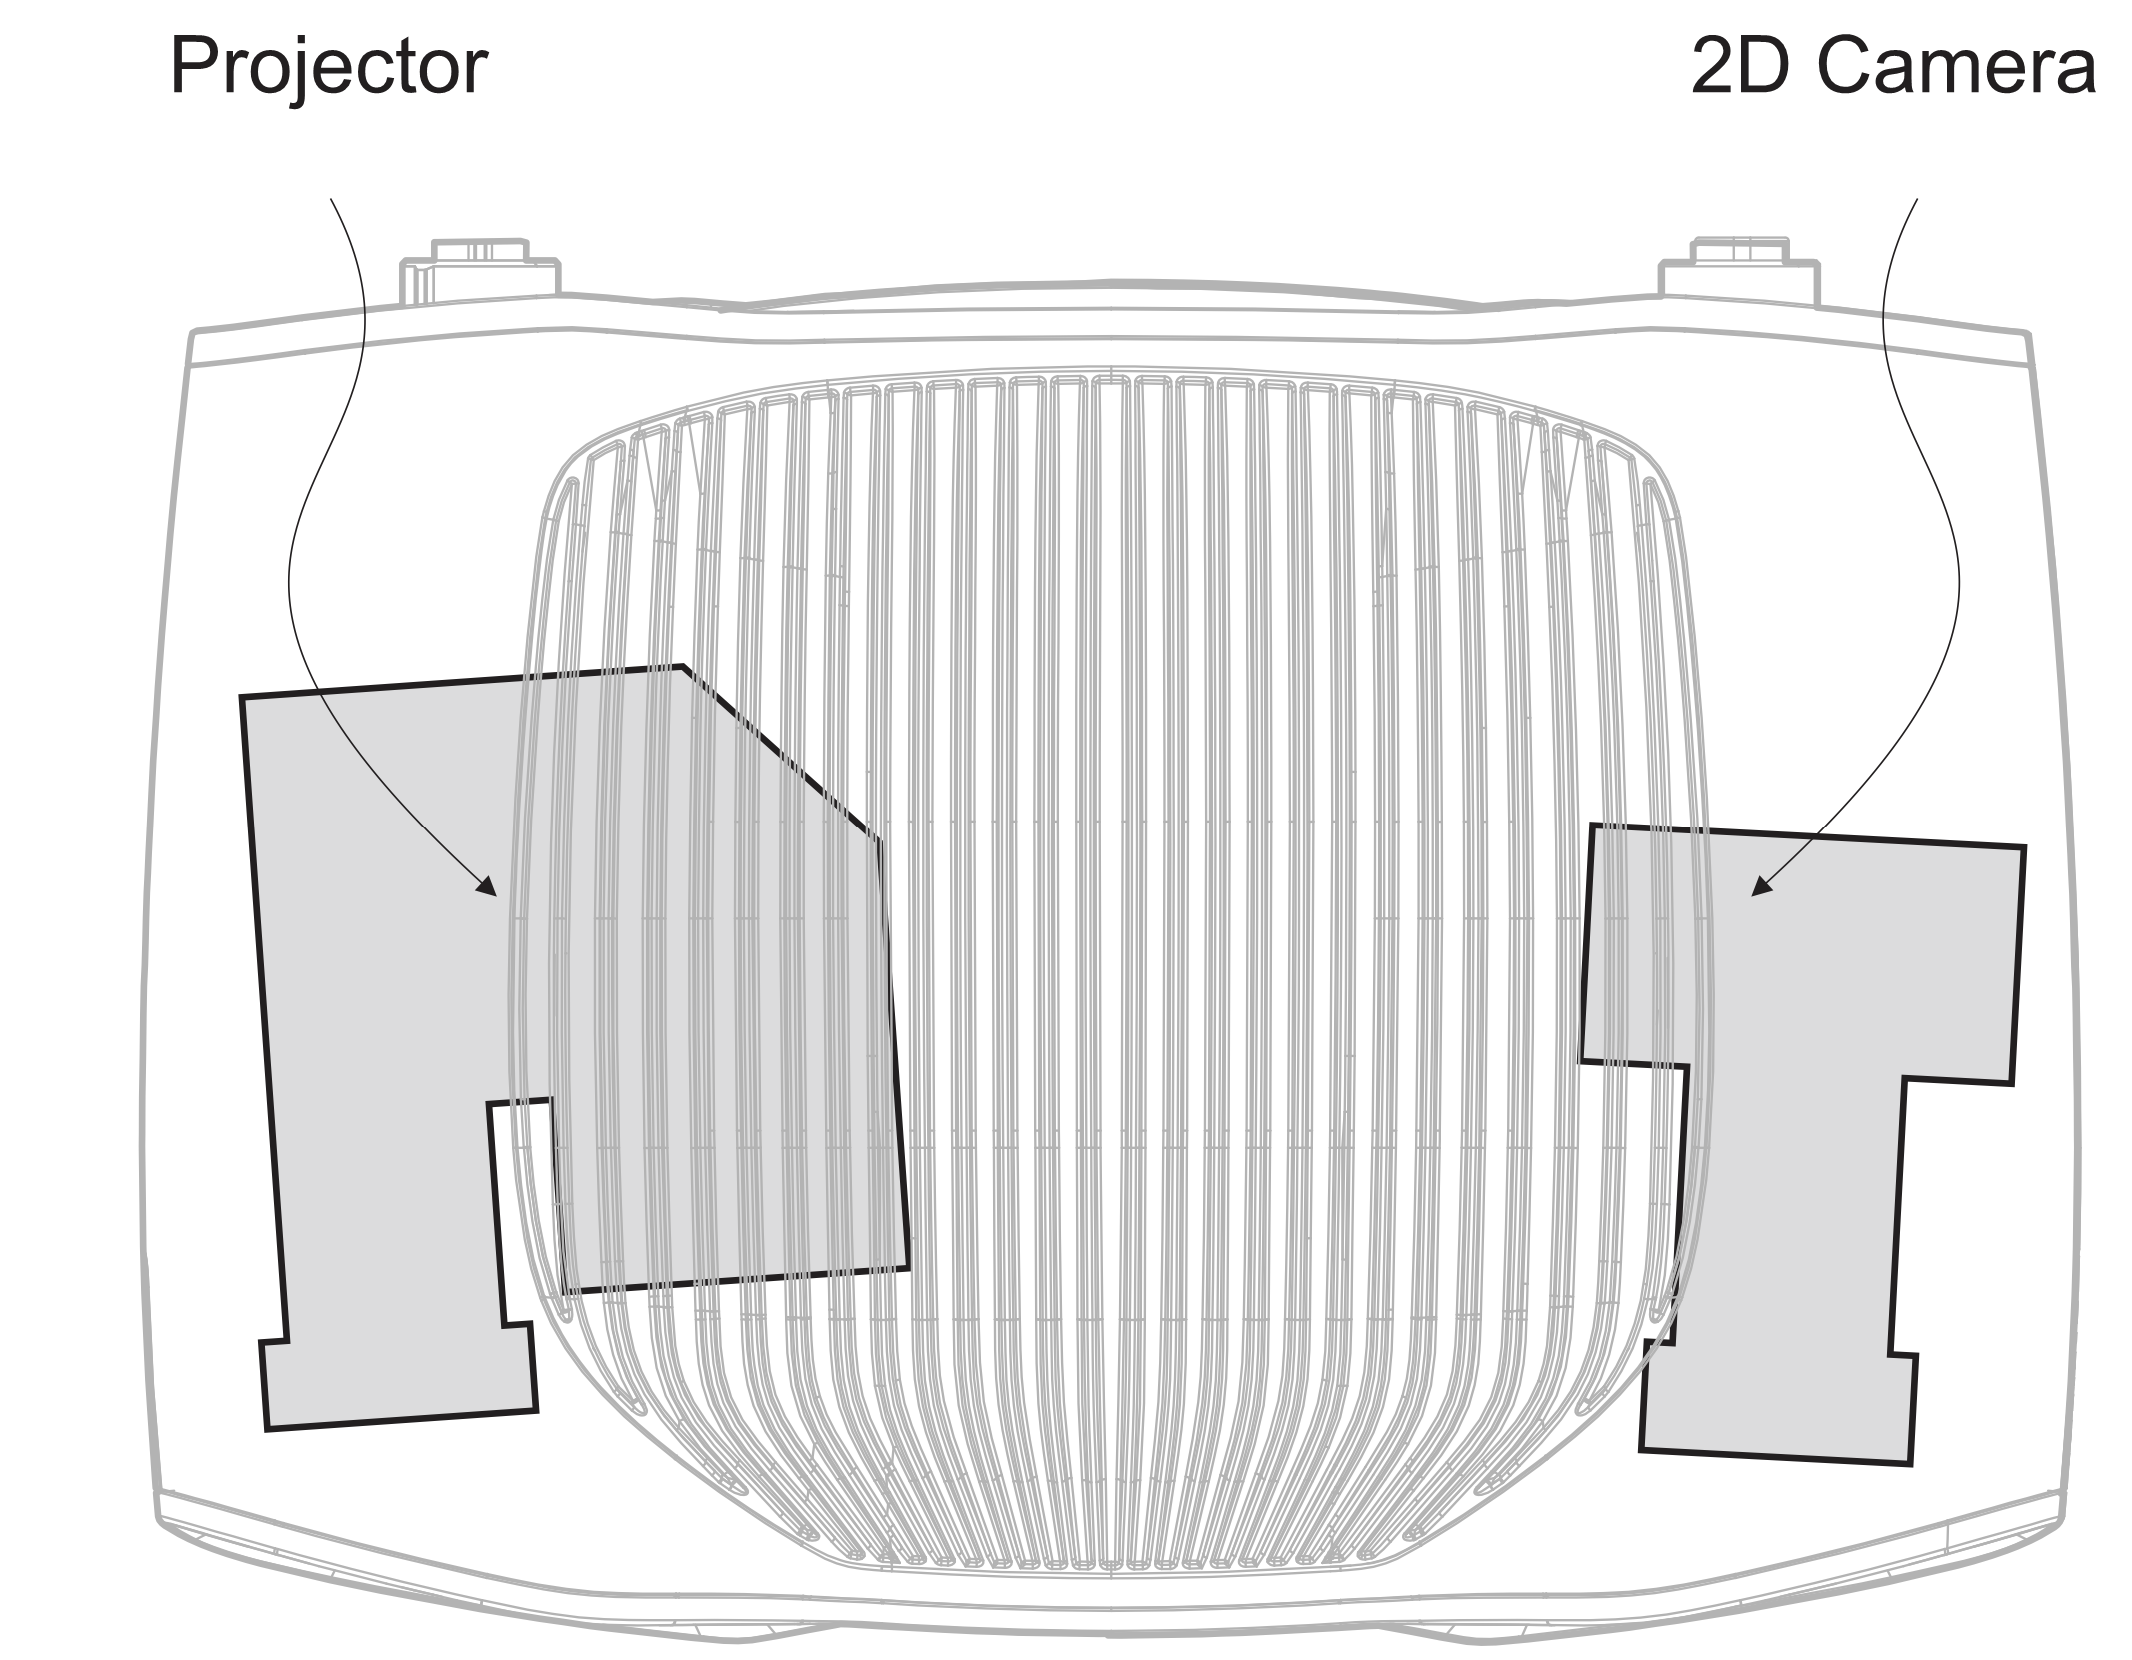
The main components of a Zivid 3D camera are a 2D color camera and an LED projector. The 2D image pixels correspond to the camera sensor pixels (parts of the sensor that collect photons). Similarly, the 2D projector image pixels correspond to the projector pixels (parts of the projector that emit photons). This tutorial shows how to use the projector to project color images onto the scene.
小心
2D image projection is experimental and may be changed and improved in the future.
Create a Projector image
To create a projector image, you need the projector image resolution. This is easily done by connecting to a camera and retrieving the projector resolution:
2D Projector image
The next step is to create a Zivid::Image<Zivid::ColorBGRA>.
Below is a demonstration of how to create a Zivid Image from scratch and how to convert an OpenCV image into a Zivid Image.
This is an example of how to create a Zivid Image where all pixels are red.
You can create an OpenCV image by loading it from a file (e.g., PNG) or by creating it from scratch.
This example loads an image with OpenCV and then converts it to a Zivid Image.

std::string imageFile = std::string(ZIVID_SAMPLE_DATA_DIR) + "/ZividLogo.png";
std::cout << "Reading 2D image from file: " << imageFile << std::endl;
const auto inputImage = cv::imread(imageFile, cv::IMREAD_UNCHANGED);
cv::Mat projectorImageResized;
cv::Mat projectorImageBGRA;
cv::resize(
    inputImage,
    projectorImageResized,
    cv::Size(projectorResolution.width(), projectorResolution.height()),
    cv::INTER_LINEAR);
cv::cvtColor(projectorImageResized, projectorImageBGRA, cv::COLOR_BGR2BGRA);
std::cout << "Creating a Zivid::Image from the OpenCV image" << std::endl;
Zivid::Image<Zivid::ColorBGRA> projectorImage{ projectorResolution,
                                               projectorImageBGRA.datastart,
                                               projectorImageBGRA.dataend };
In this example, a blank OpenCV image is created and then converted to a Zivid Image.
std::cout << "Creating a blank projector image with resolution: " << projectorResolution.toString()
          << std::endl;
const cv::Scalar backgroundColor{ 0, 0, 0, 255 };
auto projectorImageOpenCV = cv::Mat{ static_cast<int>(projectorResolution.height()),
                                     static_cast<int>(projectorResolution.width()),
                                     CV_8UC4,
                                     backgroundColor };
std::cout << "Creating a Zivid::Image from the OpenCV image" << std::endl;
const Zivid::Image<Zivid::ColorBGRA> projectorImage{ projectorResolution,
                                                     projectorImageOpenCV.datastart,
                                                     projectorImageOpenCV.dataend };
The projector Image can now be projected. Note that this image is created without considering any 3D data.
2D Projector image from 3D
Creating a projector image from 3D data is useful if you want to project a 3D object onto the scene. Alternatively, you may want to project something on specific points, surfaces, or on any other 3D features in the scene that you can detect from the point cloud. For that to be possible a correlation between 3D points and the projector pixels is needed. If creating a 2D projector image from 3D data is not relevant to you, you can go directly to Start Projection
In this example, we project small green circles at the checkerboard corners of the Zivid calibration board. The image below depicts the expected final result.
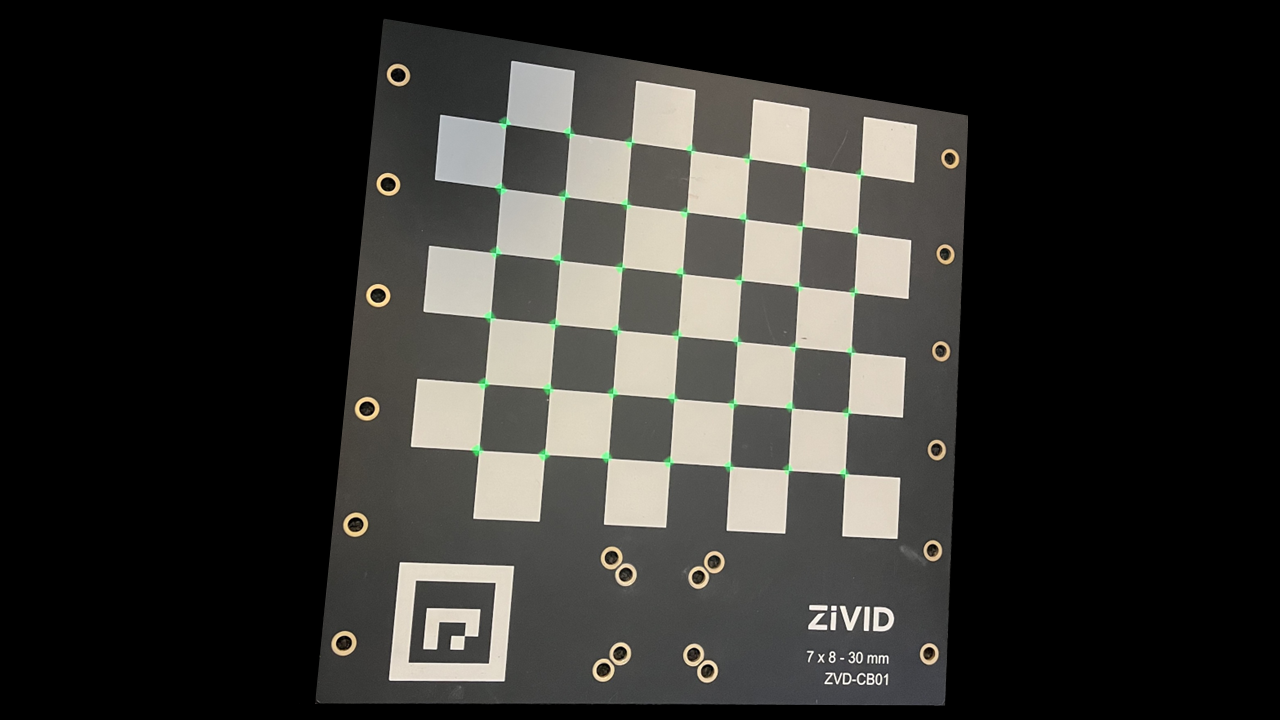
Since the checkerboard size is known, we can create a grid of points (7 x 6) with the right spacing (30 mm) between the points that represent the checkerboard corners.
std::cout << "Creating a grid of 7 x 6 points (3D) with 30 mm spacing to match checkerboard corners"
          << std::endl;
std::vector<cv::Matx41f> points;
for(int x = 0; x < 7; x++)
{
    for(int y = 0; y < 6; y++)
    {
        const float xPos = x * 30.0F;
        const float yPos = y * 30.0F;
        points.emplace_back(xPos, yPos, 0.0F, 1.0F);
    }
}
At this point a 3D grid of points is created but without a correlation to the real world. Therefore, the grid needs to be transformed to the pose of the Zivid calibration board relative to the camera. This is easily done by estimating the calibration board pose and transforming the grid to that pose:
std::cout << "Estimating checkerboard pose" << std::endl;
const auto transformCameraToCheckerboard = detectionResult.pose().toMatrix();
std::cout << "Transforming the grid to the camera frame" << std::endl;
std::vector<Zivid::PointXYZ> pointsInCameraFrame;
const auto transformationMatrix = cv::Matx44f{ transformCameraToCheckerboard.data() };
for(const auto &point : grid)
{
    const auto transformedPoint = transformationMatrix * point;
    pointsInCameraFrame.emplace_back(transformedPoint(0, 0), transformedPoint(1, 0), transformedPoint(2, 0));
}
print("Estimating checkerboard pose")
transform_camera_to_checkerboard = detection_result.pose().to_matrix()
print("Transforming the grid to the camera frame")
points_in_camera_frame = []
for point in grid:
    transformed_point = transform_camera_to_checkerboard @ point
    points_in_camera_frame.append(transformed_point[:3])
The function Zivid::Experimental::Projection::pixelsFrom3DPoints(), converts 3D points in the camera’s reference to projector pixels using the internal calibration of a Zivid camera.
After obtaining the vector of transformed points, these 3D points are converted to projector pixels as follows:
std::cout << "Getting projector pixels (2D) corresponding to points (3D) in the camera frame" << std::endl;
const auto projectorPixels = Zivid::Experimental::Projection::pixelsFrom3DPoints(camera, pointsInCameraFrame);
The next step is to create a projector image and draw green circles on the obtained projector pixels’ coordinates.
std::cout << "Creating a blank projector image with resolution: " << projectorResolution.toString()
          << std::endl;
const cv::Scalar backgroundColor{ 0, 0, 0, 255 };
auto projectorImageOpenCV = cv::Mat{ static_cast<int>(projectorResolution.height()),
                                     static_cast<int>(projectorResolution.width()),
                                     CV_8UC4,
                                     backgroundColor };
std::cout << "Drawing circles on the projector image for each grid point" << std::endl;
const cv::Scalar circleColor{ 0, 255, 0, 255 };
drawFilledCircles(projectorImageOpenCV, projectorPixels, 2, circleColor);
std::cout << "Creating a Zivid::Image from the OpenCV image" << std::endl;
const Zivid::Image<Zivid::ColorBGRA> projectorImage{ projectorResolution,
                                                     projectorImageOpenCV.datastart,
                                                     projectorImageOpenCV.dataend };
print(f"Creating a blank projector image with resolution: {projector_resolution}")
background_color = (0, 0, 0, 255)
projector_image = np.full(
    (projector_resolution[0], projector_resolution[1], len(background_color)), background_color, dtype=np.uint8
)
print("Drawing circles on the projector image for each grid point")
circle_color = (0, 255, 0, 255)
_draw_filled_circles(projector_image, projector_pixels, 2, circle_color)
It is possible to save the Projector image to disk for later use. The image can be saved as e.g., PNG, JPEG, BMP.
Start Projection
The following shows how to start projecting the image.
备注
The image will be continuously projected as long as the image handle is kept alive.
Capture and save a 2D image while Projecting
The projector and the 2D camera can be controlled separately. Therefore, while the projector is projecting, it is possible to capture a 2D image of the scene (with the projected image on the scene).
{ // A Local Scope to handle the projected image lifetime

    auto projectedImageHandle = Zivid::Experimental::Projection::showImage(camera, projectorImage);

    const Zivid::Settings2D settings2D{ Zivid::Settings2D::Acquisitions{ Zivid::Settings2D::Acquisition{
        Zivid::Settings2D::Acquisition::Brightness{ 0.0 },
        Zivid::Settings2D::Acquisition::ExposureTime{ std::chrono::microseconds{ 20000 } },
        Zivid::Settings2D::Acquisition::Aperture{ 2.83 } } } };

    std::cout << "Capturing a 2D image with the projected image" << std::endl;
    const auto frame2D = projectedImageHandle.capture(settings2D);

    const std::string capturedImageFile = "CapturedImage.png";
    std::cout << "Saving the captured image: " << capturedImageFile << std::endl;
    frame2D.imageBGRA().save(capturedImageFile);

    std::cout << "Press enter to stop projecting..." << std::endl;
    std::cin.get();

} // projectedImageHandle now goes out of scope, thereby stopping the projection
with zivid.experimental.projection.show_image_bgra(camera, projector_image) as projected_image:
    settings_2d = zivid.Settings2D()
    settings_2d.acquisitions.append(
        zivid.Settings2D.Acquisition(brightness=0.0, exposure_time=timedelta(microseconds=20000), aperture=2.83)
    )

    print("Capturing a 2D image with the projected image")
    frame_2d = projected_image.capture(settings_2d)

    captured_image_file = "CapturedImage.png"
    print(f"Saving the captured image: {captured_image_file}")
    frame_2d.image_bgra().save(captured_image_file)

    input("Press enter to stop projecting ...")
Stop Projection
The projection will stop if the stop() function is called on the handle, when the handle goes out of scope, or if a 3D capture is initiated on the camera.
Stop by using Projection Handle
Stop by leaving a scope
void projecting(Zivid::Camera &camera, const Zivid::Image<Zivid::ColorBGRA> &projectorImageFunctionScope)
{
    auto projectedImageHandle = Zivid::Experimental::Projection::showImage(camera, projectorImageFunctionScope);

    std::cout << "Press enter to stop projecting by leaving a function scope" << std::endl;
    std::cin.get();
}
Stop by triggering a 3D capture
projectedImageHandle = Zivid::Experimental::Projection::showImage(camera, projectorImage);

std::cout << "Press enter to stop projecting by performing a 3D capture" << std::endl;
std::cin.get();
const auto settings = Zivid::Settings{ Zivid::Settings::Acquisitions{ Zivid::Settings::Acquisition() } };
camera.capture(settings);
Projection Brightness
Zivid firmware is designed to safeguard the longevity of your camera by imposing limitations on the light output (projector brightness).
If your objective is to maximize brightness during projection, instruct our projector to utilize just one of the LED channels. You can achieve this by setting each colored pixel in your projector image to only one of the pure color values: red (255,0,0), green (0,255, 0), or blue (0,0,255). Where you do not want to project light, set the pixels to black (0,0,0).
小技巧
When it comes to human perception, green is by far the best choice since our eyes are much more sensitive to green than to red and blue.
When projecting white light or any other combination of red, green, and blue light, the camera firmware will automatically reduce the light output (projector brightness). This occurs even if almost all the pixels are set to, e.g., pure green (0,255,0), with only a single exception, where a pixel deviates slightly from pure green or black, e.g., (0,255,1).
Code Samples
To get some hands-on experience with the projection, check out the following code samples:
Version History
SDK |
Changes |
|---|---|
2.10 |
Experimental 2D Image Projection API is added. |