GPU について
Zivid SDK を最適に実行するには、ホストマシンに GPU が必要です。統合 GPU と専用 GPU はどちらも Zivid で適切に動作しますが、パフォーマンスの違いはキャプチャ時間にあります。
See GPU Requirements for driver requirements per OS and GPU vendor.
See Performance Considerations for dedicated vs. integrated GPU recommendations.
See Selecting Compute Device if you need to target a specific GPU or run on an unsupported compute device.
GPU 要件
Windows
For optimal performance, the dedicated or integrated GPU should have at least 3 GB of RAM available. Additionally, either a CUDA (12 or later) or an OpenCL driver (1.2 or later) for the GPU is necessary to use Zivid. An OpenGL driver (3.0 or later) for the GPU is also necessary to use Zivid Studio or visualizers in the SDK; this is usually installed with the GPU driver, but older drivers can use a version below 3.0. Follow the instructions below for your specific GPU.
Intel
OpenCL ドライバーは通常、グラフィックスドライバーと一緒にインストールされ、Windows にはすでにインストールされているはずです。使用している GPU ドライバーを確認したい場合は、下のドロップダウンを使用してください。そうでない場合は、 Intel から最新のグラフィックスドライバーをダウンロードしてインストールします。
Check GPU driver
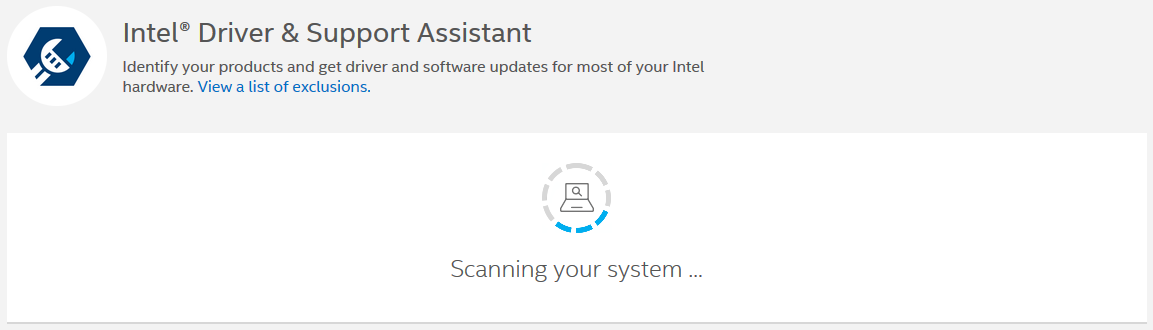
Intel Driver & Support assistant を使用してドライバーのバージョンを自動的に検出するか、以下の手順に従って手動で見つけます。
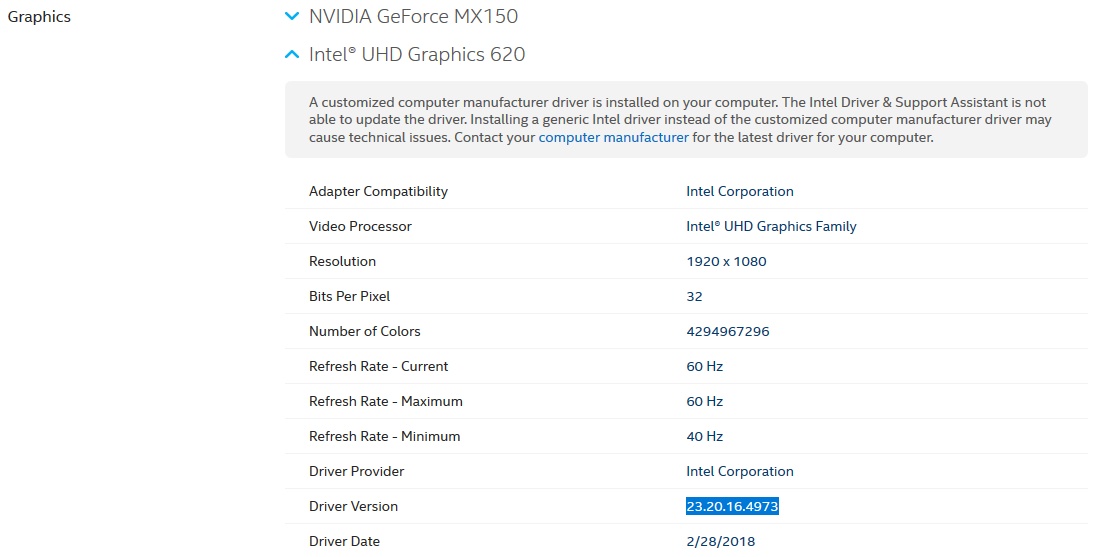
Start → Control Panel
リストから Device Manager を選択します (必要に応じて View を Small Icons に切り替えます)
Display Adapter セクションを展開し、 Intel® Display Adapter を右クリックして Properties を選択します。
Driver タブに移動し、表示されている Driver Version を確認します。
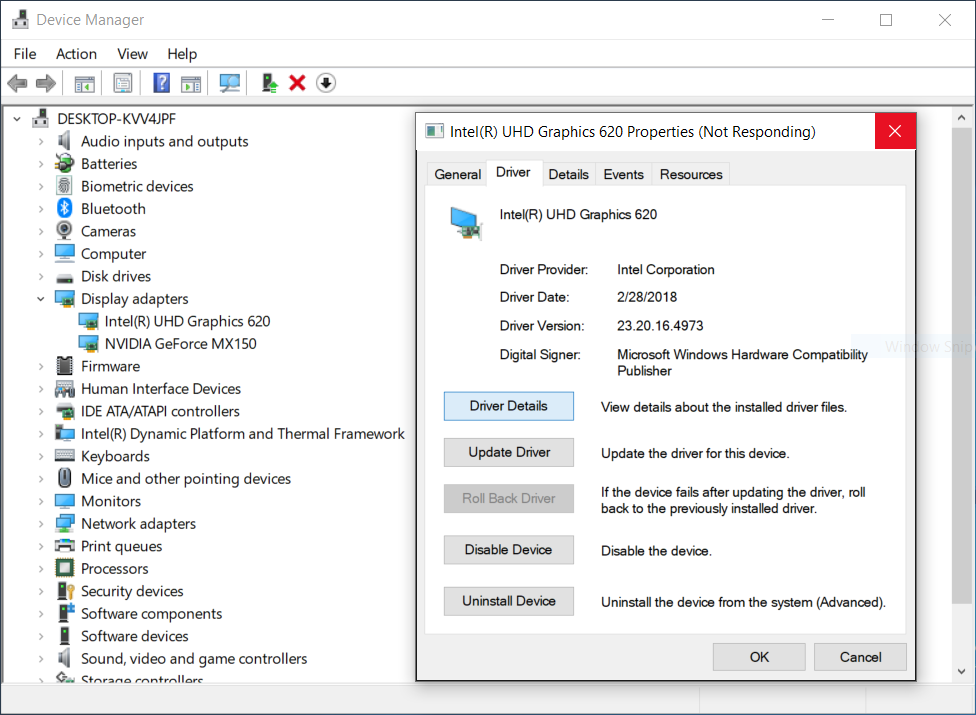
グラフィックスドライバーをインストールした後、 Zivid Studio を開き、OpenCL エラーが発生しないことを確認します。
NVIDIA
注釈
The CUDA backend requires an NVIDIA GPU with compute capability 6.1 or higher. If this requirement is not fulfilled, the SDK will throw an exception:
Detected compute capability X.Y, which is not supported. Supported versions: (6.1, 7.0, 7.5, 8.0, 8.6)
The listed versions are the compute capabilities the installed package was built for.
Setting AllowUnsupported does not make the CUDA backend work below this minimum.
The packages contain no code for older architectures, so the capture fails later instead.
The OpenCL backend has no practical limit: it requires OpenCL 1.2 support, which every NVIDIA card new enough to have an OpenCL driver provides. A compute capability floor of 3.5 exists in the SDK, but no driver that meets the OpenCL requirement falls below it. A GPU below 6.1 therefore works with the OpenCL backend but not with the CUDA backend. Be aware that the OpenCL version of the SDK rejects every NVIDIA GPU regardless of compute capability until you opt in to unsupported compute devices in the Config.yml file.
NVIDIA GPU とそれに対応するコンピュート能力の概要については、https://developer.nvidia.com/cuda-gpus を参照してください。
CUDA
The CUDA backend requires an NVIDIA driver that supports CUDA 12 or newer.
OpenCL
The OpenCL driver is usually installed together with the graphics driver.
警告
The OpenCL version of the SDK treats NVIDIA GPUs as an unsupported compute device. After installing the OpenCL version of the SDK, you must edit the Config.yml file to allow it, or the SDK will fail with an error. Zivid recommends installing the CUDA version instead, which requires no extra configuration.
Use the dropdown below if you want to check which GPU driver you have. If not, download and install the relevant graphics driver for your GPU from NVIDIA.
Check GPU driver
NVIDIA Smart Scan を使用してドライバーのバージョンを自動的に検出するか、以下の手順に従って手動で見つけます。
NVIDIA Control Panel を開きます ( Desktop を右クリックします)。
System Information (左下隅) をクリックします。
Details セクションの Driver version を確認します。
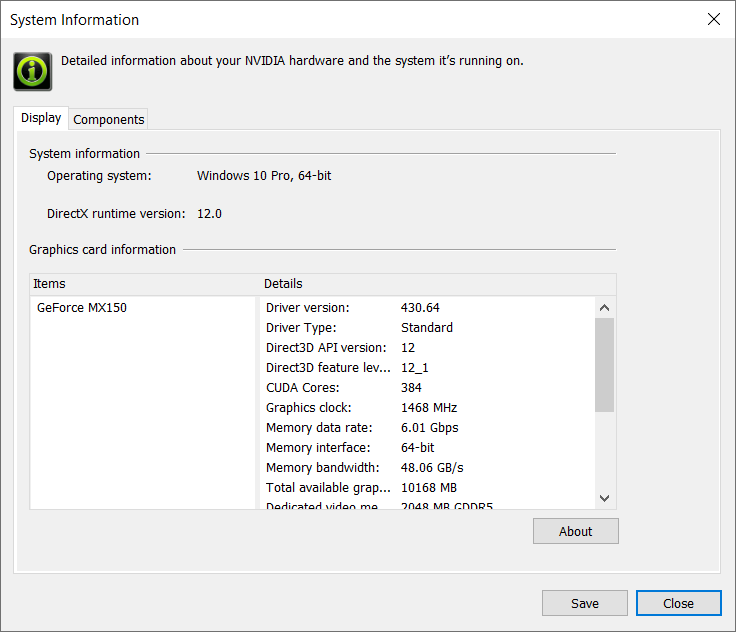
After installing the graphics drivers, open Zivid Studio and verify that no errors occur.
AMD
警告
Since SDK 2.10, support for AMD has been removed due to OpenCL stability issues in the drivers. It is possible to opt in to run the SDK with an unsupported compute device, by enabling an option in the Config.yml file. However, such a setup can give unexpected results and errors, and is not tested by Zivid.
警告
Radeon は一部の GPU で SPIR をサポートしなくなりました。Zivid と互換性があるために、GPU ドライバーが SPIR をサポートしていることを確認してください。
OpenCL ドライバーは通常、グラフィックスドライバーと一緒にインストールされます。使用している GPU ドライバーを確認したい場合は、下のドロップダウンを使用してください。そうでない場合は、GPU に関連するグラフィックスドライバーを AMD からダウンロードしてインストールします。
Check GPU driver
AMD Driver Auto-detect tool を使用してドライバーのバージョンを自動的に検出するか、以下の手順に従って手動で見つけます。
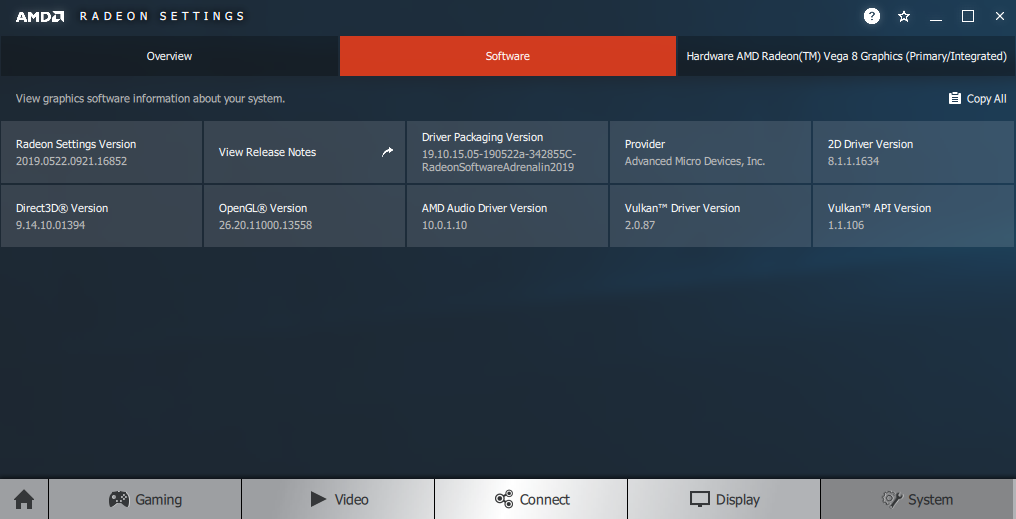
AMD Radeon Settings を開きます ( Desktop を右クリックします)。
System をクリックして、システムの概要、ソフトウェアおよびハードウェアの詳細にアクセスします。
インストールされているグラフィックスドライバーの詳細については Software タブを選択してください。 Driver Packaging Version を確認してください。
グラフィックスドライバーをインストールした後、 Zivid Studio を開き、OpenCL エラーが発生しないことを確認します。
In addition to the OpenCL or CUDA driver above, Zivid Studio and the SDK's visualizers also need an OpenGL driver.
Check OpenGL drivers
OpenGL Extensions Viewer をダウンロードします。
インストールして起動し、OpenGL のバージョンを確認します。
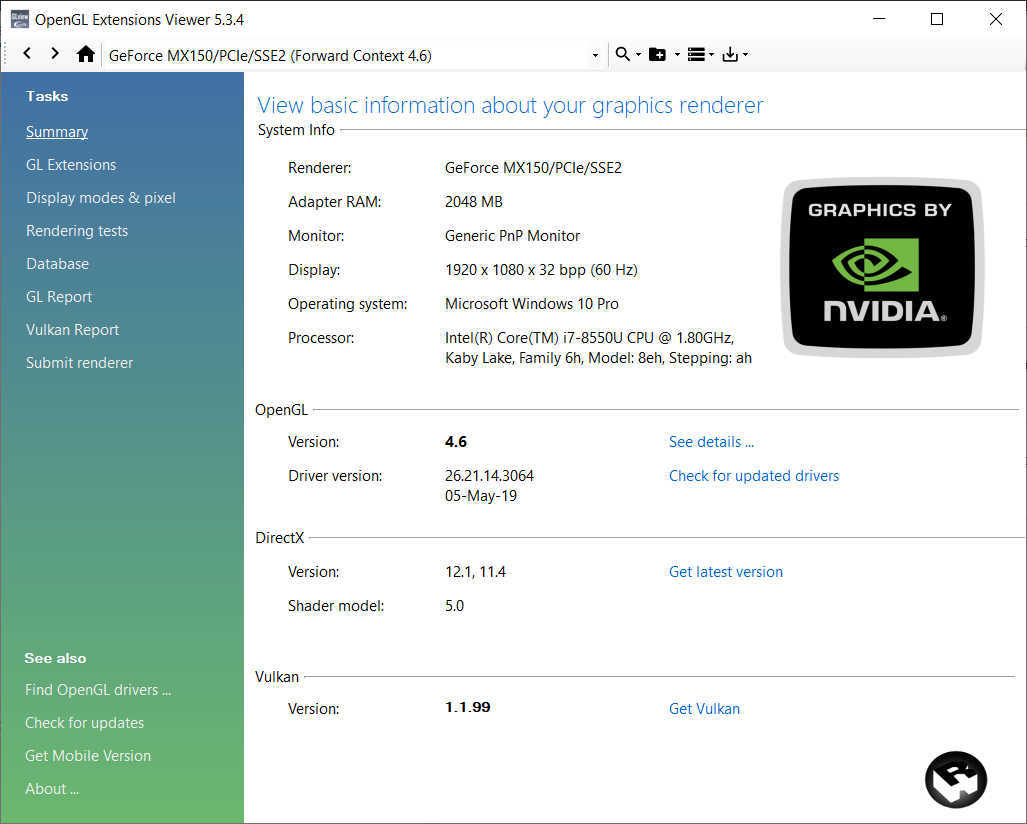
In case the version is below 3.0, you need to install the latest GPU driver following the instructions for your GPU above.
Ubuntu
For optimal performance, the dedicated or integrated GPU should have at least 3 GB of RAM available. Additionally, either a CUDA (12 or later) or an OpenCL driver (1.2 or later) for the GPU is necessary to use Zivid. An OpenGL driver (3.0 or later) for the GPU is also necessary to use Zivid Studio or visualizers in the SDK; this is usually installed with the GPU driver, but older drivers can use a version below 3.0. Follow the instructions below for your specific GPU.
Intel
Intel 用のグラフィックスドライバーは Ubuntu にすでにインストールされている必要がありますが、OpenCL ドライバーは必ずしもインストールされている必要はありません。グラフィックスドライバーが存在するかどうかを確認したい場合は、下のドロップダウンを使用してください。
Check GPU driver
キーボードの Ctrl + Alt + T キーを押してターミナルウィンドウを開き、ドライバーが存在するかどうかを確認します。
lspci -k | grep -EA3 'VGA|3D|Display'
詳細については、公式の Intel pages を参照してください。
キーボードの Ctrl + Alt + T キーを押してターミナルウィンドウを開き、OpenCL ドライバーをインストールします。
Ubuntu 26.04
sudo apt update
sudo apt install intel-opencl-icd
Ubuntu 24.04
sudo apt update
sudo apt install intel-opencl-icd
Ubuntu 22.04
sudo apt update
sudo apt install intel-opencl-icd
Ubuntu 20.04
sudo apt update
sudo apt install intel-opencl-icd
Ubuntu 18.04
注釈
Ubuntu 18.04 のサポートは SDK 2.10 以降削除されました。以前の SDK バージョンの Ubuntu 18.04 の手順を確認するには、左上隅にあるナレッジベースのバージョンを変更します。
Zivid Studio を開き、OpenCL エラーが発生しないことを確認します。
注釈
OpenCL エラーが発生した場合は、 ユーザーをグループ Video に追加する 必要がある場合があります。
NVIDIA
注釈
The CUDA backend requires an NVIDIA GPU with compute capability 6.1 or higher. If this requirement is not fulfilled, the SDK will throw an exception:
Detected compute capability X.Y, which is not supported. Supported versions: (6.1, 7.0, 7.5, 8.0, 8.6)
The listed versions are the compute capabilities the installed package was built for. Setting
AllowUnsupporteddoes not make the CUDA backend work below this minimum. The packages contain no code for older architectures, so the capture fails later instead.The OpenCL backend has no practical limit: it requires OpenCL 1.2 support, which every NVIDIA card new enough to have an OpenCL driver provides. A compute capability floor of 3.5 exists in the SDK, but no driver that meets the OpenCL requirement falls below it. A GPU below 6.1 therefore works with the OpenCL backend but not with the CUDA backend. Be aware that the OpenCL version of the SDK rejects every NVIDIA GPU regardless of compute capability until you opt in to unsupported compute devices in the Config.yml file.
NVIDIA GPU とそれに対応するコンピュート能力の概要については、https://developer.nvidia.com/cuda-gpus を参照してください。
CUDA
The CUDA backend requires an NVIDIA driver that supports CUDA 12 or newer.
OpenCL
The OpenCL driver for NVIDIA is installed with the graphics driver.
警告
The OpenCL version of the SDK treats NVIDIA GPUs as an unsupported compute device. After installing the OpenCL version of the SDK, you must edit the Config.yml file to allow it, or the SDK will fail with an error. Zivid recommends installing the CUDA version instead, which requires no extra configuration.
Use the dropdown below if you want to check if your graphics driver is present, or continue to install the latest driver for your system.
Check GPU driver
キーボードの Ctrl + Alt + T キーを押してターミナルウィンドウを開き、次のコマンドを実行します。
nvidia-smi
これにより、ドライバーのバージョンが出力されます。
NVIDIA GPU ドライバー PPA をシステムに追加します。
キーボードの Ctrl + Alt + T キーを押してターミナルウィンドウを開き、グラフィックスドライバー PPA を追加します。
sudo add-apt-repository ppa:graphics-drivers/ppa
This makes the latest long-lived driver release, packaged as
nvidia-xxx, available to install in the next step.システムの最新ドライバーをインストールします。
Ubuntu 26.04
sudo apt update
sudo apt install nvidia-driver-xxx
Ubuntu 24.04
sudo apt update
sudo apt install nvidia-driver-xxx
Ubuntu 22.04
sudo apt update
sudo apt install nvidia-driver-xxx
Ubuntu 20.04
sudo apt update
sudo apt install nvidia-driver-xxx
Ubuntu 18.04
注釈
Ubuntu 18.04 のサポートは SDK 2.10 以降削除されました。以前の SDK バージョンの Ubuntu 18.04 の手順を確認するには、左上隅にあるナレッジベースのバージョンを変更します。
ドライバーをインストールした後、システムを再起動します。
sudo rebootZivid Studio を開き、OpenCL エラーが発生しないことを確認します。
注釈
OpenCL エラーが発生した場合は、 ユーザーをグループ Video に追加する 必要がある場合があります。
AMD
警告
Since SDK 2.10, support for AMD has been removed due to OpenCL stability issues in the drivers. It is possible to opt in to run the SDK with an unsupported compute device, by enabling an option in the Config.yml file. However, such a setup can give unexpected results and errors, and is not tested by Zivid.
警告
Radeon は一部の GPU で SPIR をサポートしなくなりました。Zivid と互換性があるために、GPU ドライバーが SPIR をサポートしていることを確認してください。
Download, extract, and install the correct Radeon Software for Linux:
Ubuntu 22.04
キーボードの Ctrl + Alt + T キーを押してターミナルウィンドウを開き、一時フォルダーを作成します。
mkdir amd && cd amd
Download the driver installer package for the verified-working version, 22.20.3:
wget --referer http://support.amd.com http://repo.radeon.com/amdgpu-install/22.20.3/ubuntu/jammy/amdgpu-install_22.20.50203-1_all.deb
注釈
AMD's release notes page and its
/latestpath both link to a broken installer. Use the pinned version above instead, which Zivid has verified to work.このパッケージを
aptでインストールします。sudo apt update sudo apt install ./amdgpu-install_22.20.50203-1_all.deb
amdgpu-install --usecase=graphics,opencl --no-32 --no-dkms
注釈
セキュアブートが必要な場合は、DKMS を含める必要がある場合があります (上記のコマンドの
--no-dkmsを削除します)。詳細については、 secure-boot-support を参照してください。次に、ユーザーを
renderグループとvideoグループの両方のメンバーとして追加します。sudo gpasswd -a $USER render sudo gpasswd -a $USER video
You may have to reboot for the changes to take effect.
sudo rebootYou can now try to open Zivid Studio. If it fails, follow the Secure Boot configuration step below.
Ubuntu 20.04
キーボードの Ctrl + Alt + T キーを押してターミナルウィンドウを開き、一時フォルダーを作成します。
mkdir amd && cd amd
Linux カーネルのバージョンを確認します。
uname -rKernel 5.4
Linux カーネルバージョン 5.4 (Ubuntu LTS) の場合は、Ubuntu 20.04 用の Radeon Software 20.45 をダウンロードします。
wget --referer http://support.amd.com https://drivers.amd.com/drivers/linux/amdgpu-pro-20.45-1188099-ubuntu-20.04.tar.xz
内容を解凍します。
tar -Jxvf amdgpu-pro-20.45-1188099-ubuntu-20.04.tar.xz
cd amdgpu-pro-20.45-1188099-ubuntu-20.04
Kernel 5.8
Linux カーネルバージョン 5.8 (Ubuntu LTS HWE スタック) の場合は、Linux 20.04 用の Radeon Software 20.50 をダウンロードします。
wget --referer http://support.amd.com https://drivers.amd.com/drivers/linux/amdgpu-pro-20.50-1234664-ubuntu-20.04.tar.xz
内容を解凍します。
tar -Jxvf amdgpu-pro-20.50-1234664-ubuntu-20.04.tar.xz
cd amdgpu-pro-20.50-1234664-ubuntu-20.04
./amdgpu-pro-install --opencl=pal
Ubuntu 18.04
注釈
Ubuntu 18.04 のサポートは SDK 2.10 以降削除されました。以前の SDK バージョンの Ubuntu 18.04 の手順を確認するには、左上隅にあるナレッジベースのバージョンを変更します。
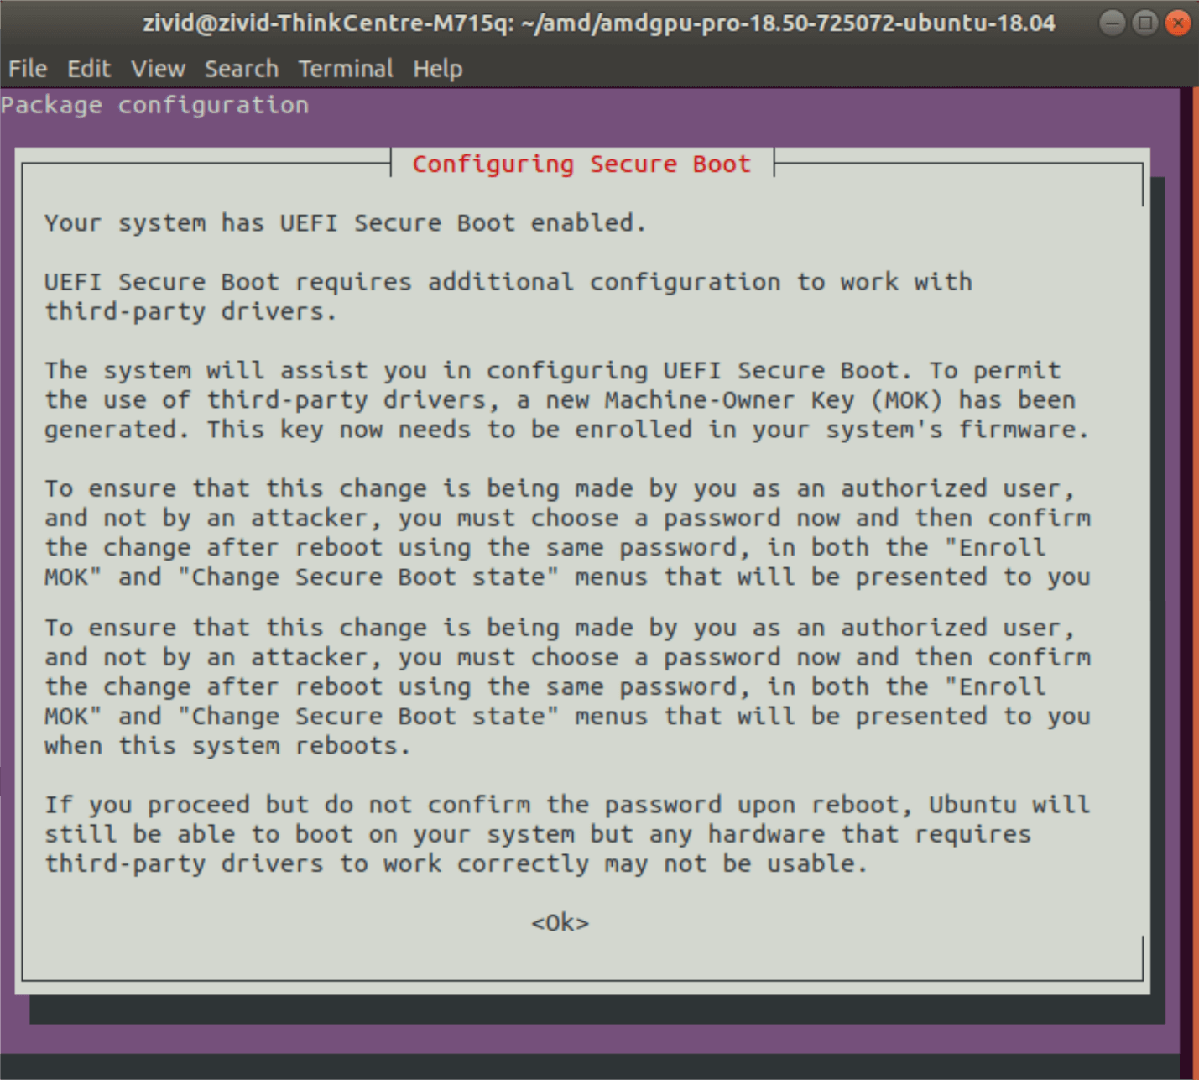
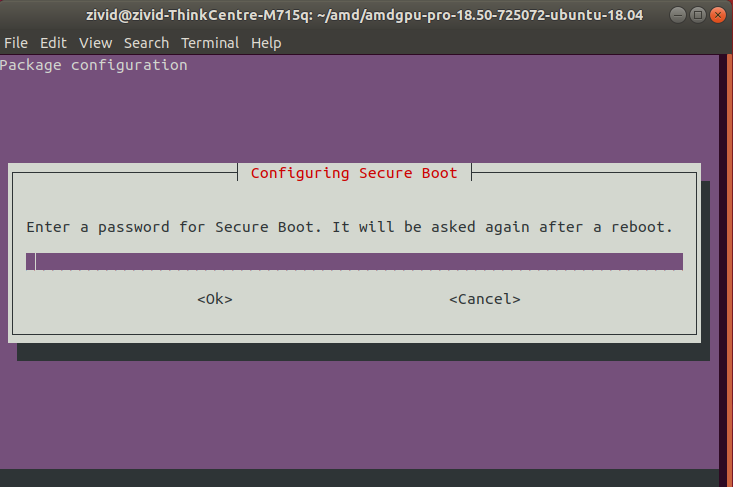
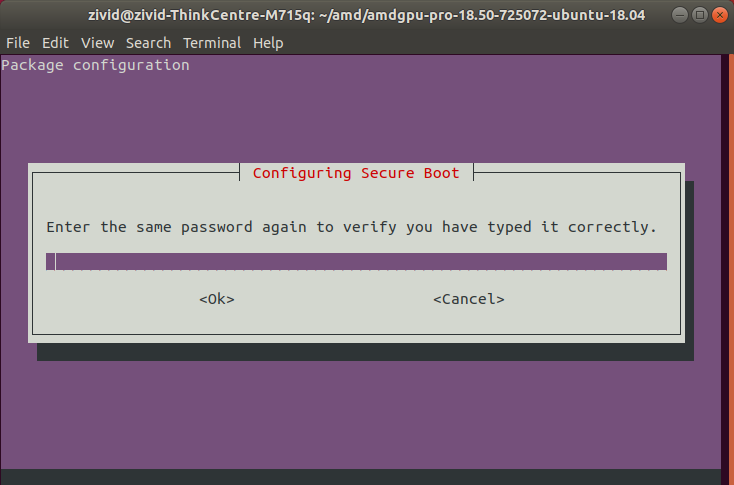
手順に従ってセキュアブートを設定します (プロンプトが表示された場合)。
Zivid Studio を開き、OpenCL エラーが発生しないことを確認します。
注釈
OpenCL エラーが発生した場合は、 ユーザーをグループ Video に追加する 必要がある場合があります。
In addition to the OpenCL or CUDA driver above, Zivid Studio and the SDK's visualizers also need an OpenGL driver.
Check OpenGL drivers
キーボードの Ctrl + Alt + T キーを押してターミナルウィンドウを開き、次のコマンドを実行します。
sudo apt install mesa-utils
glxinfo | grep "OpenGL version"
これにより、OpenGL のバージョンが出力されます。
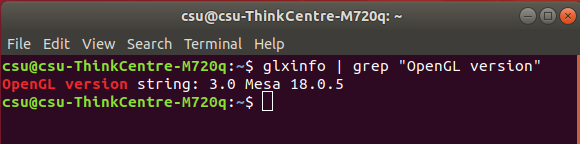
In case the version is below 3.0, you need to install the latest GPU driver following the instructions for your GPU above.
Nvidia Jetson Linux
Nvidia Jetson Orin and Thor have CUDA enabled Nvidia GPUs. All required GPU drivers are installed with the operating system.
Zivid Studio and the SDK's visualizers also need an OpenGL driver.
Check OpenGL drivers
Jetson Linux には互換性のある OpenGL バージョンが付属しているため、特別な操作は必要ありません。
パフォーマンスに関する考慮事項
Dedicated GPU
A dedicated GPU gives the best performance with Zivid. It is also the best choice if the GPU will be used for more than Zivid's computations. A medium to high-end NVIDIA GPU with at least 3 GB of memory is required for optimal performance. This is the preferred solution for Zivid.
推奨事項:
NVIDIA GeForce GTX 1060 or newer for desktops
NVIDIA GeForce MX150 or newer for laptops
Integrated GPU
This is the most cost-efficient solution for Zivid. The benefit of an integrated GPU is that the data transfer from GPU to CPU is fast. It is also beneficial for applications that require low power consumption, e.g., battery-powered mobile platforms. A high-end integrated GPU with at least 3 GB of memory available is required for optimal performance.
推奨事項:
HD630 以上を搭載した Intel i7
Nvidia Jetson
Zivid recommends Jetson boards that have at least 16GB of RAM for running Zivid SDK and additional software.
While Zivid SDK supports Jetson Orin Nano, Orin Nano has only 4GB/8GB of total RAM, which is shared between the CPU and the GPU. 4GB is generally insufficient to run any application using Zivid SDK, while 8GB in practice is insufficient for many use cases, especially when combining longer captures, the Stripe/Omni engine, and many filters. Therefore, when using Orin Nano, RAM usage in your application must be carefully evaluated.
Jetson Thor modules (T4000/T5000) ship with 64GB or 128GB of RAM, well above the recommended minimum.
警告
Jetson boards may boot in a reduced power profile that significantly slows down Zivid SDK point cloud processing. Set the maximum power profile as described in Jetson Linux に Zivid をインストールする.
コンピューティングデバイスの選択
複数の GPU があり、Zivid SDK で特定の GPU を使用したい場合は、 設定ファイル でコンピューティングデバイスを指定できます。Zivid SDK を CPU で実行するように構成することもできますが、CPU は サポートされていないコンピューティングデバイスモード です。
CUDA and OpenCL
Zivid SDK is available in two versions, a CUDA version and an OpenCL version. The version is selected when you install the SDK, not in the configuration file.
The CUDA version runs on NVIDIA GPUs only. The OpenCL version runs on Intel GPUs, and can run on NVIDIA GPUs as an unsupported compute device. To use an NVIDIA GPU as a supported compute device, install the CUDA version of the SDK.
Configuration file
ファイルがまだ存在しない場合は、 Config.yml ファイルをダウンロードして、次のディレクトリに配置します。
Windows
mkdir %LOCALAPPDATA%\Zivid\API
move %HOMEPATH%\Downloads\Config.yml %LOCALAPPDATA%\Zivid\API\
Ubuntu
mkdir --parents "${XDG_CONFIG_HOME-$HOME/.config}"/Zivid/API
mv ~/Downloads/Config.yml "${XDG_CONFIG_HOME-$HOME/.config}"/Zivid/API/
The desired GPU is assigned by changing the ComputeDevice parameters in the configuration file.
Single vendor
単一ベンダーの複数の GPU (例: 2 つの Nvidia GPU) がある場合、 SelectionFilter でどの GPU を使用するかを指定する必要があります。 clinfo を使用してすべてのコンピューティングデバイスをリストします。 clinfo の詳細、インストール方法、使用方法については、以下のドロップダウンに従ってください。
clinfo
Windows
clinfo Windows バイナリファイルをダウンロードします。
キーボードの Win + R キーを押してコマンドプロンプトを起動し、次に
cmdと入力して Enter を押します。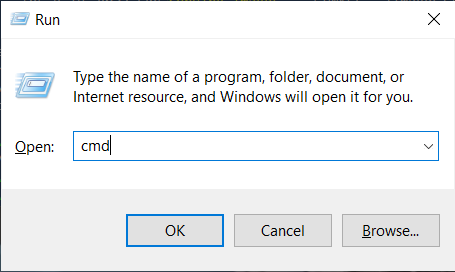
ダウンロードしたファイル (clinfo.exe) が含まれるディレクトリに移動し、次のコマンドを実行します。
clinfo.exe -l
これにより、システム上のすべての OpenCL プラットフォームと、それらが公開するデバイスに関する利用可能な情報がすべて出力されます。
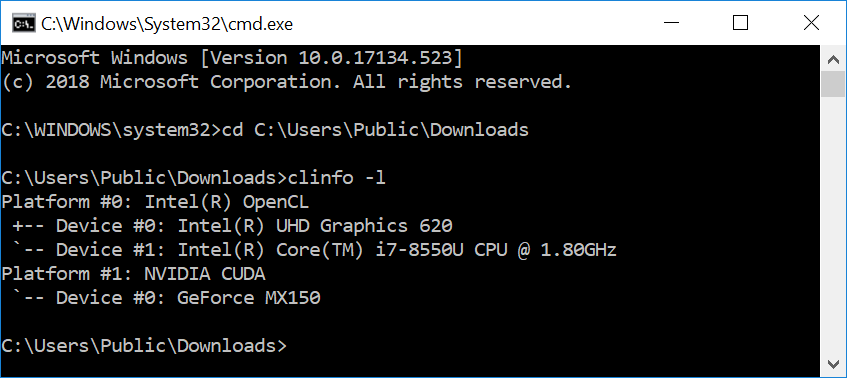
GPU がリストにない場合は OpenCL ドライバーやグラフィックスドライバーをインストールする 必要がある場合があります。
OpenCL ドライバーのバージョンを確認するには、
clinfoを使用して OpenCL プラットフォームのバージョンを検索します。clinfo.exe | findstr "Platform\ Version"
バージョンが OpenCL 1.2 より低い場合は、 グラフィックスドライバーを更新する 必要があります。
Ubuntu
キーボードの Ctrl + Alt + T キーを押してターミナルウィンドウを開き、
clinfoをインストールします。sudo apt install -y clinfo
clinfo -lを実行して、すべての OpenCL プラットフォームをリストします。sudo /usr/bin/clinfo -l
これにより、システム上のすべての OpenCL プラットフォームと、それらが公開するデバイスに関する利用可能な情報がすべて出力されます。
GPU がリストにない場合は OpenCL ドライバーやグラフィックスドライバーをインストールする 必要がある場合があります。
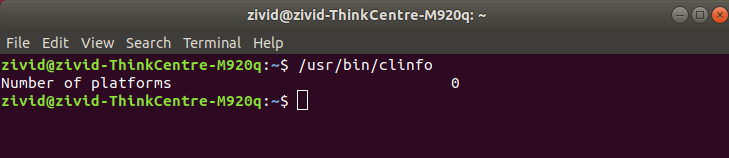
OpenCL ドライバーのバージョンを確認するには、
clinfoを使用して OpenCL プラットフォームのバージョンを検索します。sudo /usr/bin/clinfo | grep "Platform Version"
バージョンが OpenCL 1.2 より低い場合は、 OpenCL ドライバーやグラフィックスドライバーを更新する 必要があります。
特定の GPU 名を見つけるには、 clinfo を実行してコンピューティングデバイスを一覧表示します。
clinfo -l
注釈
clinfo lists OpenCL devices and applies to the OpenCL version of the SDK.
With the CUDA version, run nvidia-smi -L in a terminal instead, and use any unique part of the CUDA device name.
Both commands run on Windows and Ubuntu.
On Windows, clinfo is not installed by default and nvidia-smi is sometimes not on the PATH.
設定ファイル内の SelectionFilter を、目的のデバイスの名前の一意の部分に変更します。たとえば、次の出力の NVIDIA GeForce RTX 3060 の場合、
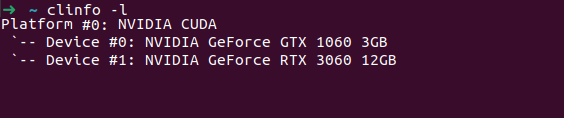
set SelectionFilter to
ComputeDevice:
    SelectionFilter: "RTX 3060"
    Type: Any
    Vendor: Any
Multiple vendors
If you have multiple GPUs from multiple vendors (e.g. an integrated Intel GPU and a dedicated NVIDIA GPU), change Type to GPU and Vendor to Nvidia or Intel, e.g.
ComputeDevice:
    SelectionFilter: ""
    Type: GPU
    Vendor: Nvidia
サポートされていないコンピューティングデバイスの有効化
Enabling unsupported compute devices can be done by enabling an option in the Configuration file.
However, such a setup can give unexpected results and errors, and is not tested by Zivid.
Currently, the unsupported compute devices are AMD GPUs, NVIDIA GPUs on the OpenCL version of the SDK, and CPUs.
Download the Config.yml file for your compute device below:
Enable AMD
Download the Config.yml file, which contains the following information, where AllowUnsupported: yes enables unsupported compute devices:
__version__:
    serializer: 1
    data: 19
Configuration:
    ComputeDevice:
        AllowUnsupported: yes
Enable NVIDIA on the OpenCL version
The OpenCL version of the SDK treats NVIDIA GPUs as unsupported compute devices.
If you install the OpenCL version on an NVIDIA GPU without enabling it, the SDK will fail with an error saying that NVIDIA compute devices are not supported (see NVIDIA Compute Devices Are Not Supported by the OpenCL Version for the exact error message).
Download the Config.yml file below, where Vendor is set to Nvidia and AllowUnsupported to yes.
For a supported setup on NVIDIA GPUs, install the CUDA version of the SDK instead.
__version__:
    serializer: 1
    data: 19
Configuration:
    ComputeDevice:
        Type: GPU
        Vendor: Nvidia
        AllowUnsupported: yes
Enable CPU
It is possible to run the Zivid SDK on an Intel chipset using their CPU Runtime for OpenCL.
Download the Config.yml file below, where the compute device Type is set to CPU, and Vendor to Intel.
__version__:
    serializer: 1
    data: 19
Configuration:
    ComputeDevice:
        Type: CPU
        Vendor: Intel
        AllowUnsupported: yes
警告
CPU はサポートされていないコンピューティングデバイスモードです。CPU を使用するとキャプチャ時間が大幅に増加するため、ほとんどのアプリケーションではこの設定は推奨されません。また、OpenCL プラットフォームが混在する環境では、CPU を選択するとクラッシュなどの不安定な動作を引き起こす可能性があります。
Once downloaded, place the Config.yml file in the following directory:
Windows
mkdir %LOCALAPPDATA%\Zivid\API
move %HOMEPATH%\Downloads\Config.yml %LOCALAPPDATA%\Zivid\API\
Ubuntu
mkdir --parents "${XDG_CONFIG_HOME-$HOME/.config}"/Zivid/API
mv ~/Downloads/Config.yml "${XDG_CONFIG_HOME-$HOME/.config}"/Zivid/API/
Version History
SDK |
変更点 |
|---|---|
2.18.0 |
Added support for the CUDA compute backend for NVIDIA GPUs. Added Jetson Thor support. Added support for Ubuntu 26.04. |
2.12.0 |
Jetson Orin のサポートを追加しました。 |