Adjusting Color Balance
In the SDK, we have functionality for adjusting the color balance values for red, green, and blue color channels. Ambient light that is not perfectly white and/or is significantly strong will affect the RGB values of the color image. Run color balance on the camera if your application requires the correct RGB. This is especially the case if you are not using the Zivid camera projector to capture color images.
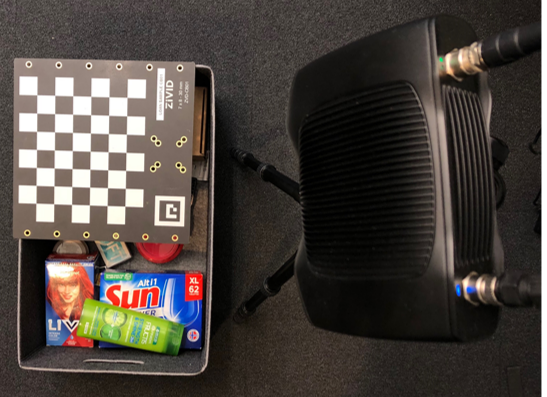
This tutorial shows how to balance the color of a 2D image by taking images of the Zivid calibration board in a loop. As a pre-requisite, you have to find and provide your 2D acquisition settings as a YML, and the tutorial will show how to balance colors with those settings. Check out Toolbar to see how you can export settings from Zivid Studio.

First, we provide the path to the 2D acquisition settings we want to balance the color for.
def _options() -> argparse.Namespace:
    """Configure and take command line arguments from user.

    Returns:
        Arguments from user

    """
    parser = argparse.ArgumentParser(
        description=(
            "Balance the color of a 2D image\n"
            "Example:\n"
            "\t $ python color_balance.py path/to/settings.yml\n\n"
            "where path/to/settings.yml is the path to the 2D acquisition settings you want to find color balance for."
        ),
        formatter_class=argparse.RawTextHelpFormatter,
    )

    parser.add_argument(
        dest="path",
        type=Path,
        help="Path to YML containing 2D capture settings",
    )

    return parser.parse_args()
Then, we connect to the camera.
After that, we load the 2D acquisition settings.
We then capture an image and display it.
Then we detect and find the white squares of the calibration board as the white reference to balance against.
If you want to use a custom mask, e.g. a piece of paper or a white wall, you can provide your own mask. As an example, you can use the following to mask the central pixels of the image.
def get_central_pixels_mask(image_shape: Tuple, num_pixels: int = 100) -> np.ndarray:
    """Get mask for central NxN pixels in an image.

    Args:
        image_shape: (H, W) of image to mask
        num_pixels: Number of central pixels to mask

    Returns:
        mask: Mask of (num_pixels)x(num_pixels) central pixels

    """
    height = image_shape[0]
    width = image_shape[1]

    height_start = int((height - num_pixels) / 2)
    height_end = int((height + num_pixels) / 2)
    width_start = int((width - num_pixels) / 2)
    width_end = int((width + num_pixels) / 2)

    mask = np.zeros((height, width))
    mask[height_start:height_end, width_start:width_end] = 1

    return mask
Then we run the calibration algorithm, which balances the color of the RGB image by taking images and masking out everything but the white pixels that we calibrate with.
The complete implementation of the algorithm is given below.
def white_balance_calibration(
    camera: zivid.Camera, settings_2d: zivid.Settings2D, mask: np.ndarray
) -> Tuple[float, float, float]:
    """Balance color for RGB image by taking images of white surface (checkers, piece of paper, wall, etc.) in a loop.

    Args:
        camera: Zivid camera
        settings_2d: 2D capture settings
        mask: (H, W) of bools masking the white surface

    Raises:
        RuntimeError: If camera does not need color balancing

    Returns:
        corrected_red_balance: Corrected red balance
        corrected_green_balance: Corrected green balance
        corrected_blue_balance: Corrected blue balance

    """
    if not camera_may_need_color_balancing(camera):
        raise RuntimeError(f"{camera.info.model} does not need color balancing.")

    corrected_red_balance = 1.0
    corrected_green_balance = 1.0
    corrected_blue_balance = 1.0

    saturated = False

    while True:
        settings_2d.processing.color.balance.red = corrected_red_balance
        settings_2d.processing.color.balance.green = corrected_green_balance
        settings_2d.processing.color.balance.blue = corrected_blue_balance

        rgba = camera.capture_2d(settings_2d).image_rgba_srgb().copy_data()
        mean_color = compute_mean_rgb_from_mask(rgba[:, :, 0:3], mask)

        mean_red, mean_green, mean_blue = mean_color[0], mean_color[1], mean_color[2]

        if int(mean_green) == int(mean_red) and int(mean_green) == int(mean_blue):
            break
        if saturated is True:
            break
        max_color = max(float(mean_red), float(mean_green), float(mean_blue))
        corrected_red_balance = float(np.clip(settings_2d.processing.color.balance.red * max_color / mean_red, 1, 8))
        corrected_green_balance = float(
            np.clip(settings_2d.processing.color.balance.green * max_color / mean_green, 1, 8)
        )
        corrected_blue_balance = float(np.clip(settings_2d.processing.color.balance.blue * max_color / mean_blue, 1, 8))

        corrected_values = [corrected_red_balance, corrected_green_balance, corrected_blue_balance]

        if 1.0 in corrected_values or 8.0 in corrected_values:
            saturated = True

    return (corrected_red_balance, corrected_green_balance, corrected_blue_balance)
We then apply the color balance settings, capture a new image and display it.
settings_2d.processing.color.balance.red = red_balance
settings_2d.processing.color.balance.green = green_balance
settings_2d.processing.color.balance.blue = blue_balance
rgba_balanced = camera.capture_2d(settings_2d).image_rgba_srgb().copy_data()
display_rgb(rgba_balanced[:, :, 0:3], title="RGB image after color balance", block=True)
Lastly, we save the 2D acquisition settings with the new color balance gains to file.
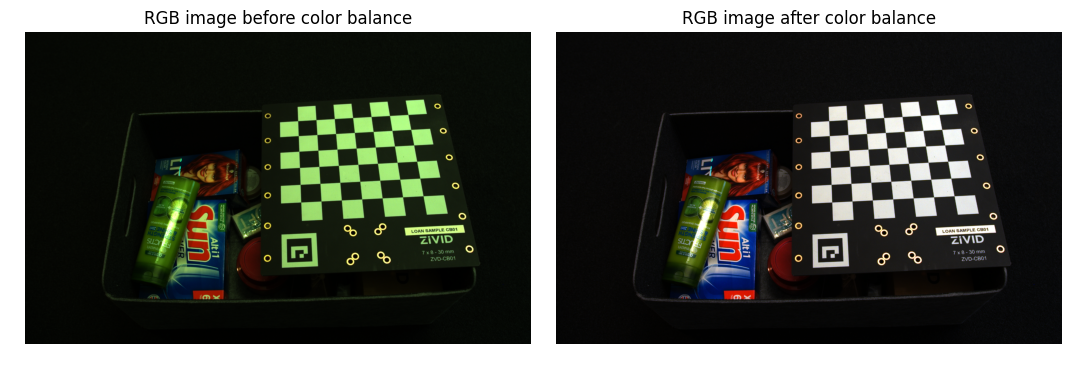
The figure below shows the color image before and after applying color balance.

To balance the color of a 2D image, you can run our code sample, providing path to your 2D acquisition settings.
Sample: color_balance.py
python color_balance.py /path/to/settings.yml
As output, 2D acquisition settings with the new color balance gains are saved to file.