Transform via Checkerboard
This tutorial demonstrates how to estimate the pose of the checkerboard and transform a point cloud using a 4x4 homogeneous transformation matrix to the checkerboard coordinate system. This sample also saves a YAML file with the transformation matrix.
The checkerboard’s point cloud to be used in this tutorial is displayed in the image below.
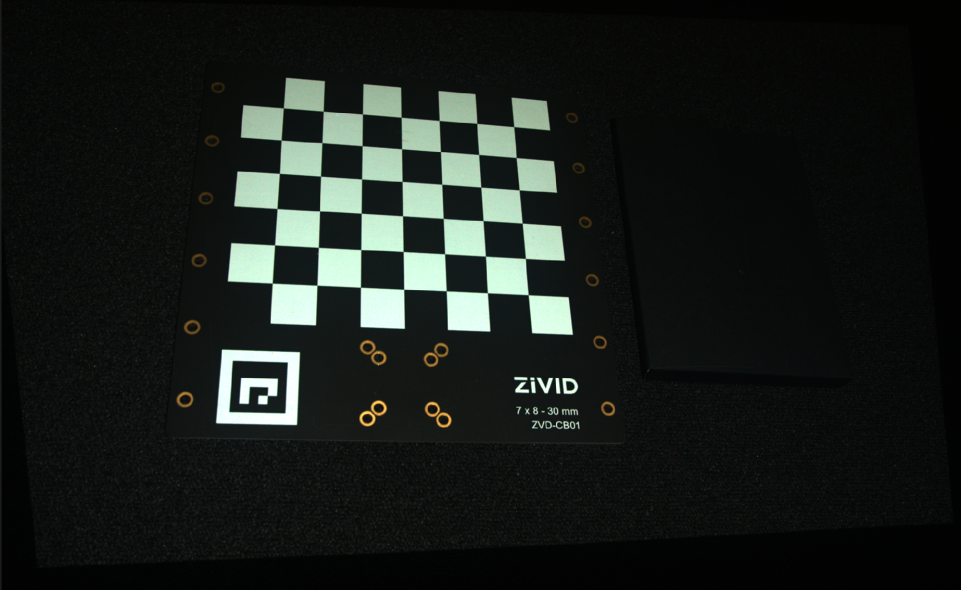
We can open the original point cloud in Zivid Studio and inspect it.
Note
The original point cloud is also in Sample Data.
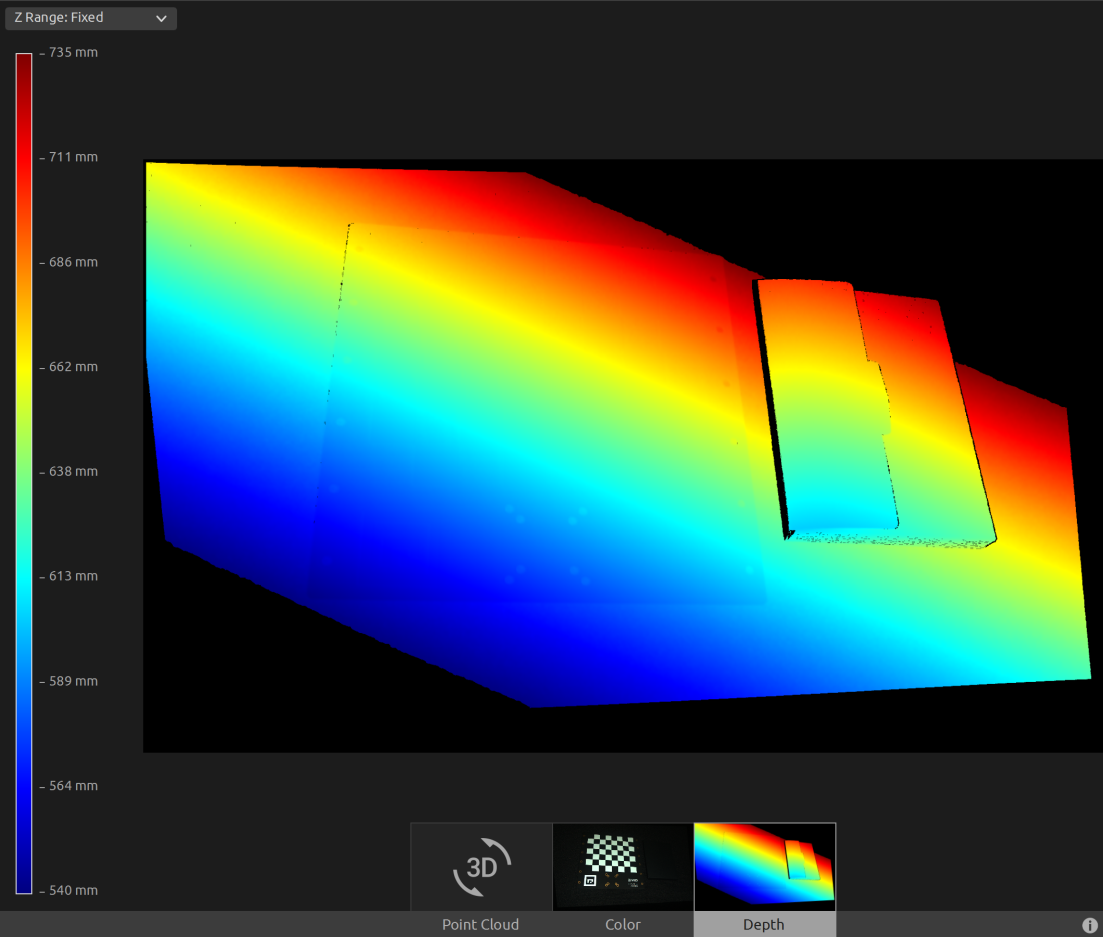
Now, we can manually set the Z Range from 540 mm to 735 mm in the Depth view. This allows us to see that there is an angle between the camera and the checkerboard frame.
First, we load a point cloud of a checkerboard.

const auto calibrationBoardFile = std::string(ZIVID_SAMPLE_DATA_DIR) + "/CalibrationBoardInCameraOrigin.zdf";
std::cout << "Reading ZDF frame from file: " << calibrationBoardFile << std::endl;
const auto frame = Zivid::Frame(calibrationBoardFile);
auto pointCloud = frame.pointCloud();
var calibrationBoardFile = Environment.GetFolderPath(Environment.SpecialFolder.CommonApplicationData)
               + "/Zivid/CalibrationBoardInCameraOrigin.zdf";
Console.WriteLine("Reading ZDF frame from file: " + calibrationBoardFile);
Then we estimate the pose of the checkerboard.
std::cout << "Detecting and estimating pose of the Zivid checkerboard in the camera frame" << std::endl;
const auto detectionResult = Zivid::Calibration::detectCalibrationBoard(frame);
if(!detectionResult.valid())
{
    throw std::runtime_error("No checkerboard detected. " + detectionResult.statusDescription());
}
const auto cameraToCheckerboardTransform = detectionResult.pose().toMatrix();
Console.WriteLine("Detecting and estimating pose of the Zivid checkerboard in the camera frame");
var detectionResult = Detector.DetectCalibrationBoard(frame);
var cameraToCheckerboardTransform = new Zivid.NET.Matrix4x4(detectionResult.Pose().ToMatrix());
print("Detecting and estimating pose of the Zivid checkerboard in the camera frame")
detection_result = zivid.calibration.detect_calibration_board(frame)

if not detection_result.valid():
    raise RuntimeError(f"No Checkerboard detected. {detection_result.status_description()}")

camera_to_checkerboard_transform = detection_result.pose().to_matrix()
Before transforming the point cloud, we invert the transformation matrix in order to get the pose of the camera in the checkerboard coordinate system.
std::cout << "Camera pose in checkerboard frame:" << std::endl;
const auto checkerboardToCameraTransform = cameraToCheckerboardTransform.inverse();
Console.WriteLine("Camera pose in checkerboard frame:");
var checkerboardToCameraTransform = cameraToCheckerboardTransform.Inverse();
After transforming we save the pose to a YAML file.
const auto transformFile = "CheckerboardToCameraTransform.yaml";
std::cout << "Saving camera pose in checkerboard frame to file: " << transformFile << std::endl;
checkerboardToCameraTransform.save(transformFile);
var transformFile = "CheckerboardToCameraTransform.yaml";
Console.WriteLine("Saving camera pose in checkerboard frame to file: " + transformFile);
checkerboardToCameraTransform.Save(transformFile);
This is the content of the YAML file:
__version__:
  serializer: 1
  data: 1
FloatMatrix:
  Data: [
    [0.9791644, 0.04366289, 0.1983198, 17.74656],
    [0.0502592, 0.8941201, -0.444998, 431.1943],
    [-0.1967516, 0.4456936, 0.8732962, -547.7883],
    [0, 0, 0, 1]]
After that, we transform the point cloud to the checkerboard coordinate system.
std::cout << "Transforming point cloud from camera frame to checkerboard frame" << std::endl;
pointCloud.transform(checkerboardToCameraTransform);
Console.WriteLine("Transforming point cloud from camera frame to checkerboard frame");
pointCloud.Transform(checkerboardToCameraTransform);
Hint
Learn more about Position, Orientation and Coordinate Transformations.
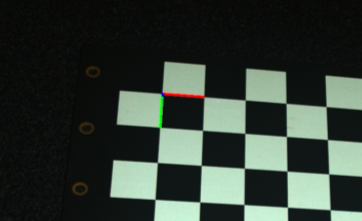
Before saving the transformed point cloud, we can convert it to an OpenCV 2D image format and draw the coordinate system.
std::cout << "Converting to OpenCV image format" << std::endl;
const auto bgraImage = pointCloudToColorBGRA_SRGB(pointCloud);
std::cout << "Visualizing checkerboard with coordinate system" << std::endl;
cv::Mat bgrCoordinateSystem;
cv::cvtColor(bgraImage, bgrCoordinateSystem, cv::COLOR_BGRA2BGR);
drawCoordinateSystem(frame, cameraToCheckerboardTransform, bgrCoordinateSystem);
displayBGR(bgrCoordinateSystem, "Checkerboard transformation frame");
print("Converting to OpenCV image format")
bgra_image = point_cloud.copy_data("bgra_srgb")
print("Visualizing checkerboard with coordinate system")
bgr_coordinate_system = bgra_image[:, :, 0:3].copy()
_draw_coordinate_system(frame, camera_to_checkerboard_transform, bgr_coordinate_system)
display_bgr(bgr_coordinate_system, "Checkerboard transformation frame")
Here we can see the image that will be displayed and we can observe where the coordinate system of the checkerboard is.
Lastly we save the transformed point cloud to disk.
const auto checkerboardTransformedFile = "CalibrationBoardInCheckerboardOrigin.zdf";
std::cout << "Saving transformed point cloud to file: " << checkerboardTransformedFile << std::endl;
frame.save(checkerboardTransformedFile);
var checkerboardTransformedFile = "CalibrationBoardInCheckerboardOrigin.zdf";
Console.WriteLine("Saving transformed point cloud to file: " + checkerboardTransformedFile);
frame.Save(checkerboardTransformedFile);
Hint
Learn more about Position, Orientation and Coordinate Transformations.
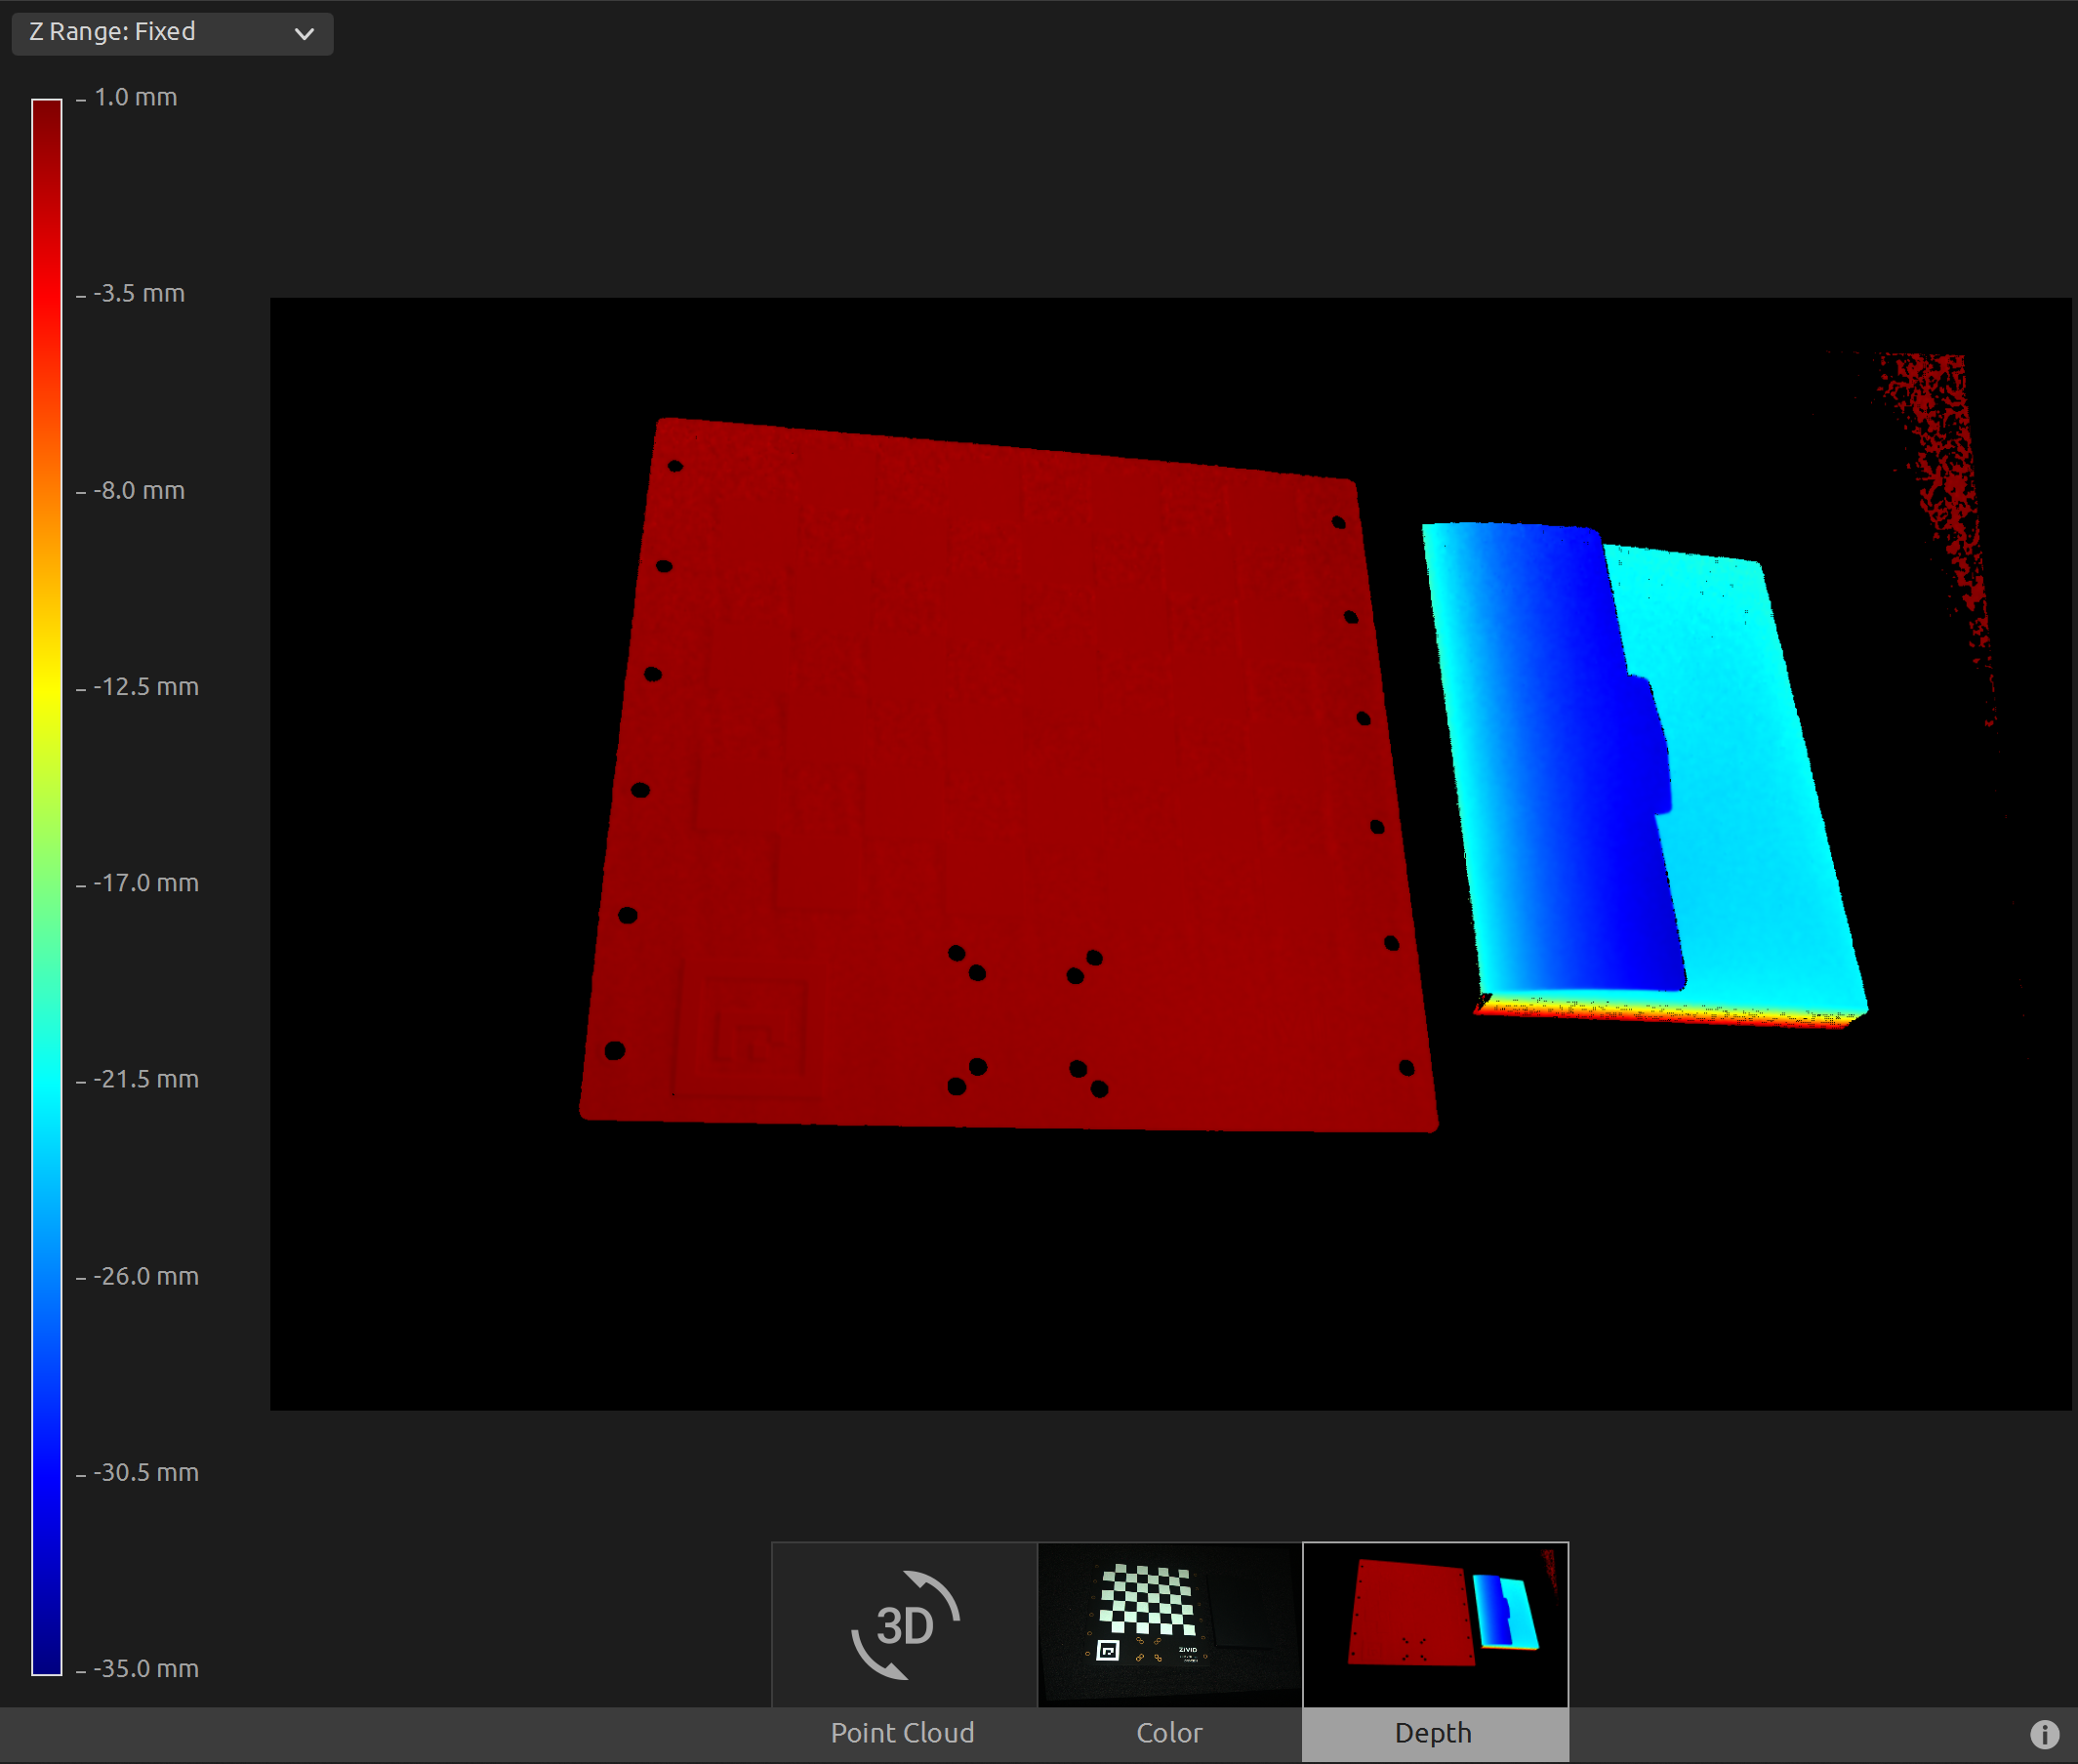
Now we can open the transformed point cloud in Zivid Studio and inspect it.
Note
Zoom out in Zivid Studio to find the data because the viewpoint origin is inadequate for transformed point clouds.
We can now manually set the Z Range from -35 mm to 1 mm in the Depth view. This way we can filter out all data except the calibration board and the object located next to it. This allows us to see that we have the same Z value across the calibration board, and from the color gradient we can check that the value is 0. This means that the origin of the point cloud is on the checkerboard.
To transform the point cloud to the Calibration board coordinate system, you can run our code sample.
Sample: TransformPointCloudViaCheckerboard.cpp
./TransformPointCloudViaCheckerboard
Sample: TransformPointCloudViaCheckerboard.cs
./TransformPointCloudViaCheckerboard
Sample: transform_point_cloud_via_checkerboard.py
python transform_point_cloud_via_checkerboard.py
Tip
Modify the code sample if you wish to use this in your own setup:
Replace the ZDF file with your actual camera and settings.
Place the checkerboard in your scene.
Run sample!