Static IP Network Configuration - Camera
Caution
The correct instructions for network configuration will depend on your SDK version. Choose your SDK version in the top left drop-down.
The CLI tool ZividNetworkCameraConfigurator allows you to change the camera network configuration of one camera at a time.
This tool is installed alongside the Zivid SDK on Windows, and with the zivid-tools package on Ubuntu.
If you are unsure whether this tool has been installed, follow the Software Installation guide.
The camera can be configured in static IP mode or DHCP mode (defaults to link-local after ~45 seconds).
Caution
When configuring, ensure that you don’t physically connect multiple cameras with the same IP address at a time.
Menu
To view the help text with information about all inputs and outputs, type:
ZividNetworkCameraConfigurator.exe -h
ZividNetworkCameraConfigurator -h
Set the IP address of the camera
Open a terminal/Command Prompt.
Connect a Zivid Two camera.
Verify that your camera is found by running:
ZividListCameras.exe
ZividListCamerasSet static IP on camera:
To set the camera in static IP mode with a specific IP address,
subnet maskandgateway:ZividNetworkCameraConfigurator.exe set-config <host> --static --ip <ip> --subnet-mask <mask> --gateway <gateway>
ZividNetworkCameraConfigurator set-config <host> --static --ip <ip> --subnet-mask <mask> --gateway <gateway>
For example, changing the static IP from
172.28.60.5to172.28.60.6:ZividNetworkCameraConfigurator.exe set-config 172.28.60.5 --static --ip 172.28.60.6 --subnet-mask 255.255.255.0 --gateway 172.28.60.1
ZividNetworkCameraConfigurator set-config 172.28.60.5 --static --ip 172.28.60.6 --subnet-mask 255.255.255.0 --gateway 172.28.60.1
Caution
When changing static IP, make sure it is not colliding with something else on your network and that it is not in the DHCP range.
Disconnect the camera.
If you are configuring IP addresses of multiple cameras, repeat steps 2 to 5 with a different IP address for each camera. For each camera, remember to use an IP address within the same subnet range of its interfacing network card.

For two cameras using individual network cards use e.g.
172.28.60.5and172.28.61.5.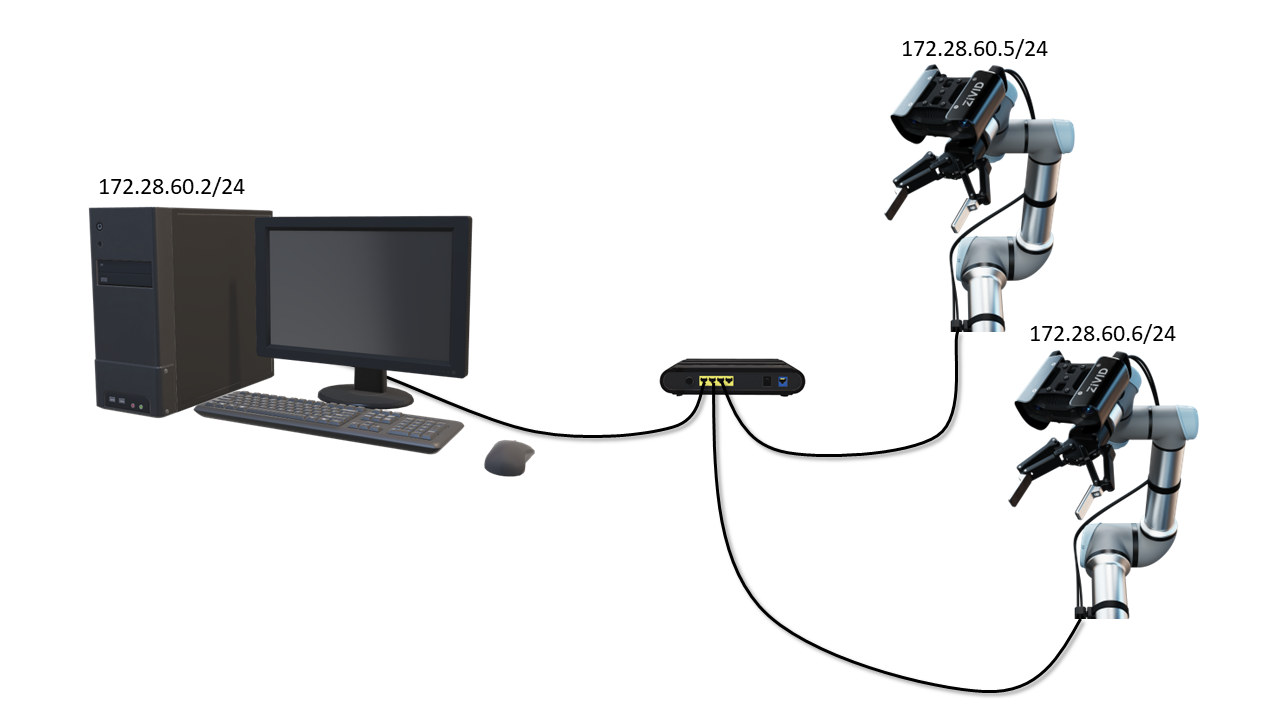
For two cameras connected to the same network card using a switch, use e.g.
172.28.60.5and172.28.60.6.If you used IP address(es) outside the default subnet range, e.g.,
192.168.100.23with gateway192.168.100.1, you need to change your network interface configuration again. To do that, follow Static IP Network Configuration - PC steps but with the IP address in the same subnet range as the camera(s), e.g.,192.168.100.2and gateway192.168.100.1.Connect your camera(s).
You have now configured the camera(s) for static IP. If the camera(s) IP is in a different subnet range than the PC, go to Static IP Network Configuration - PC before going onwards. If it is in the same subnet range, go to Discovering and connecting to the camera.