Static IP Network Configuration
To configure a static IP, set the camera to static IP mode, then set the PC’s network interface to a matching IP in the same subnet.
Caution
The correct instructions for network configuration will depend on your SDK version. Choose your SDK version in the top left drop-down.
Camera
To set a static IP on the camera, use Zivid Studio, the CLI Tool, or the API.
Zivid Studio
Open Zivid Studio and click Cameras → All Cameras to open the camera menu.
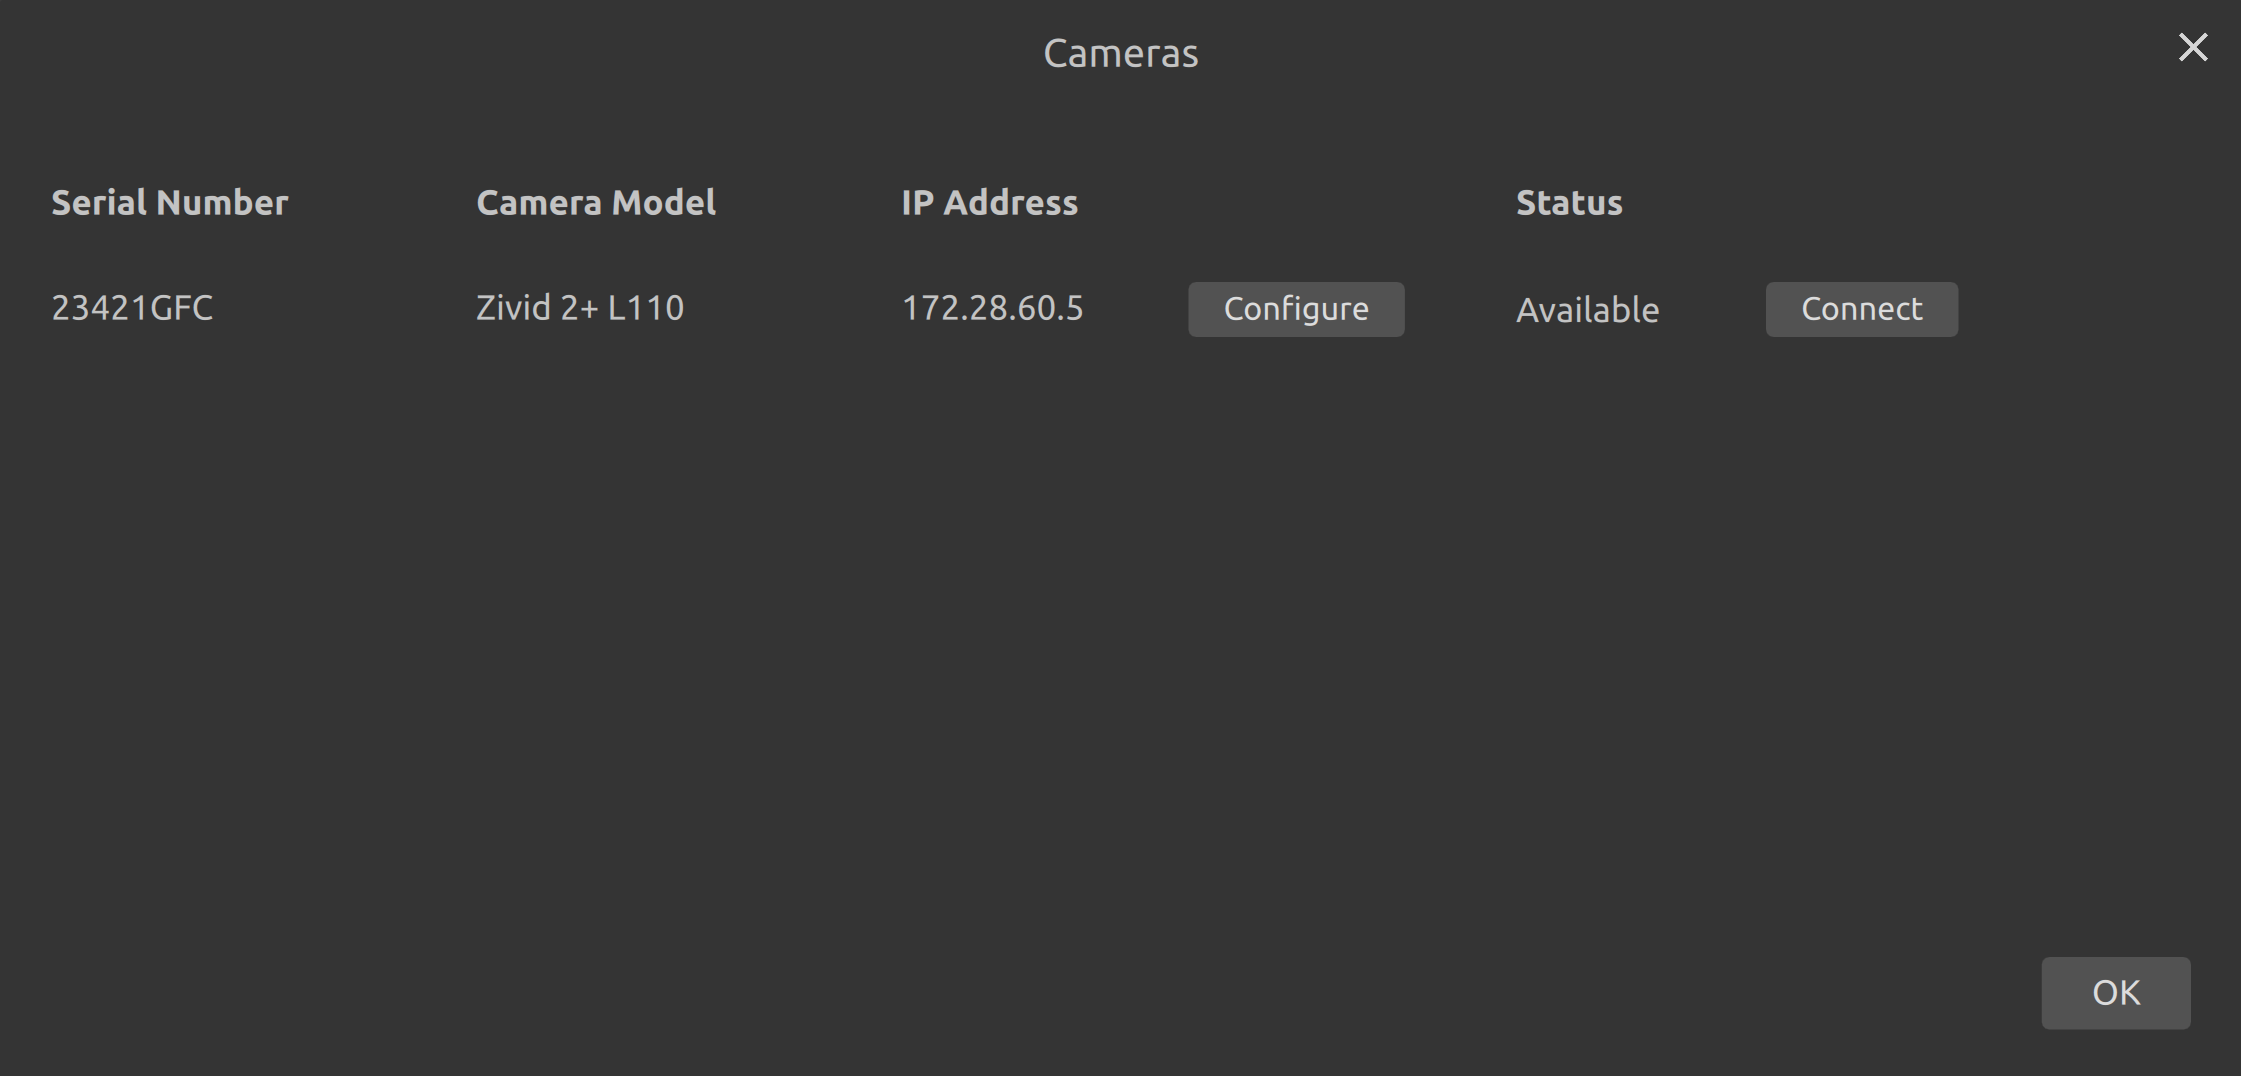
Click Configure on the camera that you want to configure.
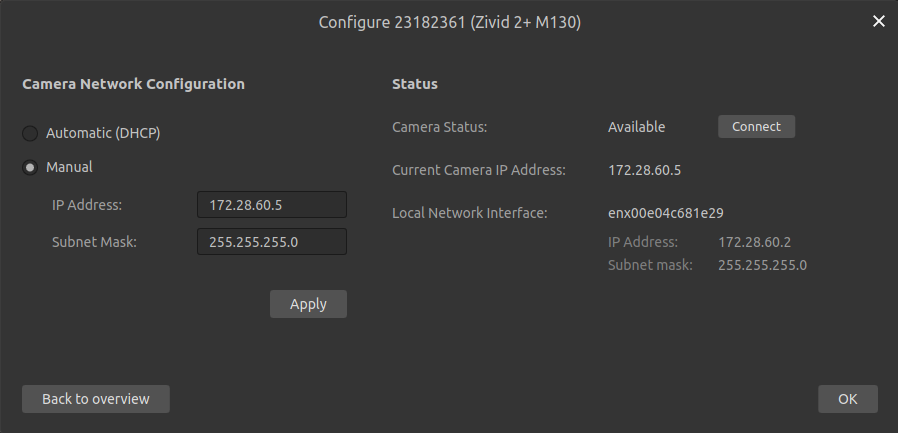
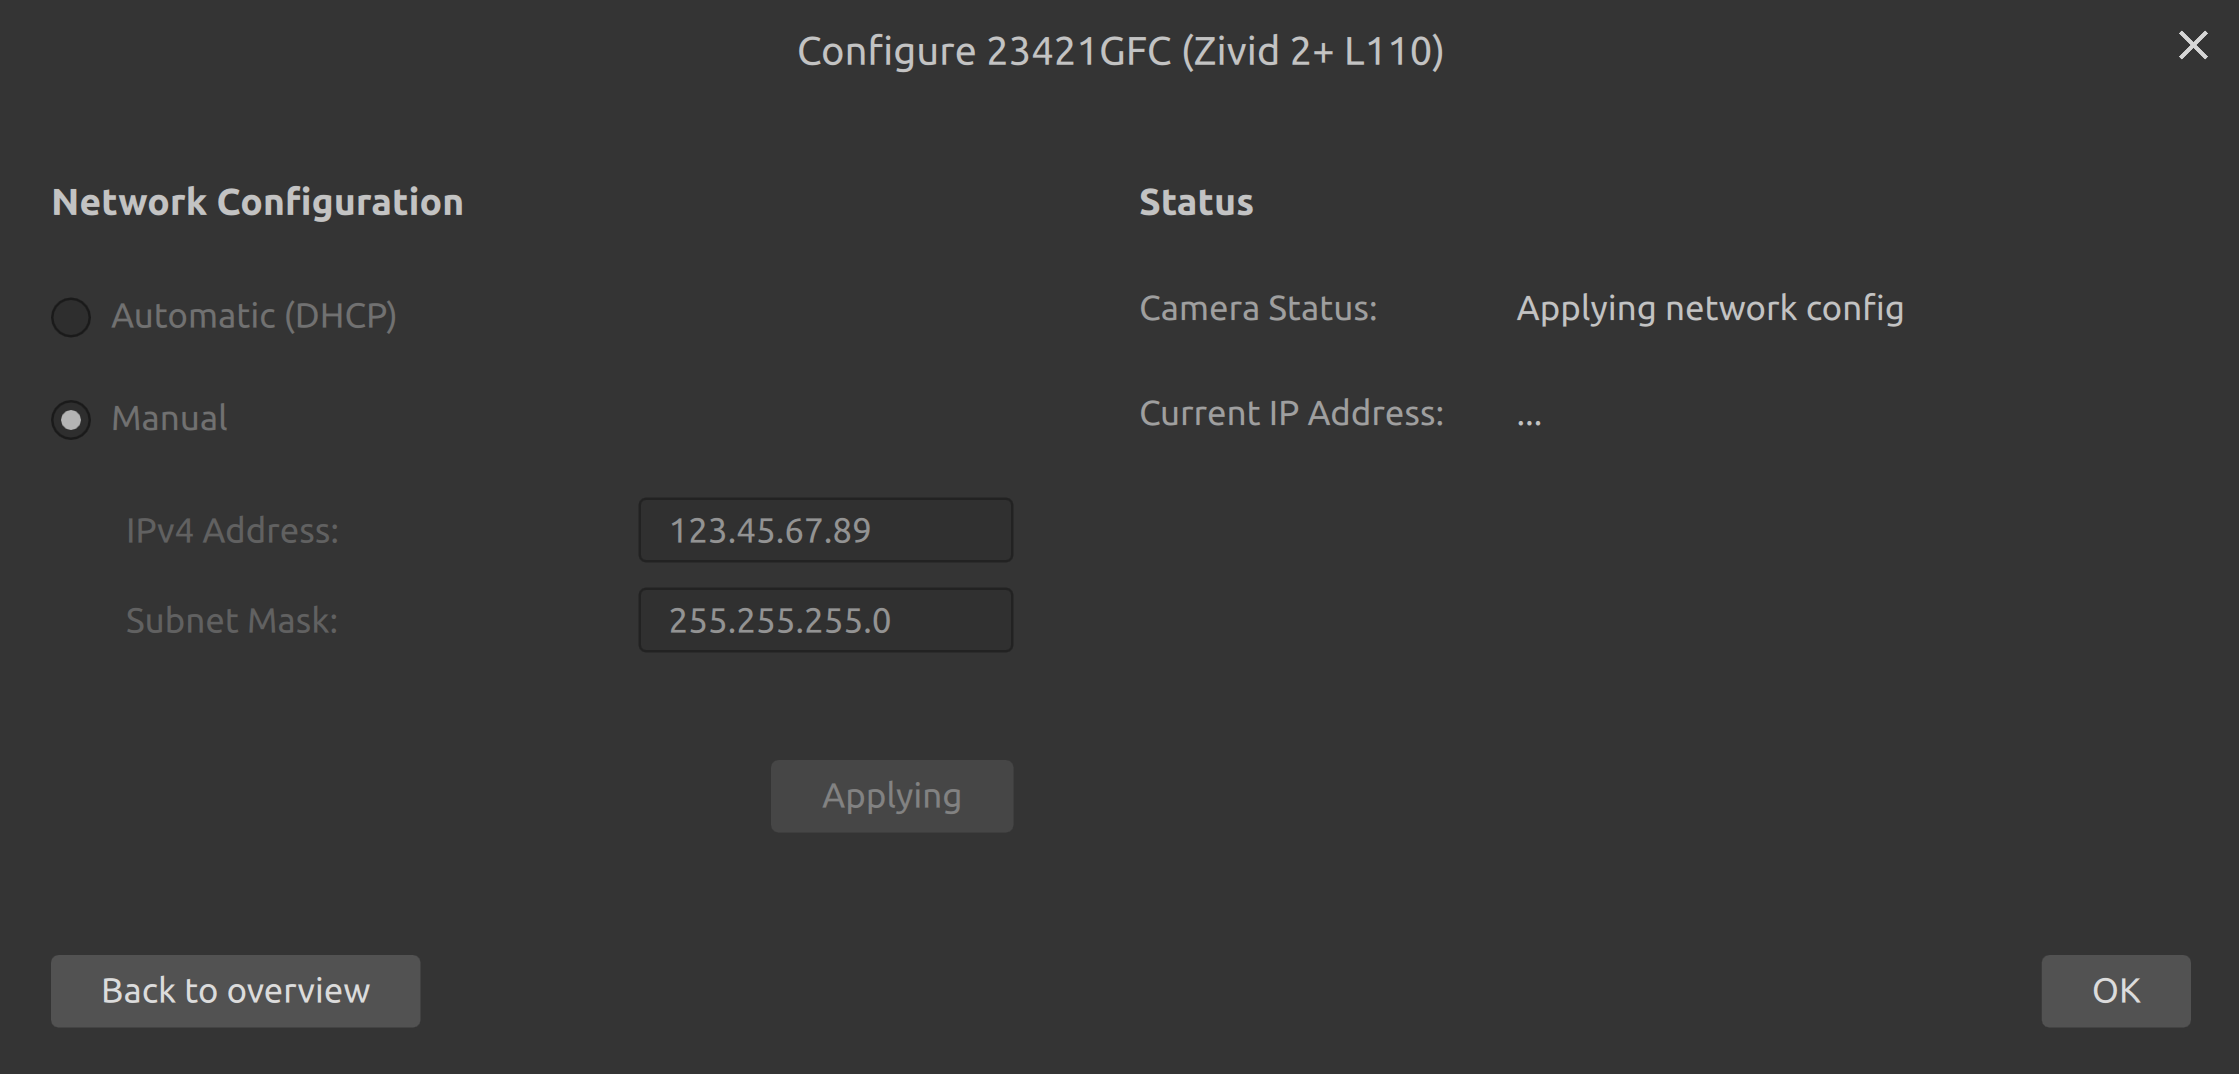
Select the manual network configuration mode, and enter your desired IP address and subnet mask. Make sure the IP address is not colliding with anything else on your network. Click Apply to apply the configuration to the camera.
CLI Tool
You can use the CLI tool ZividNetworkCameraConfigurator to change the camera network configuration of one camera at a time.
This tool is installed alongside the Zivid SDK on Windows, and with the Zivid Tools package on Ubuntu.
Open a terminal/Command Prompt.
Connect the camera.
Verify that your camera is found by running:
Windows
ZividListCameras.exe
Ubuntu
ZividListCameras
Set the camera with current IP
<host>in static IP mode with a specific IP address<ip>, subnet mask<mask>and gatewaygateway. Make sure the IP address is not colliding with anything else on your network.Windows
ZividNetworkCameraConfigurator.exe set-config <host> --static --ip <ip> --subnet-mask <mask> --gateway <gateway>
For example, changing the static IP from
172.28.60.5to172.28.60.6:ZividNetworkCameraConfigurator.exe set-config 172.28.60.5 --static --ip 172.28.60.6 --subnet-mask 255.255.255.0 --gateway 172.28.60.1
Ubuntu
ZividNetworkCameraConfigurator set-config <host> --static --ip <ip> --subnet-mask <mask> --gateway <gateway>
For example, changing the static IP from
172.28.60.5to172.28.60.6:ZividNetworkCameraConfigurator set-config 172.28.60.5 --static --ip 172.28.60.6 --subnet-mask 255.255.255.0 --gateway 172.28.60.1
API
The SDK provides the functions to configure the camera network configuration.
Connect to your camera.
Set the mode to manual.
Define the IP address and the Subnet Mask.
Create a network configuration object.

Zivid::NetworkConfiguration newConfig(Zivid::NetworkConfiguration::IPV4(mode, address, subnetMask));
var newConfig = new Zivid.NET.NetworkConfiguration()
{
    IPV4 = {
        Mode = mode,
        Address = address,
        SubnetMask = subnetMask,
    }
};
Apply the new network configuration to the camera.
PC
This guides you through how to set the static IP of the network card that interfaces your camera, on Windows, Ubuntu, or Ubuntu (headless). You can configure it to match the default configuration of the camera, or to a custom static IP.
Windows
Navigate to:
Control Panel → Network and Internet → Network and Sharing Center → Change adapter settings
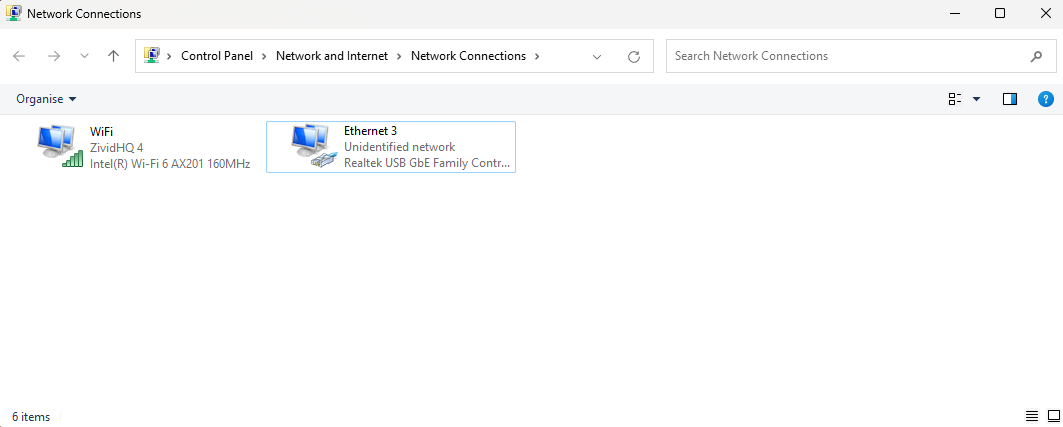
Right click on your network connection and choose Properties.
Then, find Internet Protocol Version 4 (TCP/IPv4) and open its Properties.
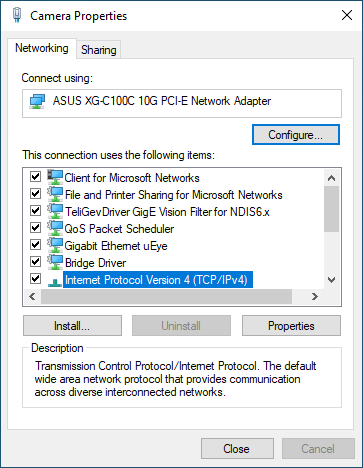
Select Use the following IP address and configure your network interface (card/adapter), and choose an IP address that is in the same subnet as the camera. For a camera with default configuration, this is:
IP address:
172.28.60.2Subnet mask:
255.255.255.0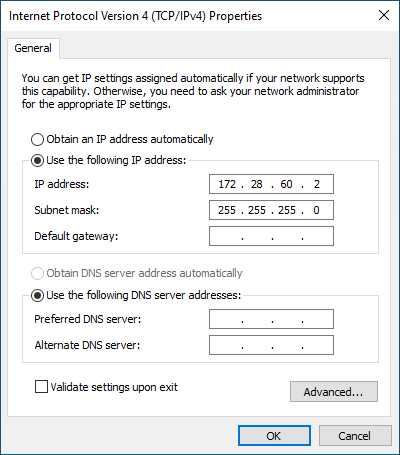
Caution
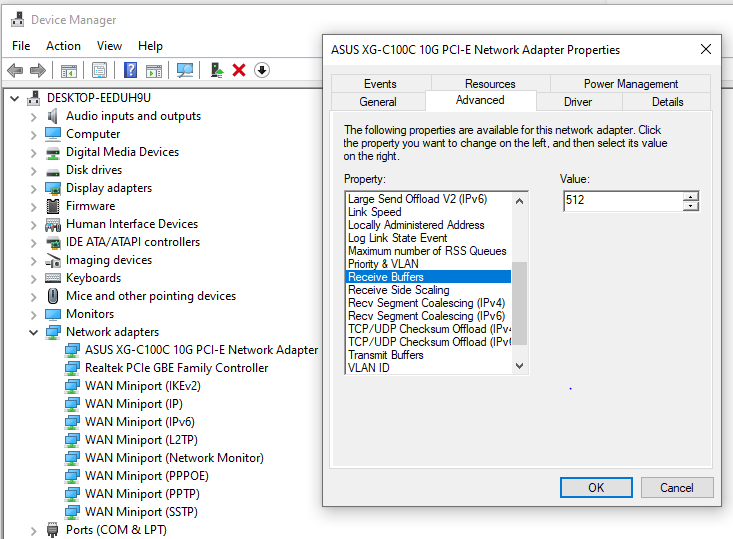
Capture time on Windows can occasionally be longer (about 1 second longer than normal) due to ethernet packet loss leading to data re-transmits. You can reduce the occurrence of packet loss by increasing receive and transmit buffers.
Navigate to Device Manager → Network adapters. Right click on your network adapter and press Properties. Under Advanced, increase Receive Buffers and Transmit Buffers.
Ubuntu
Navigate to your network settings and then click on the cogwheel for the unconnected network interface (card/adapter). If you are using Ubuntu 20.04, this should look approximately like the screenshot below.
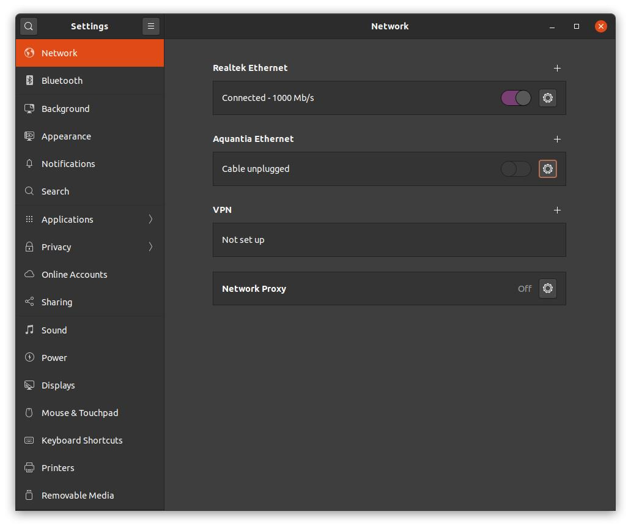
Set up the network configuration in the IPv4 tab. Set IPv4 Method to manual, and choose an IP address that is in the same subnet as the camera. For a camera with default configuration, this is:
Address to:
172.28.60.2Netmask to:
255.255.255.0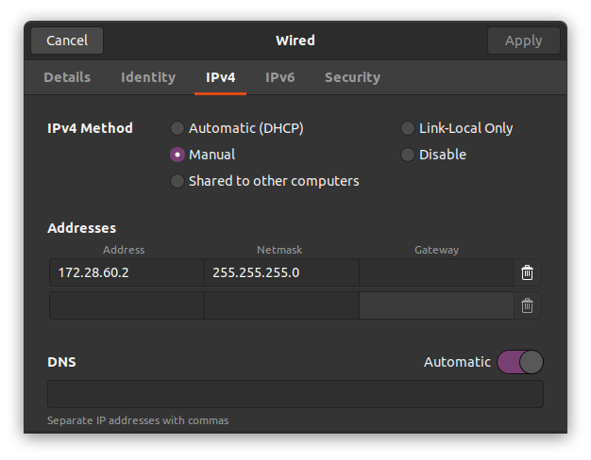
Caution
This step can require bringing your network interface down and up again (set the first toggle button from the first screenshot to on and off).
Ubuntu (headless)
Find current interfaces and configuration
ip addrExample output for ip addrzivid@se-zivid-xps15:~$ ip addr 1: lo: <LOOPBACK,UP,LOWER_UP> mtu 65536 qdisc noqueue state UNKNOWN group default qlen 1000 link/loopback 00:00:00:00:00:00 brd 00:00:00:00:00:00 inet 127.0.0.1/8 scope host lo valid_lft forever preferred_lft forever inet6 ::1/128 scope host valid_lft forever preferred_lft forever 8: eth0: <BROADCAST,MULTICAST,UP,LOWER_UP> mtu 1500 qdisc fq_codel state UP group default qlen 1000 link/ether 48:65:ee:1c:12:ba brd ff:ff:ff:ff:ff:ff inet 172.21.96.50/24 brd 172.28.60.255 scope global noprefixroute eth0 valid_lft forever preferred_lft forever inet6 fe80::4a65:eeff:fe1c:12ba/64 scope link valid_lft forever preferred_lft forever
The current IP address is
172.21.96.50/24. That will not work if the IP address of the camera is not in the same subnet. For a camera with default configuration, the IP must be in the same subnet as172.28.60.5.We will use netplan to update the IP address for this interface. First, find your current configuration.
ls /etc/netplanBy default, you should see a .yaml file named something like 01-network-manager-all.yaml. Then list its contents, e.g.:
cat /etc/netplan/01-netcfg.yaml
# Let NetworkManager manage all devices on this system
network:
  version: 2
  renderer: NetworkManager
For safety, copy the file before you update the configuration as follows:
sudo nano /etc/netplan/01-netcfg.yaml

network:
    version: 2
    renderer: networkd
    ethernets:
        eth0:
            dhcp4: no
            addresses:
                - 172.28.60.2/24
            gateway4: 172.28.60.1
Apply changes
sudo netplan apply
Verify that the IP address has been correctly updated
Example output for ip addrzivid@se-zivid-xps15:~$ ip addr 1: lo: <LOOPBACK,UP,LOWER_UP> mtu 65536 qdisc noqueue state UNKNOWN group default qlen 1000 link/loopback 00:00:00:00:00:00 brd 00:00:00:00:00:00 inet 127.0.0.1/8 scope host lo valid_lft forever preferred_lft forever inet6 ::1/128 scope host valid_lft forever preferred_lft forever 8: eth0: <BROADCAST,MULTICAST,UP,LOWER_UP> mtu 1500 qdisc fq_codel state UP group default qlen 1000 link/ether 48:65:ee:1c:12:ba brd ff:ff:ff:ff:ff:ff inet 172.28.60.2/24 brd 172.28.60.255 scope global noprefixroute eth0 valid_lft forever preferred_lft forever inet6 fe80::4a65:eeff:fe1c:12ba/64 scope link valid_lft forever preferred_lft forever
Multiple Cameras
There are two cases in the multiple camera setup: Multiple network interface cards, or Switch. In both cases, you also have to do a custom static IP configuration of each camera, using the same Zivid Studio, CLI Tool, or API steps described in the Camera section, with a different IP address for each camera. For each camera, remember to use an IP address within the same subnet range of its interfacing network card.
Multiple network interface cards
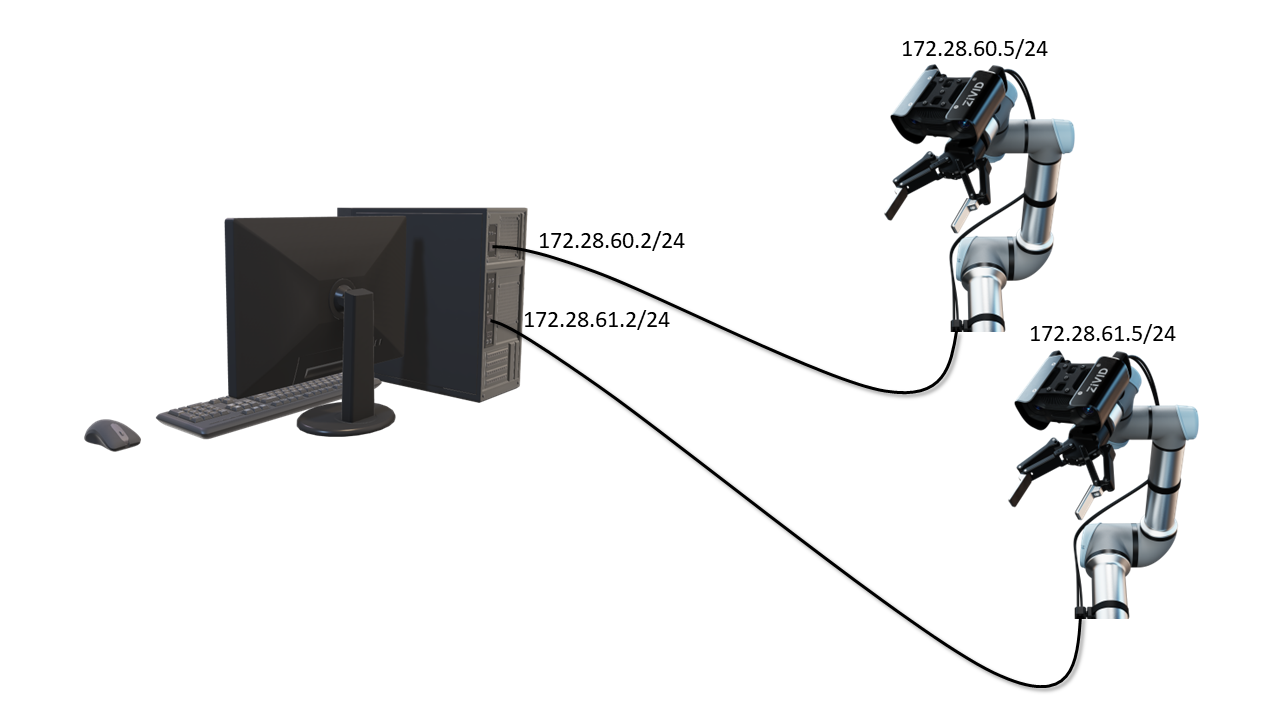
If you use multiple cameras connected to multiple network interface cards then they must not exist on the same subnet.
For example, if the subnet mask is 255.255.255.0, at least one bit in the first 24 bits must be different.
Using the default configuration as an example, the network card configurations are:
Network interface card one:
Address to:
172.28.60.2Netmask to:
255.255.255.0
Network interface card two:
Address to:
172.28.61.2Netmask to:
255.255.255.0
For network interface card two, you must also configure the IP of its camera to be in the same subnet range, e.g. 172.28.60.5 and 172.28.61.5.
Switch
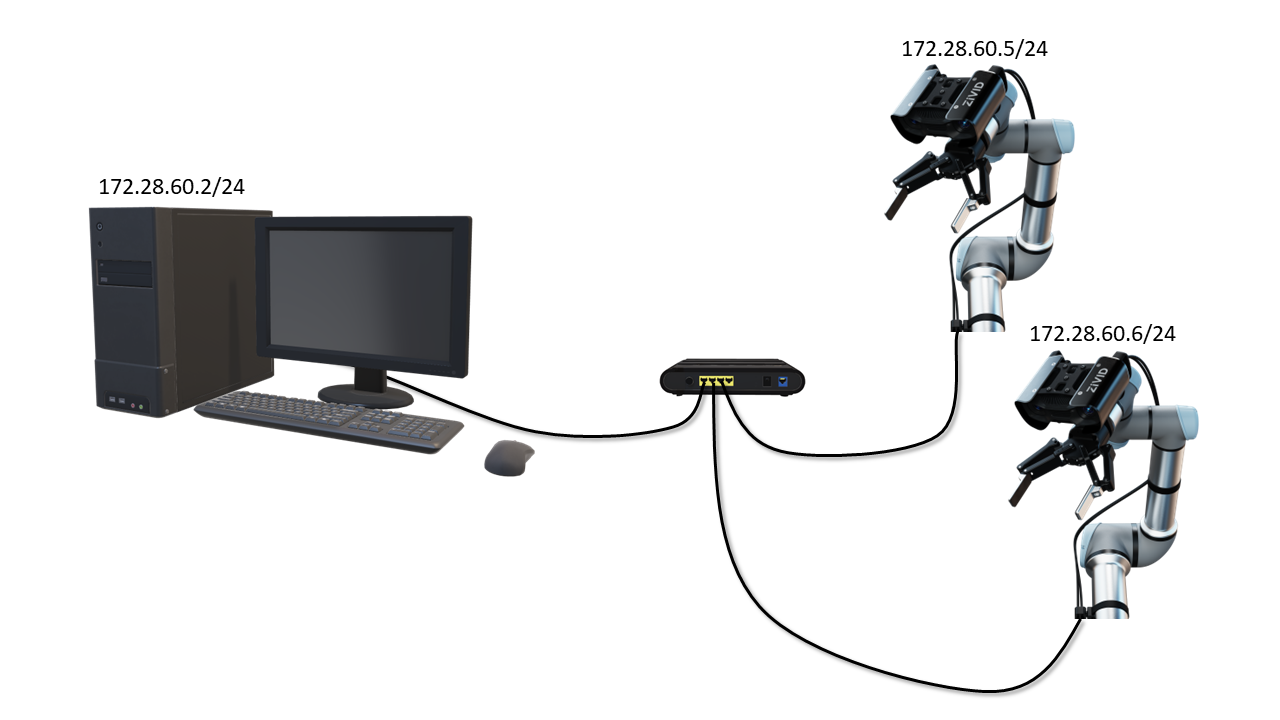
If you use multiple cameras connected to the same network card via a switch, you have to configure the cameras to different IPs in the same subnet as the network card. Using the default configuration as an example, you have to configure the cameras as:
Camera one:
Address to
172.28.60.5(already set by default)
Camera two:
Address to e.g.
172.28.60.6
This can be repeated for camera three, four, etc.
Note
Multiple network interface cards can potentially provide higher speed than a switch. This is because they will not have to share network bandwidth.
Tip
You can physically connect one or more cameras to your PC and use code to automatically configure their IP addresses. Each IP address aligns with the subnet of the detected corresponding local network interface.
Next Steps
You have now configured the camera(s) and PC with a specific static IP address. Go to Connecting to the camera.
Version History
SDK |
Changes |
|---|---|
2.15.0 |
Added section about automatic network configuration sample. |