通过棋盘格实现的ROI框过滤器
本教程演示如何过滤转换到基于与棋盘格相关联的ROI框的棋盘格坐标系的点云。这将过滤掉所有在料箱之外的点。
小技巧
如果您使用的是Zivid One+ Small相机,那么棋盘格对于此应用程序来说可能太大了。对于这种情况,我们有一个 通过ArUco标记实现的ROI框过滤器 的教程。
本教程使用了下图中展示的棋盘格点云。
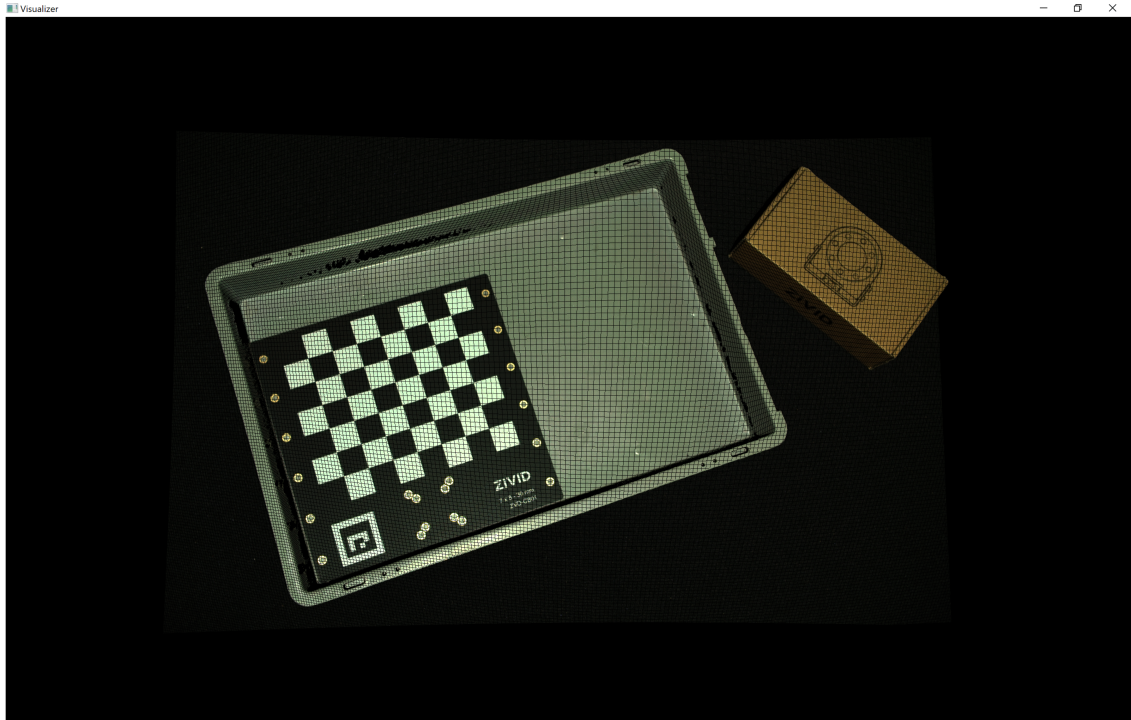
我们可以在Zivid Studio中打开 原始点云 并进行检查。
备注
原始点云在 Sample Data(示例数据) 中。
这里将略过关于转换点云的部分,这部分在 基于棋盘格的坐标转换 已涵盖, 请转到 基于ROI框的过滤。
转换点云
首先,我们加载棋盘格的点云。

const auto fileData = std::string(ZIVID_SAMPLE_DATA_DIR) + "/BinWithCalibrationBoard.zdf";
std::cout << "Reading ZDF frame from file: " << fileData << std::endl;
const auto frame = Zivid::Frame(fileData);
auto pointCloud = frame.pointCloud();
然后我们需要估计棋盘格的位姿并将其反转,因为我们需要相机相对于棋盘格的位姿。
std::cout << "Detecting and estimating pose of the Zivid checkerboard in the camera frame" << std::endl;
const auto detectionResult = Zivid::Calibration::detectFeaturePoints(pointCloud);
const auto transformCameraToCheckerboard = detectionResult.pose().toMatrix();
std::cout << "Camera pose in checkerboard frame:" << std::endl;
const auto transformCheckerboardToCamera = transformCameraToCheckerboard.inverse();
std::cout << transformCheckerboardToCamera << std::endl;
print("Detecting and estimating pose of the Zivid checkerboard in the camera frame")
detection_result = zivid.calibration.detect_feature_points(point_cloud)
transform_camera_to_checkerboard = detection_result.pose().to_matrix()
print("Camera pose in checkerboard frame:")
transform_checkerboard_to_camera = np.linalg.inv(transform_camera_to_checkerboard)
print(transform_checkerboard_to_camera)
然后我们将点云转换到棋盘格坐标系。
std::cout << "Transforming point cloud from camera frame to Checkerboard frame" << std::endl;
pointCloud.transform(transformCheckerboardToCamera);
提示
了解更多关于 位置、方向和坐标变换。
基于ROI框的过滤
现在我们将定义ROI框的左下角相对于棋盘格坐标系的位置,以及ROI框的大小。
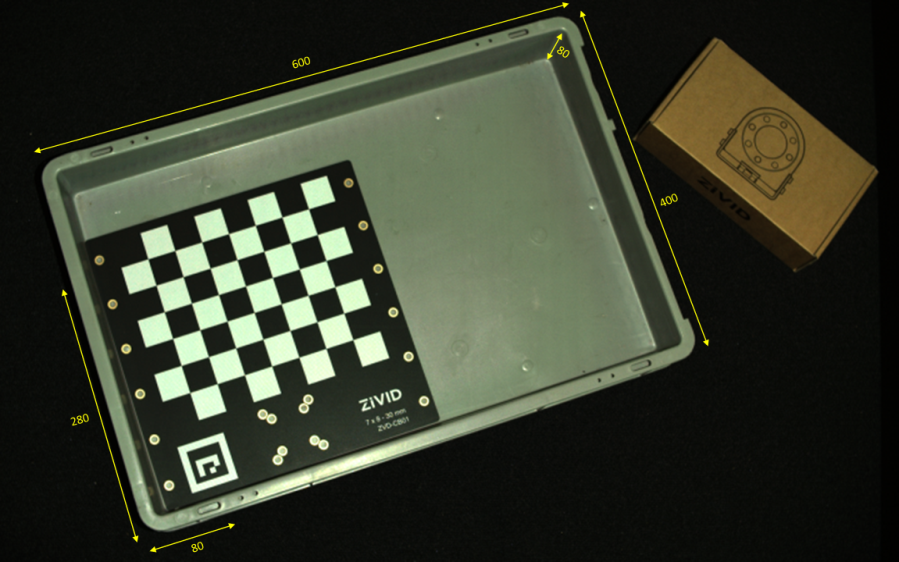
std::cout << "Bottom-Left ROI Box corner:" << std::endl;
const float roiBoxBottomLeftCornerX = -80.F; // Positive is "East"
const float roiBoxBottomLeftCornerY = 280.F; // Positive is "South"
const float roiBoxBottomLeftCornerZ = 5.F;   // Positive is "Down"
std::cout << "X: " << roiBoxBottomLeftCornerX << std::endl
          << "Y: " << roiBoxBottomLeftCornerY << std::endl
          << "Z: " << roiBoxBottomLeftCornerZ << std::endl;
std::cout << "ROI Box size:" << std::endl;
const float roiBoxLength = 600.F;
const float roiBoxWidth = 400.F;
const float roiBoxHeight = 80.F;
std::cout << "Length: " << roiBoxLength << std::endl
          << "Width: " << roiBoxWidth << std::endl
          << "Height: " << roiBoxHeight << std::endl;
print("Bottom-Left ROI Box corner:")
roi_box_bottom_left_corner_x = user_options.roi_box_bottom_left_corner_x  # Positive is "East"
roi_box_bottom_left_corner_y = user_options.roi_box_bottom_left_corner_y  # Positive is "South"
roi_box_bottom_left_corner_z = user_options.roi_box_bottom_left_corner_z  # Positive is "Down"
print(f"X: {roi_box_bottom_left_corner_x}")
print(f"Y: {roi_box_bottom_left_corner_y}")
print(f"Z: {roi_box_bottom_left_corner_z}")
print("ROI Box size:")
roi_box_length = user_options.box_dimension_in_axis_x
roi_box_width = user_options.box_dimension_in_axis_y
roi_box_height = user_options.box_dimension_in_axis_z
print(f"Length: {roi_box_length}")
print(f"Width: {roi_box_width}")
print(f"Height: {roi_box_height}")
现在我们根据ROI框的大小和位置过滤点云。这是通过使 用 PCL 库实现的。
std::cout << "Filtering the point cloud based on ROI Box" << std::endl;
const auto roiPointCloudPCL = roiBoxPointCloud(
    pointCloud,
    roiBoxBottomLeftCornerX,
    roiBoxBottomLeftCornerY,
    roiBoxBottomLeftCornerZ,
    roiBoxLength,
    roiBoxWidth,
    roiBoxHeight);
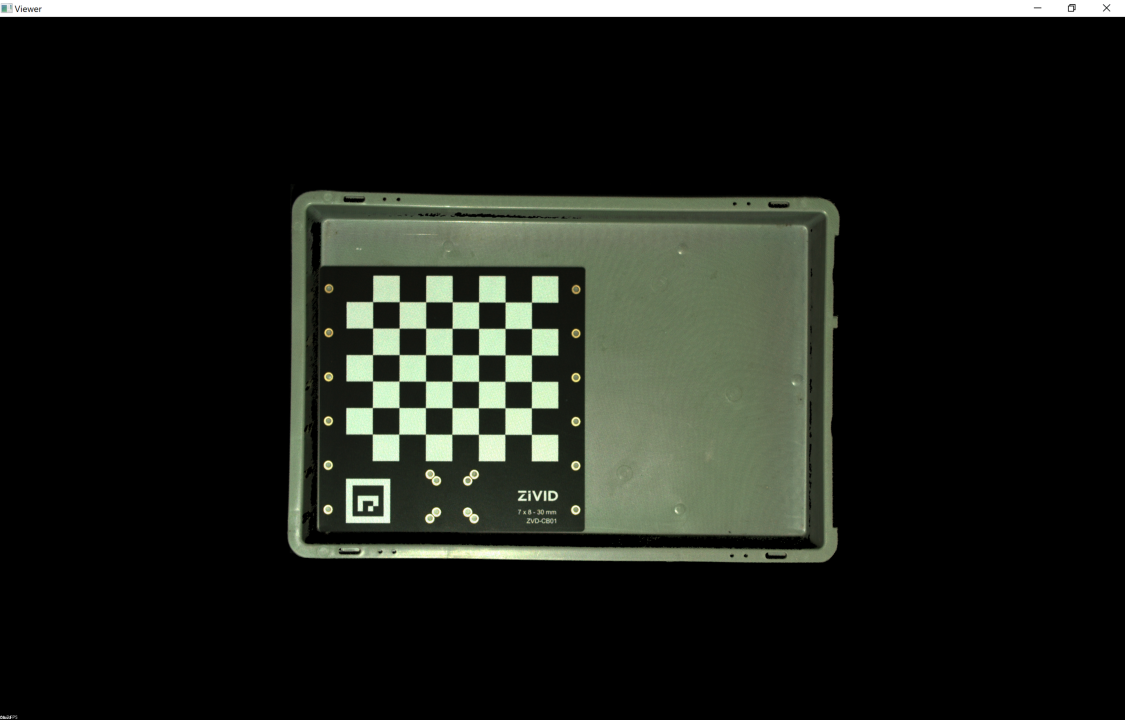
最后可视化经过转换和过滤的点云。
std::cout << "Displaying transformed point cloud after ROI Box filtering" << std::endl;
visualizePointCloud(roiPointCloudPCL);
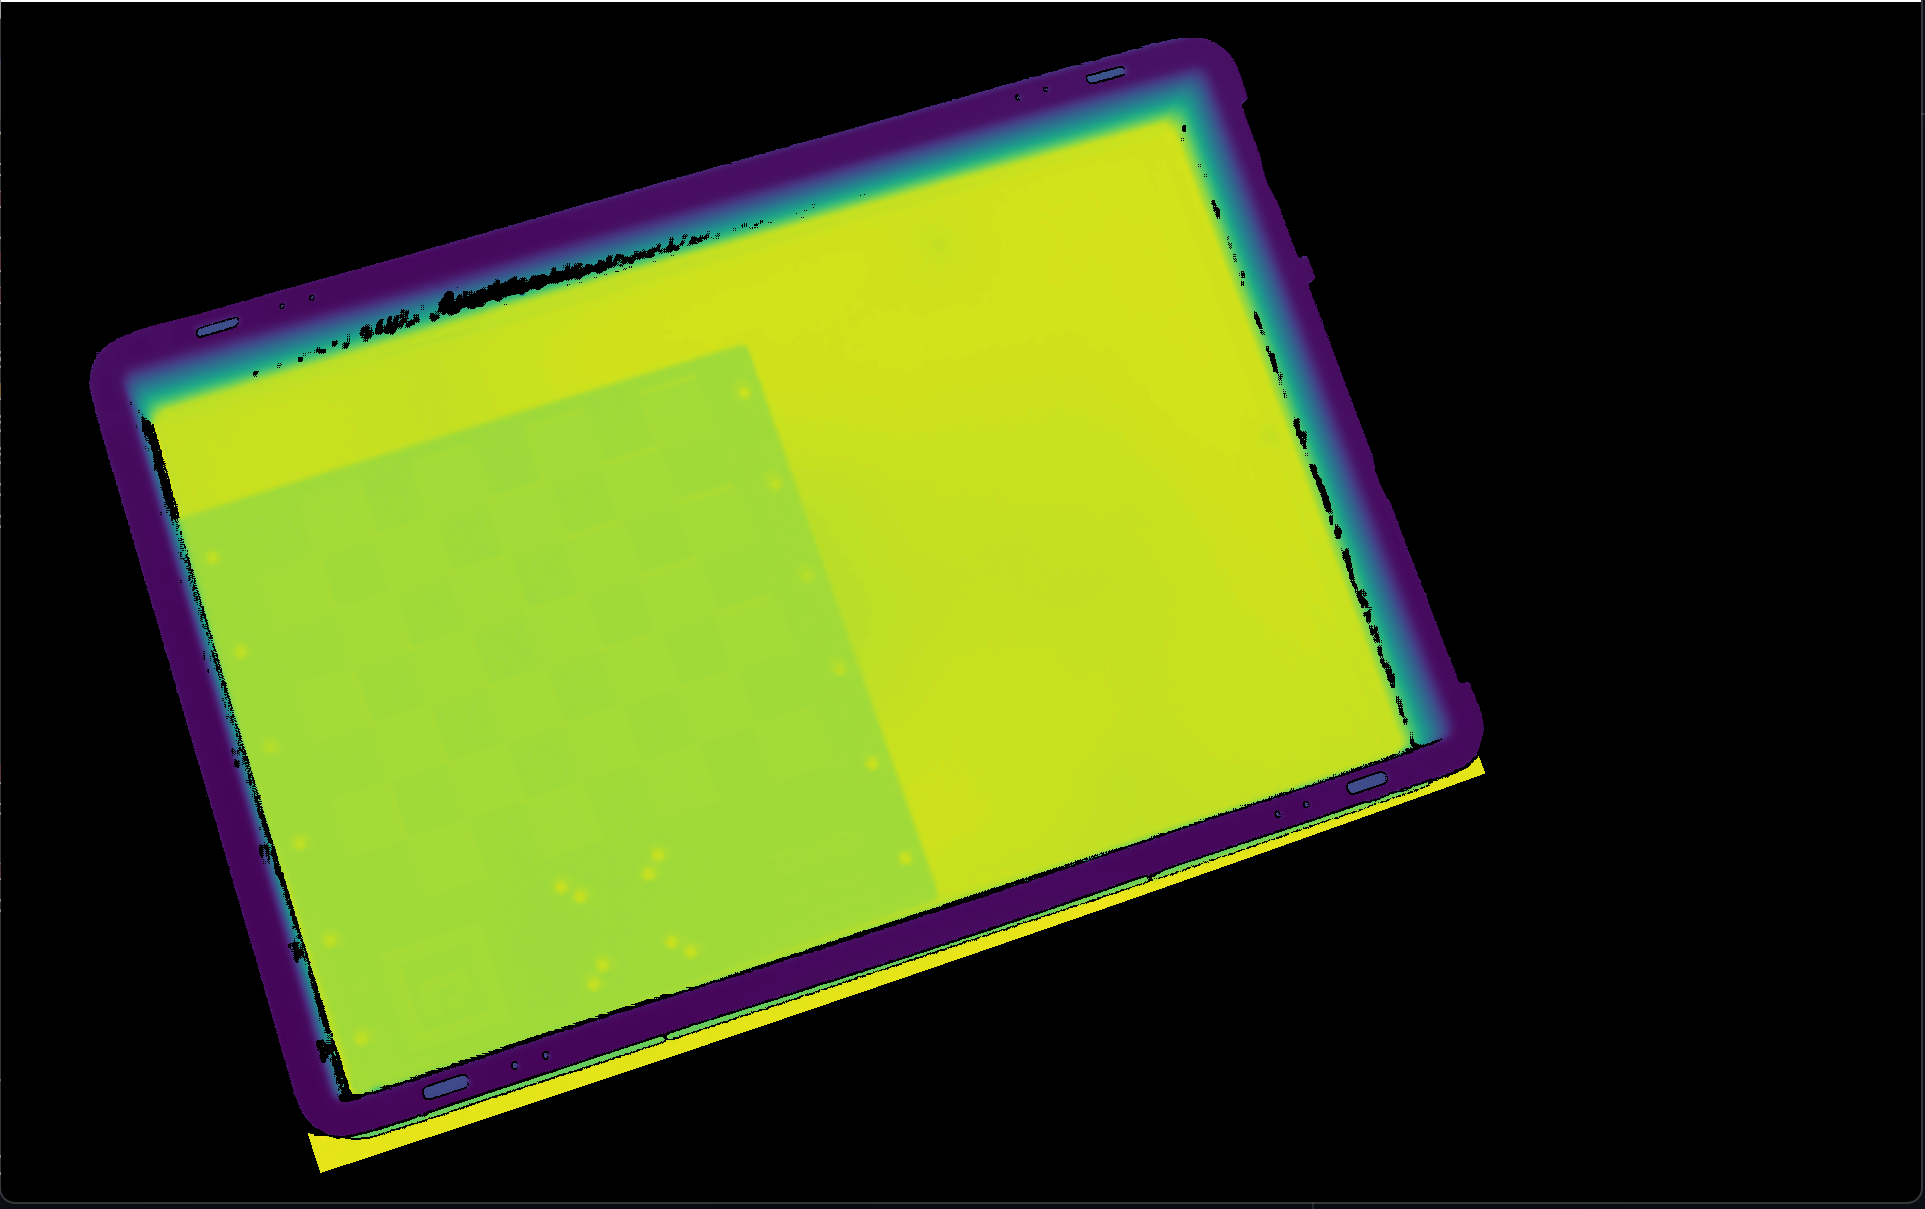
然后,我们将显示转换和过滤后的点云的深度图。
std::cout << "Displaying depth map of the transformed point cloud after ROI Box filtering" << std::endl;
visualizeDepthMap(*roiPointCloudPCL);
如需要根据ROI框过滤点云,您可以运行我们的代码示例。
ROIBoxViaCheckerboard.exe
示例: roi_box_via_checkerboard.py
python roi_box_via_checkerboard.py
示例默认使用的点云是我们在本教程中展示的点云。如需根据用户自定义的ROI框过滤任意点云,请使用以下输入参数运行相同的示例:
示例: roi_box_via_checkerboard.py
python roi_box_via_checkerboard.py --zdf-path /path/to/file.zdf --roi-box-bottom-left-corner-x -80 --roi-box-bottom-left-corner-y 280 --roi-box-bottom-left-corner-z 5 --box-dimension-in-axis-x 600 --box-dimension-in-axis-y 400 --box-dimension-in-axis-z 80 --downsample by2x2