Point Cloud Structure and Output Formats
Organized point cloud
Zivid outputs an organized point cloud by default. This means that the point cloud is laid out as a 2D array of points that resembles an image-like structure.
There are several advantages to this structure.
Algorithms designed for unorganized point clouds work on organized as well because a 2D array can be interpreted as a 1D array. This is not always true the other way around.
Ordered point clouds have a 1:1 correlation between pixels in the 2D images (color and depth) and 3D points in the point cloud. This means that the neighboring pixels in the image are the neighboring points in the point cloud. This enables 2D operations and algorithms to be applied to the 2D image, while the result can be applied directly to the point cloud. For example, for object detection and segmentation, one can segment the 2D image and directly extract the 3D points from the desired pixels.
The orderliness of points speeds up computation and lowers the cost of certain algorithms, especially operations using neighboring points.
Pixel indexing: Studio (x, y) vs. API (row, column)
The organized point cloud and the 2D image share the same grid, but Zivid Studio and the API address a pixel in that grid differently. In both cases the origin is the top-left corner.
Zivid Studio displays the pixel position as
(x, y), wherexis the horizontal position (column, increasing to the right) andyis the vertical position (row, increasing downwards).The API addresses a pixel as
(row, column), i.e. the vertical index first and the horizontal index second. For example,PointCloudandArray2Dare indexed as(row, column)withrowfrom 0 to height - 1 andcolumnfrom 0 to width - 1, and arrays in C#, Python, and MATLAB are shaped[height, width, ...].
The two are therefore the reverse of each other: a pixel shown as (x, y) in Studio corresponds to (row = y, column = x) in the API.
Keep this in mind when you read a pixel coordinate from Studio and use it to index the point cloud in code.
The ReadIterateZDF sample iterates over the point cloud and reads individual points by their (row, column) index:

const size_t iStart = (pointCloud.height() - pixelsToDisplay) / 2;
const size_t iEnd = (pointCloud.height() + pixelsToDisplay) / 2;
const size_t jStart = (pointCloud.width() - pixelsToDisplay) / 2;
const size_t jEnd = (pointCloud.width() + pixelsToDisplay) / 2;
for(size_t i = iStart; i < iEnd; i++)
{
    for(size_t j = jStart; j < jEnd; j++)
    {
        const auto &point = data(i, j);
        const auto &pointSnr = snr(i, j);

        std::cout << std::setprecision(1) << std::fixed << "Values at pixel (" << i << "," << j << "):   "
                  << "X:" << std::left << std::setfill(' ') << std::setw(8) << point.point.x
                  << "Y:" << std::setw(8) << point.point.y << "Z:" << std::setw(8) << point.point.z
                  << "R:" << std::setw(8) << std::to_string(point.color.r) << "G:" << std::setw(8)
                  << std::to_string(point.color.g) << "B:" << std::setw(8) << std::to_string(point.color.b)
                  << "SNR:" << std::setw(8) << pointSnr.value << std::endl;
    }
}
ulong iStart = (height - pixelsToDisplay) / 2;
ulong iStop = (height + pixelsToDisplay) / 2;
ulong jStart = (width - pixelsToDisplay) / 2;
ulong jStop = (width + pixelsToDisplay) / 2;
for (ulong i = iStart; i < iStop; i++)
{
    for (ulong j = jStart; j < jStop; j++)
    {
        Console.WriteLine(string.Format(
            "{0} {1} {2,-7} {3} {4,-7} {5} {6,-7} {7} {8,-7} {9} {10,-7} {11} {12,-7} {13} {14,-7}",
            "Values at pixel (" + i + "," + j + "):  ",
            "X:",
            pointCloudData[i, j].point.x.ToString("F1"),
            "Y:",
            pointCloudData[i, j].point.y.ToString("F1"),
            "Z:",
            pointCloudData[i, j].point.z.ToString("F1"),
            "R:",
            pointCloudData[i, j].color.r.ToString(),
            "G:",
            pointCloudData[i, j].color.g.ToString(),
            "B:",
            pointCloudData[i, j].color.b.ToString(),
            "SNR:",
            pointCloudSNR[i, j].ToString("F1")));
    }
}
for row in range(int((height - pixels_to_display) / 2), int((height + pixels_to_display) / 2)):
    for col in range(int((width - pixels_to_display) / 2), int((width + pixels_to_display) / 2)):
        print(
            f"Values at pixel ({row} , {col}): X:{xyz[row,col,0]:.1f} Y:{xyz[row,col,1]:.1f}"
            f" Z:{xyz[row,col,2]:.1f} R:{rgba[row,col,0]} G:{rgba[row,col,1]} B:{rgba[row,col,2]}"
            f" SNR:{snr[row,col]:.1f}"
        )
Unorganized point cloud
An unorganized point cloud is a list of points in a 1D array. Each point contains the same information as in the organized point cloud.
There are advantages to unorganized point clouds as well.
Since the mapping to sensor pixel is not preserved, neither are points without information (NaN). As a result, unorganized point clouds can be smaller in size than organized point clouds.
When you combine multiple point clouds, it is easier to merge them into a single unorganized point cloud.
Note
It is possible to get back the pixel indices from an unorganized point cloud. This can be done using intrinsics. However, the intrinsics model does not cover the full calibration of the camera. The only way to truly get correct pixel mapping is to use the organized point cloud. See Camera Intrinsics for more information.
Zivid point cloud
Different Zivid camera models use sensors with different resolutions to capture point clouds of a scene. For how sensor resolution is defined, see Zivid Specs Terminology.
Camera |
Megapixels (MP) |
Resolution |
|---|---|---|
Zivid 3 |
8 |
2816 x 2816 |
Zivid 2+ |
5 |
2448 x 2048 |
Zivid 2 |
2.3 |
1944 x 1200 |
There are multiple ways to get the resolution from the SDK.
const auto cameraInfo = camera.info();

auto defaultSettings = Zivid::Experimental::SettingsInfo::defaultValue<Zivid::Settings>(cameraInfo);
defaultSettings.acquisitions().emplaceBack(
    Zivid::Experimental::SettingsInfo::defaultValue<Zivid::Settings::Acquisition>(cameraInfo));

defaultSettings.set(
    Zivid::Settings::Color{
        Zivid::Experimental::SettingsInfo::defaultValue<Zivid::Settings2D>(cameraInfo)
            .copyWith(
                Zivid::Settings2D::Acquisitions{
                    Zivid::Experimental::SettingsInfo::defaultValue<Zivid::Settings2D::Acquisition>(
                        cameraInfo) }) });


std::cout << "Camera resolution for default settings:" << std::endl;
const auto resolution = Zivid::Experimental::SettingsInfo::resolution(cameraInfo, defaultSettings);
std::cout << "  Height: " << resolution.height() << std::endl;
std::cout << "  Width: " << resolution.width() << std::endl;

std::cout << "Point cloud (GPU memory) resolution:" << std::endl;
const auto pointCloud = camera.capture2D3D(defaultSettings).pointCloud();
std::cout << "  Height: " << pointCloud.height() << std::endl;
std::cout << "  Width: " << pointCloud.width() << std::endl;

std::cout << "Point cloud (CPU memory) resolution:" << std::endl;
const auto data = pointCloud.copyPointsXYZColorsRGBA_SRGB();
std::cout << "  Height: " << data.height() << std::endl;
std::cout << "  Width: " << data.width() << std::endl;
Zivid 3
The generated point cloud consists of 8 million points. Since there is a 1:1 correlation between pixels and points, it is possible to obtain XYZ (mm), RGB (8-bit), and SNR for every pixel, where SNR is the Signal-to-Noise Ratio. Internally on the GPU the 3D coordinates, color values, and SNR values are stored as separate 2D arrays of size 2816 x 2816. On the user’s side (CPU memory) the data can be stored in different formats, depending on how it is requested. See Point Cloud Tutorial for a detailed explanation.
Zivid 2+
The generated point cloud consists of 5 million points. Since there is a 1:1 correlation between pixels and points, it is possible to obtain XYZ (mm), RGB (8-bit), and SNR for every pixel, where SNR is the Signal-to-Noise Ratio. Internally on the GPU the 3D coordinates, color values, and SNR values are stored as separate 2D arrays of size 2448 x 2048. On the user’s side (CPU memory) the data can be stored in different formats, depending on how it is requested. See Point Cloud Tutorial for a detailed explanation.
Zivid 2
The generated point cloud consists of 2.3 million points. Since there is a 1:1 correlation between pixels and points, it is possible to obtain XYZ (mm), RGB (8-bit), and SNR for every pixel, where SNR is the Signal-to-Noise Ratio. Internally on the GPU the 3D coordinates, color values, and SNR values are stored as separate 2D arrays of size 1944 x 1200. On the user’s side (CPU memory) the data can be stored in different formats, depending on how it is requested. See Point Cloud Tutorial for a detailed explanation.
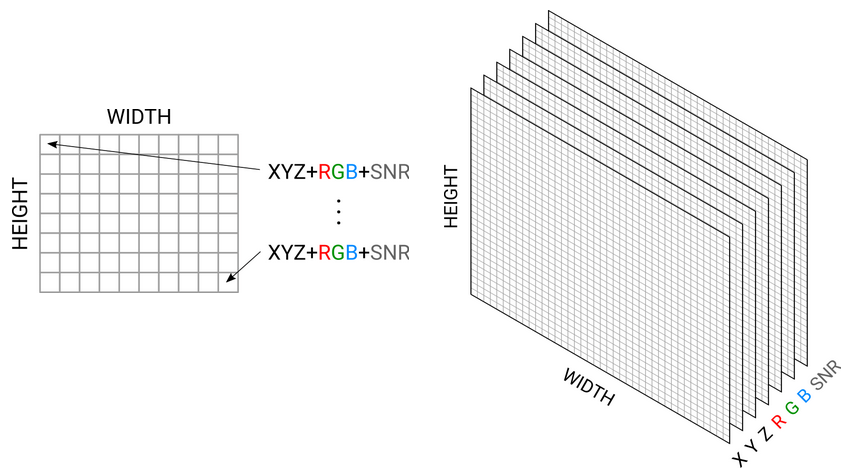
Color image and depth map can be directly extracted from a Zivid point cloud. Examples of how to do this are shown in our GitHub repository.
Zivid output formats
From Zivid Studio, you can save the point cloud in Zivid Data File (*.zdf). In addition, you can export the point cloud (File → Export) in the following formats:
Polygon (PLY)
Point Cloud Data (PCD)
ASCII (XYZ)
For each format you can choose among different export options when exporting from Zivid Studio, like color space and normals.


Export options for PLY, PCD, and XYZ file formats.
The Zivid Data File (*.zdf) is the native Zivid file format. If you are using the API, you can loop over the point cloud and save the X, Y, Z, R, G, B, and SNR data in whichever format you prefer. To see how to read or convert Zivid data, check our C++ file format samples, C# file format samples, and Python file format samples.
Tip
The easiest way to view a Zivid point cloud is to copy the ZDF file to your PC and use Zivid Studio. Alternatively, you can use the API to convert ZDF to PLY (or use our Python script) and open the file in a 3D point cloud tool such as MeshLab or CloudCompare to visualize and measure distances, planes, and deviations.
ASCII points (*.xyz)
ASCII characters are used to store cartesian coordinates. XYZ are separated with white space. In our version, RGB values are also added for each point. Each new point is separated by the newline character. This file can be viewed in a regular text editor.
PLY file (*.ply)
PLY is a file format developed at Stanford. Learn more about PLY.
Point Cloud Data file (*.pcd)
PCD is a file format native to Point Cloud Library. Learn more about PCD.
Use Experimental::PointCloudExport::exportFrame API to export point clouds to your preferred format using the Zivid SDK.
Read this if you use Frame::save API to export point clouds to PCD
Organized PCD format
When using Frame::save the Zivid SDK stores the organized point cloud with a header that indicates an unorganized point cloud.
Since SDK 2.5, it is possible to configure the SDK with the Config.yml file to export PCD with the correct header that indicates an organized point cloud.
If the file already exists and its located in %LOCALAPPDATA%\Zivid\API for Windows or "${XDG_CONFIG_HOME-$HOME/.config}"/Zivid/API for Ubuntu, update Configuration/APIBreakingBugFixes/FileFormats/PCD/UseOrganizedFormat.
If the file does not exist:
Download the
Config.ymlfile.The config file contains the following information:
__version__:
    serializer: 1
    data: 12
Configuration:
    APIBreakingBugFixes:
        FileFormats:
            PCD:
                UseOrganizedFormat: yes
Place the config file in the following directory:
Windows
mkdir %LOCALAPPDATA%\Zivid\API
move %HOMEPATH%\Downloads\Config.yml %LOCALAPPDATA%\Zivid\API\
Ubuntu
mkdir --parents "${XDG_CONFIG_HOME-$HOME/.config}"/Zivid/API
mv ~/Downloads/Config.yml "${XDG_CONFIG_HOME-$HOME/.config}"/Zivid/API/
Caution
Any existing Config file will be overwritten.
Caution
Zivid configuration files must use .yml file extension ( not .yaml).
Version History
SDK |
Changes |
|---|---|
2.17.0 |
Added support for Zivid 3 XL250. |
2.16.0 |
Added support for |