Zivid Two Network Configuration
The Zivid Two camera uses Ethernet communication and needs 10 Gbps for best performance. Your computer may not have a port for 10 Gigabit Ethernet. In that case, you may can connect to it using a Thunderbolt 3 to 10GbE Adapter. At a reduced performance you can also use USB to 5GbE, 2.5GbE, or 1GbE adapters.
Zivid Two has a factory default IP address: 172.28.60.5.
Network interface configuration
To connect to the camera you must set up the network interface.
On your PC, navigate to Control Panel → Network and Internet → Network and Sharing Center → Change adapter settings.
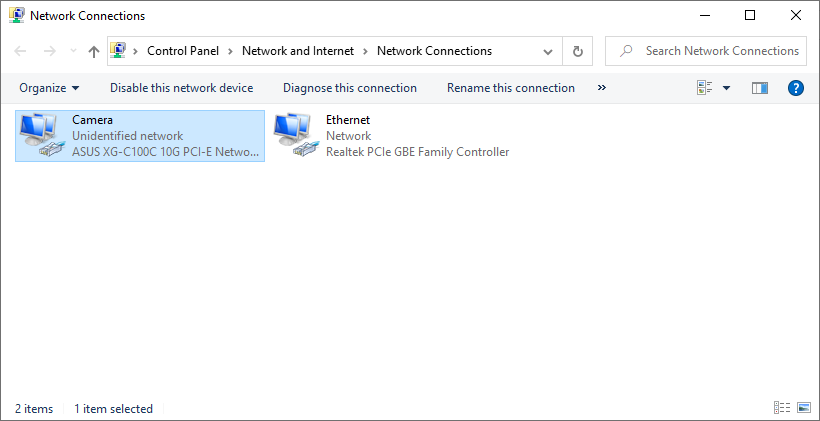
Right click on your network connection and chose Properties.
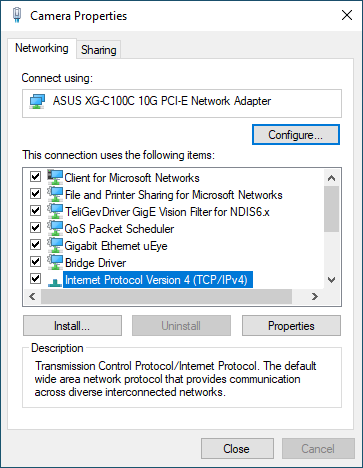
Then, find Internet Protocol Version 4 (TCP/IPv4) and open its Properties.
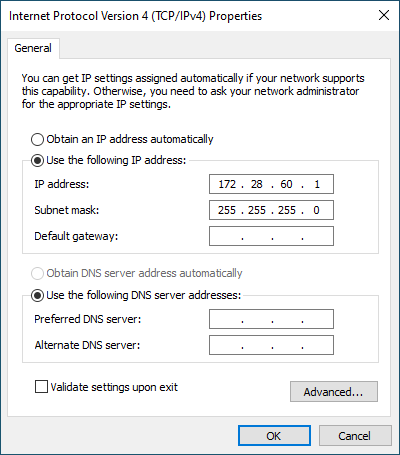
Select Use the following IP address and set up the network configuration:
IP address: 172.28.60.1
Subnet mask: 255.255.255.0
Note
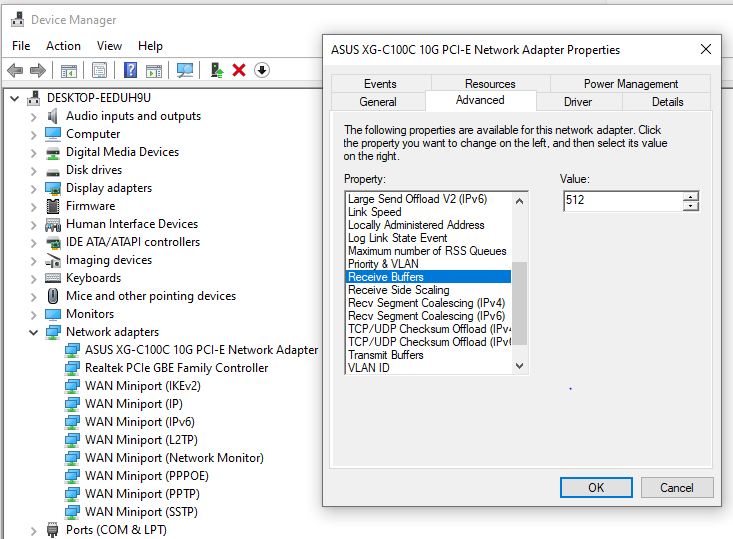
Capture time on Windows can occasionally be longer (about 1 second longer than normal) due to ethernet packet loss leading to data re-transmits. You can reduce the occurrence of packet loss by increasing receive and transmit buffers. Navigate to Device Manager → Network adapters → right click on your network adapter and press Properties. Under Advanced, increase Receive Buffers and Transmit Buffers.
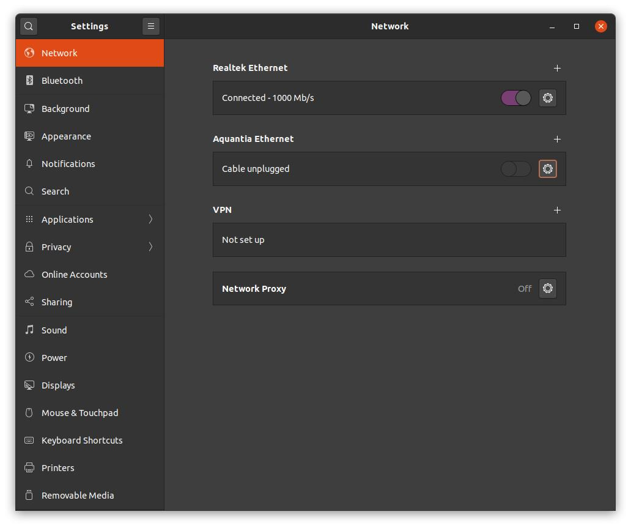
To find these settings go to your network settings and then click on the cogwheel for the unconnected network interface. This should look approximately like the screenshot below if you are using Ubuntu 20.04.
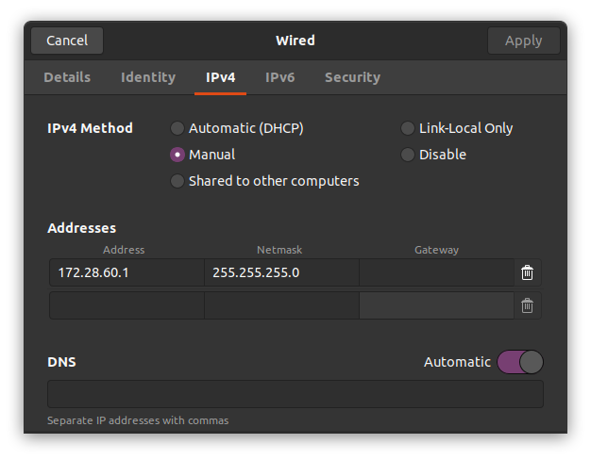
Set up the network configuration in the IPv4 tab:
Set IPv4 Method to manual
Address to: 172.28.60.1
Netmask to: 255.255.255.0
Once the network settings are configured you can close the settings pane and connect the Zivid Two camera. Open Zivid Studio. and the camera will be found automatically.
Hint
The status LEDs at the back of the camera show the current link capacity.
Custom IP configuration
If you want to change the default IP of a single camera or
use multiple Zivid Two cameras (each of them must have their unique IP address), you need to reconfigure the network settings.
The CLI tool ZividNetworkCameraConfigurator allows you to change the camera network configuration of one camera at a time.
The camera can be configured in static IP mode or DHCP mode.
Caution
When configuring, ensure that you physically connect only one camera with the same IP at the time.
To view the help text with information about all inputs and outputs, type
ZividNetworkCameraConfigurator.exe -h
ZividNetworkCameraConfigurator -h
Open a terminal/Command Prompt.
Change camera network settings:
To set the camera in static IP mode with a specified IP,
subnet mask,gateway, and optionallydns server, type:ZividNetworkCameraConfigurator.exe set-config <host> --static --ip <ip> --subnet-mask <mask> --gateway <gateway> [--dns <dns>] [--hostname <hostname>] [--update-firmware]
ZividNetworkCameraConfigurator set-config <host> --static --ip <ip> --subnet-mask <mask> --gateway <gateway> [--dns <dns>] [--hostname <hostname>] [--update-firmware]
For example, changing the static IP from 172.28.60.5 to 172.28.60.6:
ZividNetworkCameraConfigurator.exe set-config 172.28.60.5 --static --ip 172.28.60.6 --subnet-mask 255.255.255.0 --gateway 172.28.60.1
ZividNetworkCameraConfigurator set-config 172.28.60.5 --static --ip 172.28.60.6 --subnet-mask 255.255.255.0 --gateway 172.28.60.1
To set the camera in DHCP mode, type:
ZividNetworkCameraConfigurator.exe set-config <host> --dhcp [--hostname <hostname>] [--update-firmware]
ZividNetworkCameraConfigurator set-config <host> --dhcp [--hostname <hostname>] [--update-firmware]
For example, changing to DHCP with hostname zivid-two:
ZividNetworkCameraConfigurator.exe set-config 172.28.60.5 --dhcp --hostname zivid-twoZividNetworkCameraConfigurator set-config 172.28.60.5 --dhcp --hostname zivid-twoNote
The hostname (optional) is limited to maximum 15 characters.
For multiple cameras, remember to give each camera a unique IP, e.g. with 3 cameras, use
172.28.60.5,172.28.60.6, and172.28.60.7.Caution
When changing static IP, make sure it is not colliding with something else on your network and that it is not in the DHCP range
Save the new IP address/addresses to the configuration file located at:
%LOCALAPPDATA%\Zivid\API\Cameras.yml
$XDG_CONFIG_HOME/Zivid/API/Cameras.ymlCaution
If
$XDG_CONFIG_HOMEis not set use$HOME/.config.For example, the configuration file for connecting to 3 cameras looks like this:
__version__: 1
Cameras:
    NetworkCameras:
        - NetworkCamera:
            Host: 172.28.60.5
        - NetworkCamera:
            Host: 172.28.60.6
        - NetworkCamera:
            Host: 172.28.60.7
Verify that your camera is found by running:
ZividListCameras.exe
ZividListCamerasAlternatively, run the info command to try to connect to an IP or hostname. If successful it prints serial number and MAC address.
ZividNetworkCameraConfigurator.exe info <host>
ZividNetworkCameraConfigurator info <host>
Tip
In case you cannot find your camera after IP configuration, do a factory reset. Do that by locating the reset button below the power connector. Use the pointed end of a paper clip or something similar to press and hold the button until the LED goes from red to green. The camera will go back to its factory default IP 172.28.60.5. Do not hold the reset button too long because that will reset the camera firmware.