Working Distance and Camera Positioning
Introduction
In this tutorial, we will learn how to go about positioning the camera correctly for a given application. We will cover different considerations such as Field-of-View (FOV), working distance, and image blooming.
Find the right working distance
In many applications the camera will be stationary mounted to capture point clouds with a constant FOV. In other applications the camera may be mounted on the robot arm. Robot mounted camera gives a lot more freedom as to how the camera can be positioned to capture good point clouds. In both alternatives, the camera still needs to be positioned such that it is optically optimized for the given scene.
When finding the correct working distance, there are a few things to take into consideration:
What is the area or volume that the camera needs to see?
What is the required spatial resolution and precision in the working area or volume?
Is the given field of view within the working range of the Zivid camera?
Once we know what region we want to image, we can check if it satisfies the recommended working distance of the camera and the requirements for our algorithm by:
Using the FOV calculator: Calculate FOV and Imaging Distance. The calculator will estimate the relationship between camera distance to the scene, FOV, spatial resolution and precision.
Using the datasheet.
Manual validation by capturing and inspecting a point cloud using e.g. Zivid Studio.
Note
In the datasheet and the FOV calculators we can find information about Zivid camera point precision and spatial resolution as functions of the working distance.
Warning
Be aware that the noise is proportional to the working distance, and that the spatial resolution is inversely proportional to the working distance.
We may proceed if all requirements for working distance, FOV, resolution and precision can be satisfied with a single camera position. If not, we need to consider using robot mounting, multiple cameras and so on. In that case we recommend that you contact customersuccess@zivid.com and we will help you find a solution.
Angle the camera
The imaging sensor inside Zivid cameras is offset at a slight pan angle in the azimuth direction (y-axis). This should be considered if it is desired to have the camera perpendicular to the scene.
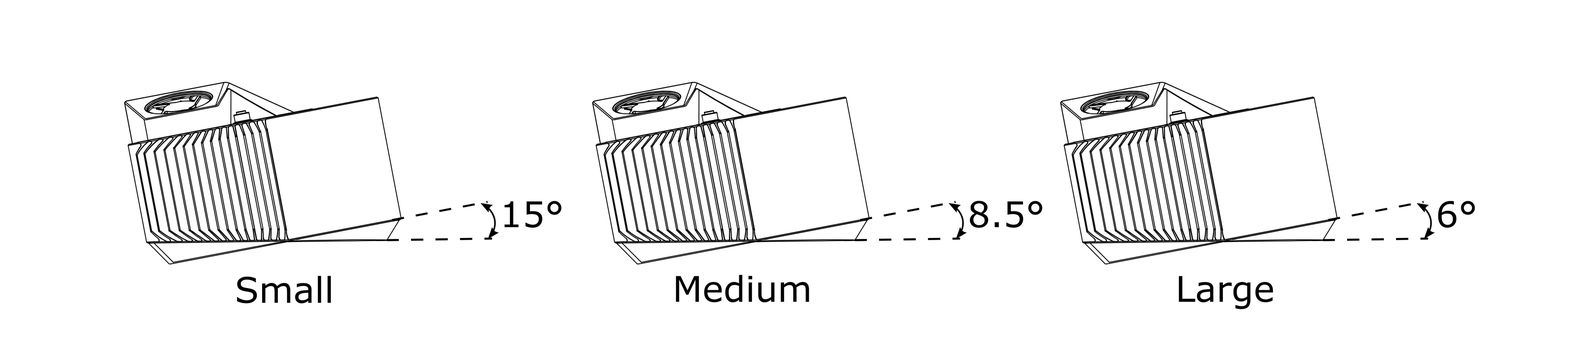
Although it is perhaps most intuitive to mount the camera perpendicular to a scene, this is not the best way. If possible, mount the camera at a slight tilt angle to avoid reflections from the background, as explained in Blooming - Bright Spots in the Point Cloud. This also frees up space above the scene for easier access for tools and robots.
Note
Camera tilting is more important if the scene contains specular surfaces.
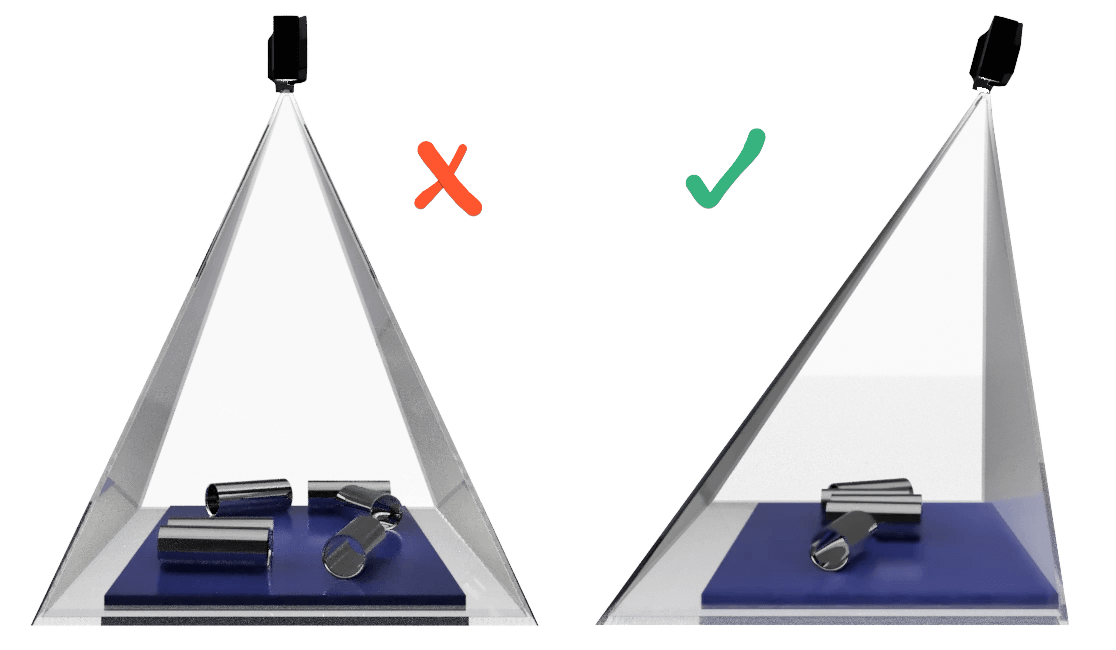
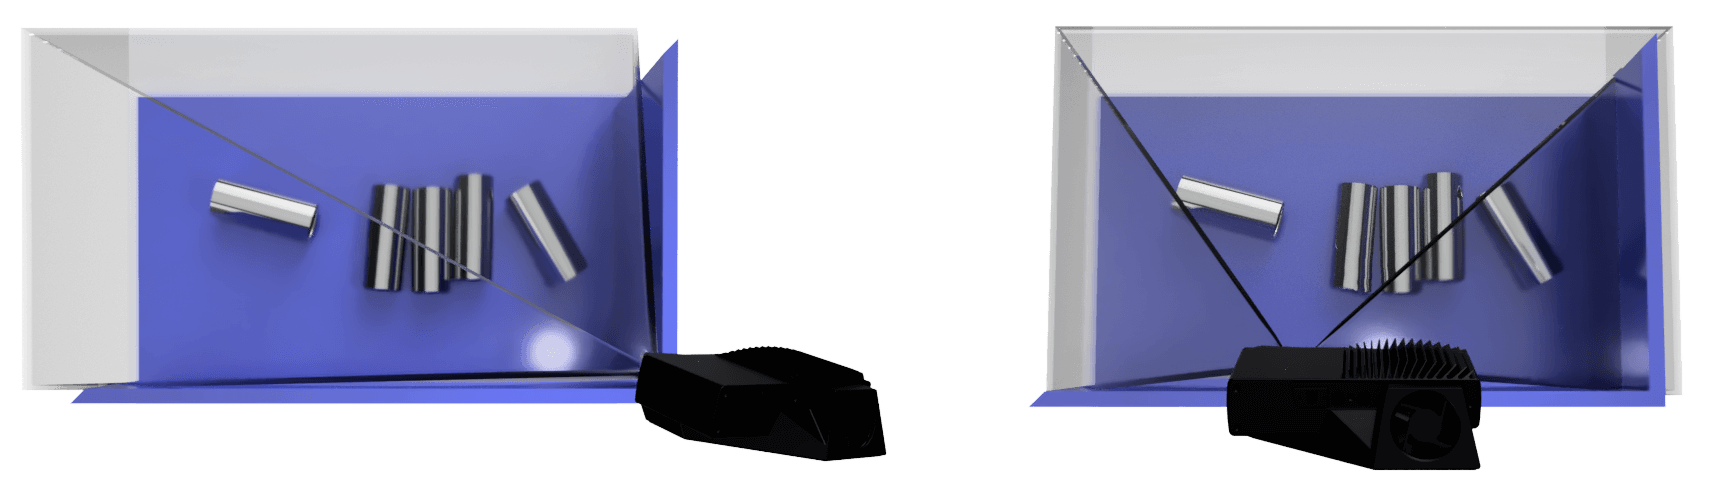
In bin-picking applications
For bin-picking applications, place the Zivid camera projector above the back edge or above the rear corner of the bin (see images below). Pan and tilt it so that the 2D camera is looking at the center of the bin. The projector rays should not fall on the inner surfaces of the two walls closest to the projector; they should almost be parallel to those two walls. Mounting the camera this way minimizes inter reflections from the bin walls.
Find the required depth of focus
Zivid cameras are very robust against defocus, but to maximize the precision of the point cloud, the depth of focus should be taken into consideration. This step is only required if the algorithm that will work on the point cloud requires it in order to be successful.
Warning
A lower degree of focus will degrade precision and enhance the Contrast Distortion.
Find the upper recommended aperture (lower recommended f-number) that we should use for the given working distance by looking at the table from Depth of Focus section. Alternatively use the Depth of Focus Calculator by selecting the camera model and inputting the closest and farthest working distance. It is recommended to set “Acceptable blur radius (pixels)” to 2.
Further reading
When we have found our working distance, it is time to find the right camera settings. We will cover this in Getting the Right Exposure for Good Point Clouds.