Color Mode

The Color Mode setting controls how the color image is computed. Color Mode setting has the following possible values:

  • ToneMapping

  • UseFirstAcquisition

  • Automatic

ToneMapping uses all the acquisitions to create one merged and normalized color image. For multi-acquisition HDR captures the dynamic range of the captured images is usually higher than the 8-bit color image range. Tone mapping will map the HDR color data to the 8-bit color output range by applying a scaling factor. Tone mapping can also be used for single-acquisition captures to normalize the captured color image to the full 8-bit output. When using ToneMapping the color values can be inconsistent over repeated captures if you move, add or remove objects in the scene. For the most control of the colors, use the UseFirstAcquisition mode.

UseFirstAcquisition uses the color data acquired from the first acquisition provided. If the capture consists of more than one acquisition, then the remaining acquisitions are not used for the color image. No tone mapping is performed. This option provides the most control of the color image, and the color values will be consistent over repeated captures with the same settings.

  • Automatic is the default option.

  • Automatic is identical to UseFirstAcquisition for single-acquisition captures and multi-acquisition captures where all the acquisitions have identical (duplicated) acquisition settings.

  • Automatic is identical to ToneMapping for multi-acquisition HDR captures with differing acquisition settings.

Note

Since SDK 2.7 it is possible to disable tone mapping for HDR captures by setting UseFirstAcquisition for Color Mode.

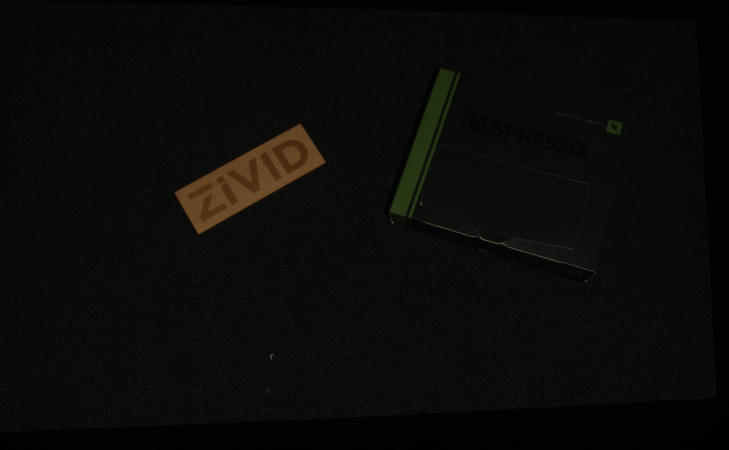
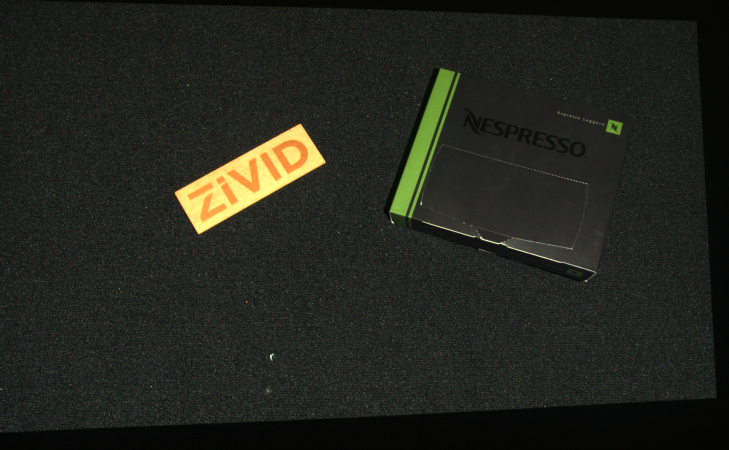
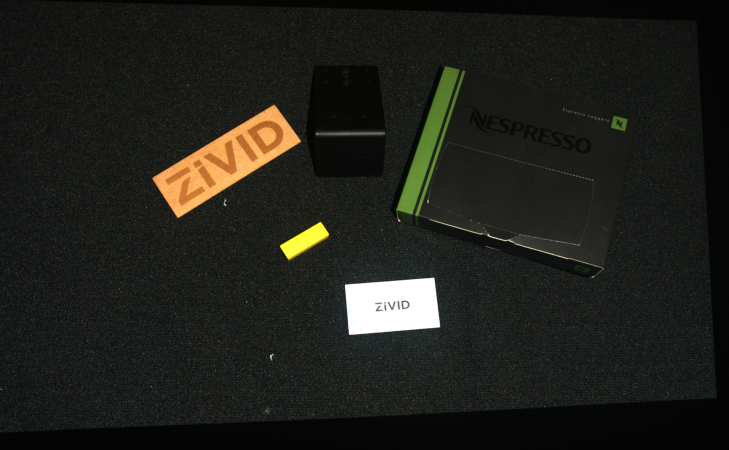
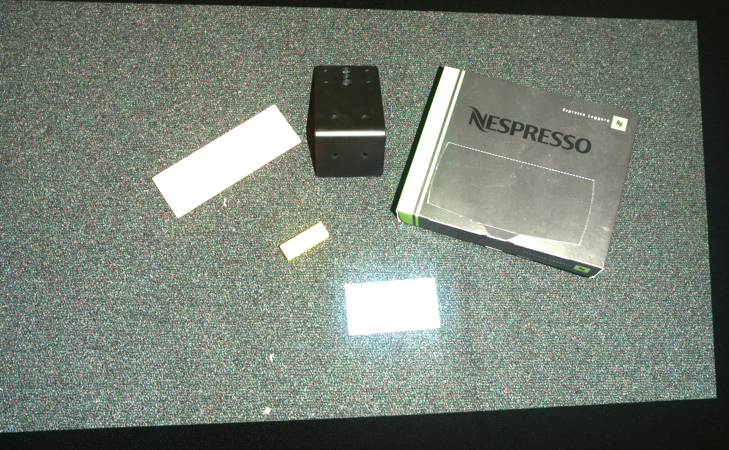
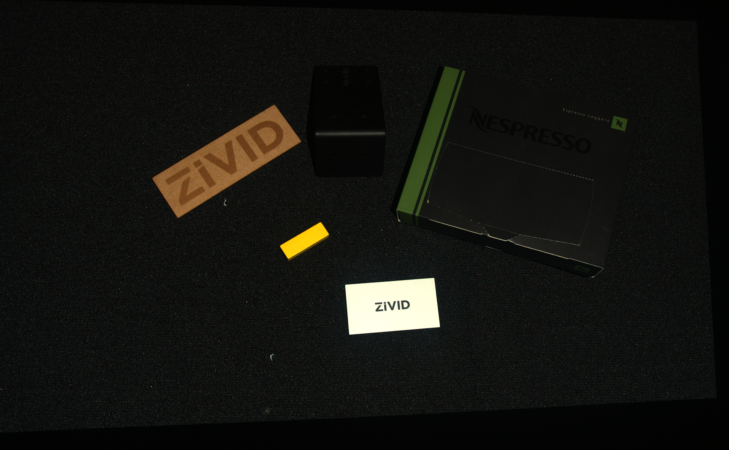
For single-acquisition captures, tone mapping can be used to brighten dark images.

Single acquisition capture with Color Mode set to :code:`UseFirstAcquisition` or :code:`Automatic` (no tone mapping)

Single acquisition capture with Color Mode set to :code:`ToneMapping`

Single acquisition capture with Color Mode set to UseFirstAcquisition or Automatic (no tone mapping)

Single acquisition capture with Color Mode set to ToneMapping

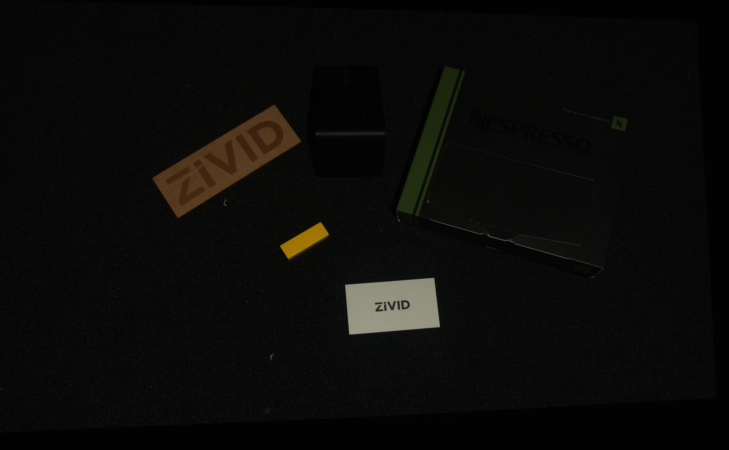
For multi-acquisition HDR tone mapping can be used to map high-dynamic-range colors to the more limited dynamic range output.

Single acquisition capture of the first of three HDR acquisitions with Color Mode set to :code:`UseFirstAcquisition` or :code:`Automatic` (no tone mapping)

Single acquisition capture of the second of three HDR acquisitions with Color Mode set to :code:`UseFirstAcquisition` or :code:`Automatic` (no tone mapping)

Single acquisition capture of the third of three HDR acquisitions with Color Mode set to :code:`UseFirstAcquisition` or :code:`Automatic` (no tone mapping)

Single acquisition capture of the first of three HDR acquisitions with Color Mode set to UseFirstAcquisition or Automatic (no tone mapping)

Single acquisition capture of the second of three HDR acquisitions with Color Mode set to UseFirstAcquisition or Automatic (no tone mapping)

Single acquisition capture of the third of three HDR acquisitions with Color Mode set to UseFirstAcquisition or Automatic (no tone mapping)

HDR with three acquisitions with Color Mode set to :code:`ToneMapping` or :code:`Automatic`

HDR with three acquisitions with Color Mode set to ToneMapping or Automatic

HDR capture with UseFirstAcquisition

If you do not want to use tone mapping for your multi-acquisition HDR, but instead use the color image of one of the acquisitions, that is possible. Identify which of the acquisitions you want to use the color from. Then, make sure that acquisition is the first in the sequence of acquisition settings for your HDR capture, and set the Color Mode to UseFirstAcquisition. For the above example, the resulting color image will look like the color image of the single capture using the first of the three HDR acquisitions.

Hint

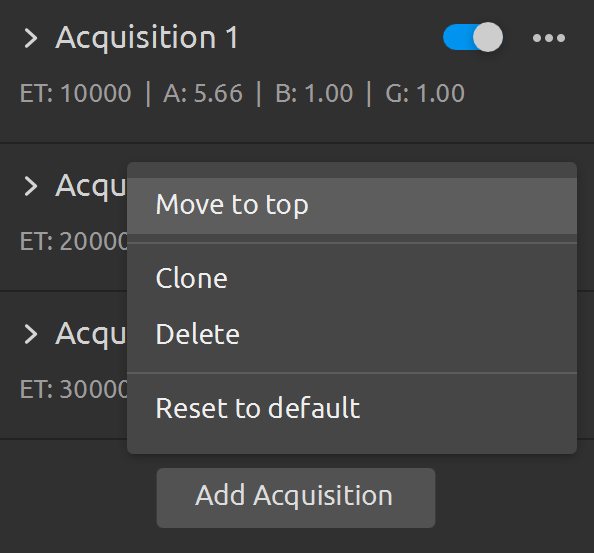
Make acquisition first in the sequence by clicking Move to top in Zivid Studio.

Move acquisition to top, making it first in the sequence

If you want to change the acquisition from which the HDR capture gets the color image, just rearrange the acquisition settings. UseFirstAcquisition Color Mode is recommended for keeping color consistent over repeated captures, useful for e.g, object classification based on color or texture in 2D image. For detailed explanation with implementation example, check out How to deal with Color Inconsistency from HDR.

Check out how to set processing settings with Zivid SDK, including Color Mode:

Go to source

source

std::cout << "Configuring settings for capture:" << std::endl;
Zivid::Settings settings{
    Zivid::Settings::Engine::phase,
    Zivid::Settings::Sampling::Color::rgb,
    Zivid::Settings::Sampling::Pixel::blueSubsample2x2,
    Zivid::Settings::RegionOfInterest::Box::Enabled::yes,
    Zivid::Settings::RegionOfInterest::Box::PointO{ 1000, 1000, 1000 },
    Zivid::Settings::RegionOfInterest::Box::PointA{ 1000, -1000, 1000 },
    Zivid::Settings::RegionOfInterest::Box::PointB{ -1000, 1000, 1000 },
    Zivid::Settings::RegionOfInterest::Box::Extents{ -1000, 1000 },
    Zivid::Settings::RegionOfInterest::Depth::Enabled::yes,
    Zivid::Settings::RegionOfInterest::Depth::Range{ 200, 2000 },
    Zivid::Settings::Processing::Filters::Smoothing::Gaussian::Enabled::yes,
    Zivid::Settings::Processing::Filters::Smoothing::Gaussian::Sigma{ 1.5 },
    Zivid::Settings::Processing::Filters::Noise::Removal::Enabled::yes,
    Zivid::Settings::Processing::Filters::Noise::Removal::Threshold{ 7.0 },
    Zivid::Settings::Processing::Filters::Noise::Suppression::Enabled::yes,
    Zivid::Settings::Processing::Filters::Noise::Repair::Enabled::yes,
    Zivid::Settings::Processing::Filters::Outlier::Removal::Enabled::yes,
    Zivid::Settings::Processing::Filters::Outlier::Removal::Threshold{ 5.0 },
    Zivid::Settings::Processing::Filters::Reflection::Removal::Enabled::yes,
    Zivid::Settings::Processing::Filters::Reflection::Removal::Mode::global,
    Zivid::Settings::Processing::Filters::Cluster::Removal::Enabled::yes,
    Zivid::Settings::Processing::Filters::Cluster::Removal::MaxNeighborDistance{ 10 },
    Zivid::Settings::Processing::Filters::Cluster::Removal::MinArea{ 100 },
    Zivid::Settings::Processing::Filters::Experimental::ContrastDistortion::Correction::Enabled::yes,
    Zivid::Settings::Processing::Filters::Experimental::ContrastDistortion::Correction::Strength{ 0.4 },
    Zivid::Settings::Processing::Filters::Experimental::ContrastDistortion::Removal::Enabled::no,
    Zivid::Settings::Processing::Filters::Experimental::ContrastDistortion::Removal::Threshold{ 0.5 },
    Zivid::Settings::Processing::Filters::Hole::Repair::Enabled::yes,
    Zivid::Settings::Processing::Filters::Hole::Repair::HoleSize{ 0.2 },
    Zivid::Settings::Processing::Filters::Hole::Repair::Strictness{ 1 },
    Zivid::Settings::Processing::Resampling::Mode::upsample2x2,
    Zivid::Settings::Processing::Color::Balance::Red{ 1.0 },
    Zivid::Settings::Processing::Color::Balance::Green{ 1.0 },
    Zivid::Settings::Processing::Color::Balance::Blue{ 1.0 },
    Zivid::Settings::Processing::Color::Gamma{ 1.0 },
    Zivid::Settings::Processing::Color::Experimental::Mode::automatic
};
std::cout << settings << std::endl;
Go to source

source

Console.WriteLine("Configuring settings for capture:");
var settings = new Zivid.NET.Settings()
{
    Engine = Zivid.NET.Settings.EngineOption.Phase,
    Sampling = { Color = Zivid.NET.Settings.SamplingGroup.ColorOption.Rgb, Pixel = Zivid.NET.Settings.SamplingGroup.PixelOption.BlueSubsample2x2 },
    RegionOfInterest = { Box = {
                            Enabled = true,
                            PointO = new Zivid.NET.PointXYZ{ x = 1000, y = 1000, z = 1000 },
                            PointA = new Zivid.NET.PointXYZ{ x = 1000, y = -1000, z = 1000 },
                            PointB = new Zivid.NET.PointXYZ{ x = -1000, y = 1000, z = 1000 },
                            Extents = new Zivid.NET.Range<double>(-1000, 1000),
                        },
                        Depth =
                        {
                            Enabled = true,
                            Range = new Zivid.NET.Range<double>(200, 2000),
                        }
    },
    Processing = { Filters = { Smoothing = { Gaussian = { Enabled = true, Sigma = 1.5 } },
                               Noise = { Removal = { Enabled = true, Threshold = 7.0 },
                                         Suppression = { Enabled = true },
                                         Repair ={ Enabled = true } },
                               Outlier = { Removal = { Enabled = true, Threshold = 5.0 } },
                               Reflection = { Removal = { Enabled = true, Mode = ReflectionFilterModeOption.Global} },
                               Cluster = { Removal = { Enabled = true, MaxNeighborDistance = 10, MinArea = 100} },
                               Hole = { Repair = { Enabled = true, HoleSize = 0.2, Strictness = 1 } },
                               Experimental = { ContrastDistortion = { Correction = { Enabled = true,
                                                                                      Strength = 0.4 },
                                                                       Removal = { Enabled = true,
                                                                                   Threshold = 0.5 } } } },
                   Resampling = { Mode = Zivid.NET.Settings.ProcessingGroup.ResamplingGroup.ModeOption.Upsample2x2},
                   Color = { Balance = { Red = 1.0, Green = 1.0, Blue = 1.0 },
                             Gamma = 1.0,
                             Experimental = { Mode = ColorModeOption.Automatic } } }
};
Console.WriteLine(settings);
Go to source

source

print("Configuring settings for capture:")
settings = zivid.Settings()
settings.engine = zivid.Settings.Engine.phase
settings.sampling.color = zivid.Settings.Sampling.Color.rgb
settings.sampling.pixel = zivid.Settings.Sampling.Pixel.blueSubsample2x2
settings.region_of_interest.box.enabled = True
settings.region_of_interest.box.point_o = [1000, 1000, 1000]
settings.region_of_interest.box.point_a = [1000, -1000, 1000]
settings.region_of_interest.box.point_b = [-1000, 1000, 1000]
settings.region_of_interest.box.extents = [-1000, 1000]
settings.region_of_interest.depth.enabled = True
settings.region_of_interest.depth.range = [200, 2000]
filters = settings.processing.filters
filters.smoothing.gaussian.enabled = True
filters.smoothing.gaussian.sigma = 1.5
filters.noise.removal.enabled = True
filters.noise.removal.threshold = 7.0
filters.noise.suppression.enabled = True
filters.noise.repair.enabled = True
filters.outlier.removal.enabled = True
filters.outlier.removal.threshold = 5.0
filters.reflection.removal.enabled = True
filters.reflection.removal.mode = zivid.Settings.Processing.Filters.Reflection.Removal.Mode.global_
filters.cluster.removal.enabled = True
filters.cluster.removal.max_neighbor_distance = 10
filters.cluster.removal.min_area = 100
filters.experimental.contrast_distortion.correction.enabled = True
filters.experimental.contrast_distortion.correction.strength = 0.4
filters.experimental.contrast_distortion.removal.enabled = False
filters.experimental.contrast_distortion.removal.threshold = 0.5
filters.hole.repair.enabled = True
filters.hole.repair.hole_size = 0.2
filters.hole.repair.strictness = 1
resampling = settings.processing.resampling
resampling.mode = zivid.Settings.Processing.Resampling.Mode.upsample2x2
color = settings.processing.color
color.balance.red = 1.0
color.balance.blue = 1.0
color.balance.green = 1.0
color.gamma = 1.0
settings.processing.color.experimental.mode = zivid.Settings.Processing.Color.Experimental.Mode.automatic
print(settings)

Version History

SDK

Changes

2.7.0

Tone mapping API is replaced by Color Mode API.

2.3.0

Tone mapping API is added.