UR5 Robot + Python: Generate Dataset and perform Hand-Eye Calibration
Note
This tutorial is built and tested using Universal Robots UR5e.
Introduction
Accurate hand-eye calibration requires a good dataset, but generating this dataset is not trivial. In this tutorial, we first set up communication between the Zivid camera and the Universal Robots (UR) UR5e. Then, we extract a dataset consisting of 3D images and robot poses. Finally, we use this dataset to do the hand-eye calibration. The sample works for both eye-in-hand and eye-to-hand.
If you are not familiar with hand-eye calibration, we recommend going through Hand-Eye Calibration.
Requirements
A UR robot with a standard TCP/IP connection.
Zivid-Python installed.
Prepare UR5e robot
Clone zivid-python-samples from Github, navigate to ur_hand_eye_calibration folder and install the runtime requirements.
cd source\applications\advanced\hand_eye_calibration\ur_hand_eye_calibration
pip install -r requirements.txt
cd source/applications/advanced/hand_eye_calibration/ur_hand_eye_calibration
pip install -r requirements.txt
This installs all 3rd party libraries including the UR RTDE (Real-Time Data Exchange) communication protocol.
The three files we need for this sample are:
universal_robots_communication_file.xml - Configuration file with I/O registers.
universal_robots_robot_motion_script.urp - Robot motion script that is created and runs in the UR controller.
universal_robots_perform_hand_eye_calibration.py - Python script that captures images and poses, saves them, and performs hand-eye calibration.
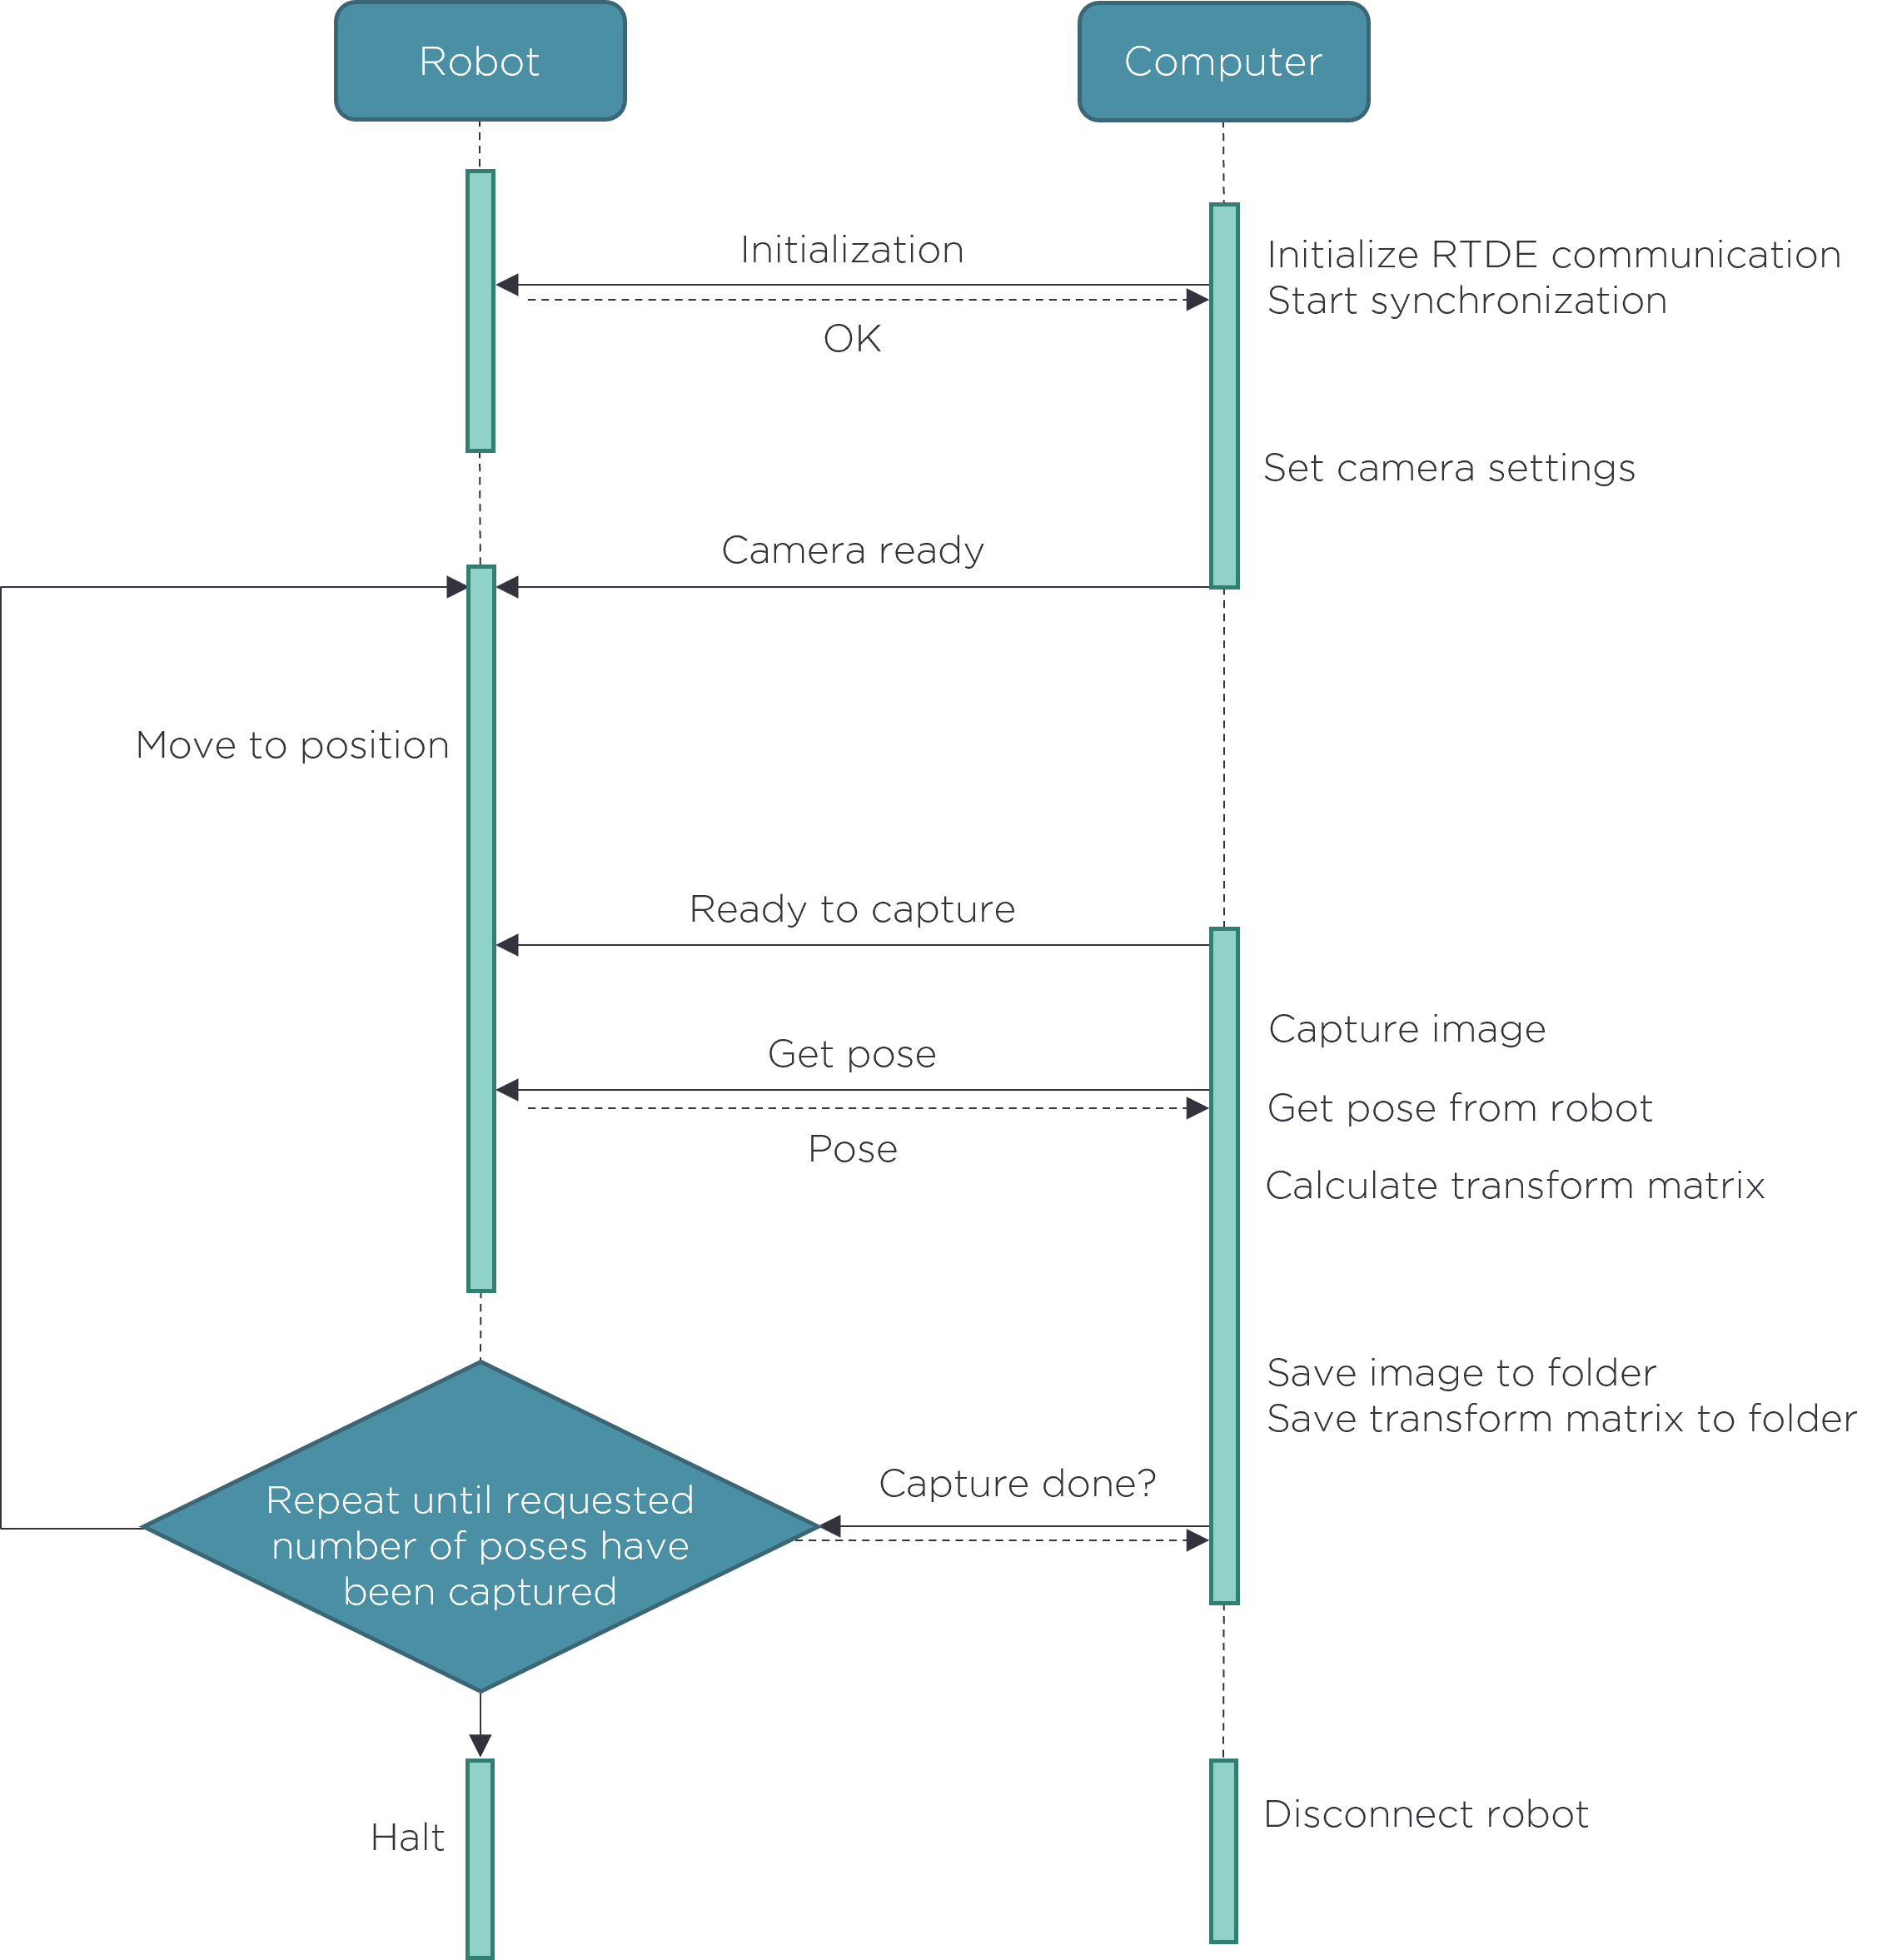
The robot motion script is where we set all robot poses used in the calibration. The python script captures images, reads robot poses, and performs hand-eye calibration. Communication between robot and computer is done through UR RTDE (Real-Time Data Exchange) protocol. An overview of the communication flow is illustrated below.
Some adjustments must be made to the UR robot motion script before we can generate a dataset.
Modify universal_robots_robot_motion_script.urp robot motion script
First, save the universal_robots_robot_motion_script.urp file on a USB drive and load the script on your UR controller. Your controller interface should look similar to this:
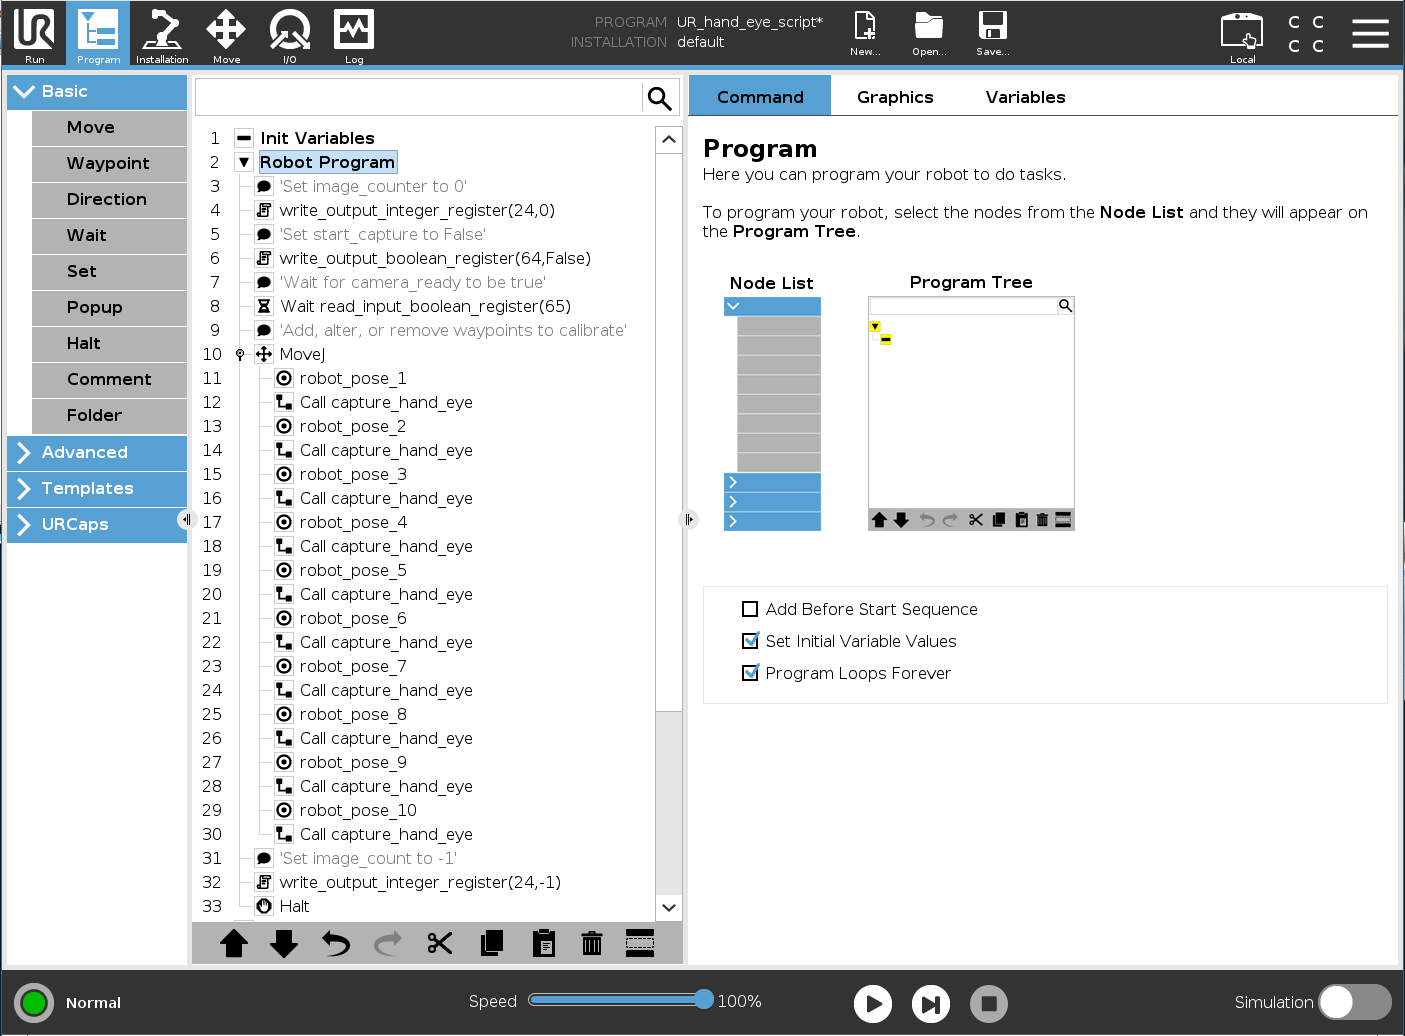
Here, capture_hand_eye is a subprogram that triggers the camera to capture one image, which is done for every robot pose. The subprogram communicates with the PC via registers - logical channels on the communication interface. The following are I/O variables used to communicate with the Python script:
image_count
start_capture
camera_ready
finish_capture
- output_int_register_24 = image_count:
Count the number of images and poses acquired.
- output_bit_register_64 = start_capture:
Bool that triggers the camera to capture an image.
- input_bit_register_64 = finish_capture:
Bool that triggers the UR robot to move to the next position.
- input_bit_register_65 = ready_to_capture::
Bool that tells UR robot that the camera is ready to be used.
The universal_robots_communication_file.xml file states which of the registers we are writing to. If we change a register in the Python script, we must change the same register in the configuration file.
<?xml version="1.0"?>
<rtde_config>
    <recipe key="out">
        <field name="actual_TCP_pose" type="VECTOR6D"/>
        <field name="output_int_register_24" type="INT32"/>
        <field name="output_bit_register_64" type="BOOL"/>
    </recipe>
    <recipe key="in">
        <field name="input_bit_register_64" type="BOOL"/>
        <field name="input_bit_register_65" type="BOOL"/>
    </recipe>
</rtde_config>
To generate a good dataset, we want to follow the steps explained in Hand-Eye Calibration Process. Every waypoint, robot_pose_X, must be modified to fit the setup. The easiest way is to set the robot in free-drive and move it with your hands to the desired postures. Make sure that the Zivid Calibration Object is visible for the camera at each of these postures. If you are using ArUco markers, not all of them need to be visible for each capture. If you don’t get good point cloud quality and coverage on the calibration object (on both dark and light squares), modify camera settings in the following function:
def _camera_settings() -> zivid.Settings:
    """Set camera settings

    Returns:
        Zivid Settings
    """
    return zivid.Settings(
        acquisitions=[
            zivid.Settings.Acquisition(
                aperture=8.0,
                exposure_time=datetime.timedelta(microseconds=10000),
                brightness=1.0,
                gain=1,
            )
        ],
        processing=zivid.Settings.Processing(
            filters=zivid.Settings.Processing.Filters(
                smoothing=zivid.Settings.Processing.Filters.Smoothing(
                    gaussian=zivid.Settings.Processing.Filters.Smoothing.Gaussian(enabled=True)
                )
            )
        ),
    )
How To Get Good Quality Data On Zivid Calibration Object explains how we can tune our parameters for the optimal 3D image quality.
Caution
If the captured images of the calibration object are not exposed well, hand-eye calibration will not work.
If you add or remove waypoints, remember to call capture_hand_eye after every waypoint. We recommend having 10-20 to get an accurate hand-eye transformation.
Before we run the Python script, it is helpful to manually go through all the robot positions. This way, we can verify that the robot will avoid singularities while moving from one pose to the next.
Caution
If you do eye-in-hand calibration, ensure that the Zivid camera does not collide with the robot.
Run python script
Now that we have modified the robot script to fit your scene, we are ready to generate a dataset and perform calibration!
Tip
It is recommended to Warm-up the camera and run Infield Correction before running hand-eye calibration. Use the same capture cycle during warmup, infield correction, and hand-eye calibration as in your application. To further reduce the impact of the temperature dependent performance factors, enable Thermal Stabilization.
First, run universal_robots_robot_motion_script.urp from the UR controller. When the program starts, it will wait for the Python script to set the camera_ready variable to True. Then, run the universal_robots_perform_hand_eye_calibration.py script from the command line.
For Eye-in-hand:
python universal_robots_perform_hand_eye_calibration.py --eih --ip 192.168.0.123For Eye-to-hand:
python universal_robots_perform_hand_eye_calibration.py --eth --ip 192.168.0.123
For Eye-in-hand:
python universal_robots_perform_hand_eye_calibration.py --eih --ip 192.168.0.123 marker --dictionary aruco4x4_50 --ids 1 2 3For Eye-to-hand:
python universal_robots_perform_hand_eye_calibration.py --eth --ip 192.168.0.123 marker --dictionary aruco4x4_50 --ids 1 2 3
Replace 192.168.0.123 with the robot’s actual IP address.
In the top right corner of the UR Teach Pendant, go to Hamburger menu → System to check or set the IP address of your robot.
The different inputs required by the Python script are displayed by typing the following command in the command prompt:
python universal_robots_perform_hand_eye_calibration.py -h

When the script is finished, it outputs the following:
the directory we saved our data in
the hand-eye transform - 4x4 calibration matrix
the residual in rotation and translation for each of the robot poses
A more detailed explanation about how Zivid calculates residuals is found in Hand-Eye Calibration Residuals.
When we have the transformation matrix, we can use it to convert a 3D point from the camera frame to the robot base frame. Details about how to do this are described in How To Use The Result Of Hand-Eye Calibration.