Zivid Two Network Configuration
The Zivid Two camera uses Ethernet communication and needs 10 Gbps for best performance. Your computer may not have a port for 10 Gigabit Ethernet. In that case, you can connect to it using a Thunderbolt 3 to 10GbE Adapter. At a reduced performance you can also use USB to 5GbE, 2.5GbE, or 1GbE adapters.
Requirements
Performance |
Network |
Interface |
Connection |
|---|---|---|---|
Optimal (recommended) |
10GbE (10Gbps) |
PCIe card |
Direct |
Very good |
10GbE |
Thunderbolt Adapter |
Direct |
Reduced |
5GbE or 2.5GbE |
PCIe/USB/Thunderbolt Adapter |
Direct/Switch |
Minimum |
1GbE (1Gbps) |
PCIe/USB Adapter |
Direct/Switch |
Caution
USB-based network adapters have reduced and more variable capture speed, and can occasionally give errors when using the camera.
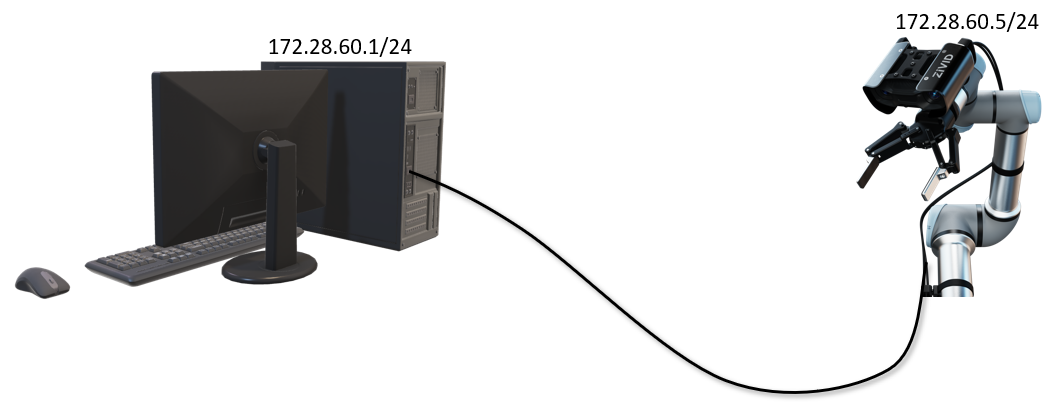
Default configuration
IP |
Subnet mask |
Gateway |
|
|---|---|---|---|
Zivid Two |
|
|
|
Possible PC |
|
|
|
- 1
Any IP address in the subnet range is valid, except the network address (
172.28.60.0) and the broadcast address (172.28.60.255). We also choose to avoid the gateway IP (172.28.60.1), even though we don’t currently require a gateway.
In order to use the camera with the default IP address your PC’s IP address must be in the same subnet, as listed in the table above. Go to Static IP Network Configuration - PC.
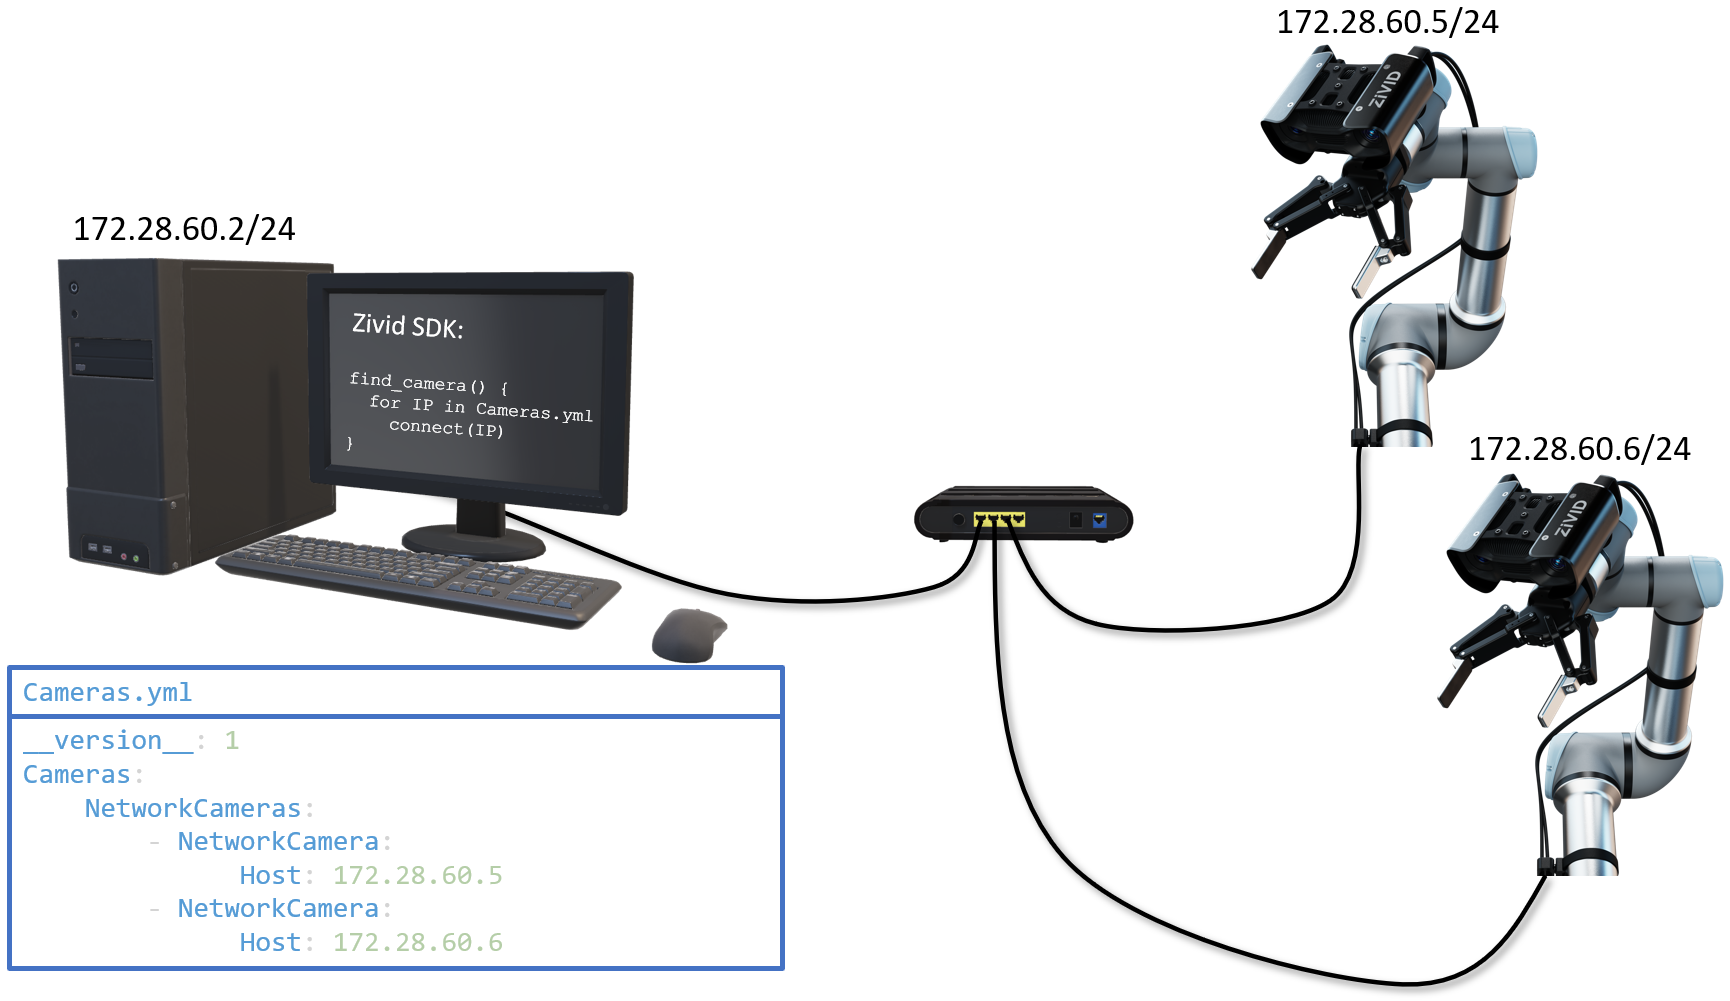
How does Zivid SDK find the camera?
The Zivid SDK knows the default IP address of the camera.
In addition it will check all IP addresses listed in Cameras.yml
pseudo code to show how Zivid SDK looks for a connected camera
def find_camera():
  if exists(Cameras.yml):
    for IP in Cameras.yml:
      connect(IP)
  else:
    connect("172.28.60.5")
__version__: 1
Cameras:
    NetworkCameras:
        - NetworkCamera:
              Host: 172.28.60.5
        - NetworkCamera:
              Host: 172.28.60.6
        - NetworkCamera:
              Host: 172.28.60.7
Path to Cameras.yml
mkdir %LOCALAPPDATA%\Zivid\API
move %HOMEPATH%\Downloads\Cameras.yml %LOCALAPPDATA%\Zivid\API\
Path to Cameras.yml
mkdir --parents $XDG_CONFIG_HOME/Zivid/API
mv ~/Downloads/Cameras.yml $XDG_CONFIG_HOME/Zivid/API/
Caution
If $XDG_CONFIG_HOME is not set use $HOME/.config.
Caution
Zivid configuration files must use .yml file extension ( not .yaml).
Custom configuration, single or multiple cameras
If you want to change the default IP of a single camera, you need to reconfigure the network settings. The same applies if you want to use multiple Zivid Two cameras connected to the same network card (each of them must have their unique IP address).
Note
There may be multiple reasons for why one wants to use custom static IPs. One may want to connect multiple cameras to the same network card or there may be an IP conflict with the IP range used by one’s internal network.
Static
Dynamic
The Zivid Two supports both DHCP and link-local configuration. A DHCP setup requires a DHCP server, either running on a router on the network or running locally on the PC. Current logic on Zivid Two:
Camera boots up
Camera looks for a DHCP server for ~15 seconds.
A DHCP server is found and an IP address is assigned.
A DHCP server is not found and the camera defaults to link-local address.
It is possible to connect to the camera via a hostname. Connection via hostname requires a NetBIOS Naming Service.
Tip
It is highly recommended to use hostnames when using a dynamic IP.
If not you have to list all possible IP addresses in Cameras.yml, or find the IP address assigned to the camera and list that.
When you use hostnames you only have to list the expected hostnames, and it doesn’t matter if the IP address is reassigned.
Warning
If you are not careful it is easy to run into issues with DHCP. For example, running more than one DHCP server with overlapping address range on the same network.
The following guides walk through each configuration option step by step.