通过ArUco标记定义的ROI盒
本教程演示了如何使用ArUco标记定义 ROI 盒的参数以及如何使用它进行过滤。我们在这里使用了 Zivid calibration board 上的ArUco标记,假设标定板放置在料箱的右下角。 料箱大小也假定为已知,该数据用于设置ROI盒的尺寸。这样你就可以自动找到相机坐标系中的ROI参数了。
本教程使用了一个档案相机(file camera)对下图中的场景进行演示。
备注
档案相机可以从 Sample Data(示例数据) 下载。
首先,我们需要捕获ArUco标记的点云。

const auto fileCamera = std::string(ZIVID_SAMPLE_DATA_DIR) + "/BinWithCalibrationBoard.zfc";

std::cout << "Creating virtual camera using file: " << fileCamera << std::endl;
auto camera = zivid.createFileCamera(fileCamera);

auto settings = Zivid::Settings{ Zivid::Settings::Acquisitions{ Zivid::Settings::Acquisition{} } };

const auto originalFrame = camera.capture(settings);
auto pointCloud = originalFrame.pointCloud();
ArUco标记坐标系的原点位于ArUco标记的中心。
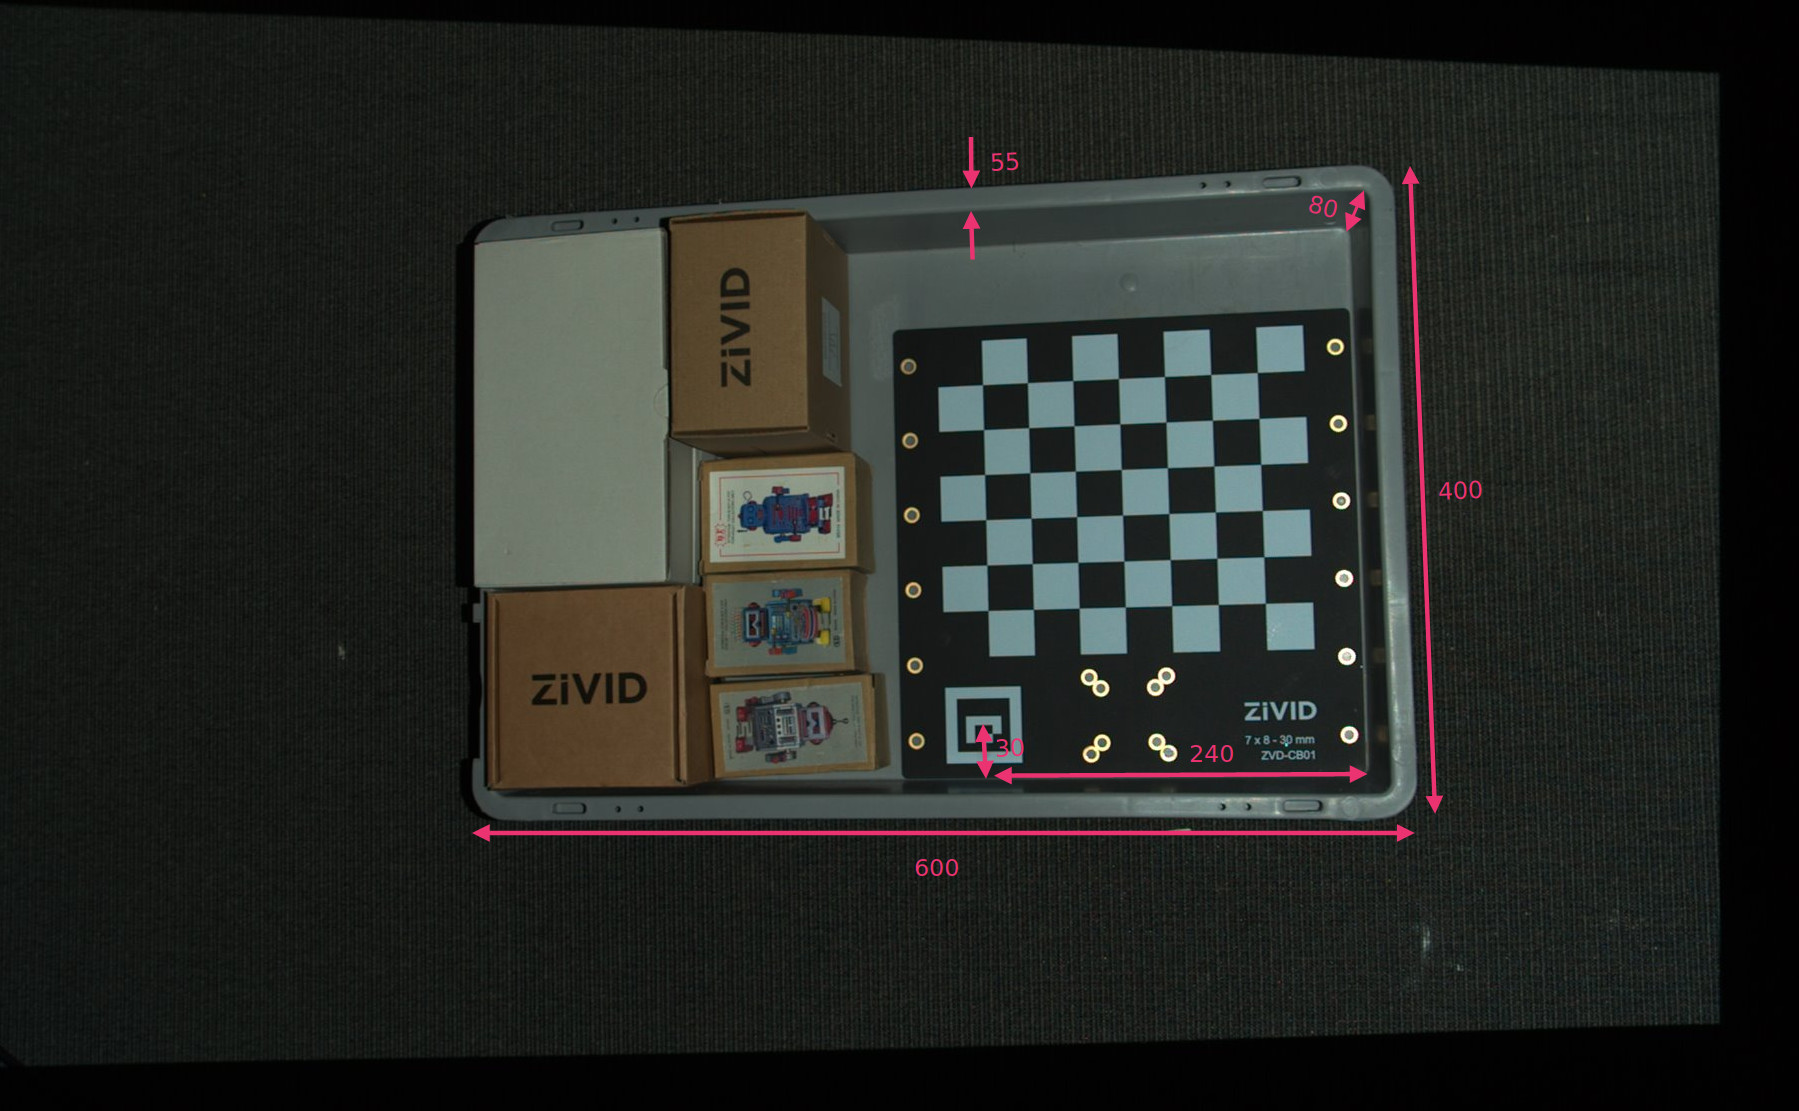
我们定义了ROI盒右下角相对于ArUco标记坐标系的位置,以及ROI盒尺寸。然后我们从长度和宽度中减去箱边缘的宽度以移除箱壁。
const float roiBoxLength = 545.F;
const float roiBoxWidth = 345.F;
const float roiBoxHeight = 150.F;
// Coordinates are relative to the ArUco marker origin which lies in the center of the ArUco marker.
// Positive x-axis is "East", y-axis is "South" and z-axis is "Down".
const Zivid::PointXYZ roiBoxLowerRightCornerInArUcoFrame{ 240.F, 30.F, 5.F };
const Zivid::PointXYZ roiBoxUpperRightCornerInArUcoFrame{ roiBoxLowerRightCornerInArUcoFrame.x,
                                                          roiBoxLowerRightCornerInArUcoFrame.y - roiBoxWidth,
                                                          roiBoxLowerRightCornerInArUcoFrame.z };
const Zivid::PointXYZ roiBoxLowerLeftCornerInArUcoFrame{ roiBoxLowerRightCornerInArUcoFrame.x - roiBoxLength,
                                                         roiBoxLowerRightCornerInArUcoFrame.y,
                                                         roiBoxLowerRightCornerInArUcoFrame.z };
然后可以设置定义ROI盒基坐标系的三个点。
然后我们将配置ArUco标记。
std::cout << "Configuring ArUco marker" << std::endl;
const auto markerDictionary = cv::aruco::getPredefinedDictionary(cv::aruco::DICT_4X4_100);
std::vector<int> markerIds;
std::vector<std::vector<cv::Point2f>> markerCorners;
cv::Ptr<cv::aruco::DetectorParameters> detectorParameters = cv::aruco::DetectorParameters::create();
detectorParameters->cornerRefinementMethod = cv::aruco::CORNER_REFINE_SUBPIX;
由于我们使用的是OpenCV,因此需要将2D图像从点云转换为OpenCV图像格式。
接下来在2D图像中检测ArUco标记。
然后我们需要估计ArUco标记的位姿,将这三个点转换到相机参考系。
std::cout << "Estimating pose of detected ArUco marker" << std::endl;
const auto transformMarkerToCamera = estimateArUcoMarkerPose(pointCloud, markerCorners[0]);
std::cout << "Transforming the ROI base frame points to the camera frame" << std::endl;
const auto roiPointsInCameraFrame = transformPoints(
    std::vector<Zivid::PointXYZ>{ pointOInArUcoFrame, pointAInArUcoFrame, pointBInArUcoFrame },
    transformMarkerToCamera);
提示
详细了解 位置、方向和坐标变换 来了解其工作原理。
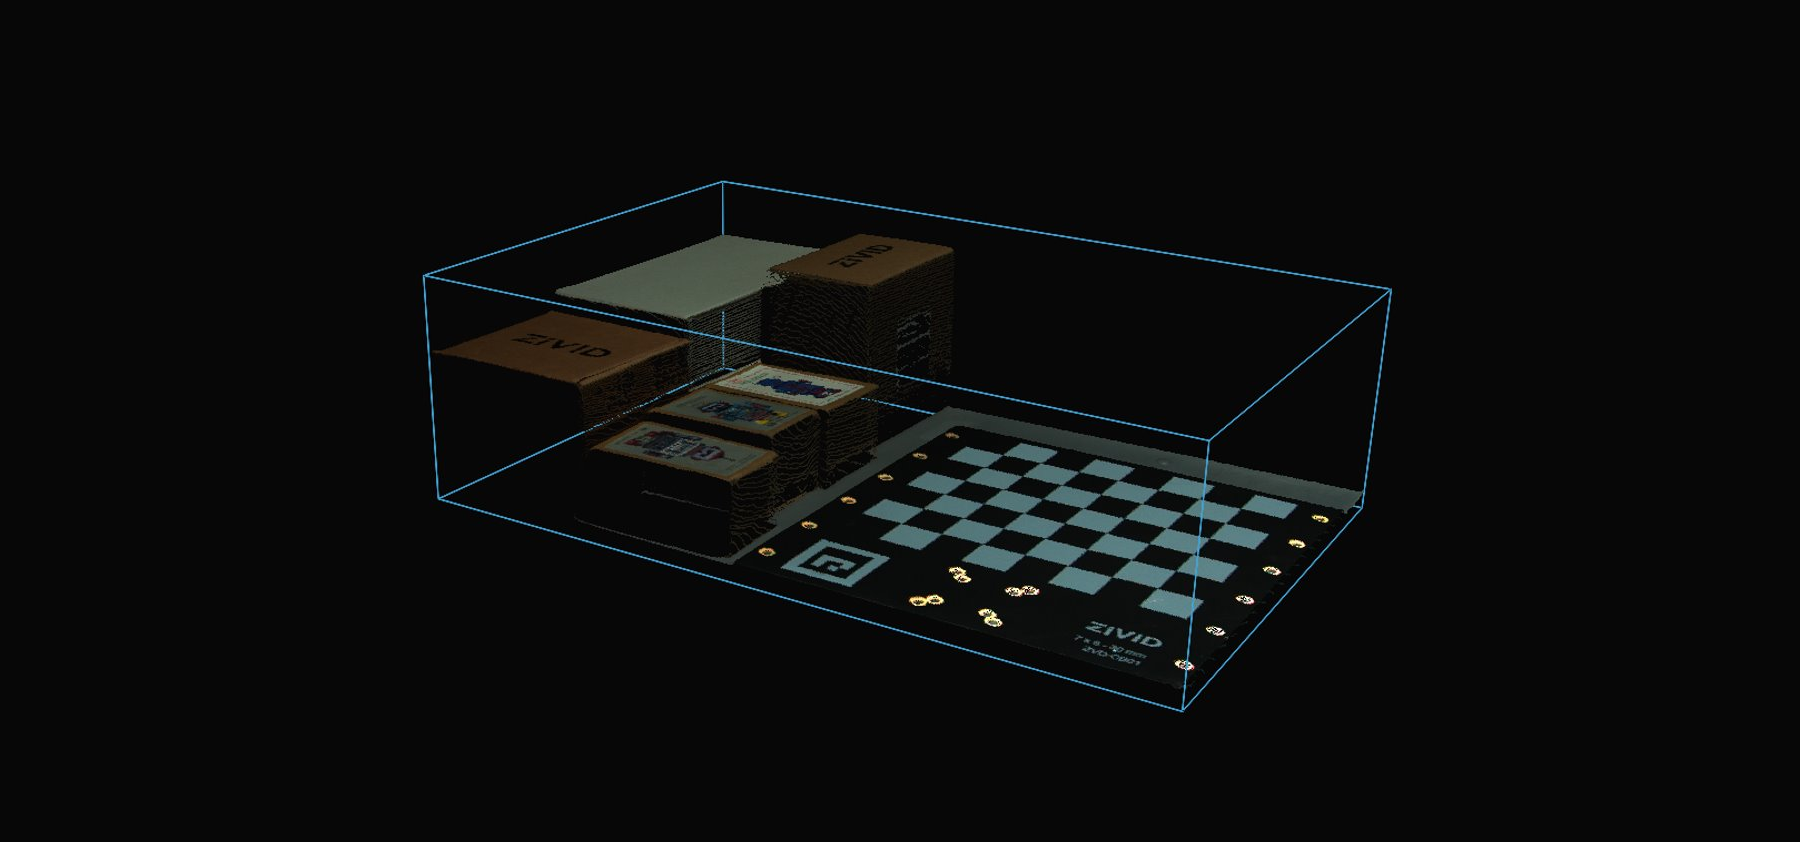
现在我们可以根据ROI盒的大小和位置过滤点云。将第一个范围(extent)设置为一个较小的负数值来避免过滤掉底板,第二个范围(extent)设置为所需的盒子高度。
settings.set(Zivid::Settings::RegionOfInterest{
    Zivid::Settings::RegionOfInterest::Box::Enabled::yes,
    Zivid::Settings::RegionOfInterest::Box::PointO{ roiPointsInCameraFrame[0] },
    Zivid::Settings::RegionOfInterest::Box::PointA{ roiPointsInCameraFrame[1] },
    Zivid::Settings::RegionOfInterest::Box::PointB{ roiPointsInCameraFrame[2] },
    Zivid::Settings::RegionOfInterest::Box::Extents{ -10, roiBoxHeight } });
最后,我们进行新的捕获并可视化过滤后的点云。
如需根据ROI盒过滤点云,您可以运行我们的代码示例。
./ROIBoxViaArucoMarker
小技巧
如果您希望在自己的设置中使用它,您可以自行修改代码示例:
用您的实际相机和设置替换档案相机。
将标定板放在料箱的右下角。
将ROI盒尺寸修改为您的料箱的尺寸。
运行示例!
您现在可以保存包含了ROI参数的捕获设置了,然后拿走标定板并在整个料箱上使用该设置。