Region of Interest Tutorial
The Region of Interest (ROI) removes points outside a user-defined region of interest and can reduce capture time. The ROI can either be a box in 3D, a range of z-values from the camera, or both.
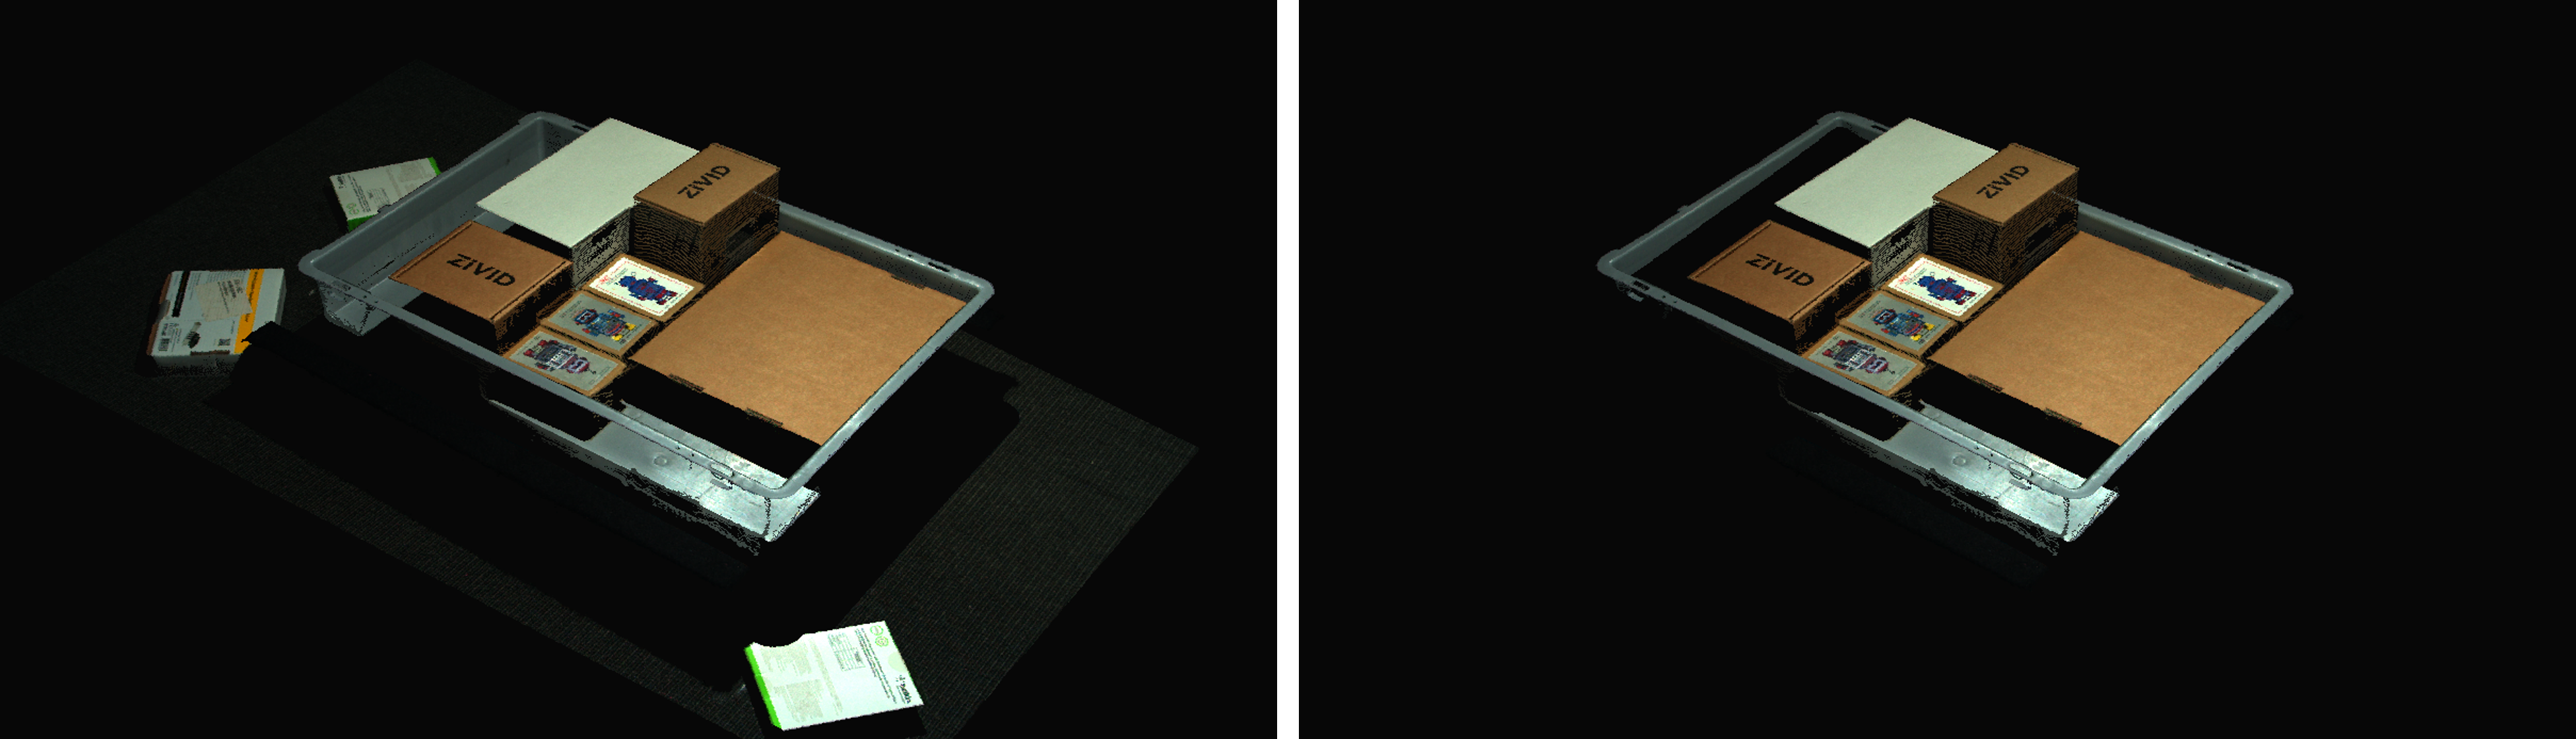
A ROI is helpful if the application only requires a portion of the field of view and not the entire scene. If you, for example, want to detect parts in a bin, your detection algorithms may benefit from the reduced search space inside the bin rather than the whole scene.
ROI as a Box
ROI box filtering benefits
ROI box filtering provides one of the following benefits:
- Reduced capture time (same point cloud quality)
There is less data to transfer, copy, and process; significant speed-ups are realized with one or both:
Weak GPU (Intel/Jetson)
Heavy point cloud processing (Omni/Stripe, 5MP resolution, multi-acquisition HDR)
- Better point cloud quality (same capture time)
Different settings can be used; for example:
Stripe/Omni engine instead of Phase
Higher resolution with Sampling::Pixel
Adding more acquisitions in HDR
- Cheaper GPU (same capture time)
With less data to process, the processing can be slower, allowing you to use, for example:
Intel/Jetson instead of dedicated Nvidia
- Cheaper Network Card (same capture time)
With less data to transfer you may not saturate the network, allowing you to use, for example:
1G instead of 2.5G/10G
2.5G instead of 10G
The parameter RegionOfInterest::Box enables using ROI as a box.
Three points define the base plane of the box and two extents define the height:
The three points (
Box::PointO,Box::PointA,Box::PointB) are given in the camera frame of reference in 3D and define the base plane of the box. A fourth point is automatically found to bind the base plane into a frame and complete the rectangle. The three points constitute two vectors in order:Point O is the origin of the vectors.
Point A spans the first vector from the origin.
Point B spans the second vector from the origin.
The two extents (
Box::Extents) extrude the base frame into a box. The cross-product of vectors OA and OB defined by Point O, Point A and Point B gives the direction of the extents. A negative extent will therefore extrude in the opposite direction of the cross-product.
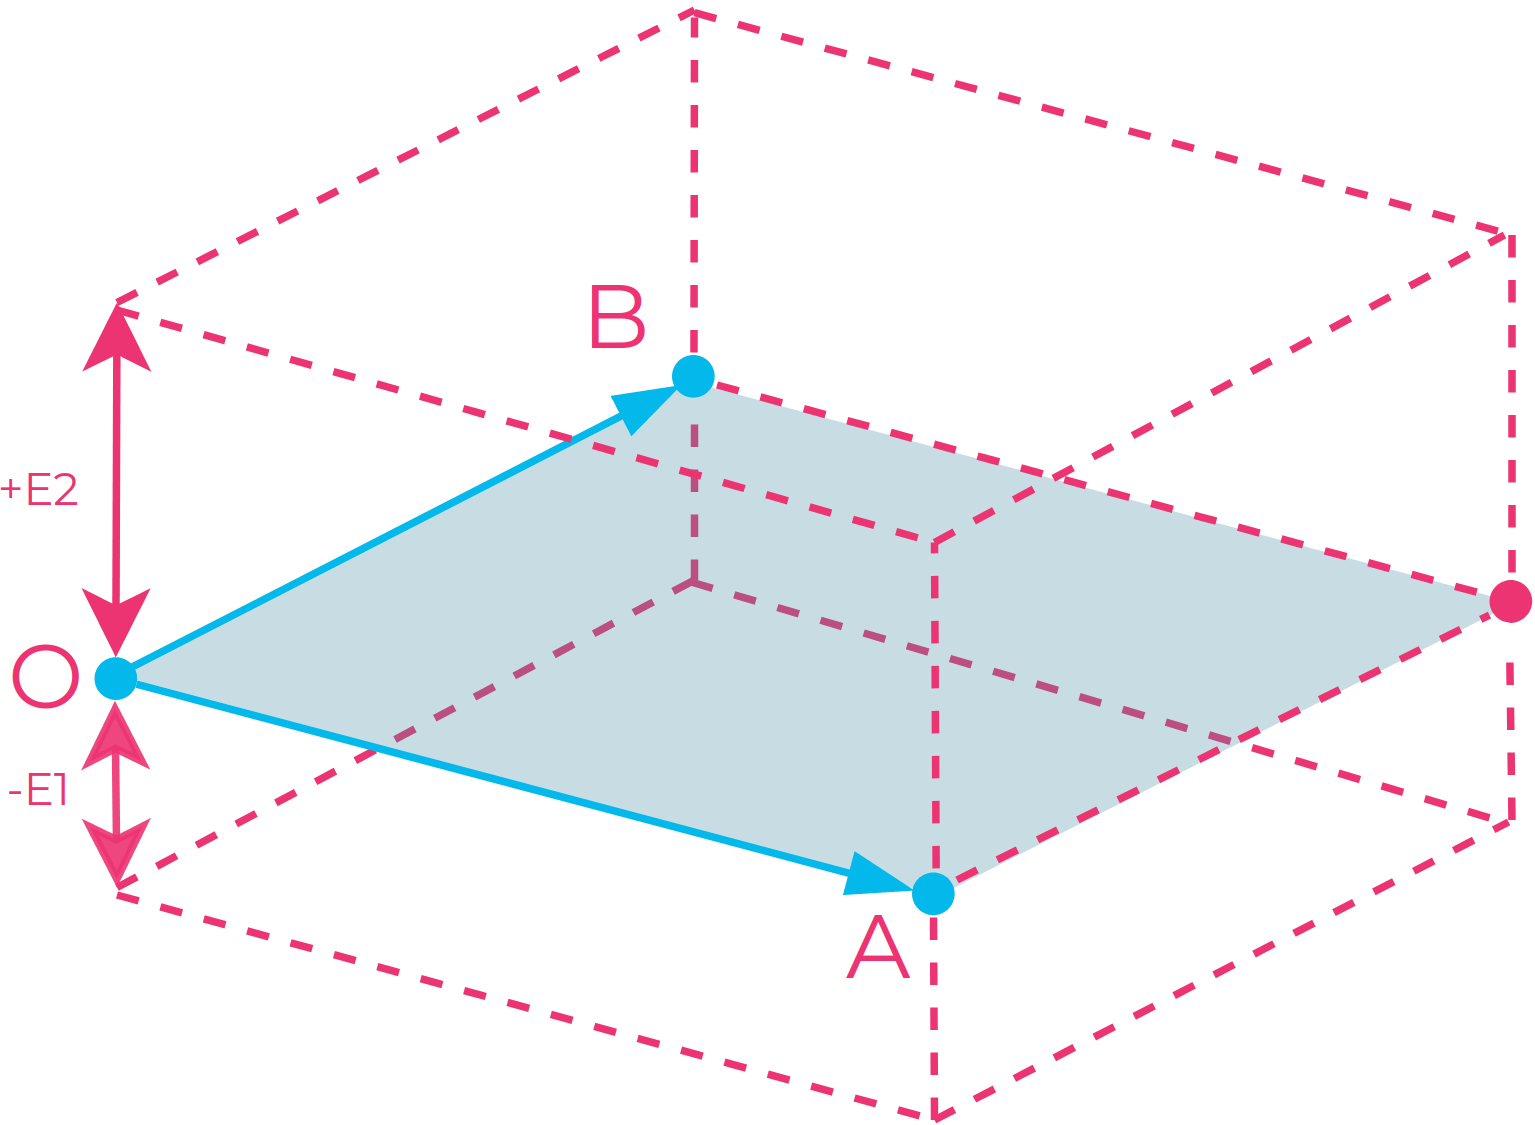
Illustration of the ROI box: Three points (O, A, and B) are given to define the box’s bottom plane, and a fourth point is automatically chosen to complete the rectangle. The bounded plane defined by the four points can then be extruded both upwards (+E2) and downwards (-E1) to complete the box.
Note
The base frame of the box is not constrained to a rectangle with perpendicular corners. It is therefore possible to make a parallelogram as the base, and a parallelepiped as the box.
Tip
Use the following steps when selecting the three points as a rule of thumb:
Select Point O in an arbitrary corner.
Select Point A such that Point B lies in a position counter-clockwise to Point A.
Select Point B in a position counter-clockwise to Point A.
This way the extents will have a positive direction towards the camera.
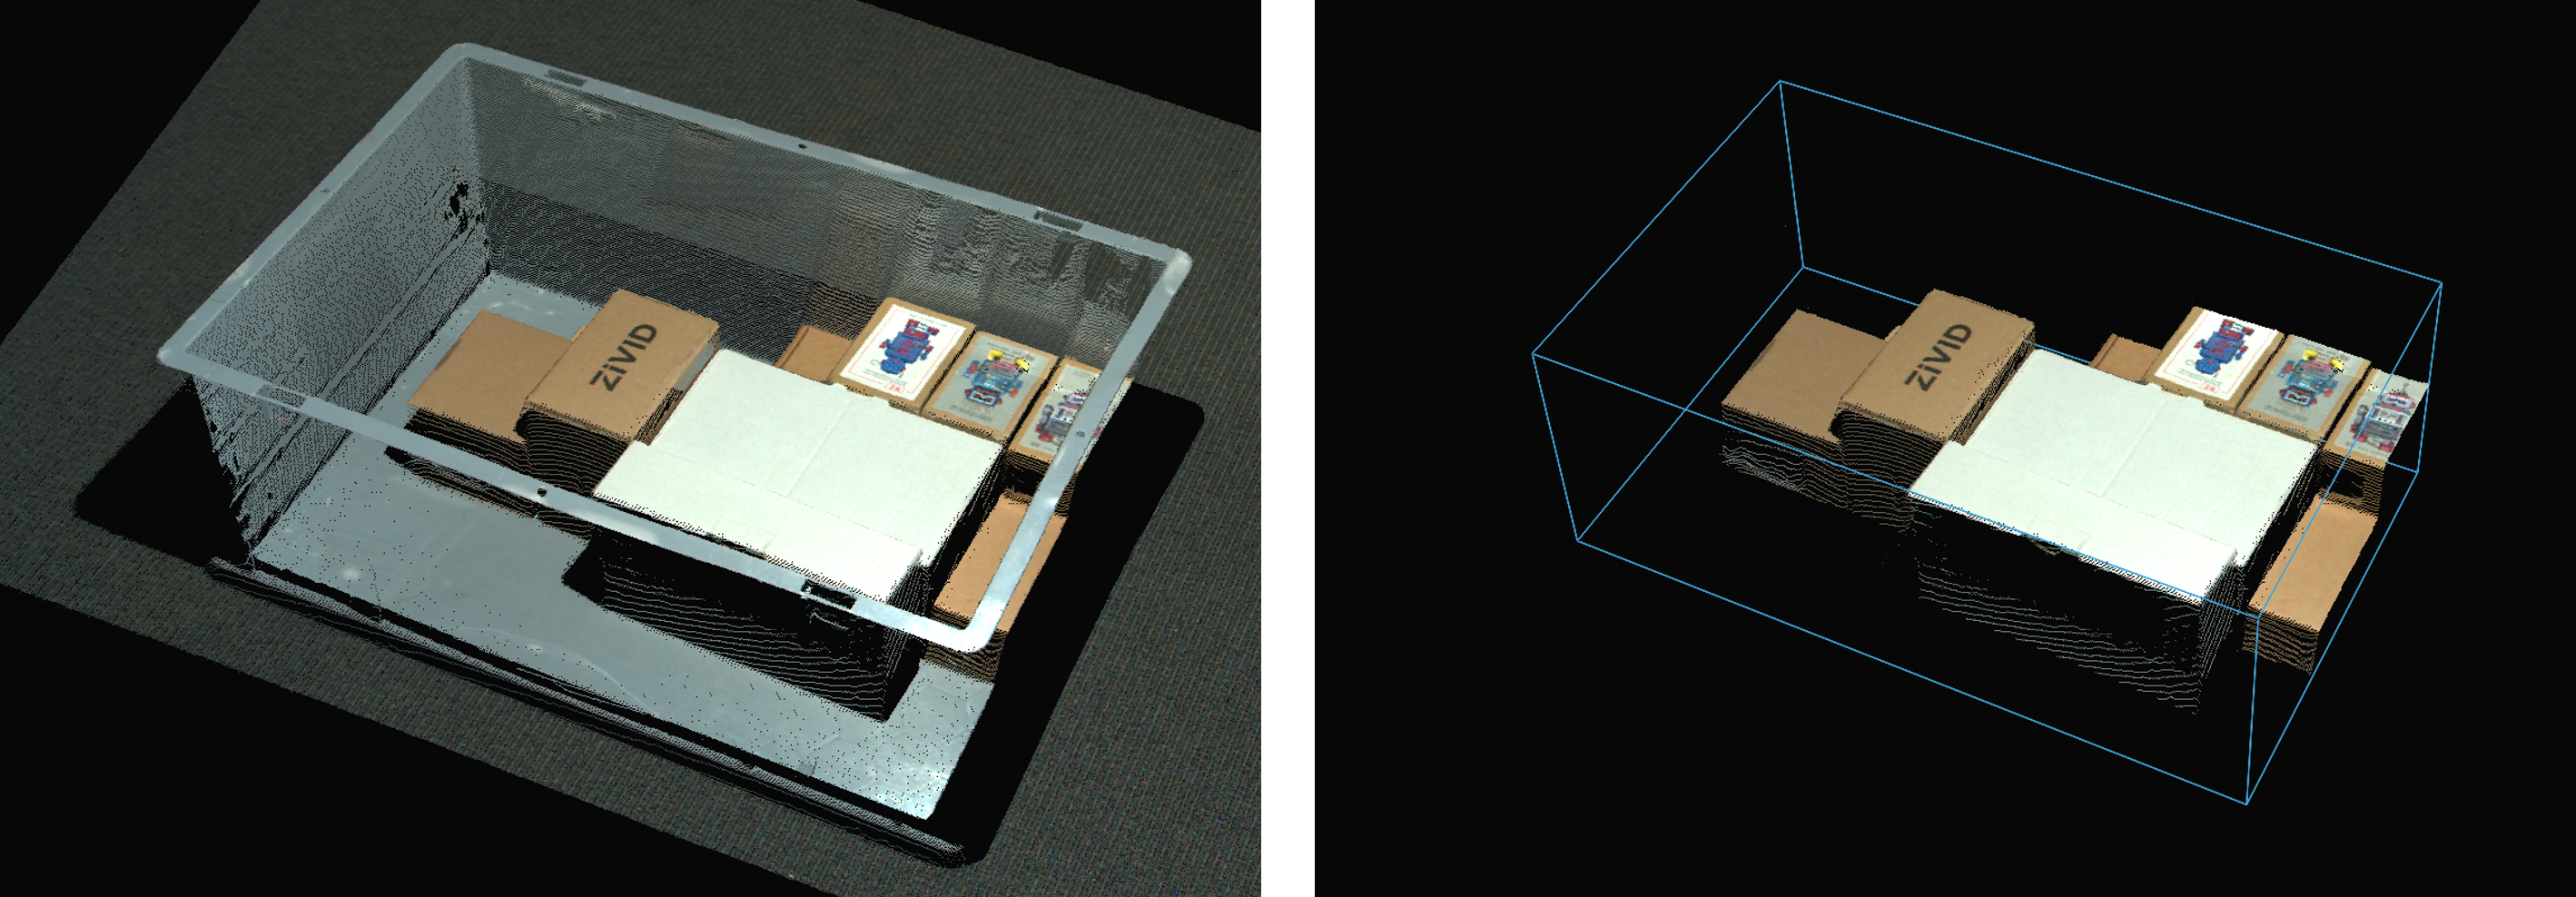
Configure ROI box in Zivid Studio
Once you have created the ROI box in Zivid Studio you can export the settings YAML and load it back into your application.

const auto settingsFile = "Settings.yml";
std::cout << "Loading settings from file: " << settingsFile << std::endl;
const auto settingsFromFile = Zivid::Settings(settingsFile);
var settingsFile = "Settings.yml";
Console.WriteLine("Loading settings from file: " + settingsFile);
var settingsFromFile = new Zivid.NET.Settings(settingsFile);
ROI box examples and Performance
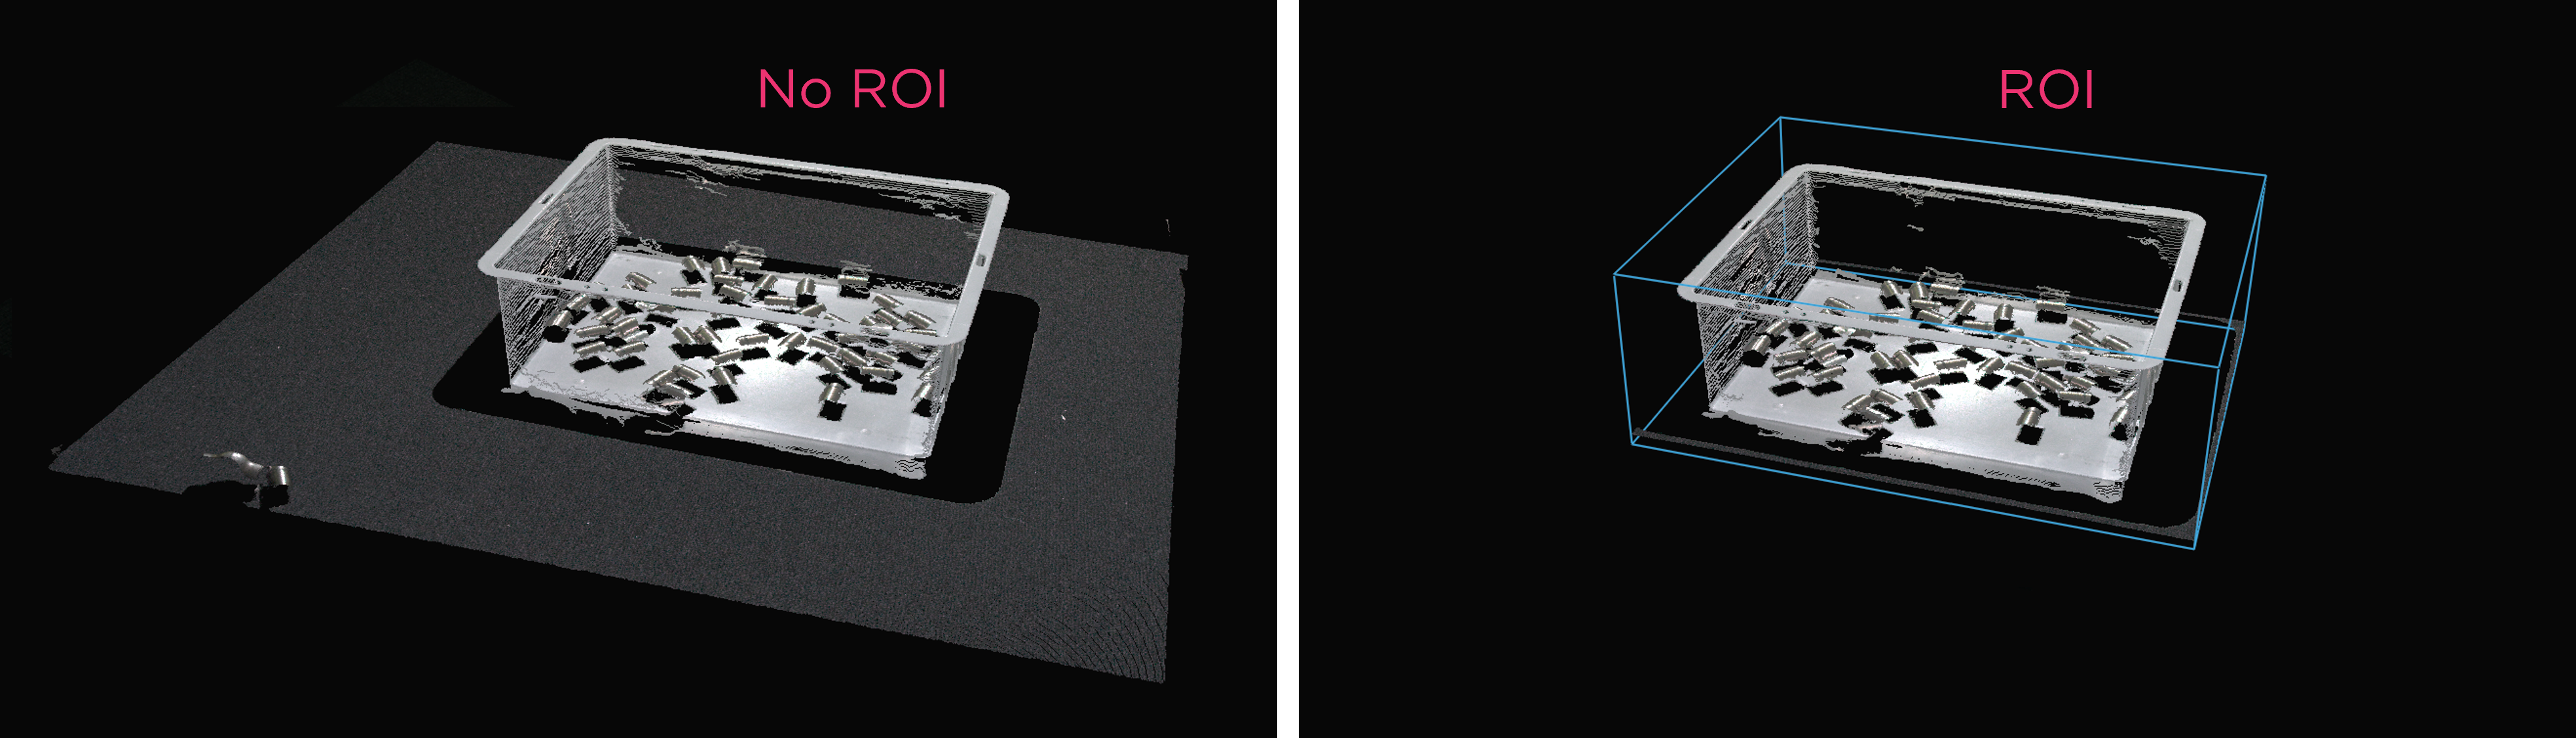
Robot Picking example
Here is an example of heavy point cloud processing using a low-end PC (Intel Iris Xe integrated laptop GPU and a 1G network card) where ROI box filtering is beneficial.
Imagine a robot picking from a 600 x 400 x 300 mm bin with a stationary-mounted Zivid 2+ MR130 camera. For good robot clearance, the camera is mounted at 1700 mm distance from the bin top, providing a FOV of approximately 1000 x 800 mm. With the camera mounted at this distance, a lot of the FOV is outside of the ROI, allowing one to crop ~20/25% of pixel columns/rows from each side. As can be seen from the table below, the capture time can be significantly reduced with ROI box filtering.
Presets |
Acquisition Time |
Capture Time |
||
|---|---|---|---|---|
No ROI |
ROI |
No ROI |
ROI |
|
Manufacturing Specular |
0.64 s |
0.64 s |
2.1 s |
1.0 s |
Consumer Goods Quality |
0.90 s |
0.88 s |
5.0 s |
3.0 s |
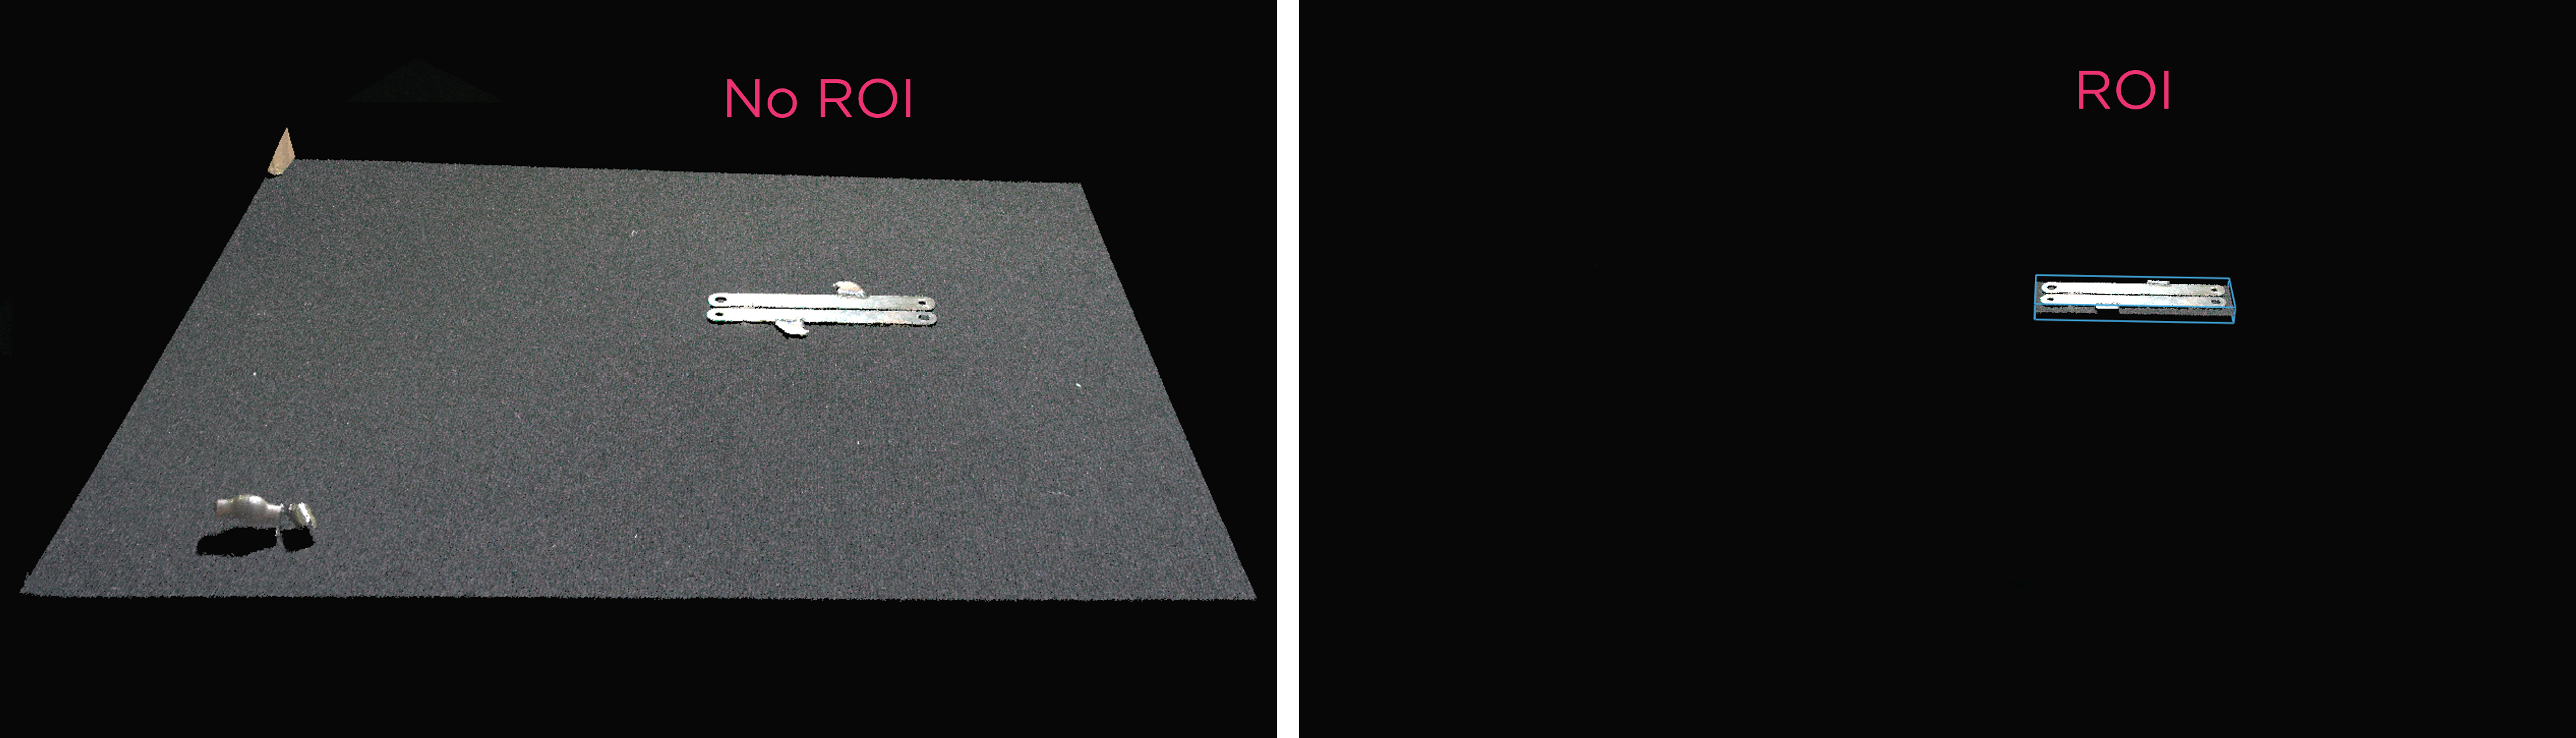
Robot Guidance / Assembly example
Here is an example of heavy point cloud processing using a low-end PC (Nvidia MX 250 laptop GPU and a 1G network card) where ROI box filtering is very beneficial.
In some applications in robot guidance (e.g., drilling, welding, gluing) or assembly (e.g., peg-in-hole), the ROI can be very small compared to the FOV of the camera at imaging distance. In such scenarios, with ROIs often comprising only 5-10% of the points in the point cloud, the capture time can drastically be reduced utilizing ROI box filtering (see table below).
Presets |
Acquisition Time |
Capture Time |
||
|---|---|---|---|---|
No ROI |
ROI |
No ROI |
ROI |
|
Manufacturing Specular |
0.65 s |
0.63 s |
1.3 s |
0.7 s |
Manufacturing Small Features |
0.70 s |
0.65 s |
5.0 s |
0.8 s |
ROI as a Depth Range
The parameter RegionOfInterest::Depth enables to use ROI as a range of z-values from the camera, where points are kept within the following thresholds:
minimum depth threshold (
RegionOfInterest::Depth::minValue)maximum depth threshold (
RegionOfInterest::Depth::maxValue)
This is useful if you have points in the foreground or background of the scene that you want to filter out. Note that the z-values are given in the camera frame of reference and will therefore filter perpendicularly to the camera. This will thus work best if the camera is mounted perpendicularly to the objects you want to capture.
ROI API
The ROI is a part of the Camera Settings and is set under the Zivid SDK main settings object. It is therefore applied when you capture, and not on the point cloud object afterward.
Tip
ROI as a Box reduces capture time; ROI as a Depth Range does not.
std::cout << "Configuring settings for capture:" << std::endl;
Zivid::Settings2D settings2D{
    Zivid::Settings2D::Sampling::Color::rgb,
    Zivid::Settings2D::Sampling::Pixel::all,

    Zivid::Settings2D::Processing::Color::Balance::Blue{ 1.0 },
    Zivid::Settings2D::Processing::Color::Balance::Green{ 1.0 },
    Zivid::Settings2D::Processing::Color::Balance::Red{ 1.0 },
    Zivid::Settings2D::Processing::Color::Gamma{ 1.0 },

    Zivid::Settings2D::Processing::Color::Experimental::Mode::automatic,
};

Zivid::Settings settings{
    Zivid::Settings::Color{ settings2D },

    Zivid::Settings::Engine::phase,

    Zivid::Settings::RegionOfInterest::Box::Enabled::yes,
    Zivid::Settings::RegionOfInterest::Box::PointO{ 1000, 1000, 1000 },
    Zivid::Settings::RegionOfInterest::Box::PointA{ 1000, -1000, 1000 },
    Zivid::Settings::RegionOfInterest::Box::PointB{ -1000, 1000, 1000 },
    Zivid::Settings::RegionOfInterest::Box::Extents{ -1000, 1000 },

    Zivid::Settings::RegionOfInterest::Depth::Enabled::yes,
    Zivid::Settings::RegionOfInterest::Depth::Range{ 200, 2000 },

    Zivid::Settings::Processing::Filters::Cluster::Removal::Enabled::yes,
    Zivid::Settings::Processing::Filters::Cluster::Removal::MaxNeighborDistance{ 10 },
    Zivid::Settings::Processing::Filters::Cluster::Removal::MinArea{ 100 },

    Zivid::Settings::Processing::Filters::Hole::Repair::Enabled::yes,
    Zivid::Settings::Processing::Filters::Hole::Repair::HoleSize{ 0.2 },
    Zivid::Settings::Processing::Filters::Hole::Repair::Strictness{ 1 },

    Zivid::Settings::Processing::Filters::Noise::Removal::Enabled::yes,
    Zivid::Settings::Processing::Filters::Noise::Removal::Threshold{ 7.0 },

    Zivid::Settings::Processing::Filters::Noise::Suppression::Enabled::yes,
    Zivid::Settings::Processing::Filters::Noise::Repair::Enabled::yes,

    Zivid::Settings::Processing::Filters::Outlier::Removal::Enabled::yes,
    Zivid::Settings::Processing::Filters::Outlier::Removal::Threshold{ 5.0 },

    Zivid::Settings::Processing::Filters::Reflection::Removal::Enabled::yes,
    Zivid::Settings::Processing::Filters::Reflection::Removal::Mode::global,

    Zivid::Settings::Processing::Filters::Smoothing::Gaussian::Enabled::yes,
    Zivid::Settings::Processing::Filters::Smoothing::Gaussian::Sigma{ 1.5 },

    Zivid::Settings::Processing::Filters::Experimental::ContrastDistortion::Correction::Enabled::yes,
    Zivid::Settings::Processing::Filters::Experimental::ContrastDistortion::Correction::Strength{ 0.4 },

    Zivid::Settings::Processing::Filters::Experimental::ContrastDistortion::Removal::Enabled::no,
    Zivid::Settings::Processing::Filters::Experimental::ContrastDistortion::Removal::Threshold{ 0.5 },

    Zivid::Settings::Processing::Resampling::Mode::upsample2x2,

    Zivid::Settings::Diagnostics::Enabled::no,
};

setSamplingPixel(settings, camera);
std::cout << settings << std::endl;
Console.WriteLine("Configuring settings for capture:");
var settings2D = new Zivid.NET.Settings2D()
{
    Sampling =
    {
        Color = Zivid.NET.Settings2D.SamplingGroup.ColorOption.Rgb,
        Pixel = Zivid.NET.Settings2D.SamplingGroup.PixelOption.All,
    },
    Processing =
    {
        Color =
        {
            Balance =
            {
                Blue = 1.0,
                Green = 1.0,
                Red = 1.0,
            },
            Gamma = 1.0,
            Experimental = { Mode = Zivid.NET.Settings2D.ProcessingGroup.ColorGroup.ExperimentalGroup.ModeOption.Automatic },
        },
    },
};
var settings = new Zivid.NET.Settings()
{
    Engine = Zivid.NET.Settings.EngineOption.Phase,

    RegionOfInterest =
    {
        Box = {
            Enabled = true,
            PointO = new Zivid.NET.PointXYZ{ x = 1000, y = 1000, z = 1000 },
            PointA = new Zivid.NET.PointXYZ{ x = 1000, y = -1000, z = 1000 },
            PointB = new Zivid.NET.PointXYZ{ x = -1000, y = 1000, z = 1000 },
            Extents = new Zivid.NET.Range<double>(-1000, 1000),
        },
        Depth =
        {
            Enabled = true,
            Range = new Zivid.NET.Range<double>(200, 2000),
        },
    },
    Processing =
    {
        Filters =
        {
            Cluster =
            {
                Removal = { Enabled = true, MaxNeighborDistance = 10, MinArea = 100}
            },
            Hole =
            {
                Repair = { Enabled = true, HoleSize = 0.2, Strictness = 1 },
            },
            Noise =
            {
                Removal = { Enabled = true, Threshold = 7.0 },
                Suppression = { Enabled = true },
                Repair = { Enabled = true },
            },
            Outlier =
            {
                Removal = { Enabled = true, Threshold = 5.0 },
            },
            Reflection =
            {
                Removal = { Enabled = true, Mode = ReflectionFilterModeOption.Global },
            },
            Smoothing =
            {
                Gaussian = { Enabled = true, Sigma = 1.5 },
            },
            Experimental =
            {
                ContrastDistortion =
                {
                    Correction = { Enabled = true, Strength = 0.4 },
                    Removal = { Enabled = true, Threshold = 0.5 },
                },
            },
        },
        Resampling = { Mode = Zivid.NET.Settings.ProcessingGroup.ResamplingGroup.ModeOption.Upsample2x2 },
    },
    Diagnostics = { Enabled = false },
};

settings.Color = settings2D;

SetSamplingPixel(ref settings, camera);
Console.WriteLine(settings);
print("Configuring settings for capture:")
settings_2d = zivid.Settings2D()

settings_2d.sampling.color = zivid.Settings2D.Sampling.Color.rgb
settings_2d.sampling.pixel = zivid.Settings2D.Sampling.Pixel.all

settings_2d.processing.color.balance.red = 1.0
settings_2d.processing.color.balance.blue = 1.0
settings_2d.processing.color.balance.green = 1.0
settings_2d.processing.color.gamma = 1.0

settings_2d.processing.color.experimental.mode = zivid.Settings2D.Processing.Color.Experimental.Mode.automatic

settings = zivid.Settings()
settings.engine = zivid.Settings.Engine.phase

settings.region_of_interest.box.enabled = True
settings.region_of_interest.box.point_o = [1000, 1000, 1000]
settings.region_of_interest.box.point_a = [1000, -1000, 1000]
settings.region_of_interest.box.point_b = [-1000, 1000, 1000]
settings.region_of_interest.box.extents = [-1000, 1000]

settings.region_of_interest.depth.enabled = True
settings.region_of_interest.depth.range = [200, 2000]

settings.processing.filters.cluster.removal.enabled = True
settings.processing.filters.cluster.removal.max_neighbor_distance = 10
settings.processing.filters.cluster.removal.min_area = 100

settings.processing.filters.hole.repair.enabled = True
settings.processing.filters.hole.repair.hole_size = 0.2
settings.processing.filters.hole.repair.strictness = 1

settings.processing.filters.noise.removal.enabled = True
settings.processing.filters.noise.removal.threshold = 7.0

settings.processing.filters.noise.suppression.enabled = True
settings.processing.filters.noise.repair.enabled = True

settings.processing.filters.outlier.removal.enabled = True
settings.processing.filters.outlier.removal.threshold = 5.0

settings.processing.filters.reflection.removal.enabled = True
settings.processing.filters.reflection.removal.mode = (
    zivid.Settings.Processing.Filters.Reflection.Removal.Mode.global_
)

settings.processing.filters.smoothing.gaussian.enabled = True
settings.processing.filters.smoothing.gaussian.sigma = 1.5

settings.processing.filters.experimental.contrast_distortion.correction.enabled = True
settings.processing.filters.experimental.contrast_distortion.correction.strength = 0.4

settings.processing.filters.experimental.contrast_distortion.removal.enabled = False
settings.processing.filters.experimental.contrast_distortion.removal.threshold = 0.5

settings.processing.resampling.mode = zivid.Settings.Processing.Resampling.Mode.upsample2x2

settings.diagnostics.enabled = False

settings.color = settings_2d

_set_sampling_pixel(settings, camera)
print(settings)
Tutorials
Check out the below tutorials for examples of how to use the ROI API.
For performance information, check out Region of Interest.
Version History
SDK |
Changes |
|---|---|
2.14.0 |
Manipulators added to ROI box in Zivid Studio. |
2.12.0 |
ROI box filtering reduces capture time. |
2.9.0 |
ROI API is added. |