Settings Selector based on Capture Speed
This section provides detailed guidance on the best camera settings based on your time budget from when you trigger an acquisition until you get the point cloud. Here we also consider your PC specs because data transfer and point cloud processing depend on that as well. We address settings for 3D captures to get good point clouds and 2D captures to get good color images.
You have determined which Zivid camera to use for your Piece Picking application, and you have mounted it and positioned it correctly. The next step is to select the camera settings that meet your cycle time requirements, given your PC specs. If you haven’t got a PC yet, then this section is also about finding the PC specs that will meet your capture time requirements in combination with the settings used.
3D settings
We have split the Piece Picking application into two categories based on scene complexity. For each category, we specify and recommend settings that meet the given imaging requirements and capture speed requirements.
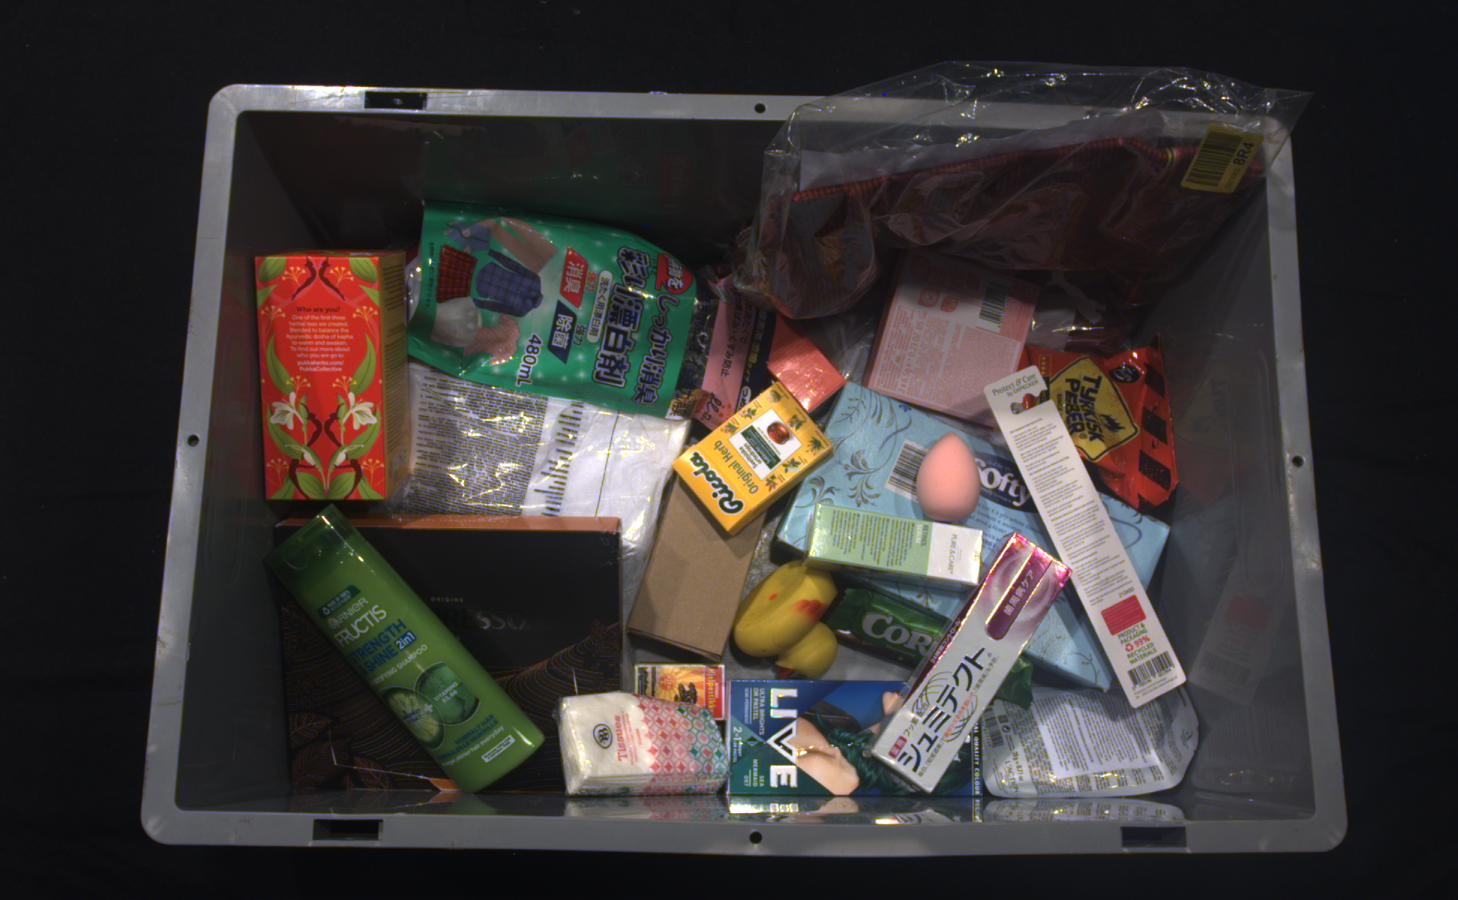
Consumer Goods
If your scene does not consist of very bright, shiny, and dark objects, you can save significant cycle time by choosing Fast settings for Piece Picking. The Fast settings cover a narrower dynamic range but provide faster captures. Here is an example of a scene where Fast settings work well. As you can see, there are no items that cause strong direct reflections, highlights and saturation, and there are no very dark items.
Note
If there are no bright, shiny, and dark items in your scene, choose Fast settings.
With Quality settings for Consumer Goods, the camera covers a reasonably wide dynamic range, providing good point clouds for a large variety of objects. The scene can, in this case, include anything from bright and reflective plastic-wrapped objects and items in poly bags to dark absorptive material. The image below depicts a typical complex Consumer Goods scene that requires Quality settings.
Note
If you want to be sure that the camera will not miss seeing anything, choose Quality settings.
Settings Selector Table
The following table represents a settings selector tool based on the required capture time budget. The same table indicates the performance and thus the cost of a PC that can meet your capture speed requirements. Check out Recommended Industrial PCs to see examples of High-End, Mid-End, and Low-End configurations.
If you notice color Inconsistency in form of random color tint in your color images, choose the presets for the grid frequency in your region (50 Hz or 60 Hz). If the ambient light is unproblematic, select Off for optimal performance.
Application |
Capture Time (2D + 3D) |
Camera Settings |
||
|---|---|---|---|---|
High-End PC |
Mid-End PC |
Low-End PC |
||
Consumer Goods (Quality) |
~250 ms |
~850 ms |
~1600 ms |
|
Consumer Goods (Fast) |
~150 ms |
~250 ms |
~430 ms |
|
To download the desired settings file, you can also connect to the camera (your specific model) in Zivid Studio, select the preset settings, turn on Ambient Light Adaption, and export the settings.
Caution
The capture time with settings adapted for ambient light frequency might be longer.
Application
Camera Settings
Consumer Goods (Quality)
Consumer Goods (Fast)
To demonstrate reaching the above requirements for piece picking we continuously run benchmark capture programs with our cameras on various PCs. The following table shows the results.
Parcel Picking
Parcel is also split into two settings depending on scene complexity and capture time.
Parcels Fast settings are designed to achieve the shortest cycle times. These settings have a limited dynamic range but are good enough for objects that are relatively straightforward for imaging, for example:
cardboard boxes
white envelopes
bright poly bags
Note
If you image only boxes, parcels, satchels, etc., choose Parcels Fast settings.
Tip
Try increasing the exposure time for more data coverage on dark specular objects or switch to Parcels Quality presets.
For more challenging scenes, you should try out Parcels Quality settings. These settings have larger dynamic range and are capable of getting good surface coverage on objects such as:
black poly bags
dark plastic bags
dark plastic wrap
Tip
To reduce capture time, switch the engine from Omni to Stripe; note that you may get less coverage on black parcels.
Settings Selector Table
If you experience color Inconsistency in form of random color tint in your color images or artifacts in the form of ripples/waves across the whole point cloud, choose 50/60 Hz to select presets adapted to the ambient light (grid) frequency. If the ambient light is unproblematic, select Off for optimal performance.
Application |
Capture Time (2D + 3D) |
Camera Settings |
||
|---|---|---|---|---|
High-End PC |
Mid-End PC |
Low-End PC |
||
Parcels (Quality) |
~135 ms |
~900 ms |
~1600 ms |
|
Parcels (Fast) |
~50 ms |
~100 ms |
~200 ms |
|
To download the desired settings file, you can also connect to the camera (your specific model) in Zivid Studio, select the preset settings, turn on Ambient Light Adaption, and export the settings.
Caution
The capture time with settings adapted for ambient light frequency might be longer.
Application
Camera Settings
Parcels (Quality/Reflective)
Parcels (Fast/Matte)
To demonstrate reaching the above requirements for parcels we continuously run benchmark capture programs with our cameras on various PCs. The following table shows the results.
Testing 3D Settings
You can use Zivid Studio to test 3D settings.
To import the settings in Zivid Studio:
Click on File → Import Capture Settings
Navigate to the location of your settings file
Click Open
You can also drag and drop a YML file into Zivid Studio to import the settings.
You can also load the settings with the SDK.
2D settings
We provide three options for acquiring 2D settings for your Piece Picking application:
Use settings presets
Get 2D settings automatically using the Zivid calibration board with a code sample
Manually tune 2D settings
The 3D settings presets also include the 2D settings. Therefore, we recommend using the same settings preset for 3D and 2D captures. If this does not provide satisfactory results, check out the following options.
Automatic 2D settings
Run the auto_2d_settings.py sample to automatically find the acquisition settings for a 2D capture using a Zivid calibration board. Place the calibration board at either the top or bottom of the bin and run the sample by specifying the calibration board location and the desired focus range (bin height) as command line arguments. If you, for example, place the calibration board at the bin top and the bin height is 400 mm, run the sample as:
python auto_2d_settings.py --desired-focus-range 400 --checkerboard-at-start-of-range --use-projector --no-color-balance
If you place the calibration board at the bin bottom, run:
python auto_2d_settings.py --desired-focus-range 400 --checkerboard-at-end-of-range --use-projector --no-color-balance
Manually tune 2D settings
If 2D settings presets or automatic tuning does not provide sufficient 2D quality, you can manually tune the color settings by adjusting the color balance and gamma parameters. Gamma correction can be used to either darken or brighten the image. The color channel parameters makes the color image look more natural.
For an in-depth tutorial on how to optimize for colors, see Optimizing Color Image.
Testing 2D Settings
To test 2D settings, you can either use the 2D capture mode in Zivid Studio or run our code sample.
To import the settings in Zivid Studio:
Click on File → Import Capture Settings
Navigate to the location of your settings file
Click Open
You can also drag and drop a YML file into Zivid Studio to import the settings.
Our code sample CaptureWithSettingsFromYml demonstrates how to load the 2D settings and capture a 2D image.
python capture_2d_with_settings_from_yml.py <path-to-2d-settings.yml>

auto camera = zivid.connectCamera();
const auto settings = Zivid::Settings(settingsFile);
    const auto frame2D = camera.capture2D(settings);
var camera = zivid.ConnectCamera();
var settings = new Zivid.NET.Settings(settingsFile);
using (var frame2D = camera.Capture2D(settings))
After capturing the image can be saved.
const auto imageRGBA = frame.frame2D().value().imageRGBA_SRGB();
const auto imageFile = "ImageRGB.png";
std::cout << "Saving 2D color image (sRGB color space) to file: " << imageFile << std::endl;
imageRGBA.save(imageFile);
var imageRGBA = frame.Frame2D.ImageRGBA_SRGB();
var imageFile = "ImageRGB.png";
Console.WriteLine("Saving 2D color image (sRGB color space) to file: " + imageFile);
imageRGBA.Save(imageFile);
Note
We have tested the 3D and 2D settings we recommend for the above typical scenes in low (~300 lx) and high (~1000 lx) ambient light conditions. This we have done for the range of distances that we specify in the Camera Selector section, and all with various items in the scene. Therefore, we are confident that these settings will work the majority of scenes that fit into these categories. However, if you know exactly what items you expect in your scene and you are an expert camera user, you can manually configure settings to optimize them for your case. Check out Capturing High Quality Point Clouds to learn how to do that.
In the next section, we cover Optimizing Robot Cycle Times for speed by making use of multithreading.
Version History
SDK |
Changes |
|---|---|
2.12.0 |
Zivid One+ has reached its End-of-Life and is no longer supported. |